2015 KIA PICANTO steering
[x] Cancel search: steeringPage 127 of 846

Features of your vehicle
54
4
Press start button while turn steering
(if equipped)
If the steering wheel does not unlock nor-
mally when the engine start/stop button
is pressed, the warning illuminates for 10
seconds on the LCD display. Also, the
warning chime sounds once and the
engine start/stop button light blinks for 10
seconds.
When you are warned, press the engine
start/stop button while turning the steer-
ing wheel right and left. Check steering wheel lock system
(if equipped)
If the steering wheel does not lock nor-
mally when the engine start/stop button
changes to the OFF position, the warning
illuminates for 10 seconds on the LCD
display. Also, the warning chime sounds
for 3 seconds and the engine start/stop
button light blinks for 10 seconds.
Steering wheel unlock
If the steering wheel does not lock nor-
mally when the ENGINE START/STOP
button turns to the OFF position, the
warning illuminates for 10 minutes on the
LCD display. If locks when the door is
opened or when you pull out the smart
key from the smart key holder.
For vehicle’s equipped with smart key system
OTA042214LOTA042216L
OTA042215L
Page 136 of 846

463
Features of your vehicle
Overspeed warning (if equipped)
Overspeed warning light
If you drive with the speed of 120 km/h or
more, the overspeed warning light will
blink. This is to prevent you from over-speeding.
Electric power steering(EPS) system warning light
(if equipped)
This indicator light comes on after the
ignition key is turned to the ON positionand then it will go out. This light also comes on when the EPS
has some troubles. In this case, we rec-
ommend that you have the vehicle
inspected by an authorized Kia dealer.
Icy road warning light(if equipped)
This warning light illuminates when out-
side temperature is below 4°C since the
road may be icy at this temperature
range. And it turns off when outside tem-
perature is over 6°C.
If the warning light comes on while driv-
ing, you should drive more attentively
and safely refraining from over-speeding,
rapid acceleration, sudden braking or
sharp turning etc.
KEY low battery indicator(if equipped)
Smart key battery warning
light (if equipped)
If the battery of smart key in the vehicle
is discharged with engine start/stop but-
ton in the OFF position, this warning light
blinks for about 3 seconds.
Replace the battery with new one.
120km/h
Page 137 of 846

Features of your vehicle
64
4
Auto stop indicator
(if equipped)
This indicator will illuminate when the engine enters the Idle Stop mode of theISG (Idle Stop and Go) system.
When the automatic starting occurs, the auto stop indicator on the cluster will
blink for 5 seconds.
For more details, refer to the ISG (Idle Stop and Go) system in chapter 5.
✽✽ NOTICE
When the engine automatically starts by
the ISG system, some warning lights
(ABS, ESC, ESC OFF, EPS or Parking
brake warning light) may turn on for a
few seconds.
This happens because of the low battery
voltage. It does not mean the system is
malfunctioning.
Low tire pressure indicator / TPMS malfunction indica-tor (if equipped)
The low tire pressure telltale comes on
for 3 seconds after the ignition switch is
turned to the "ON" position.
The low tire pressure telltale illuminates
when one or more of your tires is signifi-
cantly underinflated.
The low tire pressure telltale will illumi-
nate after it blinks for approximately one
minute when there is a problem with the
Tire Pressure Monitoring System.
In this case, we recommend that you
have the vehicle inspected by an author-
ized Kia dealer as soon as possible.
If the warning light illuminates while driv-
ing, reduce vehicle speed immediately
and stop the vehicle. Avoid hard braking
and overcorrecting at the steering wheel.Inflate the tires to the proper pressure as
indicated on the vehicle’s tire informationplacard.
WARNING - Low tire pres-
sure
Significantly low tire pressure
makes the vehicle unstable and can
contribute to loss of vehicle controland increased braking distances.
Continued driving on low pressure
tires will cause the tires to overheatand fail.
WARNING - Safe stopping
The TPMS cannot alert you to severe and sudden tire damage
caused by external factors.
If you feel any vehicle instability, immediately take your foot off the
accelerator, apply the brakes
gradually and with light force,
and slowly move to a safe posi-
tion off the road.
Page 142 of 846

469
Features of your vehicle
Battery saver function
The purpose of this feature is to pre-vent the battery from being dis-
charged. The system automatically
turns off the parking lights when the
driver removes the ignition key (smart
key: turns off the engine) and opens
the driver-side door.
With this feature, the parking lights will be turned off automatically if the driver
parks on the side of road at night.
If necessary, to keep the lights on
when the ignition key is removed,
(smart key: turns off the engine) per-
form the following:
1) Open the driver-side door.
2) Turn the parking lights OFF and ON again using the light switch on the
steering column. Headlight escort function (if equipped) The headlights (and/or taillights) will
remain on for approximately 20 minutes
after the ignition key is removed when
the engine is turned off. However, if the
driver’s door is opened and closed, the
headlights are turned off after 30 sec-
onds.
The headlights can be turned off by
pressing the lock button on the transmit-
ter (or smart key) twice or turning off the
light switch from the headlight or Autolight position.
Headlight welcome function (if equipped)
When the headlight switch is in the ON or
AUTO position and all doors (and tail-
gate) are closed and locked, if you press
the door unlock button on the transmitter
(or smart key), the headlights will come
on for about 15 seconds.
If the headlight switch is in the AUTO
position, the function can only operate atnight.
At this time, if you press the door unlock
button again or door lock button on the
transmitter (or smart key), the headlights
will turn off immediately.
Daytime running light (if equipped)
Daytime Running Lights (DRL) can make
it easier for others to see the front of your
vehicle during the day. DRL can be help-
ful in many different driving conditions,
and it is especially helpful after dawn and
before sunset.
The DRL system will make the head-
lights light turn OFF when:
1. The position or head light switch is ON.
2. Engine off or ACC.
LIGHTING
CAUTION
If the driver gets out of the vehicle
through other doors (except dri-
ver's door), the battery saver func- tion does not operate and the head-light escort function does not turnoff automatically. Therefore, It caus-
es the battery to be discharged. In this case, make sure to turn off thelamp before getting out of the vehi- cle.
Page 180 of 846
![KIA PICANTO 2015 Owners Manual 4107
Features of your vehicle
Setup the clock (Type A, Type B)
With audio off
1. Press the [SETUP] or [Clock] buttonuntil the clock of the display blinks.
2. Set the clock by turning the knob(1) and KIA PICANTO 2015 Owners Manual 4107
Features of your vehicle
Setup the clock (Type A, Type B)
With audio off
1. Press the [SETUP] or [Clock] buttonuntil the clock of the display blinks.
2. Set the clock by turning the knob(1) and](/manual-img/2/57967/w960_57967-179.png)
4107
Features of your vehicle
Setup the clock (Type A, Type B)
With audio off
1. Press the [SETUP] or [Clock] buttonuntil the clock of the display blinks.
2. Set the clock by turning the knob(1) and press it. With audio on
1. Press the [SETUP] or [Clock] button
until the clock adjust mode displayed.
2. Set the clock by turning the knob(1) and press it.
Setup the clock (Type C)
Hour:
Turn the knob to the left (H), will advance
the time displayed by one hour.
Minute:
Turn the knob to the right (M), will
advance the time displayed by one
minute.
WARNING
Do not adjust the clock while driv-
ing. You may lose your steering
control and cause an accident that
results in severe personal injury ordeath.
OTA040203L
■ Type C
OTA040095
OTA040089
■Type A
■Type B
Page 183 of 846

Features of your vehicle
110
4
Steering wheel audio controls (if equipped)
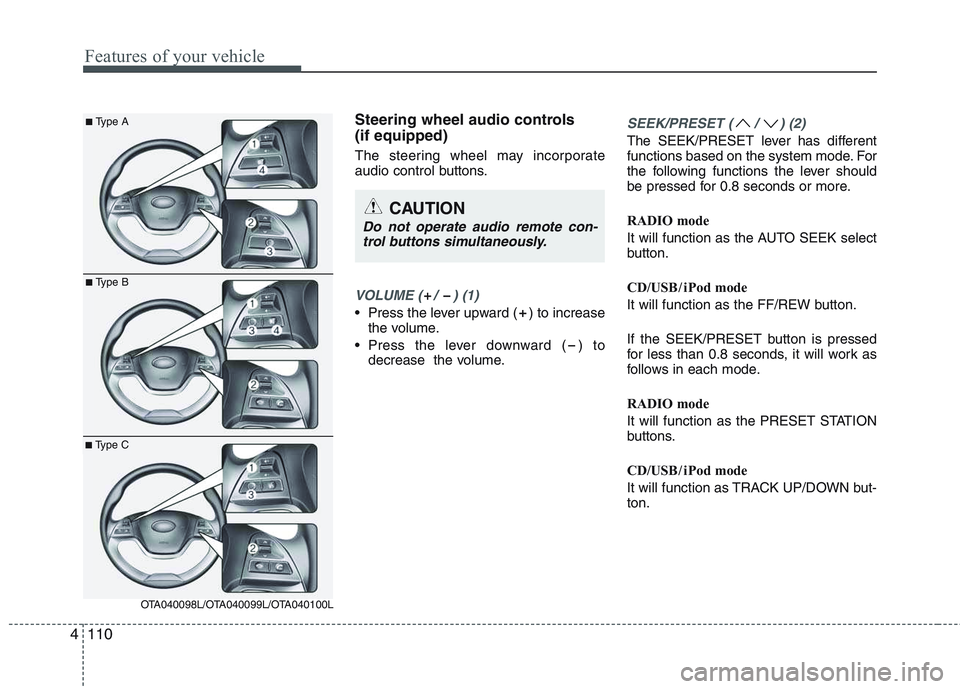
The steering wheel may incorporate
audio control buttons.
VOLUME ( / ) (1)
• Press the lever upward ( ) to increase
the volume.
Press the lever downward ( ) to decrease the volume.
SEEK/PRESET ( / ) (2)
The SEEK/PRESET lever has different
functions based on the system mode. For
the following functions the lever should
be pressed for 0.8 seconds or more.
RADIO mode
It will function as the AUTO SEEK select
button.
CD/USB / i Pod mode
It will function as the FF/REW button.
If the SEEK/PRESET button is pressed
for less than 0.8 seconds, it will work as
follows in each mode.
RADIO mode
It will function as the PRESET STATION
buttons.
CD/USB / i Pod mode
It will function as TRACK UP/DOWN but- ton.
CAUTION
Do not operate audio remote con-
trol buttons simultaneously.
■ Type A
■Type B
■Type C
OTA040098L/OTA040099L/OTA040100L
Page 215 of 846

Features of your vehicle
142
4
2. Select “PHONE”, then “PRIORITY” in
PHONE menu.
3. Select desired phone name from the list shown.
Bluetooth®Wireless
Technology Volume
Bluetooth®Wireless Technology system
volume can be adjusted separately from
main volume of the audio system.
1.Press button to enter SETUP mode.
2. Select “PHONE”, then “BT VOL” in
PHONE menu.
3. Adjust volume to desired level by turn- ing the TUNE knob, then press the
knob to confirm.
Bluetooth®Wireless
Technology ON/OFF
Bluetooth®Wireless Technology system
can be enabled (ON) or disabled (OFF)
by this menu. - If
Bluetooth®Wireless Technology is
disabled, all the commands related to
Bluetooth®Wireless Technology sys-
tem prompts whether you wish to turn
Bluetooth®Wireless Technology ON or
not.
1. Press button to enter SETUP mode.
2. Select “PHONE”, then “BT OFF” in PHONE menu. ■
Receiving a Phone Call
When receiving a phone call, a ringtone
is audible from speakers and the audio
system changes into telephone mode.
When receiving a phone call, “Incoming”
message and incoming phone number
(if available) are displayed on the audio.
- Press bu t t o n on the steering wheel.
- Press button on the steering wheel.
- Use VOLUME buttons on the steering wheel.
Call):
- Press and hold button on the steering wheel until the audio system
transfers a call to the phone.
■ Talking on the Phone
When talking on the phone, “Active Calls”
message and the other party’s phone
number (if available) are displayed on the
audio.
(if equipped)
- Press button on the audio.
- Press button on the steering wheel.
■ Making a Phone Call
A Call Back can be made by pressing button on the steering wheel.
- This is the same function as using the button solely on the cellular phone.
NOTE: Some phone models require pressing button twice to make a call.
✽✽NOTICE
In the following situations, you or the
other party may have difficulty hearing
each other:
1. Speaking at the same time, your voice may not reach each other parties. (This
is not a malfunction.) Speak alternate-
ly with the other party on the phone.
2. Keep the Bluetooth®
Wireless
Technology volume to a low level.
High-level volume may result in dis-
tortion and echo.
3. When driving on a rough road.
4. When driving at high speeds.
5. When the window is open.
6. When the air conditioning vents are facing the microphone.
7. When the sound of the air condition-
ing fan is loud.
MUTESETUP
SETUP
Page 234 of 846

4161
Features of your vehicle
BLUETOOTH®
PHONE OPERATION
(if equipped)
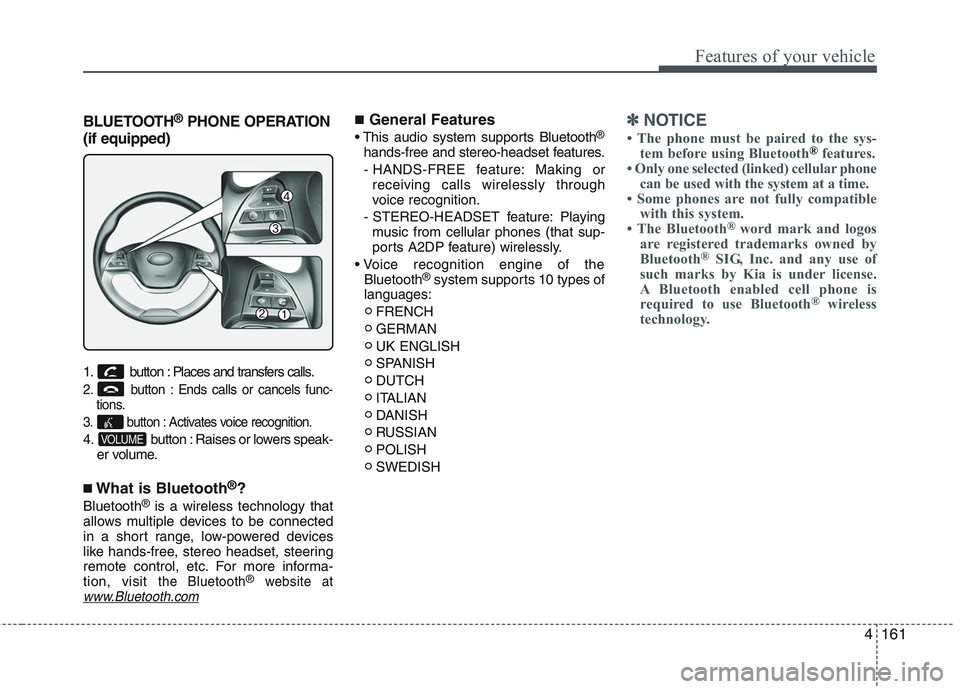
1. button : Places and transfers calls.
2. button : Ends calls or cancels func- tions.
3. button : Activates voice recognition.
4. button : Raises or lowers speak- er volume.
■ What is Bluetooth ®
?
Bluetooth ®
is a wireless technology that
allows multiple devices to be connected
in a short range, low-powered devices
like hands-free, stereo headset, steering
remote control, etc. For more informa-tion, visit
the Bluetooth®website atwww.Bluetooth.com
■ General Features
®
hands-free and stereo-headset features. - HANDS-FREE feature: Making or receiving calls wirelessly through
voice recognition.
- STEREO-HEADSET feature: Playing music from cellular phones (that sup-
ports A2DP feature) wirelessly.
Bluetooth ®
system supports 10 types of
languages:
FRENCH GERMANUK ENGLISH
SPANISHDUTCH
ITALIAN
DANISH
RUSSIANPOLISHSWEDISH✽✽ NOTICE
The phone must be paired to the sys- tem before using Bluetooth
®features.
Only one selected (linked) cellular phone can be used with the system at a time.
Some phones are not fully compatible with this system.
The Bluetooth ®
word mark and logos
are registered trademarks owned by
Bluetooth ®
SIG, Inc. and any use of
such marks by Kia is under license.
A Bluetooth enabled cell phone is
required to use Bluetooth ®
wireless
technology.
VOLUME