Page 535 of 846
Features of your vehicle
36
4
Horn
To sound the horn, press the horn sym-
bols on your steering wheel. Check the
horn regularly to be sure it operates
properly.
✽✽
NOTICE
To sound the horn, press the area indi-
cated by the horn symbol on your steer-
ing wheel (see illustration). The horn will
operate only when this area is pressed.
OTA040027
CAUTION
Do not strike the horn severely to operate it, or hit it with your fist. Do
not press on the horn with a sharp-pointed object.
Page 548 of 846

449
Features of your vehicle
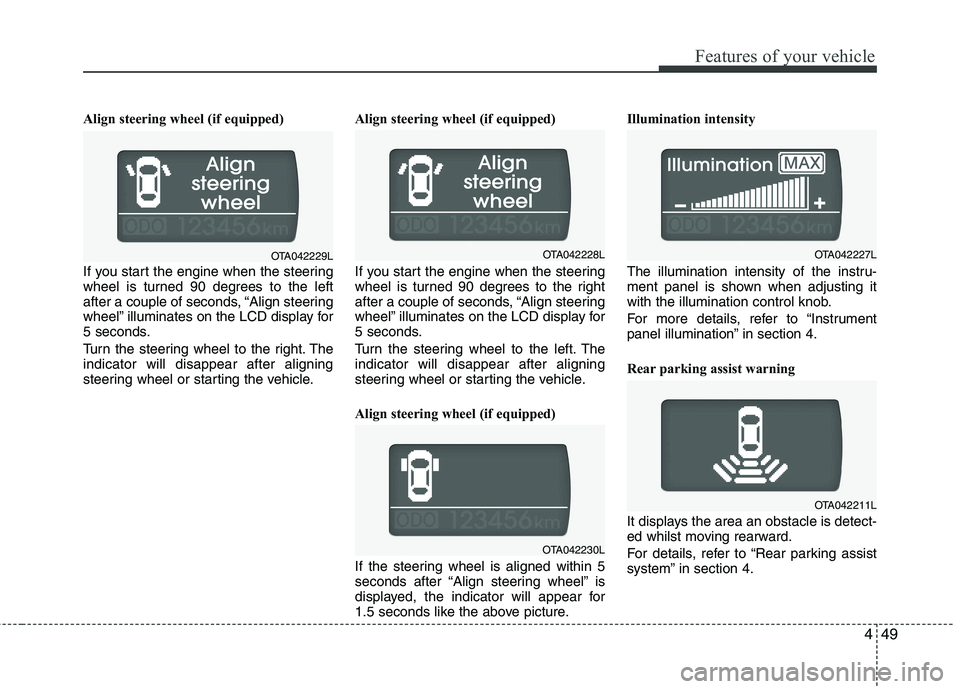
Align steering wheel (if equipped)
If you start the engine when the steering
wheel is turned 90 degrees to the left
after a couple of seconds, “Align steering
wheel” illuminates on the LCD display for
5 seconds.
Turn the steering wheel to the right. The indicator will disappear after aligning
steering wheel or starting the vehicle.Align steering wheel (if equipped)
If you start the engine when the steering
wheel is turned 90 degrees to the right
after a couple of seconds, “Align steering
wheel” illuminates on the LCD display for
5 seconds.
Turn the steering wheel to the left. The indicator will disappear after aligning
steering wheel or starting the vehicle.
Align steering wheel (if equipped)
If the steering wheel is aligned within 5
seconds after “Align steering wheel” is
displayed, the indicator will appear for
1.5 seconds like the above picture.Illumination intensity
The illumination intensity of the instru-
ment panel is shown when adjusting it
with the illumination control knob.
For more details, refer to “Instrument
panel illumination” in section 4.
Rear parking assist warning
It displays the area an obstacle is detect-
ed whilst moving rearward.
For details, refer to “Rear parking assist
system” in section 4.
OTA042230L
OTA042227LOTA042229LOTA042228L
OTA042211L
Page 552 of 846

453
Features of your vehicle
Press start button whilst turn steering
(if equipped)
If the steering wheel does not unlock nor-
mally when the engine start/stop button
is pressed, the warning illuminates for 10
seconds on the LCD display. Also, the
warning chime sounds once and the
engine start/stop button light blinks for 10
seconds.
When you are warned, press the engine
start/stop button whilst turning the steer-
ing wheel right and left.Check steering wheel lock system
(if equipped)
If the steering wheel does not lock nor-
mally when the engine start/stop button
changes to the OFF position, the warning
illuminates for 10 seconds on the LCD
display. Also, the warning chime sounds
for 3 seconds and the engine start/stop
button light blinks for 10 seconds.
Steering wheel unlock
If the steering wheel does not lock nor-
mally when the ENGINE START/STOP
button turns to the OFF position, the
warning illuminates for 10 minutes on the
LCD display. If locks when the door is
opened or when you pull out the smart
key from the smart key holder.
For vehicle’s equipped with smart key system
OTA042214LOTA042216L
OTA042215L
Page 560 of 846

461
Features of your vehicle
Key reminder warning chime (if equipped)
Without smart key system
If the driver’s door is opened whilst the
ignition key is left in the ignition switch
(ACC or LOCK position), the key
reminder warning chime will sound. This
is to prevent you from locking your keys
in the vehicle. The chime sounds until the
key is removed from the ignition switch or
the driver’s door is closed.
With smart key system
If the driver’s door is opened whilst the
smart key is in the vehicle with the
engine start/stop button in ACC, the key
reminder warning chime will sound.
The chime sounds until the driver’s door is closed.
Overspeed warning (if equipped)
Overspeed warning light
If you drive with the speed of 120 km/h or
more, the overspeed warning light will
blink. This is to prevent you from over-speeding.
Electric power steering(EPS) system warning light
(if equipped)
This indicator light comes on after the
ignition key is turned to the ON positionand then it will go out. This light also comes on when the EPS
has some troubles. If it comes on whilst
driving, have your vehicle inspected by
an authorised Kia dealer.
Icy road warning light(if equipped)
This warning light illuminates when out-
side temperature is below 4°C since the
road may be icy at this temperature
range. And it turns off when outside tem-
perature is over 6°C.
If the warning light comes on whilst driv-
ing, you should drive more attentively
and safely refraining from over-speeding,
rapid acceleration, sudden braking or
sharp turning etc.
KEY low battery indicator(if equipped)
Smart key battery warning
light (if equipped)
If the battery of smart key in the vehicle
is discharged with engine start/stop but-
ton in the OFF position, this warning light
blinks for about 3 seconds.
Replace the battery with new one.
120km/h
Page 561 of 846

Features of your vehicle
62
4
Auto stop indicator
(if equipped)
This indicator will illuminate when the engine enters the Idle Stop mode of theISG (Idle Stop and Go) system.
When the automatic starting occurs, the auto stop indicator on the cluster will
blink for 5 seconds.
For more details, refer to the ISG (Idle Stop and Go) system in chapter 5.
✽✽ NOTICE
When the engine automatically starts by
the ISG system, some warning lights
(ABS, ESC, ESC OFF, EPS or Parking
brake warning light) may turn on for a
few seconds.
This happens because of the low battery
voltage. It does not mean the system is
malfunctioning.
Low tyre pressure indicator / TPMS malfunction indica-tor (if equipped)
The low tyre pressure telltale comes on
for 3 seconds after the ignition switch is
turned to the "ON" position.
The low tyre pressure telltale illuminates
when one or more of your tyres is signif-
icantly underinflated.
The low tyre pressure telltale will illumi-
nate after it blinks for approximately one
minute when there is a problem with the
Tyre Pressure Monitoring System.
In this case, we recommend that you
have the vehicle inspected by an autho-
rised Kia dealer as soon as possible. If
the warning light illuminates whilst driv-
ing, reduce vehicle speed immediately
and stop the vehicle. Avoid hard braking
and overcorrecting at the steering wheel.Inflate the tyres to the proper pressure as
indicated on the vehicle’s tyre informationplacard.
WARNING - Low tyre pres-
sure
Significantly low tyre pressure
makes the vehicle unstable and can
contribute to loss of vehicle controland increased braking distances.
Continued driving on low pressure
tyres will cause the tyres to over-heat and fail.
WARNING - Safe stopping
The TPMS cannot alert you to severe and sudden tyre damage
caused by external factors.
If you feel any vehicle instability, immediately take your foot off the
accelerator, apply the brakes
gradually and with light force,
and slowly move to a safe posi-
tion off the road.
Page 566 of 846

467
Features of your vehicle
Battery saver function
The purpose of this feature is to pre-vent the battery from being dis-
charged. The system automatically
turns off the parking lights when the
driver removes the ignition key (smart
key: turns off the engine) and opens
the driver-side door.
With this feature, the parking lights will be turned off automatically if the driver
parks on the side of road at night.
If necessary, to keep the lights on
when the ignition key is removed,
(smart key: turns off the engine) per-
form the following:
1) Open the driver-side door.
2) Turn the parking lights OFF and ON again using the light switch on the
steering column. Headlight escort function (if equipped) The headlights (and/or taillights) will
remain on for approximately 20 minutes
after the ignition key is removed when
the engine is turned off. However, if the
driver’s door is opened and closed, the
headlights are turned off after 30 sec-
onds.
The headlights can be turned off by
pressing the lock button on the transmit-
ter (or smart key) twice or turning off the
light switch from the headlight or Autolight position.
Headlight welcome function (if equipped)
When the headlight switch is in the ON or
AUTO position and all doors (and tail-
gate) are closed and locked, if you press
the door unlock button on the transmitter
(or smart key), the headlights will come
on for about 15 seconds.
If the headlight switch is in the AUTO
position, the function can only operate atnight.
At this time, if you press the door unlock
button again or door lock button on the
transmitter (or smart key), the headlights
will turn off immediately.
Daytime running light (if equipped)
Daytime Running Lights (DRL) can make
it easier for others to see the front of your
vehicle during the day. DRL can be help-
ful in many different driving conditions,
and it is especially helpful after dawn and
before sunset.
The DRL system will make the head-
lights light turn OFF when:
1. The position or head light switch is ON.
2. Engine off or ACC.
LIGHTING
CAUTION
If the driver gets out of the vehicle
through other doors (except dri-
ver's door), the battery saver func- tion does not operate and the head-light escort function does not turnoff automatically. Therefore, It caus-
es the battery to be discharged. In this case, make sure to turn off thelamp before getting out of the vehi- cle.
Page 604 of 846
4105
Features of your vehicle
Setup the clock (Type A, Type B)
With audio off
1. Press the [SETUP] or [Clock] buttonuntil the clock of the display blinks.
2. Set the clock by turning the knob(1) and press it. With audio on
1. Press the [SETUP] or [Clock] button
until the clock adjust mode displayed.
2. Set the clock by turning the knob(1) and press it.
Setup the clock (Type C)
Hour:
Turn the knob to the left (H), will advance
the time displayed by one hour.
Minute:
Turn the knob to the right (M), will
advance the time displayed by one
minute.
WARNING
Do not adjust the clock whilst driv-
ing. You may lose your steering
control and cause an accident that
results in severe personal injury ordeath.
OTA040203R
■ Type C
OTA040095
OTA040089
■Type A
■Type B
Page 607 of 846
Features of your vehicle
108
4
Steering wheel audio controls (if equipped)
The steering wheel may incorporate
audio control buttons.
VOLUME ( / ) (1)
• Press the lever upward ( ) to increase
the volume.
Press the lever downward ( ) to decrease the volume.
SEEK/PRESET ( / ) (2)
The SEEK/PRESET lever has different
functions based on the system mode. For
the following functions the lever should
be pressed for 0.8 seconds or more.
RADIO mode
It will function as the AUTO SEEK select
button.
CD/USB / i Pod mode
It will function as the FF/REW button.
If the SEEK/PRESET button is pressed
for less than 0.8 seconds, it will work as
follows in each mode.
RADIO mode
It will function as the PRESET STATION
buttons.
CD/USB / i Pod mode
It will function as TRACK UP/DOWN but- ton.
CAUTION
Do not operate audio remote con-
trol buttons simultaneously.
■ Type A
■Type B
■Type C
OTA040098L/OTA040099L/OTA040100L