2015 KIA PICANTO change time
[x] Cancel search: change timePage 1 of 846
Kia, THE COMPANY
Enjoy your vehicle and Kia’s “Family-like Care” experience!
Thank you for becoming the owner of a new Kia vehicle.
As a global car manufacturer focused on building high-quality, value for
money prices, Kia Motors is dedicated to providing you with a customer
service experience that exceeds your expectations.
At all of our Kia dealerships you will be treated with warmth, hospitality
and professionalism by people who care based on our “Family-like Care”
promise.
All information contained in this Owner’s Manual is accurate at the
time of publication. However, Kia reserves the right to make changes
at any time so that our policy of continual product improvement can be
carried out.
This manual applies to all models of this vehicle and includes descrip-
tions and explanations of optional as well as standard equipment. As a
result, you may encounter material in this manual that is not applicable
to your specific Kia vehicle.
Page 2 of 846
i
Thank you for choosing a Kia vehicle.
When you require service, remember that your dealer
knows your vehicle best. Your dealer has factory-trained
technicians, recommended special tools, genuine Kia
replacement parts and is dedicated to your complete sat-
isfaction.
Because subsequent owners require this important infor-
mation as well, this publication should remain with the
vehicle if it is sold.
This manual will familiarize you with operational, main-
tenance and safety information about your new vehicle. It
is supplemented by a Warranty and Maintenance book
that provides important information on all warranties
regarding your vehicle. We urge you to read these publi-
cations carefully and follow the recommendations to help
assure enjoyable and safe operation of your new vehicle.
Kia offers a great variety of options, components and fea-
tures for its various models. Therefore, some of the
equipment described in this manual, along with the vari-
ous illustrations, may not be applicable to your particular
vehicle.
The information and specifications provided in this man-
ual were accurate at the time of printing. Kia reserves the
right to discontinue or change specifications or design at
any time without notice and without incurring any obli-
gation. If you have questions, always check with your
authorized Kia dealer.
We assure you of our continuing interest in your motor-
ing pleasure and satisfaction in your Kia vehicle.
© 2014 Kia MOTORS Corp.
All rights reserved. Reproduction by any means, elec-
tronic or mechanical, including photocopying, recording,
or by any information storage and retrieval system or
translation in whole or part is not permitted without writ-
ten authorization from Kia MOTORS Corporation.
Printed in Korea
Foreword
Page 17 of 846

35
Safety features of your vehicle
Seatback angle
To recline the seatback:
1. Lean forward slightly and lift up on theseatback recline lever.
2. Carefully lean back on the seat and adjust the seatback of the seat to the
position you desire.
3. Release the lever and make sure the seatback is locked in place. (The lever
MUST return to its original position for
the seatback to lock.)
Seat cushion height (for driver’s seat)
(if equipped)
To change the height of the seat cushion,
push the lever that is located on the out-
side of the seat cushion upwards or
downwards.
• To lower the seat cushion, push the lever down several times.
To raise the seat cushion, pull the lever up several times. Headrest
The driver's and front passenger's seats
are equipped with a headrest for the
occupant's safety and comfort.
The headrest not only provides comfort
for the driver and front passenger, but
also helps to protect the head and neck
in the event of a collision.
OPA039052OTA030003LOTA030004L
Page 20 of 846
Safety features of your vehicle
8
3
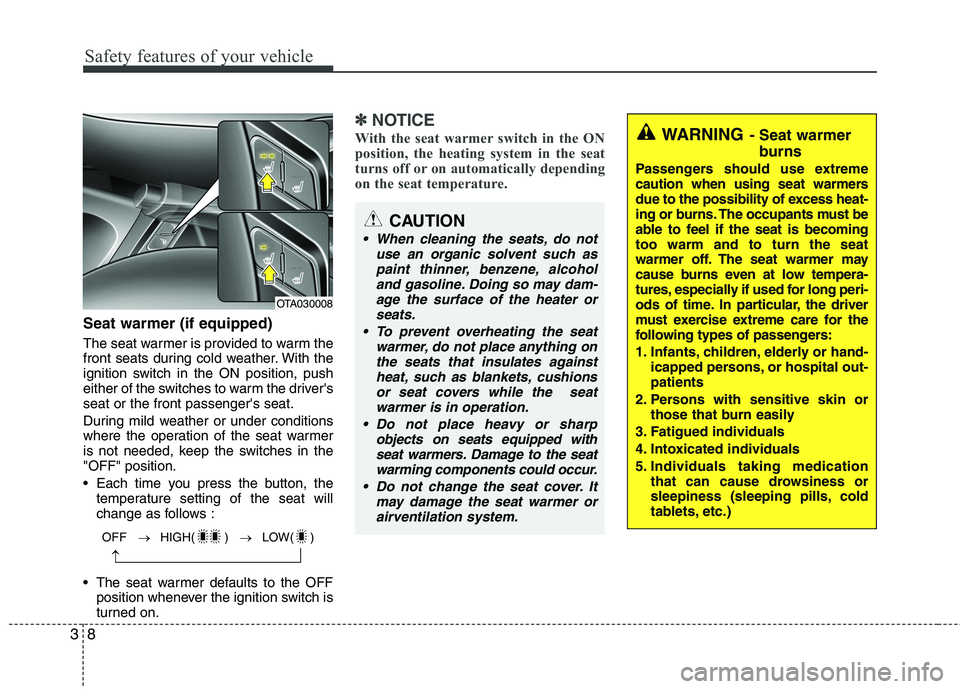
Seat warmer (if equipped)
The seat warmer is provided to warm the
front seats during cold weather. With the
ignition switch in the ON position, push
either of the switches to warm the driver'sseat or the front passenger's seat.
During mild weather or under conditions
where the operation of the seat warmer
is not needed, keep the switches in the"OFF" position.
Each time you press the button, the
temperature setting of the seat will
change as follows :
The seat warmer defaults to the OFF position whenever the ignition switch is
turned on.
✽✽ NOTICE
With the seat warmer switch in the ON
position, the heating system in the seat
turns off or on automatically depending
on the seat temperature.WARNING - Seat warmer
burns
Passengers should use extreme
caution when using seat warmers
due to the possibility of excess heat-
ing or burns. The occupants must be
able to feel if the seat is becomingtoo warm and to turn the seat
warmer off. The seat warmer may
cause burns even at low tempera-
tures, especially if used for long peri-
ods of time. In particular, the driver
must exercise extreme care for the
following types of passengers:
1. Infants, children, elderly or hand- icapped persons, or hospital out- patients
2. Persons with sensitive skin or those that burn easily
3. Fatigued individuals
4. Intoxicated individuals
5. Individuals taking medication that can cause drowsiness or
sleepiness (sleeping pills, cold
tablets, etc.)
CAUTION
When cleaning the seats, do not
use an organic solvent such aspaint thinner, benzene, alcohol and gasoline. Doing so may dam-
age the surface of the heater orseats.
To prevent overheating the seat warmer, do not place anything onthe seats that insulates against
heat, such as blankets, cushions or seat covers while the seatwarmer is in operation.
Do not place heavy or sharp objects on seats equipped with
seat warmers. Damage to the seatwarming components could occur.
Do not change the seat cover. It may damage the seat warmer orairventilation system.
OFF � HIGH( ) � LOW( )
�
OTA030008
Page 120 of 846
447
Features of your vehicle
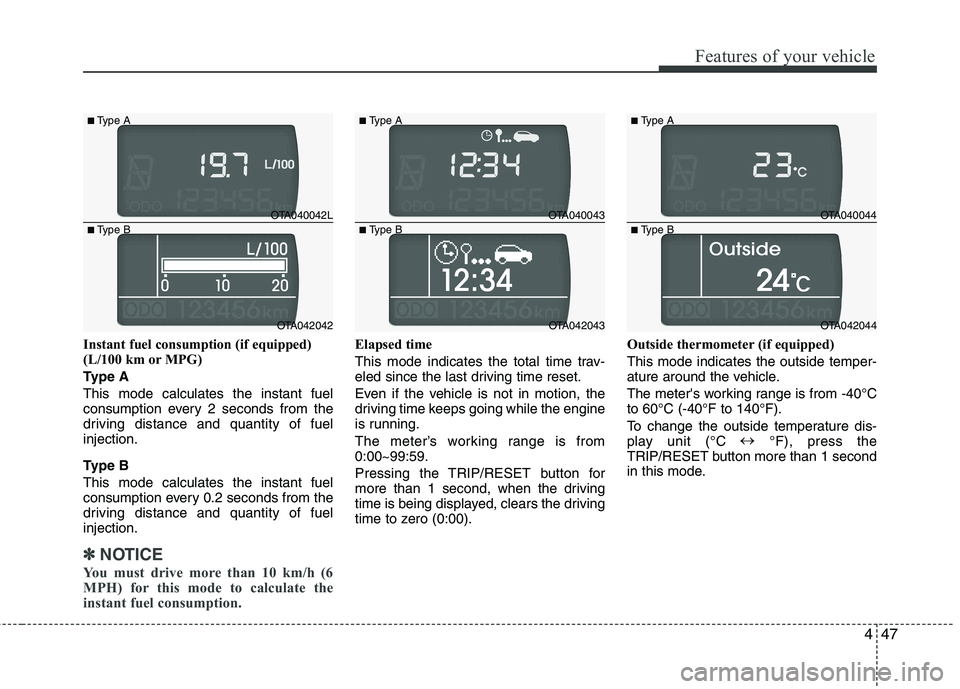
Instant fuel consumption (if equipped)
(L/100 km or MPG)
Type AThis mode calculates the instant fuel
consumption every 2 seconds from the
driving distance and quantity of fuelinjection.
Type B This mode calculates the instant fuel
consumption every 0.2 seconds from the
driving distance and quantity of fuelinjection.
✽✽NOTICE
You must drive more than 10 km/h (6
MPH) for this mode to calculate the
instant fuel consumption.
Elapsed time
This mode indicates the total time trav-
eled since the last driving time reset.
Even if the vehicle is not in motion, the
driving time keeps going while the engine
is running.
The meter’s working range is from 0:00~99:59.
Pressing the TRIP/RESET button for
more than 1 second, when the driving
time is being displayed, clears the driving
time to zero (0:00). Outside thermometer (if equipped) This mode indicates the outside temper-
ature around the vehicle.
The meter's working range is from -40°C to 60°C (-40°F to 140°F).
To change the outside temperature dis-
play unit (°C
�
°F), press the
TRIP/RESET button more than 1 second
in this mode.
OTA040042L
OTA042042
■
Type A
■ Type B
OTA040043
OTA042043
■
Type A
■ Type B
OTA040044
OTA042044
■
Type A
■ Type B
Page 145 of 846
Features of your vehicle
72
4
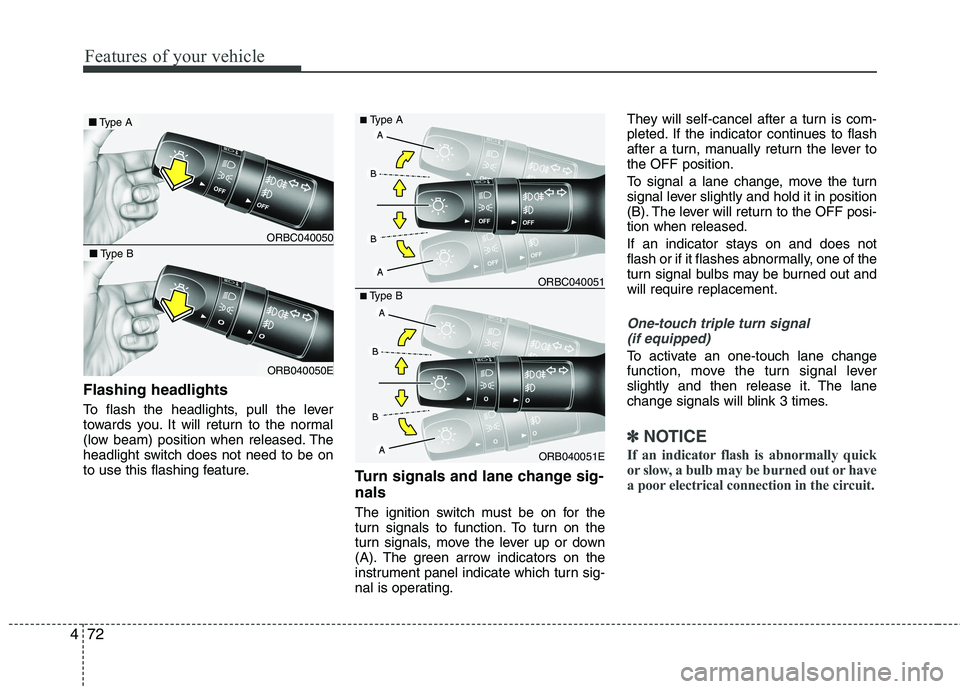
Flashing headlights
To flash the headlights, pull the lever
towards you. It will return to the normal
(low beam) position when released. The
headlight switch does not need to be on
to use this flashing feature.
Turn signals and lane change sig- nals
The ignition switch must be on for the
turn signals to function. To turn on the
turn signals, move the lever up or down
(A). The green arrow indicators on the
instrument panel indicate which turn sig-
nal is operating.They will self-cancel after a turn is com-
pleted. If the indicator continues to flash
after a turn, manually return the lever tothe OFF position.
To signal a lane change, move the turn
signal lever slightly and hold it in position
(B). The lever will return to the OFF posi-tion when released.
If an indicator stays on and does not
flash or if it flashes abnormally, one of the
turn signal bulbs may be burned out andwill require replacement.
One-touch triple turn signal
(if equipped)
To activate an one-touch lane change
function, move the turn signal lever
slightly and then release it. The lane
change signals will blink 3 times.
✽✽ NOTICE
If an indicator flash is abnormally quick
or slow, a bulb may be burned out or have
a poor electrical connection in the circuit.
ORB040051E
■
Type B ORBC040051
■
Type A
ORBC040050
■ Type A
ORB040050E
■Type B
Page 163 of 846
Features of your vehicle
90
4
Air conditioning system operation tips
If the vehicle has been parked in direct
sunlight during hot weather, open the
windows for a short time to let the hot
air inside the vehicle escape.
To help reduce moisture inside of the windows on rainy or humid days,
decrease the humidity inside the vehi-
cle by operating the air conditioningsystem.
During air conditioning system opera- tion, you may occasionally notice aslight change in engine speed as the
air conditioning compressor cycles.
This is a normal system operation
characteristic.
Use the air conditioning system every month only for a few minutes to ensure
maximum system performance. When using the air conditioning sys-
tem, you may notice clear water drip-
ping (or even puddling) on the ground
under the passenger side of the vehi-
cle. This is a normal system operation
characteristic.
Operating the air conditioning system in the recirculated air position provides
maximum cooling, however, continual
operation in this mode may cause the
air inside the vehicle to become stale.
During cooling operation, you may occasionally notice a misty air flow
because of rapid cooling and humid air
intake. This is a normal system opera-
tion characteristic.
If you operate air conditioner exces- sively, the difference between the tem-
perature of the outside air and that ofthe windshield could cause the outer
surface of the windshield to fog up,
causing loss of visibility. In this case,
set the mode selection knob or button
to the position and fan speed con-
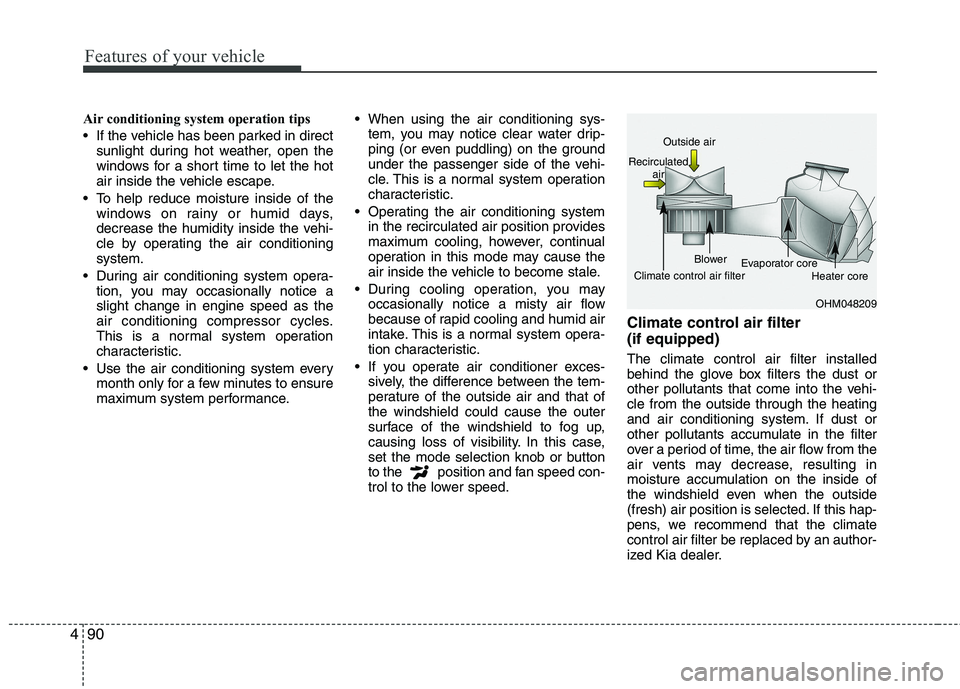
trol to the lower speed. Climate control air filter (if equipped) The climate control air filter installed
behind the glove box filters the dust or
other pollutants that come into the vehi-cle from the outside through the heating
and air conditioning system. If dust or
other pollutants accumulate in the filter
over a period of time, the air flow from the
air vents may decrease, resulting in
moisture accumulation on the inside of
the windshield even when the outside
(fresh) air position is selected. If this hap-
pens, we recommend that the climate
control air filter be replaced by an author-
ized Kia dealer.
OHM048209
Outside air
Recirculated air
Climate control air filter Blower
Evaporator core
Heater core
Page 189 of 846
Features of your vehicle
116
4
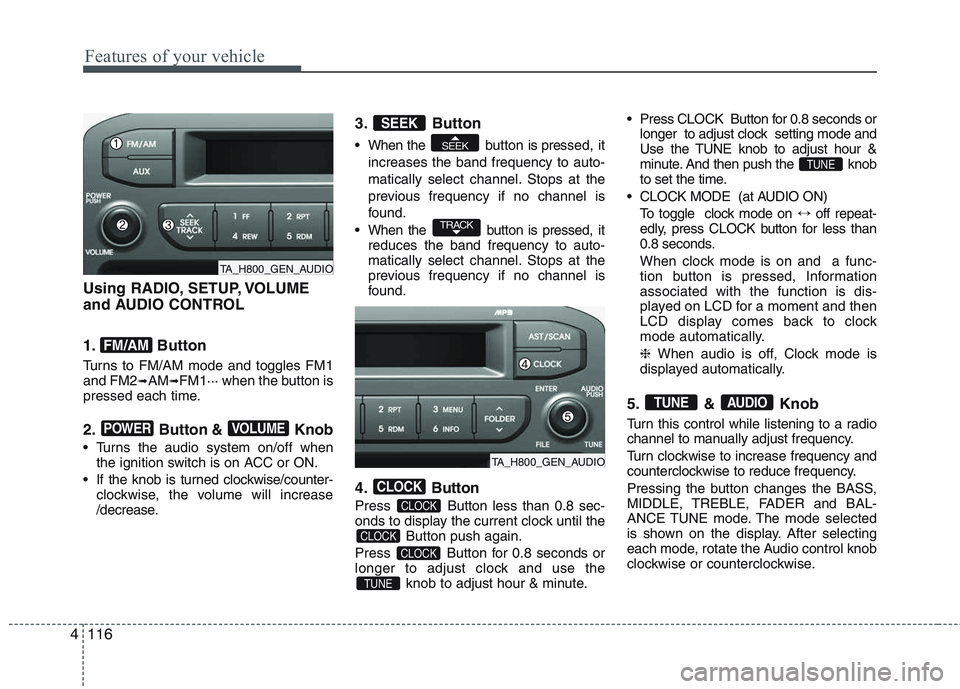
Using RADIO, SETUP, VOLUME
and AUDIO CONTROL
1. Button
Turns to FM/AM mode and toggles FM1 and FM2 ➟AM ➟FM1··· when the button is
pressed each time.
2. Button & Knob
Turns the audio system on/off when the ignition switch is on ACC or ON.
If the knob is turned clockwise/counter- clockwise, the volume will increase
/decrease. 3. Button
When the button is pre
ssed, it
increases the band frequency to auto-
matically select channel. Stops at the
previous frequency if no channel is
found.
When the button is pressed, it reduces the band frequency to auto-
matically select channel. Stops at the
previous frequency if no channel is
found.
4. Button
Press Button less than 0.8 sec-
onds to display the current clock until the Button push again.
Press Button for 0.8 seconds or
longer to adjust clock and use the knob to adjust hour & minute. Press CLOCK Button for 0.8 seconds or
longer to adjust clock setting mode and
Use the TUNE knob to adjust hour &
minute. And then push the knob
to set the time.
CLOCK MODE (at AUDIO ON) To toggle clock mode on ↔off repeat-
edly, press CLOCK button for less than
0.8 seconds.
When clock mode is on and a func-
tion button is pressed, Informationassociated with the function is dis-
played on LCD for a moment and then
LCD display comes back to clock
mode automatically. ❈ When audio is off, Clock mode is
displayed automatically.
5. & Knob
Turn this control while listening to a radio
channel to manually adjust frequency.
Turn clockwise to increase frequency and
counterclockwise to reduce frequency.
Pressing the button changes the BASS,
MIDDLE, TREBLE, FADER and BAL-
ANCE TUNE mode. The mode selected
is shown on the display. After selecting
each mode, rotate the Audio control knob
clockwise or counterclockwise.
AUDIOTUNE
TUNE
TUNE
CLOCK
CLOCK
CLOCK
CLOCK
TRACK
SEEK
SEEK
VOLUMEPOWER
FM/AM
TA_H800_GEN_AUDIO
TA_H800_GEN_AUDIO