2015 KIA Optima tow
[x] Cancel search: towPage 3 of 487

ii
1
2
3
4
5
6
7
8I
IntroductionHow to use this manual / Fuel requirements / Vehicle break-in process
Your vehicle at a glance
Exterior overview / Interior overview / Instrument panel overview / Engi\
ne compartment
Safety features of your vehicle
Seats / Seat belts / Child restraint system / Air bag
Features of your vehicleKeys / Door locks / Trunk / Windows / Hood / Fuel filler lid / Sunroof / Steering wheel / Mirrors / Instrumentcluster / Lighting / Wipers & Washers / Climate control system / Audio system / Etc.
Driving your vehicleBefore driving / Engine start/stop button / Transaxle / Brake system / Cruise control system /
Active ECO system / Winter driving / Vehicle load limit / Etc.
What to do in an emergencyRoad warning / Emergency while driving / Emergency starting / Engine overheat / Flat tire / Towing / Etc.
MaintenanceEngine compartment / Maintenance service / Engine oil / Engine coolant /\
Brake fluid / Washer fluid /
Parking brake / Air cleaner / Wiper blades / Battery / Tire and wheels / Fuses / Etc.
Specifications & Consumer information
Index
table of contents
Page 8 of 487

15
Introduction
Operation in foreign countries
If you are going to drive your vehicle
in another country, be sure to:
Observe all regulations regardingregistration and insurance.
Determine that acceptable fuel is available. No special break-in period is need-
ed. By following a few simple precau-
tions for the first 1,000 km (600
miles) you may add to the perform-
ance, economy and life of your vehi-
cle.
Do not race the engine.
While driving, keep your engine
speed (rpm, or revolutions per
minute) between 2,000 rpm and
4,000 rpm.
Do not maintain a single speed for long periods of time, either fast or
slow. Varying engine speed is
needed to properly break-in the
engine.
Avoid hard stops, except in emer- gencies, to allow the brakes to seat
properly.
Don't tow a trailer during the first 2,000 km (1,200 miles) of opera-
tion.
VEHICLE BREAK-IN PROCESS
Page 58 of 487

343
Safety features of your vehicle
Main components of occupantdetection system
A detection device located within the front passenger seat track.
Electronic system to determine whether passenger air bag sys-
tems should be activated or deac-
tivated.
An indicator light located on the instrument panel which illuminates
the words PASSENGER AIR BAG
“OFF” indicating the front passen-
ger air bag system is deactivated.
The instrument panel air bag warn- ing light is interconnected with the
occupant detection system. If the front passenger seat is occu-
pied by a person that the system
determines to be of adult size, and
he/she sits properly (sitting upright
with the seatback in an upright posi-
tion, centered on the seat cushion
with their seat belt on, legs comfort-
ably extended and their feet on the
floor), the PASSENGER AIR BAG
“OFF” indicator will turn off and the
front passenger's air bag will be able
to inflate, if necessary, in frontal
crashes.
You will find the PASSENGER AIR
BAG “OFF” indicator on the center
facia panel. This system detects the
conditions 1~4 in the following table
and activates or deactivates the front
passenger air bag based on these
conditions.
Always be sure that you and all vehi-
cle occupants are seated and
restrained properly (sitting upright
with the seat in an upright position,
centered on the seat cushion, with
the person’s legs comfortably
extended, feet on the floor, and wear-
ing the safety belt properly) for the
most effective protection by the air
bag and the safety belt. The ODS (Occupant Detection
System) may not function properly if
the passenger takes actions which
can defeat the detection system.
These include:
(1) Failing to sit in an upright position.
(2) Leaning against the door or center console.
(3) Sitting towards the sides or the front of the seat.
(4) Putting legs on the dashboard or resting them on other locations
which reduce the passenger
weight on the front seat.
(5) Improperly wearing the safety belt.
(6) Reclining the seat back.
Page 60 of 487

345
Safety features of your vehicle
1KMN3663
1KMN3664
1KMN3665
- Never sit with the hips shiftedtowards the front of the seat.
- Never lean on the door or cen-ter console.
- Never sit on one side of the front passenger seat.
- Never place the feet on the
dashboard.
B990A08O
1KMN3662
- Never put a heavy load in thefront passenger seat.
- Never excessively recline thefront passenger seatback.
OVQ036014N
- Never place the feet on thefront passenger seatback.
(Continued)
Page 80 of 487

47
Features of your vehicle
Even though you press the button,
the doors will not lock and the chime
will sound for 3 seconds if any of the
following occurs:
• The smart key is in the vehicle.
The ignition switch is in the ACC orON position.
Any door except the trunk is opened.Unlocking
Pressing the button of the driver's
outside door handle with all doors
closed and locked, unlocks the dri-
ver's door. The hazard warning lights
will blink and the chime will sound
twice to indicate that the driver's door
is unlocked.
Pressing the button in the front pas-
senger's outside door handle with all
doors closed and locked, unlocks all
the doors. The hazard warning lights
will blink and the chime will sound
twice to indicate that all doors are
unlocked. The button will only oper-
ate when the smart key is within
0.7~1 m (28~40 in.) from the outside
door handle.
Start-up
You can start the engine without
inserting the key. For detailed infor-
mation refer to "Starting the engine
with a smart key" in chapter 5.
Smart key precautions
If you lose your smart key, you willnot be able to start the engine. Tow
the vehicle, if necessary, and con-
tact an authorized Kia dealer.
A maximum of 2 smart keys can be registered to a single vehicle. If
you lose a smart key, you should
immediately take the vehicle and
key to your authorized Kia dealer
to protect it from potential theft.
The smart key will not work if any of following occurs:
- The smart key is close to a radiotransmitter such as a radio sta-
tion or an airport which can inter-
fere with normal operation of the
smart key.
- The smart key near a mobile two- way radio system or a cellular
phone.
- Another vehicle’s smart key is being operated close to your vehicle.
When the smart key does not work
correctly, open and close the door
with the mechanical key. If you
have a problem with the smart key,
contact an authorized Kia dealer.
Page 91 of 487

Features of your vehicle
18
4
DOOR LOCKS
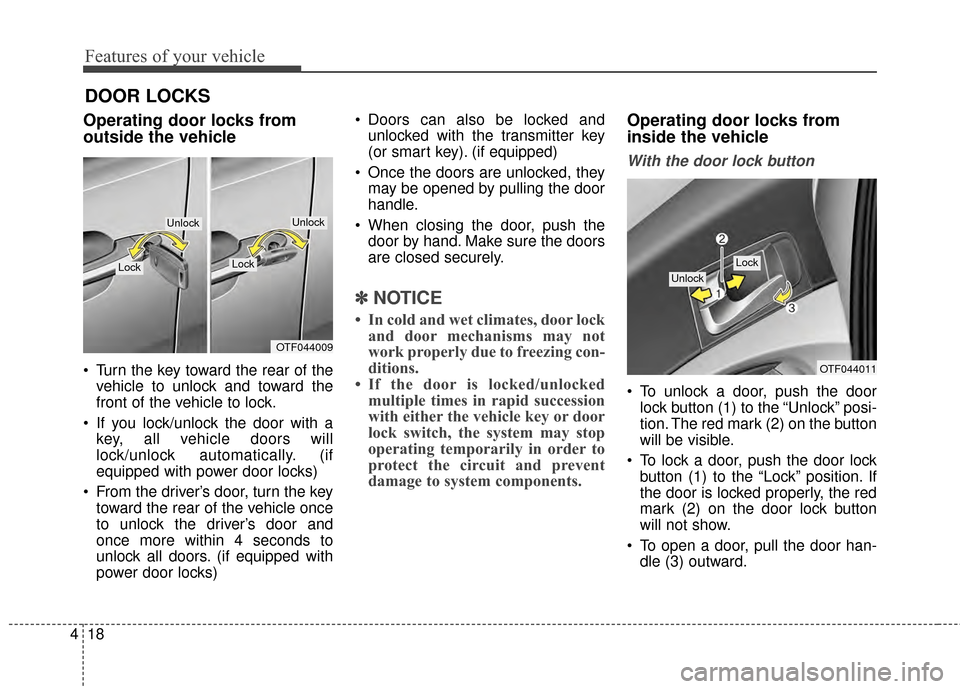
Operating door locks from
outside the vehicle
Turn the key toward the rear of the
vehicle to unlock and toward the
front of the vehicle to lock.
If you lock/unlock the door with a key, all vehicle doors will
lock/unlock automatically. (if
equipped with power door locks)
From the driver’s door, turn the key toward the rear of the vehicle once
to unlock the driver’s door and
once more within 4 seconds to
unlock all doors. (if equipped with
power door locks) Doors can also be locked and
unlocked with the transmitter key
(or smart key). (if equipped)
Once the doors are unlocked, they may be opened by pulling the door
handle.
When closing the door, push the door by hand. Make sure the doors
are closed securely.
✽ ✽ NOTICE
• In cold and wet climates, door lock
and door mechanisms may not
work properly due to freezing con-
ditions.
• If the door is locked/unlocked multiple times in rapid succession
with either the vehicle key or door
lock switch, the system may stop
operating temporarily in order to
protect the circuit and prevent
damage to system components.
Operating door locks from
inside the vehicle
With the door lock button
To unlock a door, push the door
lock button (1) to the “Unlock” posi-
tion. The red mark (2) on the button
will be visible.
To lock a door, push the door lock button (1) to the “Lock” position. If
the door is locked properly, the red
mark (2) on the door lock button
will not show.
To open a door, pull the door han- dle (3) outward.
OTF044009
LockLock
UnlockUnlock
OTF044011
Lock
Unlock
Page 118 of 487

445
Features of your vehicle
Inside rearview mirror
Adjust the rearview mirror so that the
center view through the rear window
is seen. Make this adjustment before
you start driving.
Do not place objects in the rear seat
which would interfere with your vision
through the rear window.
Day/night rearview mirror (if equipped)
Make this adjustment before you
start driving and while the day/night
lever is in the day position.
Pull the day/night lever toward you to
reduce the glare from the headlights
of the vehicles behind you during
night driving.
Remember that you lose somerearview clarity in the night position. Electric chromic mirror (ECM)
(if equipped)
The electric rearview mirror automat-
ically controls the glare from the
headlights of the vehicles behind you
in nighttime or low light driving condi-
tions. The sensor mounted in the mir-
ror senses the light level around the
vehicle, and automatically controls
the headlight glare from the vehicles
behind you.
When the engine is running, the
glare is automatically controlled by
the sensor mounted in the rearview
mirror.
Whenever the shift lever is shifted
into reverse (R), the mirror will auto-
matically go to the brightest setting in
order to improve the drivers view
behind the vehicle.
MIRRORS
WARNING - Mirror
adjustment
Do not adjust the rearview mirror
while the vehicle is moving. This
could result in loss of control.
OTF040040
Day Night
Page 119 of 487

Features of your vehicle
46
4
To operate the electric rearview mirror:
The mirror defaults to the ON posi-
tion whenever the ignition switch is
turned on. Press the ON/OFF button (1) to
turn the automatic dimming func-
tion off. The mirror indicator light
will turn off.
Press the ON/OFF button (1) to
turn the automatic dimming func-
tion on. The mirror indicator light
will illuminate.
CAUTION - Cleaning
mirror
When cleaning the mirror, use apaper towel or similar materialdampened with glass cleaner.Do not spray glass cleanerdirectly on the mirror. It maycause the liquid cleaner to enterthe mirror housing.
OVG049039
OVG049039-1
■Type A
■ Type B
IndicatorSensor
IndicatorSensor