2015 KIA OPTIMA HYBRID engine
[x] Cancel search: enginePage 30 of 50

28
For further UVO eServices with Premium Navigation* operations, refer to the Car Multimedia System User's Manual. For further audio system operations, refer to pages 2 6 - 27.
REMINDER: Your audio system may differ from those in the illustrations .
UVO eServices with Premium Navigation*
– FM/AM/Sirius®/Media (Disc,USB, iPod®, Aux, BT Audio, My Music)
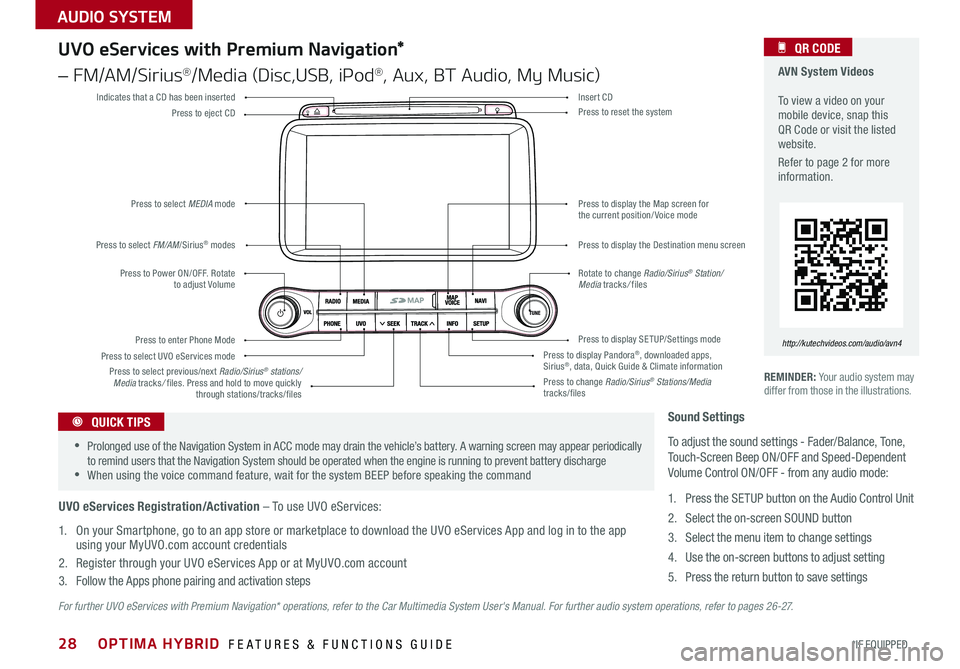
Press to Power ON/OFF . Rotate to adjust Volume
Press to enter Phone Mode
Press to select FM/AM/Sirius® modes
Press to select MEDIA mode
Press to display SE TUP/Settings mode
Press to select UVO eServices mode
Indicates that a CD has been inserted
Press to change Radio/Sirius® Stations/Media tracks/files
Press to display the Map screen for the current position/ Voice mode
Press to display the Destination menu screen
Press to display Pandora®, downloaded apps, Sirius®, data, Quick Guide & Climate information
Press to eject CDPress to reset the system
Press to select previous/next Radio/Sirius® stations/Media tracks/ files . Press and hold to move quickly through stations/tracks/files
Insert CD
Rotate to change Radio/Sirius® Station/Media tracks/ files
AVN System Videos To view a video on your mobile device, snap this QR Code or visit the listed website .
Refer to page 2 for more information .
QR CODE
http://kutechvideos.com/audio/avn4
Sound Settings
To adjust the sound settings - Fader/Balance, Tone, Touch-Screen Beep ON/OFF and Speed-Dependent Volume Control ON/OFF - from any audio mode:
1 . Press the SETUP button on the Audio Control Unit
2 . Select the on-screen SOUND button
3 . Select the menu item to change settings
4 . Use the on-screen buttons to adjust setting
5 . Press the return button to save settings
•Prolonged use of the Navigation System in ACC mode may drain the vehicle’s battery . A warning screen may appear periodically to remind users that the Navigation System should be operated when the engine is running to prevent battery discharge •When using the voice command feature, wait for the system BEEP before speaking the command
QUICK TIPS
UVO eServices Registration/Activation – To use UVO eServices:
1 . On your Smartphone, go to an app store or marketplace to download the UVO eServices App and log in to the app using your MyUVO .com account credentials
2 . Register through your UVO eServices App or at MyUVO .com account
3 . Follow the Apps phone pairing and activation steps
OPTIMA HYBRID FEATURES & FUNCTIONS GUIDE
*IF EQUIPPED
AUDIO SYSTEM
Page 31 of 50

29
REMINDER: Using the power outlet (accessory plug) for prolonged periods of time with the engine off could cause the battery to discharge .
Aux/USB/iPod® Port
& Power Outlets
Digital Clock USB Port Video To view a video on your mobile device, snap this QR Code or visit the listed website .
Refer to page 2 for more information .
QR CODE
www.KuTechVideos.com/tf23/2015
For more information on the Aux/USB/iPod® Port & Power Outlets, refer to the Owner's Manual.
H
M
H
MH
M
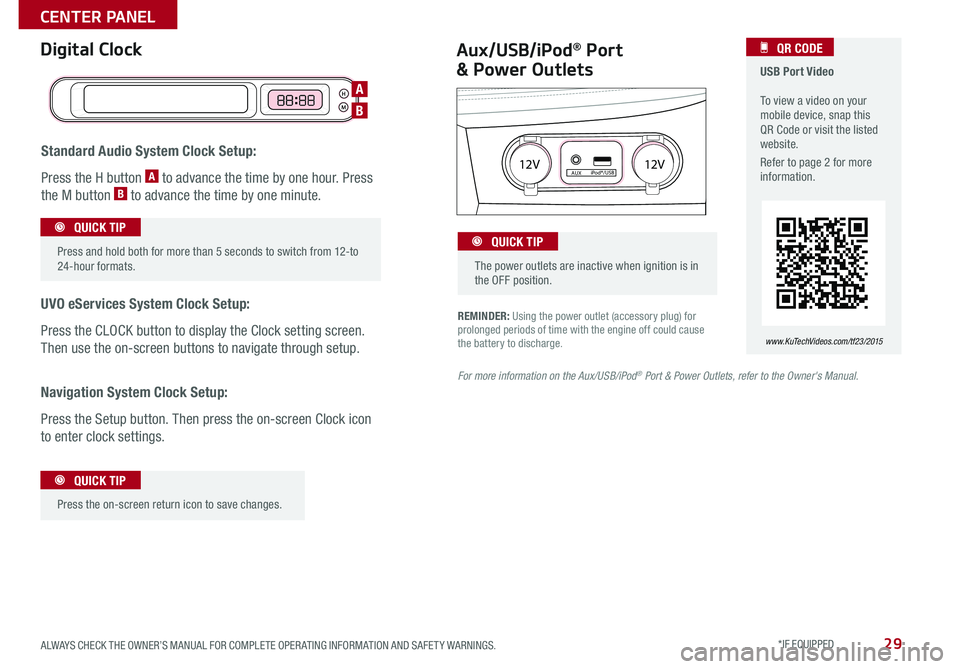
Standard Audio System Clock Setup:
Press the H button A to advance the time by one hour . Press
the M button B to advance the time by one minute .
UVO eServices System Clock Setup:
Press the CLOCK button to display the Clock setting screen .
Then use the on-screen buttons to navigate through setup .
Navigation System Clock Setup:
Press the Setup button . Then press the on-screen Clock icon
to enter clock settings .
12V 12VAUXiPod®/USB
Press and hold both for more than 5 seconds to switch from 12-to 24-hour formats .
QUICK TIP
Press the on-screen return icon to save changes
.
QUICK TIP
The power outlets are inactive when ignition is in the OFF position .
QUICK TIP
A
B
ALWAYS CHECK THE OWNER’S MANUAL FOR COMPLETE OPER ATING INFORMATION AND SAFET Y WARNINGS. *IF EQUIPPED
CENTER PANEL
Page 38 of 50

36
Smart Key Fob:
A Press to lock All Doors
B Press to unlock Driver’s Door . Press twice in 4 seconds to
unlock All Doors
C Press and hold to unlock Trunk and manually open
REMINDER:
• The Trunk unlocks when the Smart Key fob is within close proximity of the vehicle .
•The Trunk does not automatically open when the C button is pressed .
D Press and hold more than 1 second for Panic Alarm . To turn off
Alarm, press any button
E Press to release Mechanical Key (on reverse side of fob)
Driver’s Door Lock/Unlock button G:
• Press button once to unlock Driver’s Door
•Press again within 4 seconds to unlock All Doors
•Press again to lock All Doors
Mechanical Key F:
•Use to unlock Driver’s Door
• Use to enable/disable Child Safety Locks
Smart Key
HOLD
HOLD
G
Engine Start/Stop Button & Smart Key Video To view a video on your mobile device, snap this QR Code or visit the listed website .
Refer to page 2 for more information .
QR CODE
www.KuTechVideos.com/tf23/2015
REMINDER: Remote button configuration may vary depending on vehicle options .
•If the Smart Key battery is weak or not working properly, hold the Smart Key fob up to the ENGINE START/STOP button (Lock button side closest) and press to start engine •The Smart Key’s signal can be blocked by the normal operation of a cell phone or smartphone . To help prevent this, store each device separately
QUICK TIPS
A
B
C
D
F
E
OPTIMA HYBRID FEATURES & FUNCTIONS GUIDE
*IF EQUIPPED
OTHER KEY FEATURES
Page 39 of 50

37
One-Click Fuel Cap Video To view a video on your mobile device, snap this QR Code or visit the listed website .
Refer to page 2 for more information .
QR CODE
www.KuTechVideos.com/tf23/2015 REMINDER: The Fuel Filler Door Release button is located on the lower part of the driver’s door panel .
CLICK!
Fuel Cap/Malfunction Indicator
(Check Engine Light)
Tighten for ONE CLICK to prevent Malfunction
Indicator from illuminating .
LockUnlock
Double-Turn Lock/Unlock All
•Turn clockwise once to unlock Driver’s Door
•Turn clockwise again within 4 seconds to unlock All Doors
•Turn counterclockwise once to lock All Doors
ALWAYS CHECK THE OWNER’S MANUAL FOR COMPLETE OPER ATING INFORMATION AND SAFET Y WARNINGS. *IF EQUIPPED
OTHER KEY FEATURES
Page 40 of 50

38
Map/Room Lamps
Automatic turn off function*
The interior lights automatically turn off
approximately 30 seconds after the ENGINE
START/STOP button is OFF .
Map/Personal Lamp
Push the lens A to turn the Map Lamp ON/
OFF . This light produces a spot beam for
convenient use as a Map Lamp or Personal
Lamp for the driver or front passenger .
Room Lamp B
: In the off position, the lamp is OFF even if the door is opened .
: In the door position, the lamp turns ON when any door is opened .
: In the on position, the lamp stays on continuously .
( Type A )( Type B)
REMINDER: Sunshade needs to remain OPEN while Sunroof is open and vehicle is moving .
Panoramic Sunroof Operation*
The Sunroof and Sunshade operation is controlled through a
multidirectional switch/lever, and the ignition needs to be in the ON
position to operate the Sunroof/Sunshade .
Slide the Sunshade and Sunroof:
•Auto Open: Slide lever C backward to
the farthest position and release .
•Auto Close (Sunroof only): Slide the lever C forward to the farthest position
and release .
Slide the Sunshade:
•Open: Slide the lever C partially backward to the first detent position .
•Auto Close: Slide the lever C forward to the farthest position .
Slide the Sunroof (with Sunshade open):
•Open: Slide the lever C backward and release .
•Close: Slide the lever C partially forward to the first detent position or
pull the lever downward .
Tilt the Sunroof:
•Raise: Push lever C upward .
•Lower: Pull lever C downward .
•Auto Close: Slide the lever C forward to the farthest position .
•When doors are unlocked by the Smart Key*, the lamp turns ON for approximately 30 seconds •If your vehicle is equipped with the theft alarm system, the interior lights automatically turn off approximately 3 seconds after the system is in armed stage •Using interior lights for an extended period of time may cause battery discharge
QUICK TIPS
To stop the Sunroof/Sunshade at any position, push or pull the Sunroof control lever in any direction .
QUICK TIP
A
AA
B
B
C
(Buttons located on overhead controls)(Buttons located on overhead controls)
OPTIMA HYBRID FEATURES & FUNCTIONS GUIDE
*IF EQUIPPED
OTHER KEY FEATURES
Page 42 of 50

40
REMINDERS:
•If the vehicle is moving at speeds over 3 mph, the system may not activate correctly
• When more than two objects are sensed at the same time, the closest one will be recognized first
The Back-Up Warning System is not a substitute for proper and safe backing-up procedures. Always drive safely and use caution when backing up. The Back-Up Warning System may not detect every object behind the vehicle
REMINDER: The above images are for illustration purposes only and may not reflect actual operation
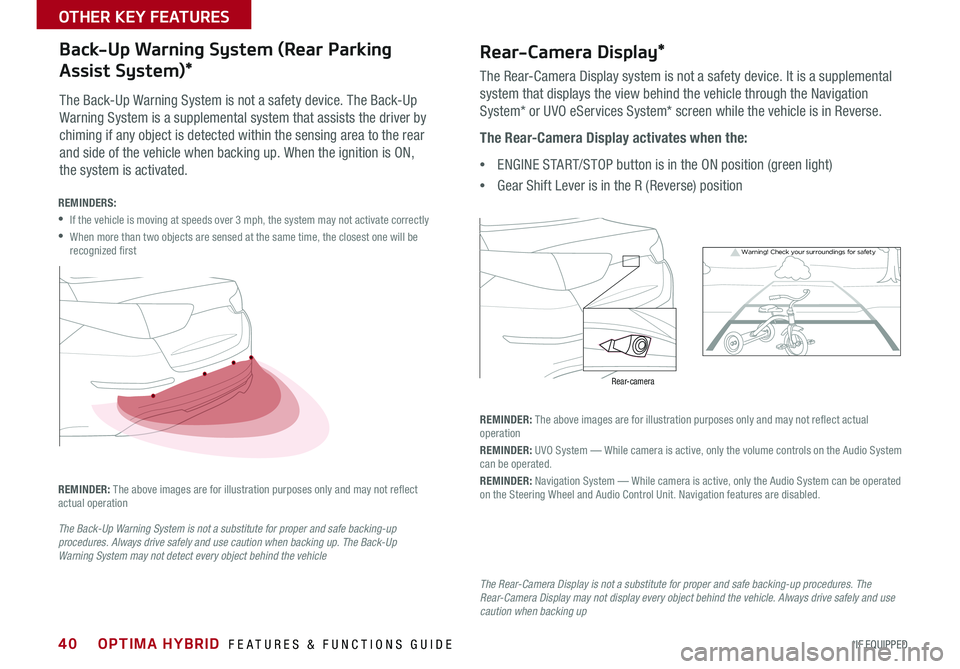
The Back-Up Warning System is not a safety device . The Back-Up
Warning System is a supplemental system that assists the driver by
chiming if any object is detected within the sensing area to the rear
and side of the vehicle when backing up . When the ignition is ON,
the system is activated .
Back-Up Warning System (Rear Parking
Assist System)*
Warning! Check yo ur sur roun dings for safe\fy
Rear-Camera Display*
The Rear-Camera Display system is not a safety device . It is a supplemental
system that displays the view behind the vehicle through the Navigation
System* or UVO eServices System* screen while the vehicle is in Reverse .
The Rear-Camera Display activates when the:
•ENGINE START/STOP button is in the ON position (green light)
•Gear Shift Lever is in the R (Reverse) position
REMINDER: The above images are for illustration purposes only and may not reflect actual operation
REMINDER: UVO System — While camera is active, only the volume controls on the Audio System can be operated .
REMINDER: Navigation System — While camera is active, only the Audio System can be operated on the Steering Wheel and Audio Control Unit . Navigation features are disabled .
The Rear-Camera Display is not a substitute for proper and safe backing-up procedures. The Rear-Camera Display may not display every object behind the vehicle. Always drive safely and use caution when backing up
Rear-camera
OPTIMA HYBRID FEATURES & FUNCTIONS GUIDE
*IF EQUIPPED
OPTIMA HYBRID FEATURES & FUNCTIONS GUIDE
OTHER KEY FEATURES
Page 48 of 50

*IF EQUIPPEDNORMAL MAINTENANCE SCHEDULE
When your vehicle requires service, remember that your dealer knows your vehicle best. Your dealer has factory-trained technicians, recommended special tools, genuine Kia
replacement parts, and is dedicated to your complete satisfaction. For expert advice and quality service, see your authorized Kia dealer.
Optima Hybrid Features & Functions Guide
A Inspect* — Air cleaner filter* and vacuum hose Replace — Engine oil and oil filter Perform — Rotate tires; add fuel additive1
B Inspect* — Brake hoses and lines, drive shafts and boots, exhaust pipe and muffler, front disc brake/pads, calipers and rotors, steering gear box, linkage & boots/lower arm ball joint, upper arm ball joint, suspension mounting bolts, air conditioning refrigerant, rear disc brake/pads, parking brake Replace — Climate control air filter (for evaporator and blower unit)C Inspect* — Brake fluid, fuel filter2, fuel lines, fuel hoses and connections, fuel tank air filter* *2, vapor hose, fuel filler cap, fuel tank Replace — Air cleaner filterD Inspect* — Drive belt3 (auto-tensioner, generator, power steering, air conditioning, water pump)E Inspect* — Valve clearance4
F Replace — Spark Plugs (iridium coated)G Replace — Engine coolant5, inverter coolant
* and, if necessary, adjust, clean, replace or correct** If equipped* * * Check and adjust level and check for leaks. Inspect regularlyCheck tire pressure frequently, at least once per month or more.Transfer case oil and rear differential oil should be changed anytime they have been submerged in water.1 If TOP TIER Detergent Gasoline is not available, one bottle of additive is recommended. Additives are available from your authorized Kia dealer along with information on how to use them. Do not mix other additives.
2 Fuel filter & Fuel tank air filter are considered to be maintenance free but periodic inspection is recommended for this maintenance schedule depends on fuel quality. If there are some important safety matters like fuel flow restriction, surging, loss of power, hard starting problem etc., replace the fuel filter immediately regardless of maintenance schedule and consult an authorized Kia dealer for details.3 The drive belt should be replaced when cracks occur or tension is reduced excessively.4 Inspect for excessive tappet noise and/or engine vibration and adjust if necessary.5 When replacing coolant, use only deionized water or soft water for your vehicle and never mix hard water in the coolant filled at the factory. An improper coolant mixture can result in serious malfunction or engine damage.
See your owner’s manual for more details and complete maintenance information, including severe maintenance schedule. Warranty may be voided if maintenance schedule is not followed. Call 1-800-333-4kia (4542) for roadside assistance.
© 2014 Kia Motors America, Inc. All rights reserved. Part Number: UH150-PS-004
INTERVAL MAINTENANCE CHART
7,500 miles A
15,000 milesAB
22,500 milesA
30,000 milesABC
37,500 milesA
45,000 milesAB
52,500 milesA
60,000 milesABCDE
67,500 milesA
75,000 milesABD
82,500 milesA
90,000 milesABC
97,500 milesA
105,000 miles ABDF
112,500 milesA
120,000 milesABCDEG
Page 50 of 50

Sales Consultant:
______________________________________________________________
Date:
____________________
Sales Manager:
________________________________________________________________
Date:
____________________
Customer:
_____________________________________________________________________
Date:
____________________
Explain first service process and schedule first service appointment Tour Parts & Service departments, introduce staff & explain value of Kia Parts and Service Review recommended maintenance schedule and maintenance requirements to validate warranty Review business hours & Customer 360° Care Review the Kia 10-year/100,000-mile warranty program Ensure 100% satisfaction with sales and delivery process and no problems with the vehicle Confirm time and best contact number for initial dealer follow-up
OPTIMA HYBRID
CUSTOMER DELIVERY CHECKLIST
...
continued
KEY FEATURE WALKTHROUGHDURING DELIVERY Tire Pressure Monitoring System ( TPMS) – page 5 Trip Computer/ Tripmeter – page 7 Fuel Economy – page 8 Active ECO (ECODynamics) – page 10 Engine Start /Stop Button – page 18 Audio Controls – page 24 Digital Clock – page 29 Seat Warmers/ Ventilated Seats* – page 32
Smart Key – page 36 Panoramic Sunroof Operation* – page 38 Sunvisor – page 39 Back-up Warning System* – page 40 Rear-Camera Display* – page 40 Tire Mobility Kit – page 42 Passenger Airbag Off Indicator – page 43
*IF EQUIPPED
UVO eServices System*
– page 27
For further
operational information
, refer to
the UVO System User’s Manual.
Aux/USB/iPod
® Port
– page 29
Cruise Control
– page 24
Demonstrate operation
Bluetooth
® Wireless
Technology
– pages 22-23
Demonstrate operation, and pair customer’s phone.
UVO eServices with Premium Navigation*
– page 28
For further
operational information
, refer to
the Car Multimedia System User’s Manual.
Standard Audio System
Overview/Operation*
– pages 26DISP
RADIO
MEDIA
PHONE SCAN
SETUP
MENU
ENTER TUNE
FILE
POWER
PUSH
VOL
B luetooth®1 2
34
56RPT RDMSEEK
TRACK C AT
FOLDER
DISP
RADIO
MEDIA
PHONE SCAN
SETUP
MENU
ENTER TUNE
FILE
POWER
PUSH
VOL
B luetooth®1 2
34
56RPT RDMSEEK
TRACK C AT
FOLDER
DISP
FM/AM
S AT
MEDIA eServices
PHONE
SETUP
ENTER TUNE
FILE
POWER
PUSH
VOL
B luetooth®
SEEK
TRACK CATEGORY
12V
12V
AUXiPod®/USBVOL
VOLMUTE
MODE
CRUISERESSET
CANCEL
OK
DRIVE
MODE
VOL
VOLMUTE
MODE
VOL
VOLMUTE
MODE
CR
UISERESSET
CANCEL
OK
ECO
VOL
VOLMUTE
MODE