2015 KIA MORNING check engine light
[x] Cancel search: check engine lightPage 291 of 420
Driving your vehicle
50 5
Following distance
Stay at least twice as far behind the vehi-
cle ahead as you would when driving
your vehicle without a trailer. This can
help you avoid situations that require
heavy braking and sudden turns.
Passing
You’ll need more passing distance up
ahead when you’re towing a trailer. And,
because of the increased vehicle length,
you’ll need to go much farther beyond the
passed vehicle before you can return to
your lane.
Backing up
Hold the bottom of the steering wheel
with one hand. Then, to move the trailer
to the left, just move your hand to the left.
To move the trailer to the right, move your
hand to the right. Always back up slowly
and, if possible, have someone guide
you.
Making turns
When you’re turning with a trailer, make
wider turns than normal. Do this so your
trailer won’t strike soft shoulders, kerbs,
road signs, trees, or other objects. Avoid
jerky or sudden manoeuvres. Signal well
in advance.
Turn signals when towing a trailer
When you tow a trailer, your vehicle has
to have a different turn signal flasher and
extra wiring. The green arrows on your
instrument panel will flash whenever you
signal a turn or lane change. Properly
connected, the trailer lights will also flash
to alert other drivers you’re about to turn,
change lanes, or stop.
When towing a trailer, the green arrows
on your instrument panel will flash for
turns even if the bulbs on the trailer are
burned out. Thus, you may think drivers
behind you are seeing your signals
when, in fact, they are not. It’s important
to check occasionally to be sure the trail-
er bulbs are still working. You must also
check the lights every time you discon-
nect and then reconnect the wires.
Do not connect a trailer lighting system
directly to your vehicle’s lighting system.
Use only an approved trailer wiring har-
ness.
An authorised Kia dealer can assist you
in installing the wiring harness.
Driving on grades
Reduce the speed and shift to a lower
gear before you start down a long or
steep downgrade. If you don’t shift down,
you might have to use your brakes so
much that they would get hot and no
longer operate efficiently.
On a long uphill grade, shift down and
reduce your speed to around 45 mph (70
km/h) to reduce the possibility of engine
and transaxle overheating.
If your trailer weighs more than the max-
imum trailer weight without trailer brakes
and you have an automatic transaxle,
you should drive in D (Drive) when tow-
ing a trailer.
Operating your vehicle in D (Drive) when
towing a trailer will minimise heat build up
and extend the life of your transaxle.
WARNING
Failure to use an approved trailer
wiring harness could result in dam-
age to the vehicle electrical system
and/or personal injury.
Page 300 of 420
What to do in an emergency
4 6
IF THE ENGINE WILL NOT START
If engine doesn't turn over or
turns over slowly
1. If your vehicle has an automatic
transaxle, be sure the shift lever is in N
(Neutral) or P (Park) and the emer-
gency brake is set.
2. Check the battery connections to be
sure they are clean and tight.
3. Turn on the interior light. If the light
dims or goes out when you operate the
starter, the battery is discharged.
4. Check the starter connections to be
sure they are securely tightened.
5. Do not push or pull the vehicle to start
it. See instructions for "Jump starting".
If engine turns over normally but
does not start
1. Check fuel level.
2. With the ignition switch in the LOCK
/OFF position, check all connectors at
the ignition coils and spark plugs.
Reconnect any that may be discon-
nected or loose.
3. If the engine still does not start, call an
authorised Kia dealer or seek other
qualified assistance.
WARNING
If the engine will not start, do not
push or pull the car to start it. This
could result in a collision or cause
other damage.
Page 332 of 420
75
Maintenance
While operating your vehicle:
Note any changes in the sound of the
exhaust or any smell of exhaust fumes
in the vehicle.
Check for vibrations in the steering
wheel. Notice any increased steering
effort or looseness in the steering
wheel, or change in its straight-ahead
position.
Notice if your vehicle constantly turns
slightly or “pulls” to one side when trav-
elling on smooth, level road.
When stopping, listen and check for
unusual sounds, pulling to one side,
increased brake pedal travel or “hard-
to-push” brake pedal.
If any slipping or changes in the oper-
ation of your transaxle occurs, check
the transaxle fluid level.
Check manual transaxle operation,
including clutch operation.
Check automatic transaxle P (Park)
function.
Check parking brake.
Check for fluid leaks under your vehicle
(water dripping from the air condition-
ing system during or after use is nor-
mal).
At least monthly:
Check coolant level in the engine
coolant reservoir.
Check the operation of all exterior
lights, including the stoplights, turn sig-
nals and hazard warning flashers.
Check the inflation pressures of all
tyres including the spare.
At least twice a year
(i.e., every Spring and Fall):
Check radiator, heater and air condi-
tioning hoses for leaks or damage.
Check windscreen washer spray and
wiper operation. Clean wiper blades
with clean cloth dampened with wash-
er fluid.
Check headlight alignment.
Check muffler, exhaust pipes, shields
and clamps.
Check the lap/shoulder belts for wear
and function.
Check for worn tyres and loose wheel
lug nuts.
At least once a year:
Clean body and door drain holes.
Lubricate door hinges and checks, and
bonnet hinges.
Lubricate door and bonnet locks and
latches.
Lubricate door rubber weatherstrips.
Check the air conditioning system.
Inspect and lubricate automatic
transaxle linkage and controls.
Clean battery and terminals.
Check the brake fluid level.
Page 355 of 420
Maintenance
28 7
✽
✽
NOTICE
The “COLD” range is for reference only
and should NOT be used to determine
the transaxle fluid level.
✽ ✽
NOTICE
New automatic transaxle fluid should be
red. The red dye is added so the assem-
bly plant can identify it as automatic
transaxle fluid and distinguish it from
engine oil or antifreeze. The red dye,
which is not an indicator of fluid quali-
ty, is not permanent. As the vehicle is
driven, the automatic transaxle fluid
will begin to look darker. The colour
may eventually appear light brown.
Therefore, have an authorised Kia deal-
er change the automatic transaxle fluid
according to the Scheduled
Maintenance at the beginning of this
section.
Use only the specified automatic
transaxle fluid. (Refer to "Recommended
lubricants or capacities" in section 8.)
Changing the automatic transaxle
fluid
Have the automatic transaxle fluid
changed by an authorised Kia dealer
according to the Maintenance Schedule
at the beginning of this section.
WARNING - Transaxle fluid
The transaxle fluid level should be
checked when the engine is at nor-
mal operating temperature. This
means that the engine, radiator,
radiator hose and exhaust system
etc., are very hot. Exercise great
care not to burn yourself during
this procedure.
CAUTION
Low fluid level causes transaxle
shift slippage. Overfilling can
cause foaming, loss of fluid and
transaxle malfunction.
The use of a non-specified fluid
could cause transaxle malfunc-
tion and failure.
WARNING- Parking brake
To avoid sudden movement of the
vehicle, apply the parking brake
and depress the brake pedal before
moving the shift lever.
Page 377 of 420
Maintenance
50 7
FUSES
A vehicle’s electrical system is protected
from electrical overload damage by
fuses.
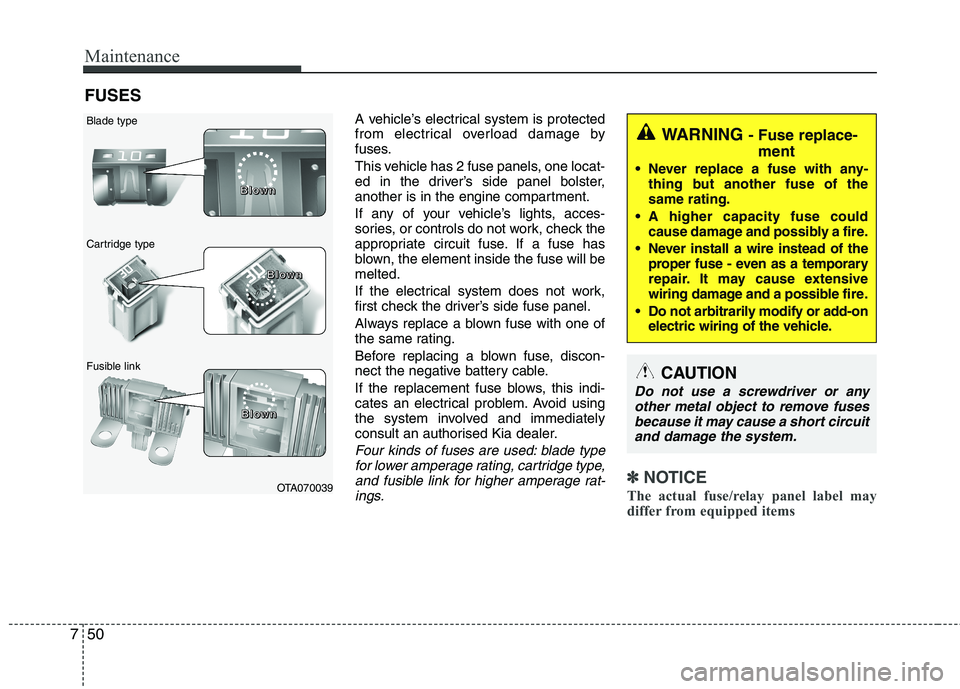
This vehicle has 2 fuse panels, one locat-
ed in the driver’s side panel bolster,
another is in the engine compartment.
If any of your vehicle’s lights, acces-
sories, or controls do not work, check the
appropriate circuit fuse. If a fuse has
blown, the element inside the fuse will be
melted.
If the electrical system does not work,
first check the driver’s side fuse panel.
Always replace a blown fuse with one of
the same rating.
Before replacing a blown fuse, discon-
nect the negative battery cable.
If the replacement fuse blows, this indi-
cates an electrical problem. Avoid using
the system involved and immediately
consult an authorised Kia dealer.
Four kinds of fuses are used: blade type
for lower amperage rating, cartridge type,
and fusible link for higher amperage rat-
ings.
✽ ✽
NOTICE
The actual fuse/relay panel label may
differ from equipped items
WARNING - Fuse replace-
ment
Never replace a fuse with any-
thing but another fuse of the
same rating.
A higher capacity fuse could
cause damage and possibly a fire.
Never install a wire instead of the
proper fuse - even as a temporary
repair. It may cause extensive
wiring damage and a possible fire.
Do not arbitrarily modify or add-on
electric wiring of the vehicle.
CAUTION
Do not use a screwdriver or any
other metal object to remove fuses
because it may cause a short circuit
and damage the system.
OTA070039 Blade type
Cartridge type
Fusible linkB B B B
l l l l
o o o o
w w w w
n n n n
B B B B
l l l l
o o o o
w w w w
n n n n
B B B B
l l l l
o o o o
w w w w
n n n n
Page 379 of 420
Maintenance
52 7
If you do not have a spare, use a fuse of
the same rating from a circuit you may
not need for operating the vehicle, such
as the cigarette lighter fuse.
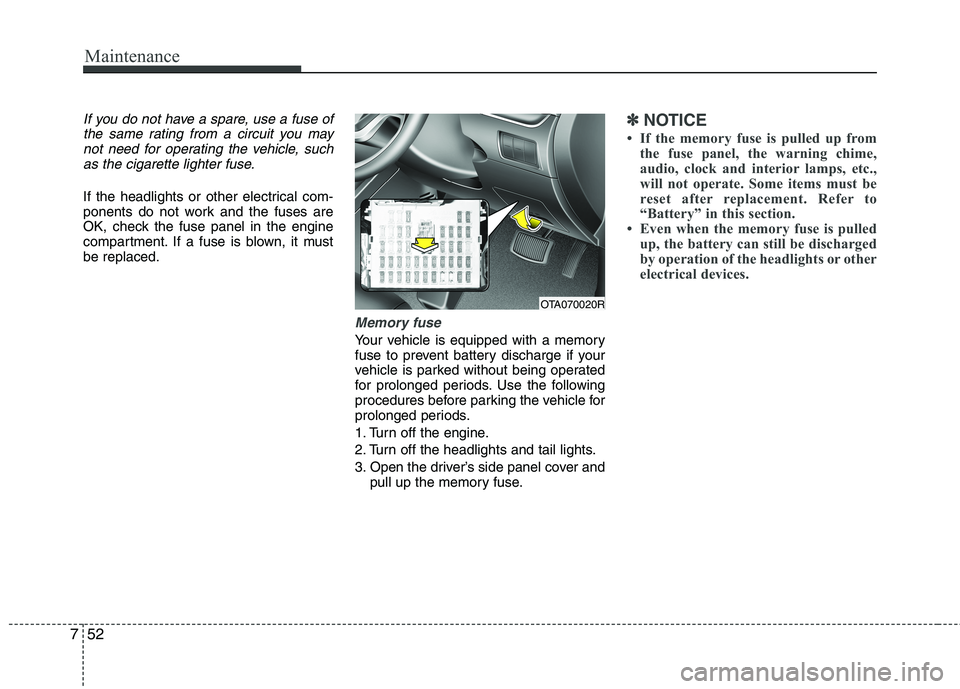
If the headlights or other electrical com-
ponents do not work and the fuses are
OK, check the fuse panel in the engine
compartment. If a fuse is blown, it must
be replaced.
Memory fuse
Your vehicle is equipped with a memory
fuse to prevent battery discharge if your
vehicle is parked without being operated
for prolonged periods. Use the following
procedures before parking the vehicle for
prolonged periods.
1. Turn off the engine.
2. Turn off the headlights and tail lights.
3. Open the driver’s side panel cover and
pull up the memory fuse.
✽ ✽
NOTICE
• If the memory fuse is pulled up from
the fuse panel, the warning chime,
audio, clock and interior lamps, etc.,
will not operate. Some items must be
reset after replacement. Refer to
“Battery” in this section.
• Even when the memory fuse is pulled
up, the battery can still be discharged
by operation of the headlights or other
electrical devices.
OTA070020R
Page 414 of 420
I3
Index
Cargo weight ..................................................................5-55
Central door lock switch ................................................4-16
Changing tyres ..................................................................6-9
Chains
Tyre chains ................................................................5-44
Checking tyre inflation pressure ....................................7-41
Child restraint system ....................................................3-28
Lap belt......................................................................3-31
Lap/shoulder belt ......................................................3-30
Child-protector rear door lock ........................................4-17
Climate control system (Automatic) ..............................4-90
Air conditioning ........................................................4-95
Automatic heating and air conditioning....................4-91
Manual heating and air conditioning ........................4-92
Climate control system (Manual) ..................................4-81
Air conditioning ........................................................4-86
Climate control air filter............................................4-88
Heating and air conditioning ....................................4-82
Cigarette lighter ............................................................4-101
Climate control air filter ........................................4-88, 7-32
Clock (Digital) ..............................................................4-104
Clothes hanger ..............................................................4-105
Combined instrument, see instrument cluster ................4-41
Coolant ............................................................................7-23
Cooling fluid, see engine coolant ..................................7-23
Crankcase emission control system ................................7-75
Cup holder ....................................................................4-102
Curtain air bag ................................................................3-52Dashboard, see instrument cluster ..................................4-41
Daytime running light ....................................................4-67
Declaration of conformity ................................................8-7
Defogging (Windscreen) ................................................4-97
Defogging logic (Windscreen)........................................4-99
Defroster (Rear window) ................................................4-80
Defrosting (Windscreen) ................................................4-97
Digital clock..................................................................4-104
Dimensions ......................................................................8-2
Displays, see instrument cluster ....................................4-41
Door locks ......................................................................4-14
Central door lock switch ..........................................4-16
Child-protector rear door lock ..................................4-17
Drink holders, see cup holders ....................................4-102
Driver's air bag ................................................................3-46
Driving at night ..............................................................5-40
Driving in flooded areas ................................................5-42
Driving in the rain ..........................................................5-41D