2015 KIA CEED remote
[x] Cancel search: remotePage 82 of 1210
Features of your vehicle
Keys . . . . . . . . . . . . . . . . . . . . . . . . . . . . . . . . . . . . . 4-4• Record your key number . . . . . . . . . . . . . . . . . . . . . 4-4
• Key operations . . . . . . . . . . . . . . . . . . . . . . . . . . . . . . 4-4
• Immobilizer system . . . . . . . . . . . . . . . . . . . . . . . . . . 4-4
Remote keyless entry . . . . . . . . . . . . . . . . . . . . . . . 4-6 • Remote keyless entry system operations . . . . . . . . . 4-6
• Transmitter precautions . . . . . . . . . . . . . . . . . . . . . . 4-8
• Battery replacement . . . . . . . . . . . . . . . . . . . . . . . . . 4-9
Smart key . . . . . . . . . . . . . . . . . . . . . . . . . . . . . . . . 4-11 • Smart key function . . . . . . . . . . . . . . . . . . . . . . . . . . 4-11
• Smart key precautions. . . . . . . . . . . . . . . . . . . . . . . . 4-13
• Door lock/unlock in an emergency situation . . . . . . 4-13
Theft-alarm system . . . . . . . . . . . . . . . . . . . . . . . . 4-14 • Armed stage . . . . . . . . . . . . . . . . . . . . . . . . . . . . . . . . 4-14
• Theft-alarm stage . . . . . . . . . . . . . . . . . . . . . . . . . . . . 4-15
• Disarmed stage . . . . . . . . . . . . . . . . . . . . . . . . . . . . . . 4-16
Door locks . . . . . . . . . . . . . . . . . . . . . . . . . . . . . . . . 4-17 • From outside. . . . . . . . . . . . . . . . . . . . . . . . . . . . . . . . 4-17
• From inside . . . . . . . . . . . . . . . . . . . . . . . . . . . . . . . . . 4-18
• Deadlocks . . . . . . . . . . . . . . . . . . . . . . . . . . . . . . . . . . 4-20
• Door lock/unlock features . . . . . . . . . . . . . . . . . . . . . 4-20
• Child-protector rear door lock . . . . . . . . . . . . . . . . . 4-21
Tailgate . . . . . . . . . . . . . . . . . . . . . . . . . . . . . . . . . . 4-22 • Opening the tailgate. . . . . . . . . . . . . . . . . . . . . . . . . . 4-22
• Closing the tailgate . . . . . . . . . . . . . . . . . . . . . . . . . . 4-22
• Emergency tailgate safety release . . . . . . . . . . . . . . 4-23
Windows . . . . . . . . . . . . . . . . . . . . . . . . . . . . . . . . . 4-24 • Power windows. . . . . . . . . . . . . . . . . . . . . . . . . . . . . . 4-25
• Manual windows . . . . . . . . . . . . . . . . . . . . . . . . . . . . 4-27 Hood . . . . . . . . . . . . . . . . . . . . . . . . . . . . . . . . . . . . 4-28
• Opening the hood . . . . . . . . . . . . . . . . . . . . . . . . . . . . 4-28
• Closing the hood. . . . . . . . . . . . . . . . . . . . . . . . . . . . . 4-29
Fuel filler lid . . . . . . . . . . . . . . . . . . . . . . . . . . . . . . 4-30 • Opening the fuel filler lid . . . . . . . . . . . . . . . . . . . . . 4-30
• Closing the fuel filler lid . . . . . . . . . . . . . . . . . . . . . . 4-30
Panorama sunroof . . . . . . . . . . . . . . . . . . . . . . . . . 4-33 • Sunroof open warning . . . . . . . . . . . . . . . . . . . . . . . . 4-33
• Sunshade . . . . . . . . . . . . . . . . . . . . . . . . . . . . . . . . . . . 4-34
• Sliding the sunroof . . . . . . . . . . . . . . . . . . . . . . . . . . . 4-34
• Tilting the sunroof . . . . . . . . . . . . . . . . . . . . . . . . . . . 4-34
• Closing the sunroof . . . . . . . . . . . . . . . . . . . . . . . . . . 4-35
• Resetting the sunroof . . . . . . . . . . . . . . . . . . . . . . . . . 4-36
Steering wheel . . . . . . . . . . . . . . . . . . . . . . . . . . . . 4-37 • Electronic power steering . . . . . . . . . . . . . . . . . . . . . 4-37
• Tilt and telescopic steering . . . . . . . . . . . . . . . . . . . . 4-38
• Heated steering wheel . . . . . . . . . . . . . . . . . . . . . . . . 4-38
• Horn . . . . . . . . . . . . . . . . . . . . . . . . . . . . . . . . . . . . . . 4-39
• Flex steering wheel. . . . . . . . . . . . . . . . . . . . . . . . . . . 4-40
Mirrors . . . . . . . . . . . . . . . . . . . . . . . . . . . . . . . . . . 4-42 • Inside rearview mirror . . . . . . . . . . . . . . . . . . . . . . . 4-42
• Outside rearview mirror . . . . . . . . . . . . . . . . . . . . . . 4-43
Instrument cluster (Normal vision) . . . . . . . . . . . 4-46 • Instrument panel illumination . . . . . . . . . . . . . . . . . 4-47
• Gauges . . . . . . . . . . . . . . . . . . . . . . . . . . . . . . . . . . . . . 4-47
• Manual transaxle shift indicator . . . . . . . . . . . . . . . 4-49
• Automatic transaxle shift position indicator . . . . . . 4-49
• Double clutch transmission shift indicator . . . . . . . 4-50
• Speed limiter indicator . . . . . . . . . . . . . . . . . . . . . . . 4-51
4
JD eng 4a.QXP 3/4/2015 4:21 PM Page 1
Page 84 of 1210

• Glove box lamp . . . . . . . . . . . . . . . . . . . . . . . . . . . . . 4-125
Welcome system . . . . . . . . . . . . . . . . . . . . . . . . . . . 4-126 • Headlamp welcome . . . . . . . . . . . . . . . . . . . . . . . . . . 4-126
• Interior light . . . . . . . . . . . . . . . . . . . . . . . . . . . . . . . . 4-126
• Puddle lamp . . . . . . . . . . . . . . . . . . . . . . . . . . . . . . . . 4-126
Defroster . . . . . . . . . . . . . . . . . . . . . . . . . . . . . . . . . 4-127 • Rear window defroster . . . . . . . . . . . . . . . . . . . . . . . 4-127
Manual climate control system . . . . . . . . . . . . . . 4-128 • Heating and air conditioning . . . . . . . . . . . . . . . . . . 4-129
• System operation . . . . . . . . . . . . . . . . . . . . . . . . . . . . 4-133
• Climate control air filter . . . . . . . . . . . . . . . . . . . . . . 4-135
• Checking the amount of air conditioner refrigerant and compressor lubricant . . . . . . . . . . 4-136
Automatic climate control system . . . . . . . . . . . . 4-137 • Automatic heating and air conditioning . . . . . . . . . 4-138
• Manual heating and air conditioning . . . . . . . . . . . 4-140
• System operation . . . . . . . . . . . . . . . . . . . . . . . . . . . . 4-145
• Climate control air filter . . . . . . . . . . . . . . . . . . . . . . 4-147
• Checking the amount of air conditioner refrigerant and compressor lubricant . . . . . . . . . . 4-148
Windshield defrosting and defogging . . . . . . . . . 4-149 • Manual climate control system. . . . . . . . . . . . . . . . . 4-149
• Automatic climate control system . . . . . . . . . . . . . . 4-150
Clean air . . . . . . . . . . . . . . . . . . . . . . . . . . . . . . . . . 4-151
Storage compartment . . . . . . . . . . . . . . . . . . . . . . 4-152 • Center console storage. . . . . . . . . . . . . . . . . . . . . . . . 4-152
• Sliding armrest . . . . . . . . . . . . . . . . . . . . . . . . . . . . . . 4-152
• Glove box . . . . . . . . . . . . . . . . . . . . . . . . . . . . . . . . . . 4-153
• Cool box . . . . . . . . . . . . . . . . . . . . . . . . . . . . . . . . . . . 4-153 • Sunglass holder . . . . . . . . . . . . . . . . . . . . . . . . . . . . . 4-154
• Luggage tray. . . . . . . . . . . . . . . . . . . . . . . . . . . . . . . . 4-154
• Luggage side tray . . . . . . . . . . . . . . . . . . . . . . . . . . . . 4-155
Interior features . . . . . . . . . . . . . . . . . . . . . . . . . . . 4-155 • Cigarette lighter . . . . . . . . . . . . . . . . . . . . . . . . . . . . . 4-155
• Ashtray . . . . . . . . . . . . . . . . . . . . . . . . . . . . . . . . . . . . 4-156
• Cup holder . . . . . . . . . . . . . . . . . . . . . . . . . . . . . . . . . 4-157
• Bottle holder . . . . . . . . . . . . . . . . . . . . . . . . . . . . . . . . 4-158
• Sunvisor . . . . . . . . . . . . . . . . . . . . . . . . . . . . . . . . . . . 4-158
• Power outlet . . . . . . . . . . . . . . . . . . . . . . . . . . . . . . . . 4-159
• Aux, USB and iPod . . . . . . . . . . . . . . . . . . . . . . . . . . 4-160
• Clothes hanger . . . . . . . . . . . . . . . . . . . . . . . . . . . . . . 4-161
• Floor mat anchor(s) . . . . . . . . . . . . . . . . . . . . . . . . . . 4-161
• Luggage net (holder) . . . . . . . . . . . . . . . . . . . . . . . . . 4-162
• Cargo area cover . . . . . . . . . . . . . . . . . . . . . . . . . . . . 4-162
• Barrier net . . . . . . . . . . . . . . . . . . . . . . . . . . . . . . . . . 4-163
• Cargo security screen . . . . . . . . . . . . . . . . . . . . . . . . 4-166
• Luggage rail system . . . . . . . . . . . . . . . . . . . . . . . . . . 4-167
• Shopping bag holder . . . . . . . . . . . . . . . . . . . . . . . . . 4-168
Exterior features . . . . . . . . . . . . . . . . . . . . . . . . . . 4-169 • Mounting bracket for roof carrier . . . . . . . . . . . . . . 4-169
• Roof rack . . . . . . . . . . . . . . . . . . . . . . . . . . . . . . . . . . 4-170
Audio system . . . . . . . . . . . . . . . . . . . . . . . . . . . . . 4-172 • Antenna . . . . . . . . . . . . . . . . . . . . . . . . . . . . . . . . . . . . 4-172
• Audio remote control . . . . . . . . . . . . . . . . . . . . . . . . . 4-173
• How car audio works. . . . . . . . . . . . . . . . . . . . . . . . . 4-174
4
JD eng 4a.QXP 3/4/2015 4:21 PM Page 3
Page 87 of 1210

Features of your vehicle
6
4
Remote keyless entry system operations
Type A, B
• To unfold the key, press the release
button then the key will unfold automat-
ically.
• To fold the key, fold the key manually while pressing the release button.
Type C
• To remove the mechanical key, press and hold the release button and
remove the mechanical key.
• To reinstall the mechanical key, put the key into the hole and push it until a
click sound is heard.
REMOTE KEYLESS ENTRY (IF EQUIPPED)
CAUTION
Do not fold the key without press-
ing the release button. This maydamage the key.
OAM049096L
OJD043244
OJD042002
■ Type B
■
Type A
■ Type C
OXM049003
OJD043245
OJD042001
■ Type B
■
Type A
■ Type C
JD eng 4a.QXP 3/4/2015 4:21 PM Page 6
Page 92 of 1210

411
Features of your vehicle
SMART KEY (IF EQUIPPED)
Smart key function
1. Door lock
2. Door unlock
3. Tailgate unlock
With a smart key, you can lock or unlock
a door and tailgate and even start the
engine without inserting the key.
The functions of the buttons on a smart
key are similar to the remote keyless
entry. Refer to the “Remote keyless
entry” in this chapter. Carrying the smart key, you may lock and
unlock the vehicle doors and tailgate.
Also, you may start the engine. Refer to
the following, for more details.
Locking
1. Carry the smart key.
2. Close all doors.
3. Press the button of the outside door
handle.
4. The hazard warning lights will blink once (the engine hood and tailgate
must be closed). Also, the outside
rearview mirror will automatically fold
if the outside rearview mirror folding
switch is in the AUTO position (if equipped).
5. Make sure that doors are locked by pulling the outside door handle.
✽NOTICE
• The button will only operate when the smart key is within 0.7 m (28 in.) from
the outside door handle.
• Even though you press the outside
door handle button, the doors will not
lock and the chime will sound for 3
seconds if any of following occur:- The smart key is in the vehicle.
- The engine start/stop button is in ACC or ON position.
- Any door except the tailgate is opened.
OJD042001OJD042008
JD eng 4a.QXP 3/4/2015 4:21 PM Page 11
Page 124 of 1210

443
Features of your vehicle
To operate the electric rearview mirror:
• Press the on/off button (1) to turn theautomatic dimming function on. The
mirror indicator light will illuminate.
Press the on/off button to turn the auto-
matic dimming function off. The mirror
indicator light will turn off.
• The mirror defaults to the ON position whenever the ignition switch is turnedon. Outside rearview mirror
Be sure to adjust mirror angles before
driving.
Your vehicle is equipped with both left-
hand and right-hand outside rearview
mirrors. The mirrors can be adjusted
remotely with the remote switch. The mir-
ror heads can be folded back to prevent
damage during an automatic car wash or
when passing in a narrow street.
OMD040032
IndicatorWARNING -
Rearview mir-
rors
• The outside rearview mirror is convex. Objects seen in the mir-
ror are closer than they appear.
• Use your interior rearview mirror or direct observation to deter-
mine the actual distance of fol-
lowing vehicles when changing lanes.
CAUTION
Do not scrape ice off the mirror
face; this may damage the surface of the glass. If ice should restrictmovement of the mirror, do notforce the mirror for adjustment. To
remove ice, use a deicer spray, or a sponge or soft cloth with very warmwater.
CAUTION
If the mirror is jammed with ice, do not adjust the mirror by force. Usean approved spray de-icer (not radi- ator antifreeze) to release the
frozen mechanism or move thevehicle to a warm place and allow
the ice to melt.
WARNING
Do not adjust or fold the outside
rearview mirrors while the vehicle
is moving. This could result in loss
of control, and an accident which
could cause death, serious injury
or property damage.
JD eng 4a.QXP 3/4/2015 4:23 PM Page 43
Page 125 of 1210

Features of your vehicle
44
4
Remote control
The electric remote control mirror switch
allows you to adjust the position of the
left and right outside rearview mirrors. To
adjust the position of either mirror, move
the lever (1) to R (Right) or L (Left) to
select the right side mirror or the left side
mirror, then press a corresponding pointon the mirror adjustment control to posi-
tion the selected mirror up, down, left or
right.
After adjustment, put the lever into neu-
tral (center) position to prevent inadver-tent adjustment.
Folding the outside rearview mirror
Manual type
To fold outside rearview mirror, grasp the
housing of mirror and then fold it toward
the rear of the vehicle.
CAUTION
• The mirrors stop moving when
they reach the maximum adjust-ing angles, but the motor contin-ues to operate while the switch ispressed. Do not press the switch
longer than necessary, the motor may be damaged.
• Do not attempt to adjust the out- side rearview mirror by hand.
Doing so may damage the parts.
OJD042033OJD042034
JD eng 4a.QXP 3/4/2015 4:24 PM Page 44
Page 254 of 1210

4 173
Features of your vehicle
Audio remote control (if equipped)
The steering wheel audio remote control
button is installed to promote safe driving.
VOL (+/ -) (1)
• Push up the lever to increase volume.
Push down the lever to decrease vol-ume.
SEEK ( / ) (2)
The SEEK/PRESET button has different
functions base on the system mode. For
the following functions the button should
be pressed for 0.8 seconds or more.
RADIO mode
It will function as the AUTO SEEK select
button.
CDP mode
It will function as the FF/REW button.
If the SEEK button is pressed for less
than 0.8 second, it will work as follows in
each mode. RADIO mode
It will function as the PRESET STATION
select buttons.
CDP mode
It will function as the TRACK UP/DOWN
button.
Detailed information for audio control
buttons are described in the followingpages in this section.
MUTE (3)
Press the MUTE button to cancel the
sound.
Press the MUTE button again to acti- vate the sound.
MODE (4)
Press the button to select Radio or CD (compact disc).
CAUTION
Do not operate the audio remote
control buttons simultaneously.
OJD042149
■ Type B OJD042147
■
Type A
JD eng 4b(~211).QXP 3/4/2015 4:39 PM Page 173
Page 283 of 1210
Features of your vehicle
202
4
PHONE (if equipped)
Before using the
Bluetooth®Wireless
Technology
phone features
In order to use
Bluetooth®Wireless
Technologyphone, you must first pair
and connect the Bluetooth®Wireless
Technologymobile phone.
If the mobile phone is not paired or con- nected, it is not possible to enter Phone
mode. Once a phone is paired or con-nected, the guidance screen will be dis-
played.
If Priority is set upon vehicle ignition (IGN/ACC ON), the
Bluetooth®Wireless
Technologyphone will be automatically
connected. Even if you are outside, the
Bluetooth®Wireless Technologyphone
will be automatically connected once
you are in the vicinity of the vehicle. If
you do not want automatic
Bluetooth®
Wireless Technologyphone connection,
set the Bluetooth®Wireless Technologyto OFF. Making a call using the Steering
remote controller
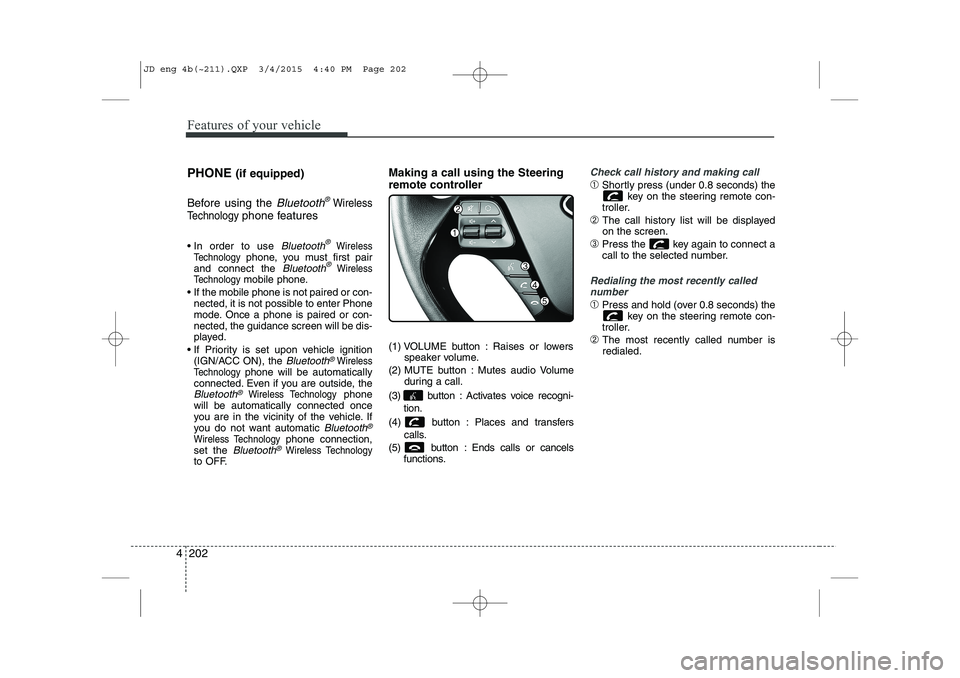
(1) VOLUME button : Raises or lowers
speaker volume.
(2) MUTE button : Mutes audio Volume during a call.
(3) button : Activates voice recogni- tion.
(4) button : Places and transfers calls.
(5) button : Ends calls or cancels functions.
Check call history and making call
➀Shortly press (under 0.8 seconds) the
key on the steering remote con-
troller.
➁ The call history list will be displayed on the screen.
➂ Press the key again to connect a
call to the selected number.
Redialing the most recently called
number
➀ Press and hold (over 0.8 seconds) the
key on the steering remote con-
troller.
➁ The most recently called number is redialed.
JD eng 4b(~211).QXP 3/4/2015 4:40 PM Page 202