2015 KIA CEED tailgate
[x] Cancel search: tailgatePage 953 of 1210

53
Driving your vehicle
WARNING- ENGINE EXHAUST CAN BE DANGEROUS!
Engine exhaust fumes can be extremely dangerous. If, at any time, you smell exhaust fumes inside the vehicle, open the win-
dows immediately.
• Do not inhale exhaust fumes.
Exhaust fumes contain carbon monoxide, a colourless, odourless gas that can cause unconsciousness and death by asphyx- iation.
Be sure the exhaust system does not leak. The exhaust system should be checked whenever the vehicle is raised to change the oil or for any other purpose. If you hear
a change in the sound of the exhaust or if you drive over something that strikes the underneath side of the vehicle, we rec-
ommend that the system be checked by an authorised Kia dealer.
Do not run the engine in an enclosed area. Letting the engine idle in your garage, even with the garage door open, is a hazardous practice. Never run the engine in your
garage any longer than it takes to start the engine and back the vehicle out.
Avoid idling the engine for prolonged periods with people inside the vehicle. If it is necessary to idle the engine for a prolonged period with people inside the vehicle, be sure to do so only in an open a rea
with the air intake set at "Fresh" and fan operating at one of the higher speeds so fresh air is drawn into the interior.
If you must drive with the tailgate/boot open because you are carrying objects that make this necessary:
1. Close all windows.
2. Open side vents.
3. Set the air intake control at "Fresh", the air flow control at "Floor" or "Face" and the fan at one of the higher speeds.
To assure proper operation of the ventilation system, be sure the ventilation air intakes located just in front of the windscre en
are kept clear of snow, ice, leaves or other obstructions.
JD RHD 5.QXP 2/17/2015 10:32 AM Page 3
Page 988 of 1210

Driving your vehicle
38
5
To release EPB (electric parking brake)
automatically:
Manual transaxle vehicle
1. Start the engine.
2. Fasten the driver's seat belt.
3. Close the driver's door, engine bon- net and tailgate.
4. Depress the clutch pedal with the gear engaged.
5. Depress the accelerator pedal whilst releasing the clutch pedal.
Automatic transaxle vehicle 1. Start the engine.
2. Fasten the driver's seat belt.
3. Close the driver's door, engine bon- net and tailgate.
4. Depress the accelerator pedal whilst the shift lever is in R (Rear), D
(Drive).
Shift lever in P (Park) With the engine running depress thebrake pedal and shift out of P (Park) to
R (Rear) or D (Drive).
Shift lever in N (Neutral) With the engine running depress the
brake pedal and shift out of N (Neutral)
to R (Rear) or D (Drive).
Make sure the brake warning light goes
off.✽✽ NOTICE
For your safety, you can engage the EPB even though the ignition switch or
engine stop/start button is in the OFF
position, but you cannot release it.
For your safety, depress the brake
pedal and release the parking brake
manually with the EPB switch when
you drive downhill or when backing up
the vehicle.
✽
✽ NOTICE - Manual transaxle
A vehicle towing a trailer on a hill or on
an incline may slightly roll backwards
when starting the vehicle. To prevent the
situation follow the below instructions.
1. Depress the clutch pedal and select a gear.
2. Keep pulling up the EPB switch.
3. Depress the accelerator pedal and slowly release the clutch pedal.
4. If the vehicle starts off with enough driving power release the EPB switch.
Do not follow the above procedure when
driving on a flat level ground. The vehi-
cle may suddenly move forward.
CAUTION
If the parking brake warning light is still on even though the EPB
has been released, we recom-mend that the system be checkedby an authorised Kia dealer.
Do not drive your vehicle with the EPB applied. It may cause exces-sive brake pad and brake rotor wear.
JD RHD 5.QXP 2/17/2015 10:34 AM Page 38
Page 1060 of 1210

What to do in an emergency
30
6
CAUTION
Failure to place the transaxle shift
lever in N (Neutral) may cause inter-
nal damage to the transaxle.
OJD062008
■ Rear (3 Door and 5 Door)
OJD062012
■Rear (wagon)
■ Front
OJD062009
OJD062010
When towing your vehicle in an emer- gency without wheel dollies :
1. Set the ignition switch in the ACC posi-
tion.
2. Place the transaxle shift lever in N (Neutral).
3. Release the parking brake.
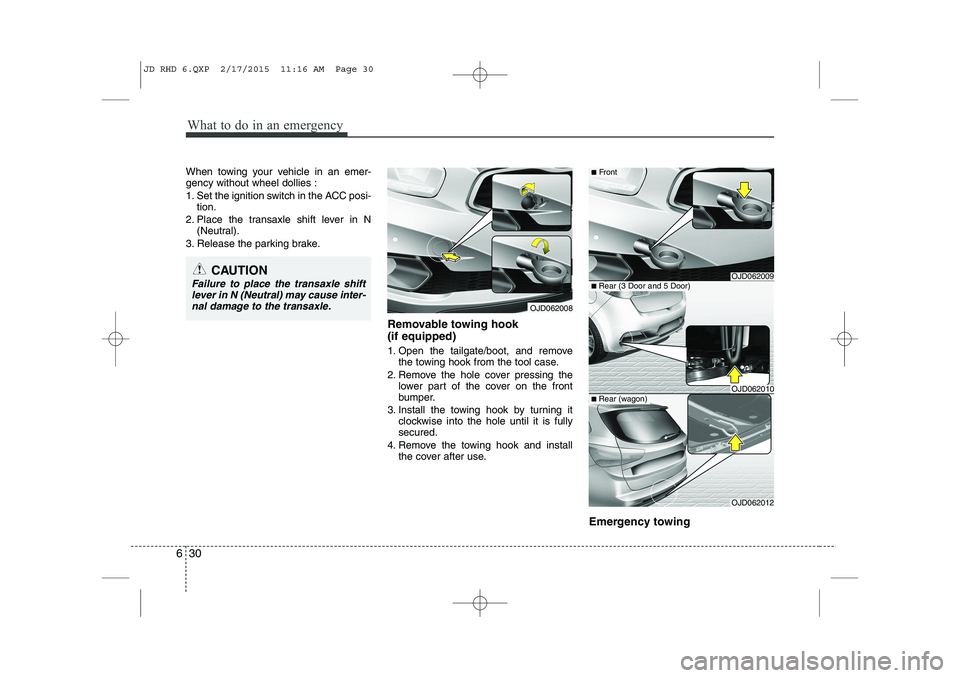
Removable towing hook (if equipped)
1. Open the tailgate/boot, and removethe towing hook from the tool case.
2. Remove the hole cover pressing the lower part of the cover on the front
bumper.
3. Install the towing hook by turning it clockwise into the hole until it is fullysecured.
4. Remove the towing hook and install the cover after use.
Emergency towing
JD RHD 6.QXP 2/17/2015 11:16 AM Page 30
Page 1169 of 1210

Maintenance
106
7
❈ The actual rear combination lamp shape in
the vehicle may differ from illustration.
Outside light
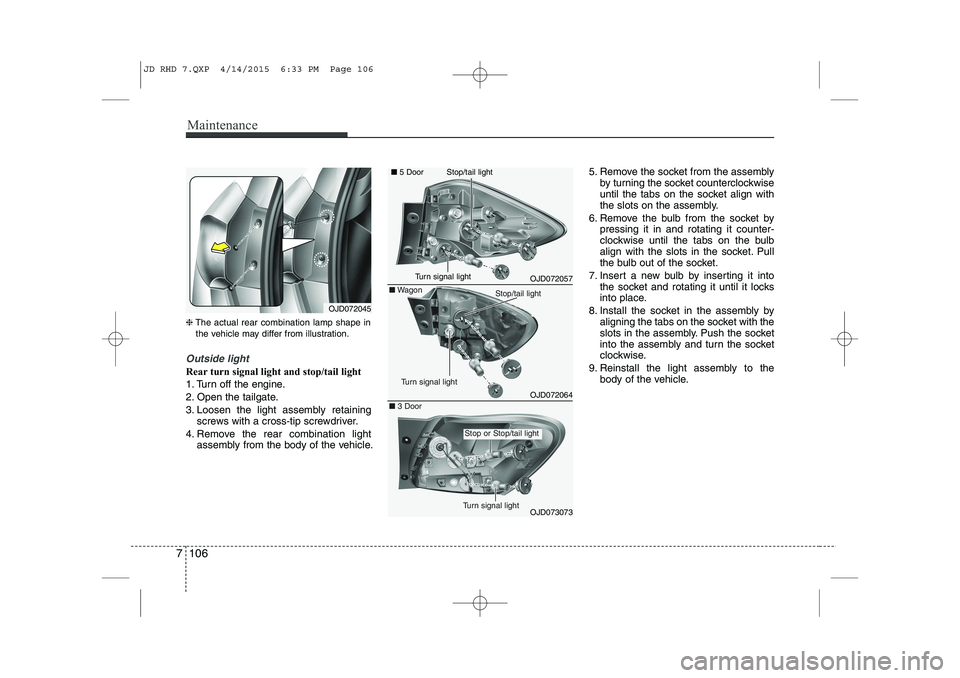
Rear turn signal light and stop/tail light
1. Turn off the engine.
2. Open the tailgate.
3. Loosen the light assembly retaining
screws with a cross-tip screwdriver.
4. Remove the rear combination light assembly from the body of the vehicle. 5. Remove the socket from the assembly
by turning the socket counterclockwise
until the tabs on the socket align with
the slots on the assembly.
6. Remove the bulb from the socket by pressing it in and rotating it counter-
clockwise until the tabs on the bulb
align with the slots in the socket. Pull
the bulb out of the socket.
7. Insert a new bulb by inserting it into the socket and rotating it until it locks
into place.
8. Install the socket in the assembly by aligning the tabs on the socket with the
slots in the assembly. Push the socket
into the assembly and turn the socket
clockwise.
9. Reinstall the light assembly to the body of the vehicle.
OJD072045
OJD072057
OJD072064
■
5 Door
■Wagon
OJD073073
■ 3 Door
Turn signal light
Stop/tail light
Stop or Stop/tail light
Turn signal light
Stop/tail light
Turn signal light
JD RHD 7.QXP 4/14/2015 6:33 PM Page 106
Page 1170 of 1210

7 107
Maintenance
Stop and tail light or tail light (LED type)
If the light does not operate, we recom-
mend that the system be checked by an
authorised Kia dealer.
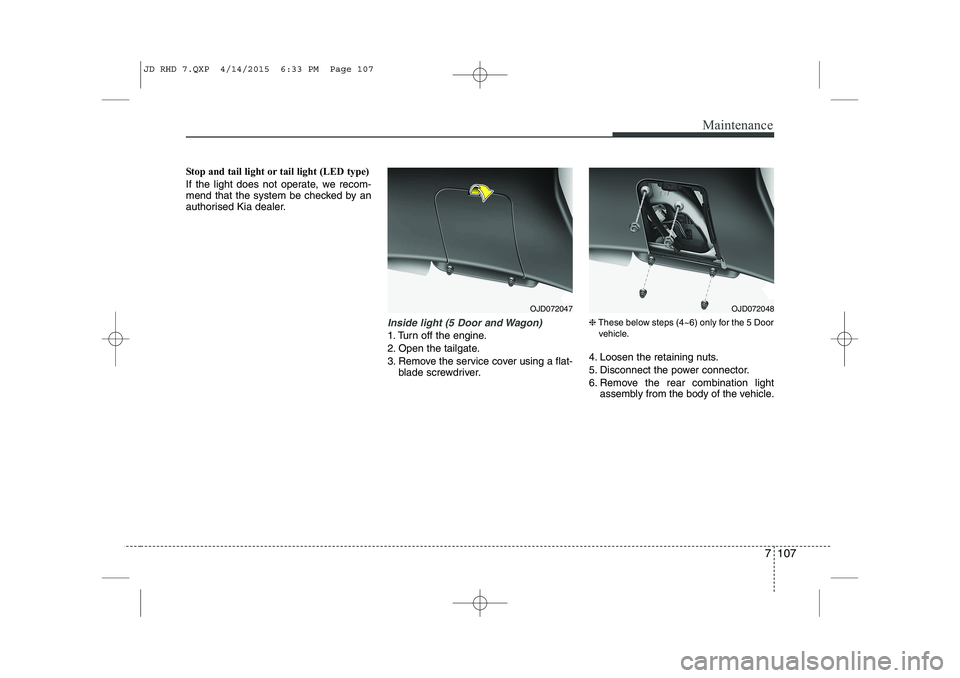
Inside light (5 Door and Wagon)
1. Turn off the engine.
2. Open the tailgate.
3. Remove the service cover using a flat-blade screwdriver. ❈
These below steps (4~6) only for the 5 Door
vehicle.
4. Loosen the retaining nuts.
5. Disconnect the power connector.
6. Remove the rear combination light assembly from the body of the vehicle.
OJD072047OJD072048
JD RHD 7.QXP 4/14/2015 6:33 PM Page 107
Page 1209 of 1210

Index
12
I
Tilt and telescopic steering . . . . . . . . . . . . . . . . . . . 4-38
Storage compartment . . . . . . . . . . . . . . . . . . . . . . . . 4-152 Centre console storage . . . . . . . . . . . . . . . . . . . . . . 4-152
Cool box . . . . . . . . . . . . . . . . . . . . . . . . . . . . . . . . . . 4-153
Glove box . . . . . . . . . . . . . . . . . . . . . . . . . . . . . . . . . 4-153
Luggage side tray . . . . . . . . . . . . . . . . . . . . . . . . . 4-155
Luggage tray . . . . . . . . . . . . . . . . . . . . . . . . . . . . . . 4-154
Sliding armrest . . . . . . . . . . . . . . . . . . . . . . . . . . . . 4-152
Sunglass holder . . . . . . . . . . . . . . . . . . . . . . . . . . . . 4-154
Sunroof, see panorama sunroof. . . . . . . . . . . . . . . . . 4-33
Sunvisor . . . . . . . . . . . . . . . . . . . . . . . . . . . . . . . . . . . 4-158
Tachometer (Normal vision) . . . . . . . . . . . . . . . . . . . 4-47
Tachometer (Super vision) . . . . . . . . . . . . . . . . . . . . . 4-61
Tailgate . . . . . . . . . . . . . . . . . . . . . . . . . . . . . . . . . . . . . 4-22
Tether anchor system . . . . . . . . . . . . . . . . . . . . . . . . . 3-36
Theft-alarm system . . . . . . . . . . . . . . . . . . . . . . . . . . . 4-14
Tilt and telescopic steering. . . . . . . . . . . . . . . . . . . . . 4-38
Towing . . . . . . . . . . . . . . . . . . . . . . . . . . . . . . . . . . . . . 6-29
Trailer towing . . . . . . . . . . . . . . . . . . . . . . . . . . . . . . . 5-71
Transaxle
Automatic transaxle . . . . . . . . . . . . . . . . . . . . . . . . . 5-23
Double clutch transmission . . . . . . . . . . . . . . . . . . . 5-23
Manual transaxle . . . . . . . . . . . . . . . . . . . . . . . . . . . 5-20
Trip computer (Normal vision) . . . . . . . . . . . . . . . . . 4-51 Service mode . . . . . . . . . . . . . . . . . . . . . . . . . . . . . . . 4-55
User Settings . . . . . . . . . . . . . . . . . . . . . . . . . . . . . . . 4-56
Trip computer (Super vision) . . . . . . . . . . . . . . . . . . 4-67
Driving information mode . . . . . . . . . . . . . . . . . . . . 4-68
Lane Departure Warning System Mode . . . . . . . . 4-69
Service mode . . . . . . . . . . . . . . . . . . . . . . . . . . . . . . . 4-70
User Settings . . . . . . . . . . . . . . . . . . . . . . . . . . . . . . . 4-71
Turn signals . . . . . . . . . . . . . . . . . . . . . . . . . . . . . . . . 4-115
Tyre chains. . . . . . . . . . . . . . . . . . . . . . . . . . . . . . . . . . 5-68
Tyre pressure monitoring system (TPMS) . . . . . . . . 6-24
Tyre rotation . . . . . . . . . . . . . . . . . . . . . . . . . . . . . . . . 7-59
Tyre specification and pressure label . . . . . . . . . . . . 8-12
Tyres and wheels . . . . . . . . . . . . . . . . . . . . . . . . . 7-56, 8-7
Checking tyre inflation pressure . . . . . . . . . . . . . . . 7-58
Compact spare tyre replacement . . . . . . . . . . . . . . 7-62
Low aspect ratio tyre . . . . . . . . . . . . . . . . . . . . . . . . 7-67
Recommended cold tyre inflation pressures . . . . . 7-56
Tyre care . . . . . . . . . . . . . . . . . . . . . . . . . . . . . . . . . . 7-56
Tyre maintenance . . . . . . . . . . . . . . . . . . . . . . . . . . . 7-62
Tyre replacement . . . . . . . . . . . . . . . . . . . . . . . . . . . 7-60
Tyre rotation . . . . . . . . . . . . . . . . . . . . . . . . . . . . . . . 7-59
Tyre sidewall labeling . . . . . . . . . . . . . . . . . . . . . . . . 7-62
Tyre traction . . . . . . . . . . . . . . . . . . . . . . . . . . . . . . . 7-62
Wheel alignment and tyre balance . . . . . . . . . . . . . 7-60
Wheel replacement . . . . . . . . . . . . . . . . . . . . . . . . . . 7-62
T
JD RHD Index.QXP 2/17/2015 12:03 PM Page 12