2015 JEEP RENEGADE audio
[x] Cancel search: audioPage 114 of 220
The USB device battery charges when plugged into the USB port (if supported by the
specific device).
• To route the USB/iPod®cable out of the center console, use the access cut out.
NOTE:
• When connecting your iPod®device for the first time, the system may take several
minutes to read your music, depending on the number of files. For example, the
system will take approximately five minutes for every 1,000 songs loaded on the
device. Also during the reading process, the Shuffle and Browse functions will be
disabled. This process ensures the full use of your iPod®features and only
happens the first time it is connected. After the first time, the reading process of
your iPod®will take considerably less time unless changes are made or new songs
are added to the play list.
• The USB port supports certain Mini, Classic, Nano, Touch, and iPhone®devices.
The USB port also supports playing music from compatible external USB Mass
Storage Class memory devices. Some iPod®software versions may not fully
support the USB port features. Please visit Apple’s website for iPod®software
updates.
Bluetooth® Streaming Audio
If equipped with Uconnect®Voice Command, your Bluetooth®-equipped iPod®
devices, cell phones or other media players, may also be able to stream music to your
vehicle's sound system. Your connected device must be Bluetooth®-compatible, and
paired with your system (see Uconnect®Phone for pairing instructions). You can
access the music from your connected Bluetooth®device by pressing the
“Bluetooth®” button on the touchscreen while in Media mode.
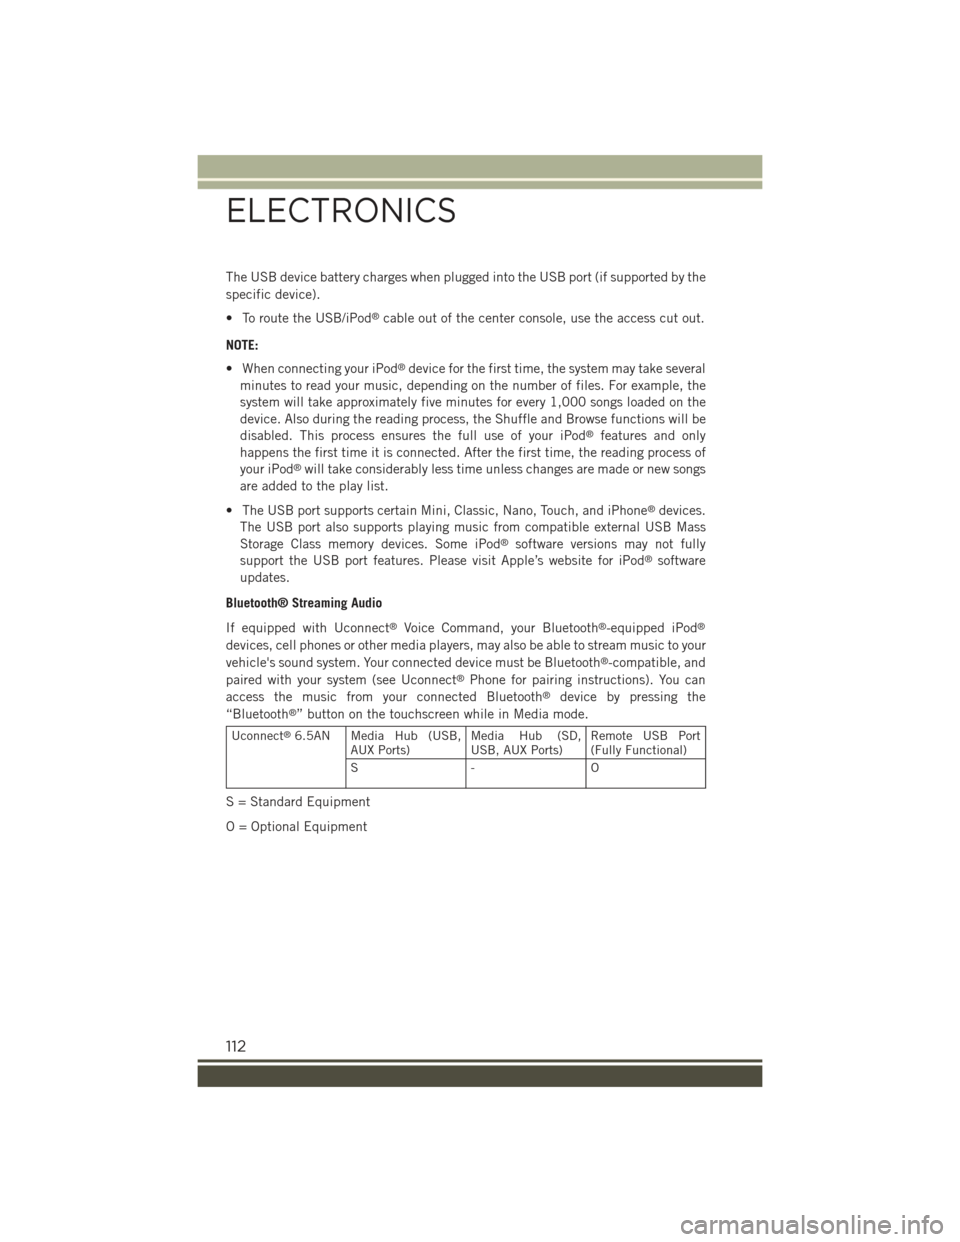
Uconnect®6.5AN Media Hub (USB,AUX Ports)Media Hub (SD,USB, AUX Ports)Remote USB Port(Fully Functional)
S- O
S = Standard Equipment
O = Optional Equipment
ELECTRONICS
112
Page 134 of 220
Select The iPhone's Priority Level
When the pairing process has successfully completed, the system will prompt you to
choose whether or not this is your favorite mobile phone. Selecting “Yes” will make
this mobile phone the highest priority. This mobile phone will take precedence over
other paired mobile phones within range and will connect to the Uconnect®system
automatically when entering the vehicle. Only one mobile phone and/or one
Bluetooth®audio device can be connected to the Uconnect®system at a time. If
“No” is selected, simply select “Uconnect” from the mobile phone/audio device
Bluetooth®screen, and the Uconnect®system will reconnect to the Bluetooth®
device.
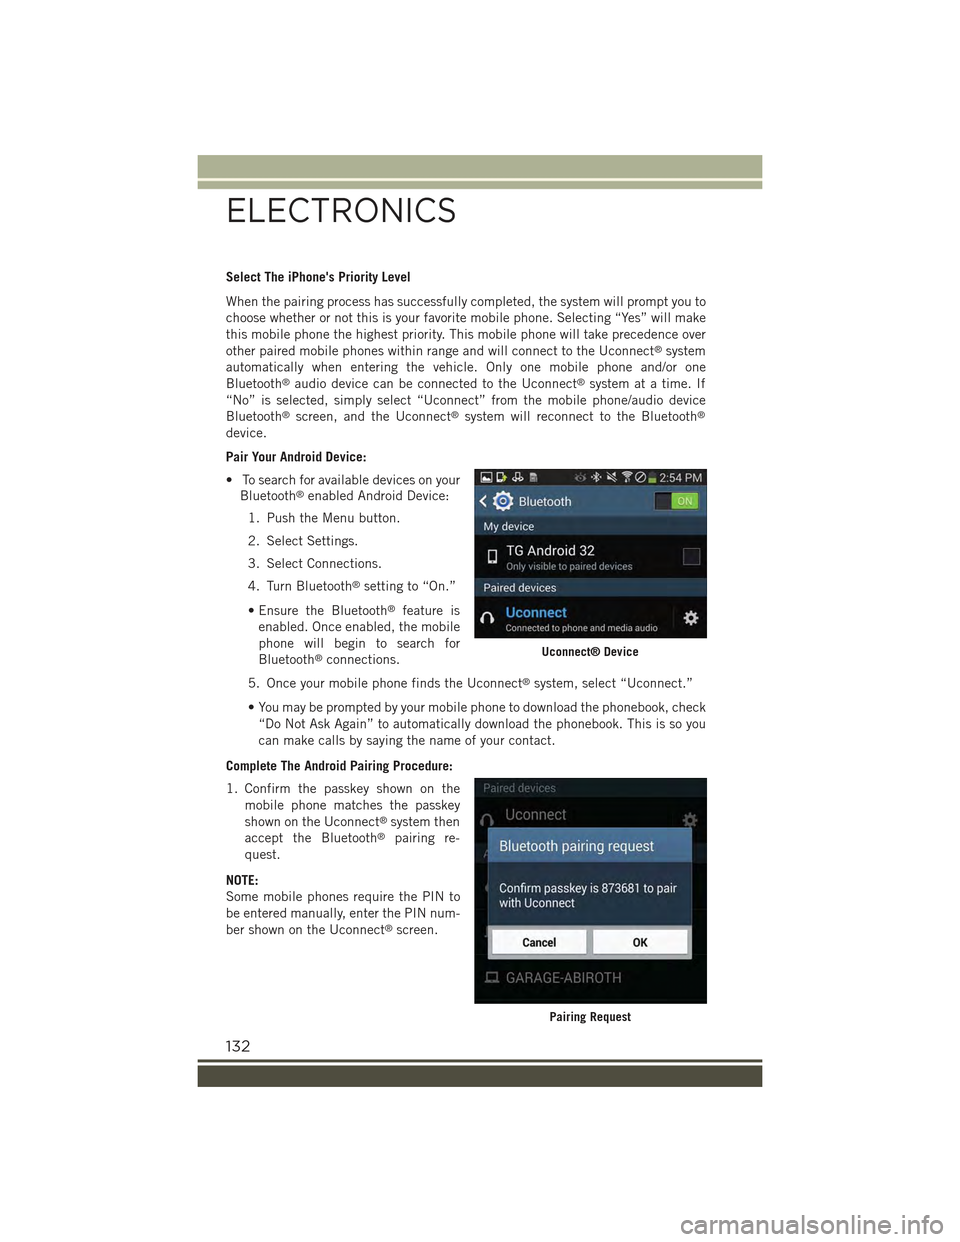
Pair Your Android Device:
• To search for available devices on your
Bluetooth®enabled Android Device:
1. Push the Menu button.
2. Select Settings.
3. Select Connections.
4. Turn Bluetooth®setting to “On.”
• Ensure the Bluetooth®feature is
enabled. Once enabled, the mobile
phone will begin to search for
Bluetooth®connections.
5. Once your mobile phone finds the Uconnect®system, select “Uconnect.”
• You may be prompted by your mobile phone to download the phonebook, check
“Do Not Ask Again” to automatically download the phonebook. This is so you
can make calls by saying the name of your contact.
Complete The Android Pairing Procedure:
1. Confirm the passkey shown on the
mobile phone matches the passkey
shown on the Uconnect®system then
accept the Bluetooth®pairing re-
quest.
NOTE:
Some mobile phones require the PIN to
be entered manually, enter the PIN num-
ber shown on the Uconnect®screen.
Uconnect® Device
Pairing Request
ELECTRONICS
132
Page 135 of 220
Select The Android Mobile Phone's Priority Level
When the pairing process has successfully completed, the system will prompt you to
choose whether or not this is your favorite mobile phone. Selecting “Yes” will make
this mobile phone the highest priority. This mobile phone will take precedence over
other paired mobile phones within range and will connect to the Uconnect®system
automatically when entering the vehicle. Only one mobile phone and/or one
Bluetooth®audio device can be connected to the Uconnect®system at a time. If
“No” is selected, simply select “Uconnect” from the mobile phone/audio device
Bluetooth®screen, and the Uconnect®system will reconnect to the Bluetooth®
device.
You are now ready to make hands-free calls. Press the Uconnect®“Phone” button
on your steering wheel to begin.
NOTE:
Refer to UconnectPhone.com website for additional information on mobile phone
pairing and for a list of compatible phones.
Common Phone Commands (Examples)
• “Call John Smith”
• “Call John Smith mobile”
• “Dial 1 248 555 1212”
• “Redial”
Mute (Or Unmute) Microphone During Call
• During a call, press the “Mute” button on the Phone main screen to mute and
unmute the call.
Transfer Ongoing Call Between Handset And Vehicle
• During an on-going call, press the “Transfer” button on the Phone main screen to
transfer an on-going call between handset and vehicle.
Phonebook
The Uconnect®system will automatically sync your phonebook from your paired
phone, if this feature is supported by your phone. Phonebook contacts are updated
each time that the phone is connected. If your phone book entries do not appear,
check the settings on your phone. Some phones require you to enable this feature
manually.
• Your phonebook can be browsed on the Uconnect®system touchscreen, but
editing can only be done on your phone. To browse, press the “Phone” button on
the touchscreen, then the “Phonebook” button on the touchscreen.
Favorite phonebook entries can be saved as Favorites for quicker access. Favorites
are shown at the top of the main phone screen.
ELECTRONICS
133
Page 136 of 220
Voice Command Tips
• Speaking complete names (i.e; Call John Doe vs. Call John) will result in greater
system accuracy.
• You can “link” commands together for faster results. Say “Call John Doe, mobile,”
for example.
• If you are listening to available voice command options, you do not have to listen
to the entire list. When you hear the command that you need, push the
button on the steering wheel, wait for the beep and say your command.
Changing The Volume
• Start a dialogue by pushing the Phone button, then say a command for
example - "Help."
• Use the radio VOLUME/MUTE rotary knob to adjust the volume to a comfortable
level while the Uconnect®system is speaking. Please note the volume setting for
Uconnect®is different than the audio system.
NOTE:
To access help, push the Uconnect®Phone buttonon the steering wheel and
say "help." Press the display or press either the Phoneor VRbutton and
say "cancel" to cancel the help session.
Incoming Text Messages
After pairing your Uconnect®system with a Bluetooth®enabled mobile device with
the Message Access Profile (MAP), the Uconnect®system can announce a new
incoming text message and read it to you over the vehicle’s audio system.
NOTE:
Only incoming text messages received during the current ignition cycle can be
viewed/read.
To enable incoming text messaging:
iPhone®
1. Press the settings button on the mobile phone.
2. Select Bluetooth®.
• Ensure Bluetooth is enabled, and the mobile phone is paired to the Uconnect®
system.
3. Selectlocated under DEVICES next to Uconnect.
ELECTRONICS
134
Page 138 of 220
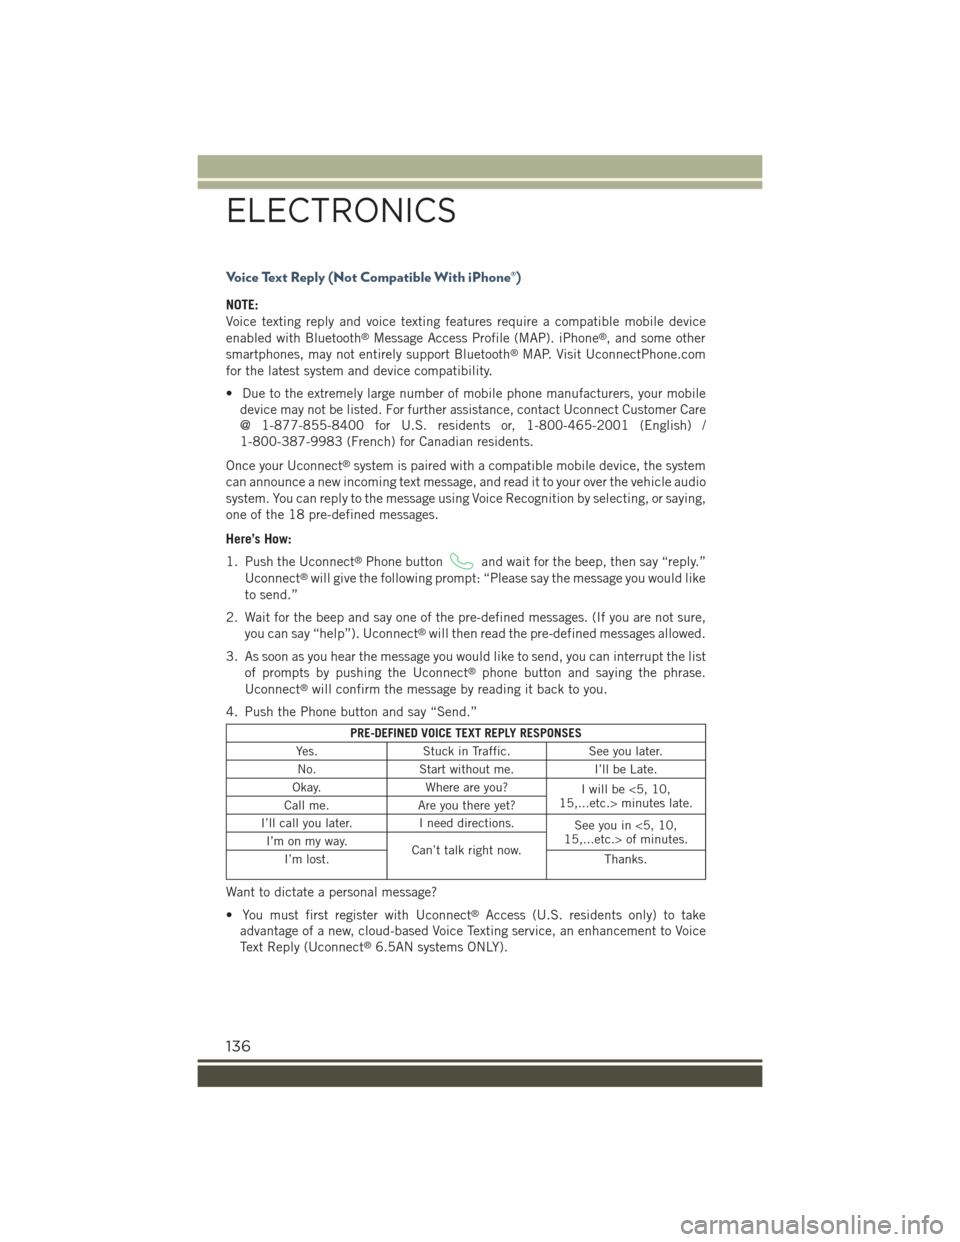
Voice Text Reply (Not Compatible With iPhone®)
NOTE:
Voice texting reply and voice texting features require a compatible mobile device
enabled with Bluetooth®Message Access Profile (MAP). iPhone®, and some other
smartphones, may not entirely support Bluetooth®MAP. Visit UconnectPhone.com
for the latest system and device compatibility.
• Due to the extremely large number of mobile phone manufacturers, your mobile
device may not be listed. For further assistance, contact Uconnect Customer Care
@ 1-877-855-8400 for U.S. residents or, 1-800-465-2001 (English) /
1-800-387-9983 (French) for Canadian residents.
Once your Uconnect®system is paired with a compatible mobile device, the system
can announce a new incoming text message, and read it to your over the vehicle audio
system. You can reply to the message using Voice Recognition by selecting, or saying,
one of the 18 pre-defined messages.
Here’s How:
1. Push the Uconnect®Phone buttonand wait for the beep, then say “reply.”
Uconnect®will give the following prompt: “Please say the message you would like
to send.”
2. Wait for the beep and say one of the pre-defined messages. (If you are not sure,
you can say “help”). Uconnect®will then read the pre-defined messages allowed.
3. As soon as you hear the message you would like to send, you can interrupt the list
of prompts by pushing the Uconnect®phone button and saying the phrase.
Uconnect®will confirm the message by reading it back to you.
4. Push the Phone button and say “Send.”
PRE-DEFINED VOICE TEXT REPLY RESPONSES
Yes.Stuck in Traffic.See you later.
No.Start without me.I’ll be Late.
Okay.Where are you?Iwillbe<5,10,15,...etc.> minutes late.Call me.Are you there yet?
I’ll call you later.I need directions.See you in <5, 10,15,...etc.> of minutes.I’m on my way.Can’t talk right now.I’m lost.Thanks.
Want to dictate a personal message?
• You must first register with Uconnect®Access (U.S. residents only) to take
advantage of a new, cloud-based Voice Texting service, an enhancement to Voice
Text Reply (Uconnect®6.5AN systems ONLY).
ELECTRONICS
136
Page 140 of 220
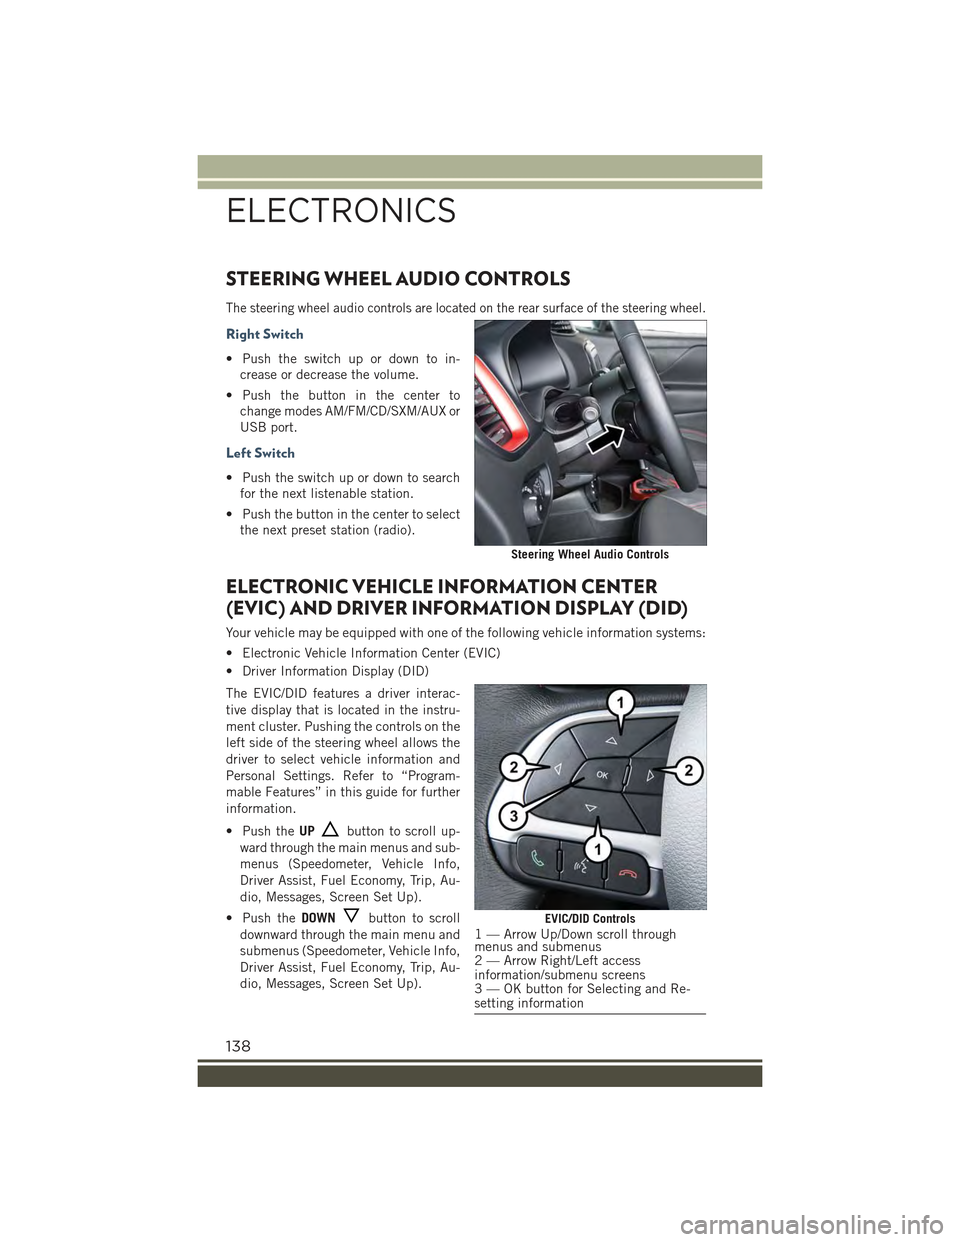
STEERING WHEEL AUDIO CONTROLS
The steering wheel audio controls are located on the rear surface of the steering wheel.
Right Switch
• Push the switch up or down to in-
crease or decrease the volume.
• Push the button in the center to
change modes AM/FM/CD/SXM/AUX or
USB port.
Left Switch
• Push the switch up or down to search
for the next listenable station.
• Push the button in the center to select
the next preset station (radio).
ELECTRONIC VEHICLE INFORMATION CENTER
(EVIC) AND DRIVER INFORMATION DISPLAY (DID)
Your vehicle may be equipped with one of the following vehicle information systems:
• Electronic Vehicle Information Center (EVIC)
• Driver Information Display (DID)
The EVIC/DID features a driver interac-
tive display that is located in the instru-
ment cluster. Pushing the controls on the
left side of the steering wheel allows the
driver to select vehicle information and
Personal Settings. Refer to “Program-
mable Features” in this guide for further
information.
• Push theUPbutton to scroll up-
ward through the main menus and sub-
menus (Speedometer, Vehicle Info,
Driver Assist, Fuel Economy, Trip, Au-
dio, Messages, Screen Set Up).
• Push theDOWNbutton to scroll
downward through the main menu and
submenus (Speedometer, Vehicle Info,
Driver Assist, Fuel Economy, Trip, Au-
dio, Messages, Screen Set Up).
Steering Wheel Audio Controls
EVIC/DID Controls1 — Arrow Up/Down scroll throughmenus and submenus2 — Arrow Right/Left accessinformation/submenu screens3 — OK button for Selecting and Re-setting information
ELECTRONICS
138
Page 141 of 220
• Push theRIGHTbutton to access the information screens or submenu screens
of a main menu item.
• Push theBACK/LEFTbutton to access the information screens or submenu
screens of a main menu item.
• Push theOKbutton to access/select the information screens or submenu screens
of a main menu item. Push and hold the OK arrow button for two seconds to reset
displayed/selected features that can be reset.
EVIC/DID Main Menu
The Main Menu is composed of several options that can be selected using the control
buttons above.
NOTE:
• The display mode of the menu items varies depending on the type of display.
• For some items, a submenu is provided.
• In the Uconnect®system, some items on the menu are not shown on the
instrument panel display.
Menu Items
The Menu has the following options:
• Speedometer
• Vehicle Info
• Driver Assist
• Fuel Consumption
• Trip
• Audio
• Alerts
• Display Setup
• Vehicle Setup
Speedometer
Push and release the UP or DOWN arrow button until “Speedometer” is highlighted
in the EVIC or DID. Push the OK button to change the speedometer scale from MPH
to km/h (km/h to MPH).
ELECTRONICS
139
Page 143 of 220
Average Consumption
• (MPG, or l/ 100km or km/l)
Travel Time
• (Hour/Minute)
Audio (Viewing Audio Information)
This menu item allows you to view the instrument cluster display and the information
present on the display of the Uconnect®system.
The information displayed is:
“Radio (AM or FM)”
• View Radio Station Name (if equipped), frequency, and graphical icon
"MP3”
• Title display or number song playing
"USB"
• Title display or number song playing
"Ipod"
• Display song title (if equipped)
See Phone
The instrument cluster display can also display the information concerning phone
mode.
The information that can be displayed is the connection status of the mobile phone
(phone connected or disconnected), the active telephone calls/incoming/on hold,
and the management of double calls (first incoming second waiting, etc.).
Alerts (Messages Stored)
This menu item allows you to display the information messages/malfunction stored.
Vehicles With Multi-Functional Display Reconfigurable
The background color of the display varies according to the priorities of the failure:
Failed Messages with low priority
• Displays in yellow
Failed Messages with high priority
• Displays in red
Display Setup (Edit Settings Cluster Display)
This menu item allows you to change the position of the information on the display.
ELECTRONICS
141