2015 JEEP RENEGADE ECO mode
[x] Cancel search: ECO modePage 110 of 220

Radio
• To access the Radio mode, press the RADIO button below the screen.
Selecting Radio Stations
• Press the desired radio band (AM, FM or SXM) button.
Seek Next/Seek Previous
• Press the “Seek Arrow” buttons on the touchscreen for less than two seconds to
seek through radio stations.
• Press and hold either Seek Arrow button on the touchscreen for more than two
seconds to bypass stations without stopping. The radio will stop at the next
listenable station once the Seek Arrow button on the touchscreen is released.
Direct Tune
• Tune directly to a radio station by pressing the “Tune” button on the touchscreen
on the screen, and entering the desired station number.
Uconnect® 6.5AN Radio
1 — Radio Station Presets2 — Toggle Presets3 — HD Radio Available4 — Audio Settings5 — Seek Next
6 — Direst Tune Radio Stations7 — Seek Previous8 — Browse/Manage Presets9 — Radio Bands
ELECTRONICS
108
Page 111 of 220

Store Radio Presets
• Your radio can store 36 total preset stations, 12 presets per band (AM, FM and
SXM). They are shown at the top of your radio screen. To see the 12 preset stations
per band, press the “Arrow” button on the touchscreen at the top right of the
screen to toggle between the two sets of six presets.
• You can also see all presets for a band by pressing the "Browse" button on the
touchscreen. This browse screen lets you delete a preset and shows the station
frequency, name and genre.
• To set a station into memory press and hold the desired numbered button on the
touchscreen for more than two seconds or until you hear a confirmation beep.
SiriusXM Premier Over 160 Channels
Get every channel available on your satellite radio, and enjoy all you want, all in one
place. Hear commercial-free music plus sports, news, talk and entertainment. Get all
the premium programming, including Howard Stern, every NFL game, Oprah Radio®,
every MLB®and NHL®game, every NASCAR®race and more. And get 20+ Xtra
channels, including SiriusXM Latino, a selection of channels dedicated to Spanish
language programming.
• To access SiriusXM Satellite Radio, press the “SXM” button on the main Radio
screen.
The following describes features that are available when in SiriusXM Satellite Radio
mode.
Seek Up/Seek Down
• Press the “Seek Arrow” buttons on the touchscreen for less than two seconds to
seek through channels in SXM mode.
• Press and hold either arrow button on the touchscreen for more than two seconds
to bypass channels without stopping. The radio will stop at the next listenable
channel once the arrow button on the touchscreen is released.
Direct Tune
• Tune directly to a SXM channel by pressing the “Tune” button on the touchscreen
on the screen, and entering the desired station number.
Traffic & Weather
Automatically tells you when Traffic & Weather for a favorite city is available, and
gives you the option to switch to that channel.
Fav
Activates the favorites menu. You can add up to 50 favorite artists or songs. Just
press Add Fav Artist or Add Fav Song while the song is playing. You will then be
alerted any time one of these songs, or works by these artists, is playing on other
SiriusXM channels.
ELECTRONICS
109
Page 140 of 220
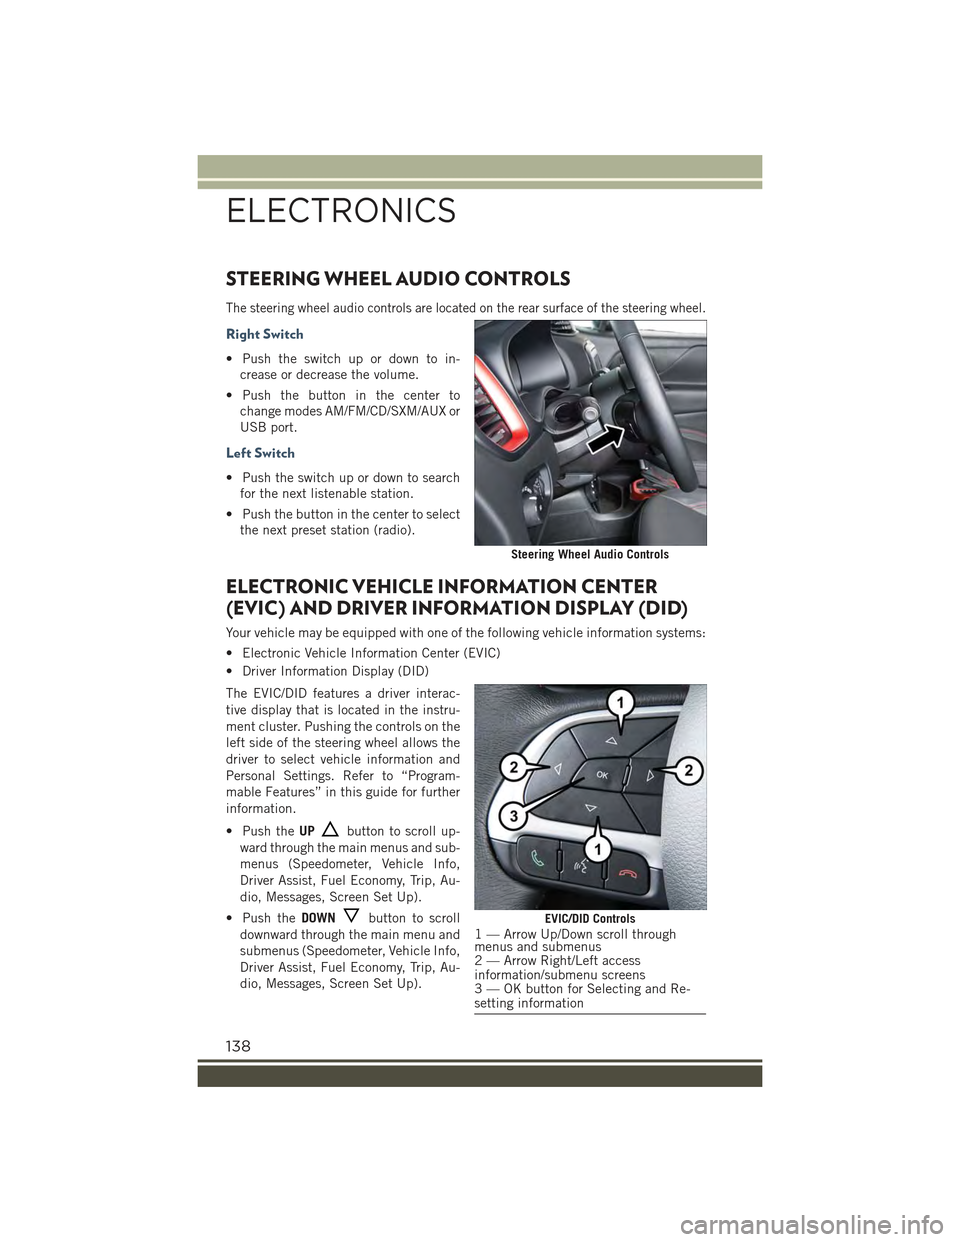
STEERING WHEEL AUDIO CONTROLS
The steering wheel audio controls are located on the rear surface of the steering wheel.
Right Switch
• Push the switch up or down to in-
crease or decrease the volume.
• Push the button in the center to
change modes AM/FM/CD/SXM/AUX or
USB port.
Left Switch
• Push the switch up or down to search
for the next listenable station.
• Push the button in the center to select
the next preset station (radio).
ELECTRONIC VEHICLE INFORMATION CENTER
(EVIC) AND DRIVER INFORMATION DISPLAY (DID)
Your vehicle may be equipped with one of the following vehicle information systems:
• Electronic Vehicle Information Center (EVIC)
• Driver Information Display (DID)
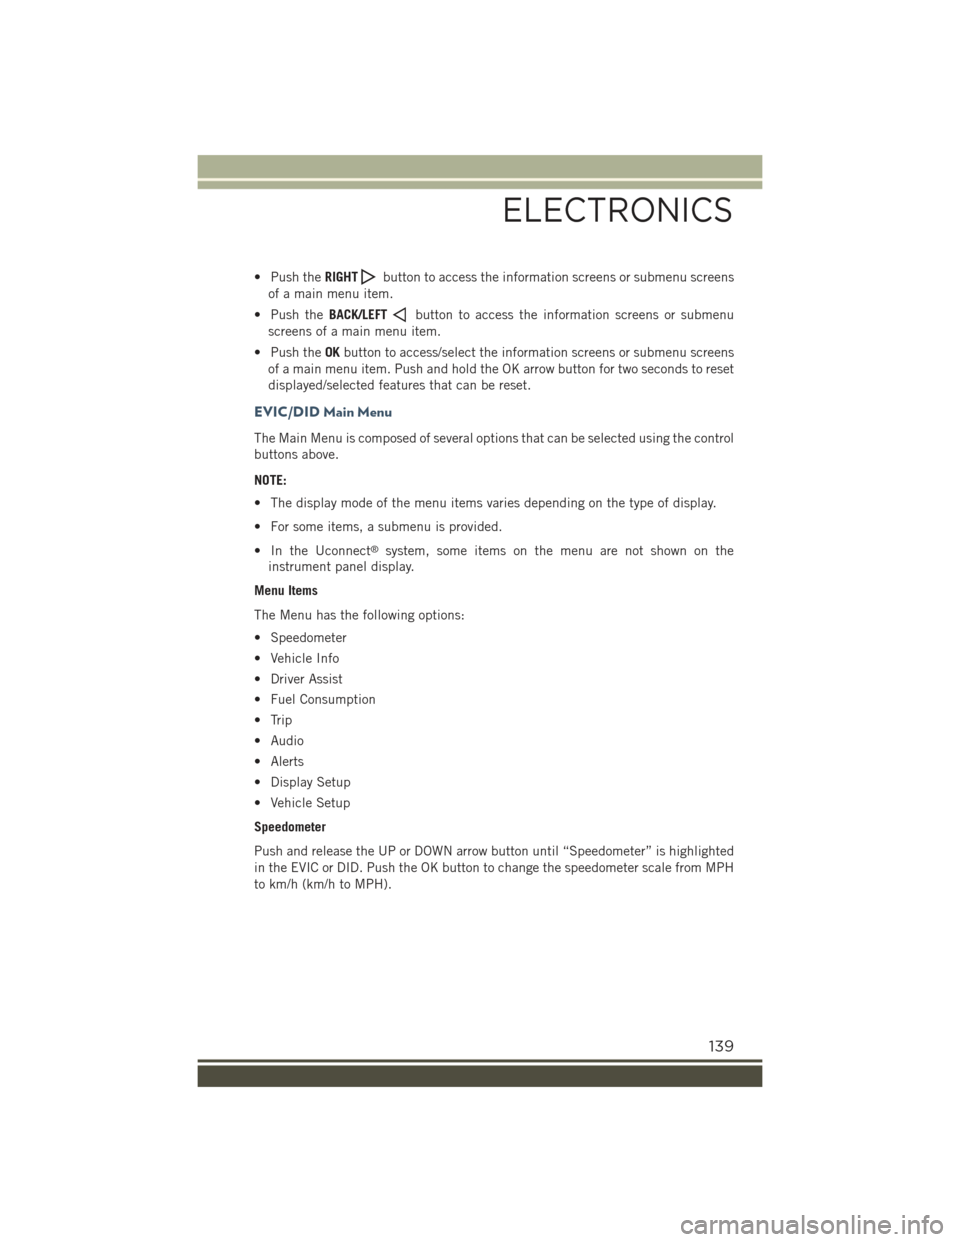
The EVIC/DID features a driver interac-
tive display that is located in the instru-
ment cluster. Pushing the controls on the
left side of the steering wheel allows the
driver to select vehicle information and
Personal Settings. Refer to “Program-
mable Features” in this guide for further
information.
• Push theUPbutton to scroll up-
ward through the main menus and sub-
menus (Speedometer, Vehicle Info,
Driver Assist, Fuel Economy, Trip, Au-
dio, Messages, Screen Set Up).
• Push theDOWNbutton to scroll
downward through the main menu and
submenus (Speedometer, Vehicle Info,
Driver Assist, Fuel Economy, Trip, Au-
dio, Messages, Screen Set Up).
Steering Wheel Audio Controls
EVIC/DID Controls1 — Arrow Up/Down scroll throughmenus and submenus2 — Arrow Right/Left accessinformation/submenu screens3 — OK button for Selecting and Re-setting information
ELECTRONICS
138
Page 141 of 220
• Push theRIGHTbutton to access the information screens or submenu screens
of a main menu item.
• Push theBACK/LEFTbutton to access the information screens or submenu
screens of a main menu item.
• Push theOKbutton to access/select the information screens or submenu screens
of a main menu item. Push and hold the OK arrow button for two seconds to reset
displayed/selected features that can be reset.
EVIC/DID Main Menu
The Main Menu is composed of several options that can be selected using the control
buttons above.
NOTE:
• The display mode of the menu items varies depending on the type of display.
• For some items, a submenu is provided.
• In the Uconnect®system, some items on the menu are not shown on the
instrument panel display.
Menu Items
The Menu has the following options:
• Speedometer
• Vehicle Info
• Driver Assist
• Fuel Consumption
• Trip
• Audio
• Alerts
• Display Setup
• Vehicle Setup
Speedometer
Push and release the UP or DOWN arrow button until “Speedometer” is highlighted
in the EVIC or DID. Push the OK button to change the speedometer scale from MPH
to km/h (km/h to MPH).
ELECTRONICS
139
Page 143 of 220
Average Consumption
• (MPG, or l/ 100km or km/l)
Travel Time
• (Hour/Minute)
Audio (Viewing Audio Information)
This menu item allows you to view the instrument cluster display and the information
present on the display of the Uconnect®system.
The information displayed is:
“Radio (AM or FM)”
• View Radio Station Name (if equipped), frequency, and graphical icon
"MP3”
• Title display or number song playing
"USB"
• Title display or number song playing
"Ipod"
• Display song title (if equipped)
See Phone
The instrument cluster display can also display the information concerning phone
mode.
The information that can be displayed is the connection status of the mobile phone
(phone connected or disconnected), the active telephone calls/incoming/on hold,
and the management of double calls (first incoming second waiting, etc.).
Alerts (Messages Stored)
This menu item allows you to display the information messages/malfunction stored.
Vehicles With Multi-Functional Display Reconfigurable
The background color of the display varies according to the priorities of the failure:
Failed Messages with low priority
• Displays in yellow
Failed Messages with high priority
• Displays in red
Display Setup (Edit Settings Cluster Display)
This menu item allows you to change the position of the information on the display.
ELECTRONICS
141
Page 144 of 220
Display Gears (Vehicles With Reconfigurable Multi-Functional Display And Automatic
Transmission)
By selecting this item, you can select the display mode, the particulars relating to the
automatic transmission, and choose between the following options:
"Single digit"
• The right side of the display will show the letter concerning the automatic
transmission shift lever (P,N,R or D) position. After approximately two seconds, the
letter will be displayed in a central position.
"Full PNRD"
• (Default): The right side of the display the letters PNRD, the position assumed by
the shift lever will be highlighted in the display. During the operation in sequential
mode ("AutoStick"), in place of the letter D, the gear will be will be displayed.
In The Top Left/Top Right
The information relating to the following can be displayed:
• External temperature
• Compass (If Equipped)
• Date (Month/Day)
• Time (Hours/Minutes)
In the central area of the display, you can view all of the information listed above as
well as the following:
• Audio Information
• Speed Display (If Equipped)
• Date (Day/Month/Year)
• Range To Empty
• Menu Item
• Average Consumption
• Current Consumption
• Distance Traveled (Trip)
• Distance Traveled B (Trip B)
Restore Default Settings
Selecting this item, and you can reset and restore the default settings.
Vehicle Setup (Edit Settings Of The Car)
This menu item allows you to change the settings for the following:
• Display
• Units of measure
• Clock and Data
• Safety
ELECTRONICS
142
Page 145 of 220
• Safety and Assistance
• Lights
• Doors and Locks
• Compass (If Equipped)
Vehicles Equipped With Multifunctional Display Reconfigurable:Menu
items "Display" (you can select only the items "See Phone" and "See Navigation,"
"Security," and "Safety & Assistance" (only "Volume Alerts" is selectable) are present.
All other entries are displayed and selected on the display of the Uconnect®system.
“Display”
By selecting the "Display," you can access the following settings:
•Language: allows you to select the language in which to display the information/
warnings.
•See Phone:allows you to view, on the instrument cluster display, the information
relating to Phone mode displayed on the display of the Uconnect®system.
•See Navigation:allows you to view, on the instrument cluster display, information
relating to the navigation mode.
"Units Of Measure"
By selecting the item "Units of measure," you can select the unit of measure to use
for displaying various magnitudes.
Possible options are:
•US
• Metric
• Custom
"Clock & Data"
By selecting the item, "Clock & Data" you can adjust the clock.
Possible options are:
• Set Time: adjusting hours/minutes
• Set Format: adjusting the time format "12h" (12 hours) or "24h" (24 hours)
• Set Date: adjustment day/month/year
Safety
By selecting the item “Safety,” you can make the following adjustments:
Speed Warning:
• Set the vehicle speed limit (mph or km/h), which the driver is notified through a
visual and acoustic signaling (display of a message and a symbol on the display).
ELECTRONICS
143
Page 154 of 220

SELEC-TERRAIN™
Selec-Terrain™ combines the capabilities of the vehicle control systems, along with
driver input, to provide the best performance for all terrains.
Mode Selection Guide
Rotate the Selec-Terrain™ knob to select the desired mode.
•AUTO: This four-wheel drive operation
is a continuous operation, is fully au-
tomatic and can be used on and off
road. This mode balances traction to
ensure maneuverability and accelera-
tion improvement compared to a car
with two wheel drive. This mode also
reduces fuel consumption, since it al-
lows the disconnect of the drive shaft
where conditions permit.
•SNOW: This mode allows you to have
greater stability under conditions of
bad weather. For use on and off road on
surfaces with poor traction, such as
roads covered with snow. When in
SNOW mode (depending on certain
operating conditions), the transmis-
sion may use second gear (rather than
first gear) during launches, to mini-
mize wheel slippage.
•SAND: For off-road driving or use on
surfaces with poor traction, such as
sandy bottoms. The transmission is set
to provide maximum traction.
•MUD: For off-road driving or use on
surfaces with poor traction, such as
roads covered by mud or wet grass.
•ROCK(Trailhawk only): This mode isonly available in 4WD LOW range. Thedevice sets the vehicle to maximizetraction and allow the highest steering capacity for off-road surfaces. This modegives you the maximum performance off-road. Use for low speed obstacles such aslarge rocks, deep ruts, etc.
NOTE:
• Rock mode is only available on the vehicles equipped with the Off-Road package.
•Activate the Hill Descent Control or Selec Speed Control for steep downhill control. See“Electronic Brake Control System” in this section for further information.
Selec-Terrain™ Switch
Selec-Terrain™ Switch (Trailhawk)
OFF-ROAD CAPABILITIES
152