Page 113 of 678

The window controls will operate only when the ignition
is in the MAR/RUN or AVV/START position.
NOTE:For vehicles equipped with Uconnect®, the
power window switches will remain active for up to
three minutes after the ignition is cycled to the STOP/
OFF position. Opening either front door will cancel this
feature. Refer to “Uconnect® Settings” in “Multimedia”
for further information.
WARNING!
Never leave children unattended in a vehicle, and do
not let children play with power windows. Do not
leave the Key Fob in or near the vehicle, or in a
location accessible to children, and do not leave the
ignition of a vehicle equipped with Keyless Enter-N-
Go™ in the RUN mode. Occupants, particularly
unattended children, can become entrapped by the
(Continued)
WARNING!(Continued)
windows while operating the power window
switches. Such entrapment may result in serious
injury or death.
AUTO-Down Feature — If Equipped
The driver and passenger power window switches have
an AUTO-down feature. Push the switch for half a
second and release it, the window will go down auto-
matically.
To partially open the window, push the window switch
and release it when you want the window to stop.
To stop the window from going all the way down during
the AUTO-down operation, pull up on the switch briefly
when the when the window has reached the desired
position.
4
GETTING TO KNOW YOUR VEHICLE 111
Page 133 of 678

NOTE:The Front Defrost Control (MAX-DEF) function
remains on for approximately three minutes from when
the engine coolant reaches the appropriate temperature.
When the function is activated, the AUTO button LED
turns off. With the function activated, the only possible
manual adjustments are adjusting the fan speed and
turning the heated rear window off.
When the Recirculation Control, Rear Defrost Control , or
AUTO buttons are pushed, the Climate Control system
will deactivate the Front Defrost (MAX-DEF) function.
Selecting the footwell/windshield or only windshield
distribution activates the Climate Control system com-
pressor (LED on A/C button on) and the air recirculation
is set to#outside air#intake (LED on the recirculation
button off).
This logic guarantees optimum visibility at the windows.
It is, however, always possible to manage air recirculation
and the Climate Control system compressor manually.
Rear Window Defrosting
Push and release the rear window defrost button to turn
the function on/off.
Activation of this function is indicated by the rear defrost
indicator light on the instrument panel turning on. The
function is automatically deactivated after 20 minutes.
If equipped, push the rear defrost button to activate the
defrosting of door mirrors and heated rear window.
CAUTION!
To avoid causing damage to the rear window de-
froster heating filaments do not affix stickers or other
objects to the inside of the rear glass.
4
GETTING TO KNOW YOUR VEHICLE 131
Page 155 of 678

NOTE:Before closing the liftgate, make sure to be in
possession of the key because the liftgate will be locked
automatically.
Liftgate Initialization
As a result of a possible disconnection of the battery or
the interruption of the fuse protection, you will need to
#initialize#the opening/closing mechanism of the liftgate
as follows:
1. Close all the doors and the liftgate.
2. Press the LIFTGATE button on the Key Fob with
Remote Control.
3. Press the LIFTGATE button on the Key Fob with
Remote Control a second time.
Cargo Area Features
Cargo Load Floor
The vehicle is equipped with a load floor that can be
adjusted as needed.
Position 1 (Floor Flush):
This position allows you to make the load floor flat for
ease of loading/unloading objects from the cargo area.
This position also makes it possible to use the space
below as another compartment for storing fragile or
smaller objects.
Position 2 (Elevated Position):
When the rear seatbacks and front passenger seat is
folded flat, it will allow for loading objects of long
dimensions. It is recommended to use this position only
during the actual transporting of the objects, then bring
the load floor in position 1.
4
GETTING TO KNOW YOUR VEHICLE 153
Page 255 of 678

2. If a child from 2 to 12 years old (not in a rear-facing
child restraint) must ride in the front passenger seat,
move the seat as far back as possible and use the
proper child restraint. (Refer to “Child Restraints”)
3. Children that are not big enough to wear the vehicle
seat belt properly (Refer to#Child Restraints#) should
be secured in a vehicle with a rear seat in child
restraints or belt-positioning booster seats. Older chil-
dren who do not use child restraints or belt-
positioning booster seats should ride properly buckled
up in a vehicle with a rear seat.
4. Never allow children to slide the shoulder belt behind
them or under their arm.
5. You should read the instructions provided with your
child restraint to make sure that you are using it
properly.
6. All occupants should always wear their lap and
shoulder belts properly.
7. The driver and front passenger seats should be moved
back as far as practical to allow the Advanced Front
Air Bags room to inflate.
8. Do not lean against the door or window. If your
vehicle has side air bags, and deployment occurs, the
side air bags will inflate forcefully into the space
between you and the door and you could be injured.
9. If the air bag system in this vehicle needs to be
modified to accommodate a disabled person, contact
the Customer Center. Phone numbers are provided
under#If You Need Assistance.#
6
SAFETY 253
Page 261 of 678
Lap/Shoulder Belt Operating Instructions
1. Enter the vehicle and close the door. Sit back and
adjust the seat.
2. The seat belt latch plate is above the back of the front
seat, and next to your arm in the rear seat (for vehicles
equipped with a rear seat). Grasp the latch plate and
pull out the seat belt. Slide the latch plate up the
webbing as far as necessary to allow the seat belt to go
around your lap.
Pulling Out The Latch Plate
6
SAFETY 259
Page 277 of 678

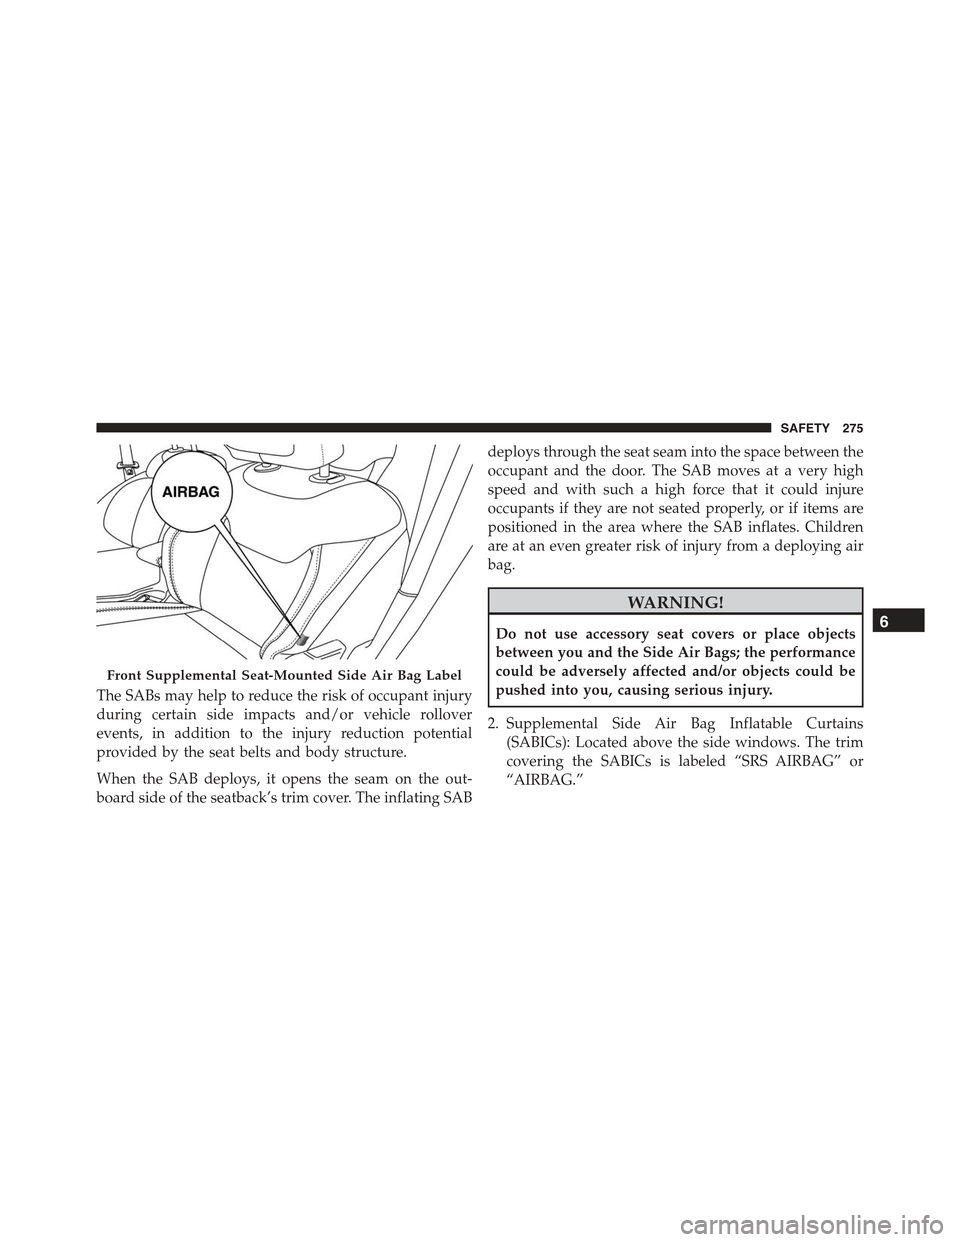
The SABs may help to reduce the risk of occupant injury
during certain side impacts and/or vehicle rollover
events, in addition to the injury reduction potential
provided by the seat belts and body structure.
When the SAB deploys, it opens the seam on the out-
board side of the seatback’s trim cover. The inflating SAB
deploys through the seat seam into the space between the
occupant and the door. The SAB moves at a very high
speed and with such a high force that it could injure
occupants if they are not seated properly, or if items are
positioned in the area where the SAB inflates. Children
are at an even greater risk of injury from a deploying air
bag.
WARNING!
Do not use accessory seat covers or place objects
between you and the Side Air Bags; the performance
could be adversely affected and/or objects could be
pushed into you, causing serious injury.
2. Supplemental Side Air Bag Inflatable Curtains
(SABICs): Located above the side windows. The trim
covering the SABICs is labeled “SRS AIRBAG” or
“AIRBAG.”
Front Supplemental Seat-Mounted Side Air Bag Label
6
SAFETY 275
Page 325 of 678

Shutting The Engine Off
To turn off the engine, proceed as follows:
•Park the car in a position that does not cause a traffic
hazard.
•Place the transmission in gear (models with a manual
transmission) or place the transmission in PARK (P)
(models with automatic transmission).
•With the engine idling, place the ignition in the STOP/
OFF position.
Remove the key from the ignition when the engine is shut
off.
Vehicles Equipped With Electronic Key (Keyless Enter-
N-Go™):
To shut off the engine with vehicle speed greater than
5 mph (8 km/h) you must push and hold the ignition or
push the START/STOP button three times consecutively
within a few seconds. The engine will shut down and the
ignition will be placed in the RUN position.
Turning Off the car (turning the ignition from RUN to the
STOP position), the power supply to the accessories are
maintained for a period of three minutes.
Opening the driver side door with the ignition RUN will
sound a short chime, to remind the driver to turn the
ignition to STOP.
When the ignition is in the STOP/OFF position, the
window switches remains active for three minutes.
Opening a front door will cancel this function.
After severe driving, idle the engine to allow the tem-
perature inside the engine compartment to cool before
shutting off the engine.
Turbocharger “Cool Down” — If Equipped
This vehicle is equipped with an after-run pump to cool
the turbocharger after the engine is shut off. Depending
7
STARTING AND OPERATING 323
Page 402 of 678

VEHICLE LOADING
Certification Label
As required by National Highway Traffic Safety Admin-
istration regulations, your vehicle has a certification label
affixed to the driver’s side door or pillar.
This label contains the month and year of manufacture,
Gross Vehicle Weight Rating (GVWR), Gross Axle Weight
Rating (GAWR) front and rear, and Vehicle Identification
Number (VIN). A Month-Day-Hour (MDH) number is
included on this label and indicates the Month, Day and
Hour of manufacture. The bar code that appears on the
bottom of the label is your VIN.
Gross Vehicle Weight Rating (GVWR)
The GVWR is the total permissible weight of your vehicle
including driver, passengers, vehicle, options and cargo.
The label also specifies maximum capacities of front and
rear axle systems (GAWR). Total load must be limited so
GVWR and front and rear GAWR are not exceeded.
Payload
The payload of a vehicle is defined as the allowable load
weight a truck can carry, including the weight of the
driver, all passengers, options and cargo.
Gross Axle Weight Rating (GAWR)
The GAWR is the maximum permissible load on the front
and rear axles. The load must be distributed in the cargo
area so that the GAWR of each axle is not exceeded.
Each axle GAWR is determined by the components in the
system with the lowest load carrying capacity (axle,
springs, tires or wheels). Heavier axles or suspension
components sometimes specified by purchasers for in-
creased durability does not necessarily increase the vehi-
cle’s GVWR.
400 STARTING AND OPERATING