Page 172 of 636

turn off when the switch is pushed a second time, when
the headlight switch is rotated to the off position, or the
high beam is selected.
Interior Lights
Courtesy and dome lights are turned on when the front
doors are opened or when the dimmer control (rotating
wheel on the right side of the headlight switch) is rotated
to its farthest upward position. If your vehicle is
equipped with Remote Keyless Entry (RKE) and the
UNLOCK button is pressed on the RKE transmitter the
courtesy and dome lights will turn on. When a door is
open and the interior lights are on, rotating the dimmer
control all the way down, to the OFF detent, will cause all
the interior lights to go out. This is also known as the
“Party” mode because it allows the doors to stay open for
extended periods of time without discharging the vehi-
cle’s battery.The brightness of the instrument panel lighting can be
regulated by rotating the dimmer control up (brighter) or
down (dimmer). When the headlights are on you can
supplement the brightness of the odometer, trip odom-
eter, radio and overhead console by rotating the control
to its farthest position up until you hear a click. This
feature is termed the “Parade” mode and is useful when
headlights are required during the day.
170 UNDERSTANDING THE FEATURES OF YOUR VEHICLE
Page 174 of 636
Front Map/Reading Lights — If Equipped
The front map/reading lights are mounted in the over-
head console.
Each light can be turned on by pushing a switch on either
side of the console. These buttons are backlit for night
time visibility. To turn the lights off, push the switch asecond time. The lights will also turn on when the
UNLOCK button on the Remote Keyless Entry (RKE) is
pushed.
Front Map/Reading LightsFront Map/Reading Light Switches
172 UNDERSTANDING THE FEATURES OF YOUR VEHICLE
Page 183 of 636
To tilt the steering column, move the lever up or down as
desired. To lengthen or shorten the steering column, pull
the lever toward you or push the lever away from you as
desired.NOTE:For vehicles equipped with Driver Memory Seat,
you can use your Remote Keyless Entry (RKE) transmit-
ter or the memory switch on the driver’s door trim panel
to return the tilt/telescopic steering column to pre-
programmed positions. Refer to “Driver Memory Seat”
in this section for further information.
WARNING!
Do not adjust the steering column while driving.
Adjusting the steering column while driving or driv-
ing with the steering column unlocked, could cause
the driver to lose control of the vehicle. Failure to
follow this warning may result in serious injury or
death.
Power Tilt/Telescoping Steering Column
3
UNDERSTANDING THE FEATURES OF YOUR VEHICLE 181
Page 253 of 636
POWER SUNROOF — IF EQUIPPED
The power sunroof switch is located between the sun
visors on the overhead console.
WARNING!
•Never leave children unattended in a vehicle, or
with access to an unlocked vehicle. Never leave the
Key Fob in or near the vehicle, or in a location
accessible to children. Do not leave the ignition of
a vehicle equipped with Keyless Enter-N-Go™ in
the ACC or ON/RUN mode. Occupants, particu-
larly unattended children, can become entrapped
by the power sunroof while operating the power
sunroof switch. Such entrapment may result in
serious injury or death.
•In a collision, there is a greater risk of being thrown
from a vehicle with an open sunroof. You could
also be seriously injured or killed. Always fasten
your seat belt properly and make sure all passen-
gers are also properly secured.
(Continued)
Power Sunroof Switch
3
UNDERSTANDING THE FEATURES OF YOUR VEHICLE 251
Page 257 of 636

WARNING!
•Never leave children unattended in a vehicle, or
with access to an unlocked vehicle. Never leave the
Key Fob in or near the vehicle, or in a location
(Continued)
WARNING!(Continued)
accessible to children. Do not leave the ignition of
a vehicle equipped with Keyless Enter-N-Go™ in
the ACC or ON/RUN mode. Occupants, particu-
larly unattended children, can become entrapped
by the power sunroof while operating the power
sunroof switch. Such entrapment may result in
serious injury or death.
•In a collision, there is a greater risk of being thrown
from a vehicle with an open sunroof. You could
also be seriously injured or killed. Always fasten
your seat belt properly and make sure all passen-
gers are also properly secured.
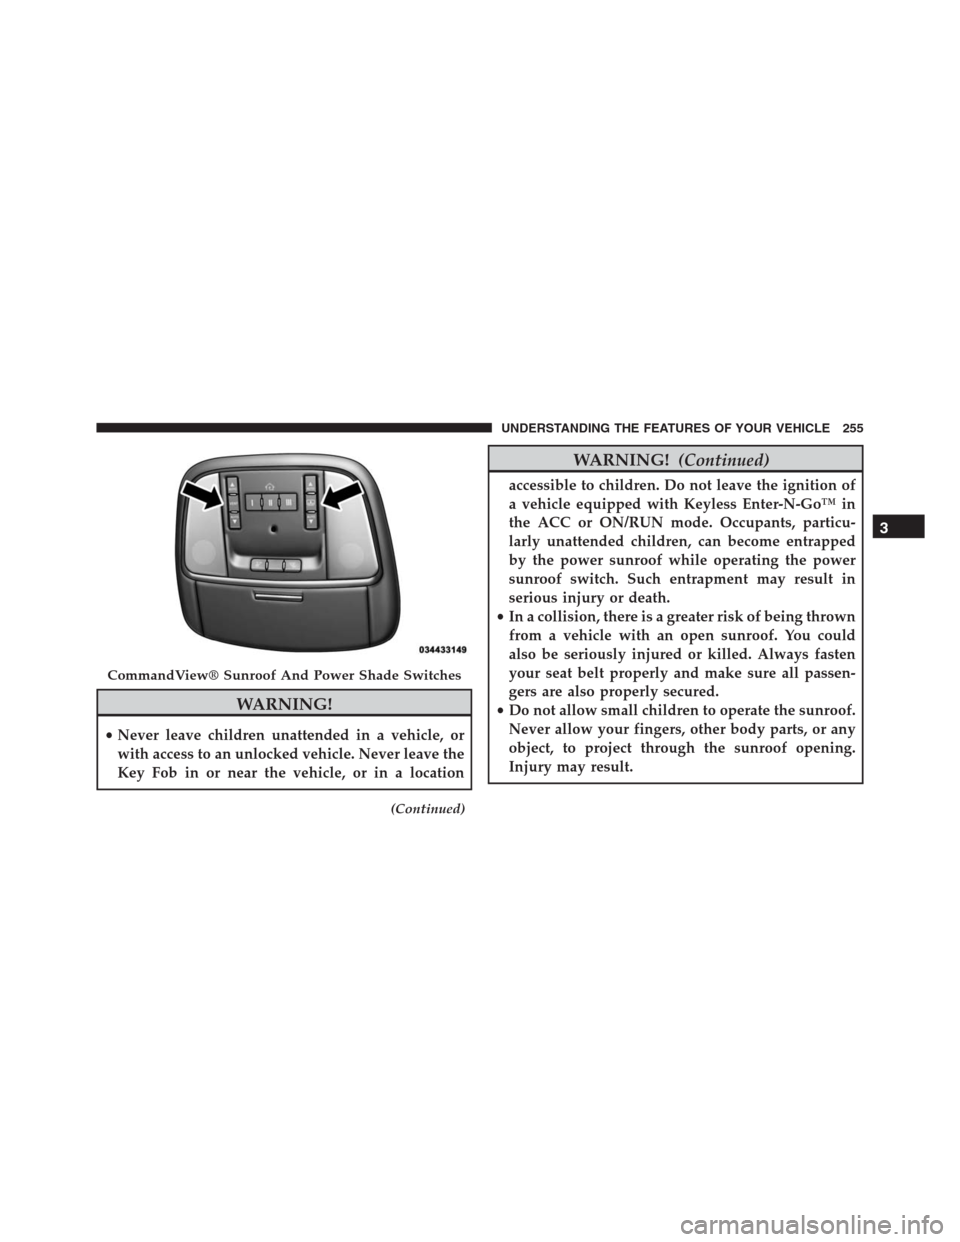
•Do not allow small children to operate the sunroof.
Never allow your fingers, other body parts, or any
object, to project through the sunroof opening.
Injury may result.
CommandView® Sunroof And Power Shade Switches
3
UNDERSTANDING THE FEATURES OF YOUR VEHICLE 255
Page 303 of 636
•Battery Voltage Low
•Service Electronic Throttle Control
•Lights On
•Right Turn Signal Light Out
•Left Turn Signal Light Out
•IGN OR ACC
•Vehicle Not In Park
•IGN OR ACC KEYLESS GO
•Key in Ignition Lights On
•Remote Start Active Key to Run
•Remote Start Active Push Start Button
•Remote Start Aborted Fuel Low
•Remote Start Aborted Too Cold•Remote Start Aborted Door Open
•Remote Start Aborted Hood Open
•Remote Start Aborted Tailgate Open
•Remote Start Aborted Time Expired
•Remote Start Disabled Start To Reset
•Service Airbag System
•Service Airbag Warning Light
•Door Open
•Doors Open
•Liftgate Open
•Gear Not Available
•Shift Not Allowed
•Vehicle Speed To High To Shift
4
UNDERSTANDING YOUR INSTRUMENT PANEL 301
Page 329 of 636

are unlocked with the Remote Keyless Entry (RKE)
transmitter. To change the Illuminated Approach status,
press the “+” or “–” button on the touchscreen to select
your desired time interval. Press the back arrow button
on the touchscreen to return to the previous menu, or
push the back button on the faceplate.
•Headlights With Wipers — If Equipped
When this feature is selected, and the headlight switch is
in the AUTO position, the headlights will turn on ap-
proximately 10 seconds after the wipers are turned on.
The headlights will also turn off when the wipers are
turned off if they were turned on by this feature. To make
your selection, press the Headlights With Wipers button
on the touchscreen, until a check-mark appears next to
setting, showing that setting has been selected. Press the
back arrow button on the touchscreen to return to the
previous menu, or push the back button on the faceplate.•Auto Dim High Beams — If Equipped
When this feature is selected, the high beam headlights
will activate/deactivate automatically under certain con-
ditions. To make your selection, press the “Auto High
Beams” button on the touchscreen, until a check-mark
appears next to setting, showing that setting has been
selected. Press the back arrow button on the touchscreen
to return to the previous menu, or push the back button
on the faceplate. Refer to “Automatic High Beam Head-
lamp Control — If Equipped” in “Understanding The
Features Of Your Vehicle” for further information.
•Daytime Running Lights — If Equipped
When this feature is selected, the headlights will turn on
whenever the vehicle is set in motion. To make your
selection, press the “Daytime Running Lights” button on
the touchscreen, until a check-mark appears next to
setting, showing that setting has been selected. Press the
4
UNDERSTANDING YOUR INSTRUMENT PANEL 327
Page 330 of 636

back arrow button on the touchscreen to return to the
previous menu, or push the back button on the faceplate.
•Flash Lights With Lock
When this feature is selected, the exterior lights will flash
when the doors are locked or unlocked with the Remote
Keyless Entry (RKE) transmitter. This feature may be
selected with or without the sound horn on lock feature
selected. To make your selection, press the “Flash Lights
with Lock” button on the touchscreen, until a check-mark
appears next to setting, showing that setting has been
selected. Press the back arrow button on the touchscreen
to return to the previous menu, or push the back button
on the faceplate.
Doors & Locks
After pressing the Doors & Locks button on the touch-
screen the following settings will be available.•Auto Door Locks
When this feature is selected, all doors will lock auto-
matically when the vehicle reaches a speed of 15 mph
(24 km/h). To make your selection, press the “Auto Door
Locks” button on the touchscreen, until a check-mark
appears next to setting, showing that setting has been
selected. Press the back arrow button on the touchscreen
to return to the previous menu, or push the back button
on the faceplate.
•Auto Unlock On Exit
When this feature is selected, all doors will unlock when
the vehicle is stopped, the transmission is in the PARK or
NEUTRAL position and the driver’s door is opened. To
make your selection, press the “Auto Unlock on Exit”
button on the touchscreen, until a check-mark appears
next to setting, showing that setting has been selected.
Press the back arrow button on the touchscreen to return
to the previous menu, or push the back button on the
faceplate.
328 UNDERSTANDING YOUR INSTRUMENT PANEL