Page 117 of 636

▫Daytime Running Lights — If Equipped.....167
▫Automatic Headlight Leveling — HID Headlights
Only...............................168
▫Adaptive Bi-Xenon High Intensity Discharge
Headlights — If Equipped...............168
▫Headlight Delay......................168
▫Parking Lights And Panel Lights...........169
▫Fog Lights — If Equipped...............169
▫Interior Lights........................170
▫Lights-On Reminder...................171
▫Battery Saver.........................171
▫Front Map/Reading Lights — If Equipped . . .172
▫Courtesy Lights.......................173
▫Ambient Light — If Equipped............173▫Multifunction Lever....................174
▫Turn Signals.........................174
▫Lane Change Assist...................174
▫Flash-To-Pass........................175
▫High/Low Beam Switch.................175
�WINDSHIELD WIPERS AND WASHERS......175
▫Windshield Wiper Operation.............175
▫Intermittent Wiper System...............176
▫Windshield Washer Operation.............177
▫Mist...............................178
▫Rain Sensing Wipers — If Equipped........179
�POWER TILT/TELESCOPING STEERING
COLUMN — IF EQUIPPED...............180
3
UNDERSTANDING THE FEATURES OF YOUR VEHICLE 115
Page 118 of 636

�HEATED STEERING WHEEL — IF EQUIPPED . .182
�ELECTRONIC SPEED CONTROL — IF
EQUIPPED...........................183
▫To Activate..........................184
▫To Set A Desired Speed.................184
▫To Deactivate........................185
▫To Resume Speed.....................185
▫To Vary The Speed Setting...............185
▫To Accelerate For Passing...............186
�ADAPTIVE CRUISE CONTROL (ACC) — IF
EQUIPPED...........................187
▫Adaptive Cruise Control (ACC) Operation. . . .189
▫Activating Adaptive Cruise Control (ACC). . . .190
▫To Activate/Deactivate..................191▫To Set A Desired ACC Speed.............192
▫To Cancel...........................193
▫ToTurnOff..........................193
▫To Resume..........................194
▫To Vary The Speed Setting...............194
▫Setting The Following Distance In ACC......197
▫Overtake Aid........................201
▫ACC Operation At Stop.................201
▫Adaptive Cruise Control (ACC) Menu.......202
▫Display Warnings And Maintenance........203
▫Precautions While Driving With ACC.......206
▫General Information...................210
116 UNDERSTANDING THE FEATURES OF YOUR VEHICLE
Page 160 of 636

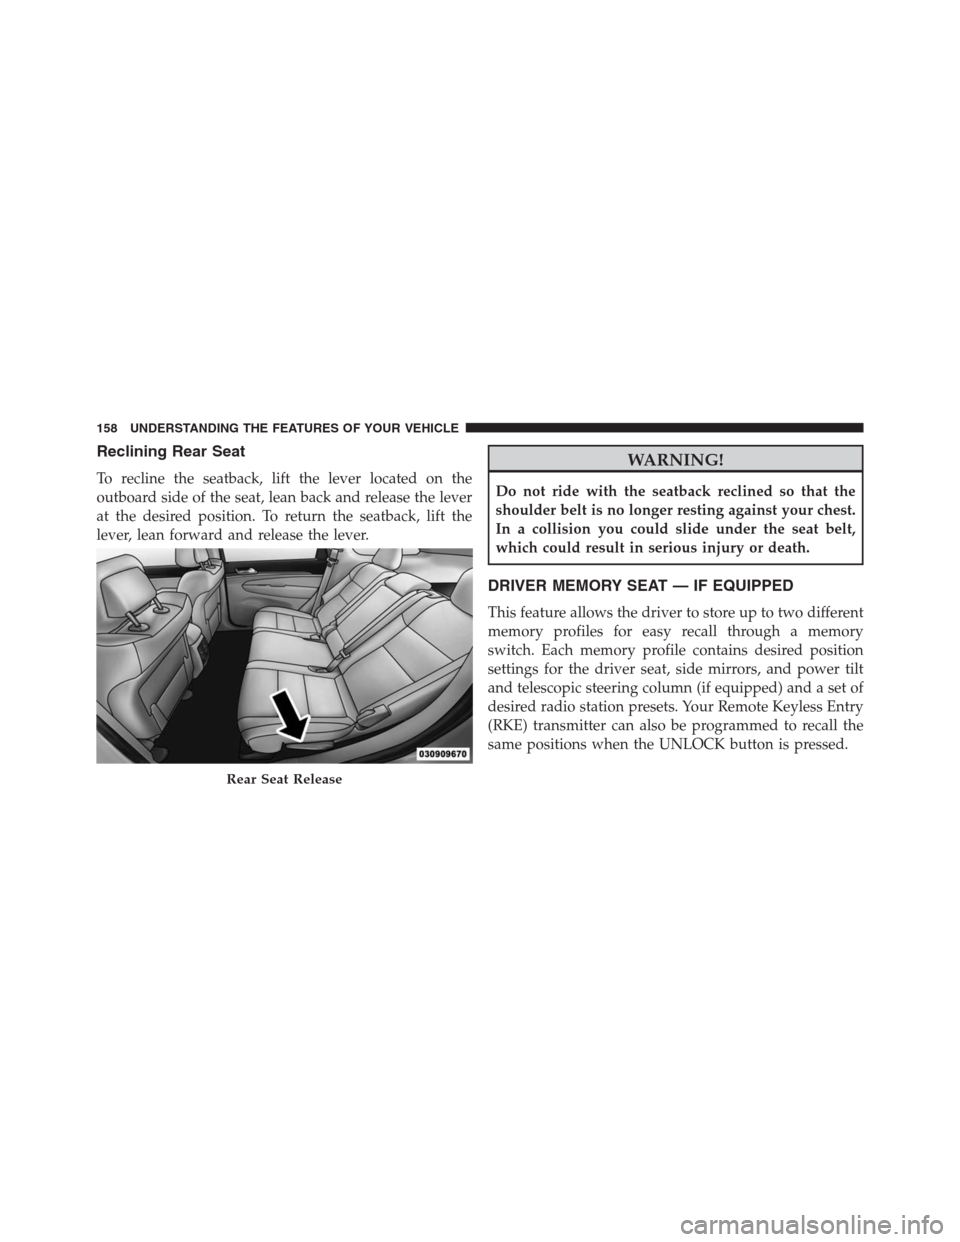
Reclining Rear Seat
To recline the seatback, lift the lever located on the
outboard side of the seat, lean back and release the lever
at the desired position. To return the seatback, lift the
lever, lean forward and release the lever.
WARNING!
Do not ride with the seatback reclined so that the
shoulder belt is no longer resting against your chest.
In a collision you could slide under the seat belt,
which could result in serious injury or death.
DRIVER MEMORY SEAT — IF EQUIPPED
This feature allows the driver to store up to two different
memory profiles for easy recall through a memory
switch. Each memory profile contains desired position
settings for the driver seat, side mirrors, and power tilt
and telescopic steering column (if equipped) and a set of
desired radio station presets. Your Remote Keyless Entry
(RKE) transmitter can also be programmed to recall the
same positions when the UNLOCK button is pressed.
Rear Seat Release
158 UNDERSTANDING THE FEATURES OF YOUR VEHICLE
Page 162 of 636
![JEEP GRAND CHEROKEE 2015 WK2 / 4.G SRT Owners Manual 2. Adjust all memory profile settings to desired prefer-
ences (i.e., seat, side mirror, power tilt and telescopic
steering column [if equipped], and radio station pre-
sets).
3. Push and release the JEEP GRAND CHEROKEE 2015 WK2 / 4.G SRT Owners Manual 2. Adjust all memory profile settings to desired prefer-
ences (i.e., seat, side mirror, power tilt and telescopic
steering column [if equipped], and radio station pre-
sets).
3. Push and release the](/manual-img/16/7110/w960_7110-161.png)
2. Adjust all memory profile settings to desired prefer-
ences (i.e., seat, side mirror, power tilt and telescopic
steering column [if equipped], and radio station pre-
sets).
3. Push and release the S (Set) button on the memory
switch.
4. Within five seconds, push and release either of the
memory buttons (1) or (2). The Driver Information
Display (DID) will display which memory position
has been set.
NOTE:
•Memory profiles can be set without the vehicle in
PARK, but the vehicle must be in PARK to recall a
memory profile.
•To set a memory profile to your RKE transmitter, refer
to “Linking And Unlinking The Remote Keyless Entry
Transmitter To Memory” in this section.Linking And Unlinking The Remote Keyless Entry
Transmitter To Memory
Your RKE transmitters can be programmed to recall one
of two pre-programmed memory profiles by pushng the
UNLOCK button on the RKE transmitter.
NOTE:Before programming your RKE transmitters you
must select the “Memory To FOB” feature through the
Uconnect® system screen. Refer to “Uconnect® Settings ”
in “Understanding Your Instrument Panel” for further
information.
To program your RKE transmitters, perform the follow-
ing:
1. Cycle the vehicles ignition to the OFF position.
2. Select a desired memory profile (1) or (2).
NOTE:If a memory profile has not already been set,
refer to�Programming The Memory Feature�in this
section for instructions on how to set a memory profile.
160 UNDERSTANDING THE FEATURES OF YOUR VEHICLE
Page 164 of 636

cancelled, the driver’s seat, steering column (if equipped)
and pedals (if equipped) stop moving. A delay of one
second will occur before another recall can be selected.
Easy Entry/Exit Seat
This feature provides automatic driver seat positioning to
enhance driver mobility when entering and exiting the
vehicle.
The distance the driver seat moves depends on where
you have the driver seat positioned when you cycle the
vehicle’s ignition to the OFF position.
•When you cycle the vehicle’s ignition to the OFF
position, the driver seat will move about 2.4 in
(60 mm) rearward if the driver seat position is greater
than or equal to 2.7 in (67.7 mm) forward of the rear
stop. The seat will return to its previously set position
when you cycle the vehicle’s ignition to the ACC or
RUN position.•The Easy Entry/Easy Exit feature is disabled when the
driver seat position is less than 0.9 in (22.7 mm)
forward of the rear stop. At this position, there is no
benefit to the driver by moving the seat for Easy Exit
or Easy Entry.
Each stored memory setting will have an associated Easy
Entry and Easy Exit position.
NOTE:The Easy Entry/Exit feature is not enabled when
the vehicle is delivered from the factory. The Easy
Entry/Exit feature is enabled (or later disabled) through
the programmable features in the Uconnect® system.
Refer to “Uconnect® Settings/Customer Programmable
Features” in “Understanding Your Instrument Panel” for
further information.
162 UNDERSTANDING THE FEATURES OF YOUR VEHICLE
Page 166 of 636
CAUTION!
To prevent possible damage, do not slam the hood to
close it. Use a firm downward push at the front center
of the hood to ensure that both latches engage.
WARNING!
Be sure the hood is fully latched before driving your
vehicle. If the hood is not fully latched, it could open
when the vehicle is in motion and block your vision.
Failure to follow this warning could result in serious
injury or death.
LIGHTS
Headlight Switch
The headlight switch is located on the left side of the
instrument panel, next to the steering wheel. The head-
light switch controls the operation of the headlights,
parking lights, instrument panel lights, cargo lights and
fog lights (if equipped).
164 UNDERSTANDING THE FEATURES OF YOUR VEHICLE
Page 170 of 636

Automatic Headlight Leveling — HID Headlights
Only
This feature prevents the headlights from interfering
with the vision of oncoming drivers. Headlight leveling
automatically adjusts the height of the headlight beam in
reaction to changes in vehicle pitch.
Adaptive Bi-Xenon High Intensity Discharge
Headlights — If Equipped
This system automatically swivels the headlight beam
pattern horizontally to provide increased illumination in
the direction the vehicle is steering.
NOTE:
•Each time the Adaptive Headlight System is turned on,
the headlights will initialize by performing a brief
sequence of rotations.
•The Adaptive Headlight System is active only when
the vehicle is moving forward.The Adaptive Headlight System can be turned On or Off
using the Uconnect® System, refer to “Uconnect® Set-
tings” in “Understanding Your Instrument Panel” for
further information.
Headlight Delay
To aid in your exit, your vehicle is equipped with a
headlight delay that will leave the headlights on for
approximately up to 90 seconds. This delay is initiated
when the ignition is turned OFF while the headlight
switch is on, and then the headlight switch is cycled off.
Headlight delay can be cancelled by either turning the
headlight switch on then off, or by turning the ignition
ON.
NOTE:If your vehicle is equipped with a touchscreen,
this feature can be programmed through the Uconnect®
system. Refer to “Uconnect® Settings” in “Understand-
ing Your Instrument Panel” for further information.
168 UNDERSTANDING THE FEATURES OF YOUR VEHICLE
Page 176 of 636
Multifunction Lever
The multifunction lever is located on the left side of the
steering column.
Turn Signals
Move the multifunction lever up or down and the arrows
on each side of the instrument cluster flash to show
proper operation of the front and rear turn signal lights.
NOTE:If either light remains on and does not flash, or
there is a very fast flash rate, check for a defective outside
light bulb. If an indicator fails to light when the lever is
moved, it would suggest that the indicator bulb is
defective.
Lane Change Assist
Tap the lever up or down once, without moving beyond
the detent, and the turn signal (right or left) will flash
three times then automatically turn off.
Multifunction Lever
174 UNDERSTANDING THE FEATURES OF YOUR VEHICLE