Page 29 of 636

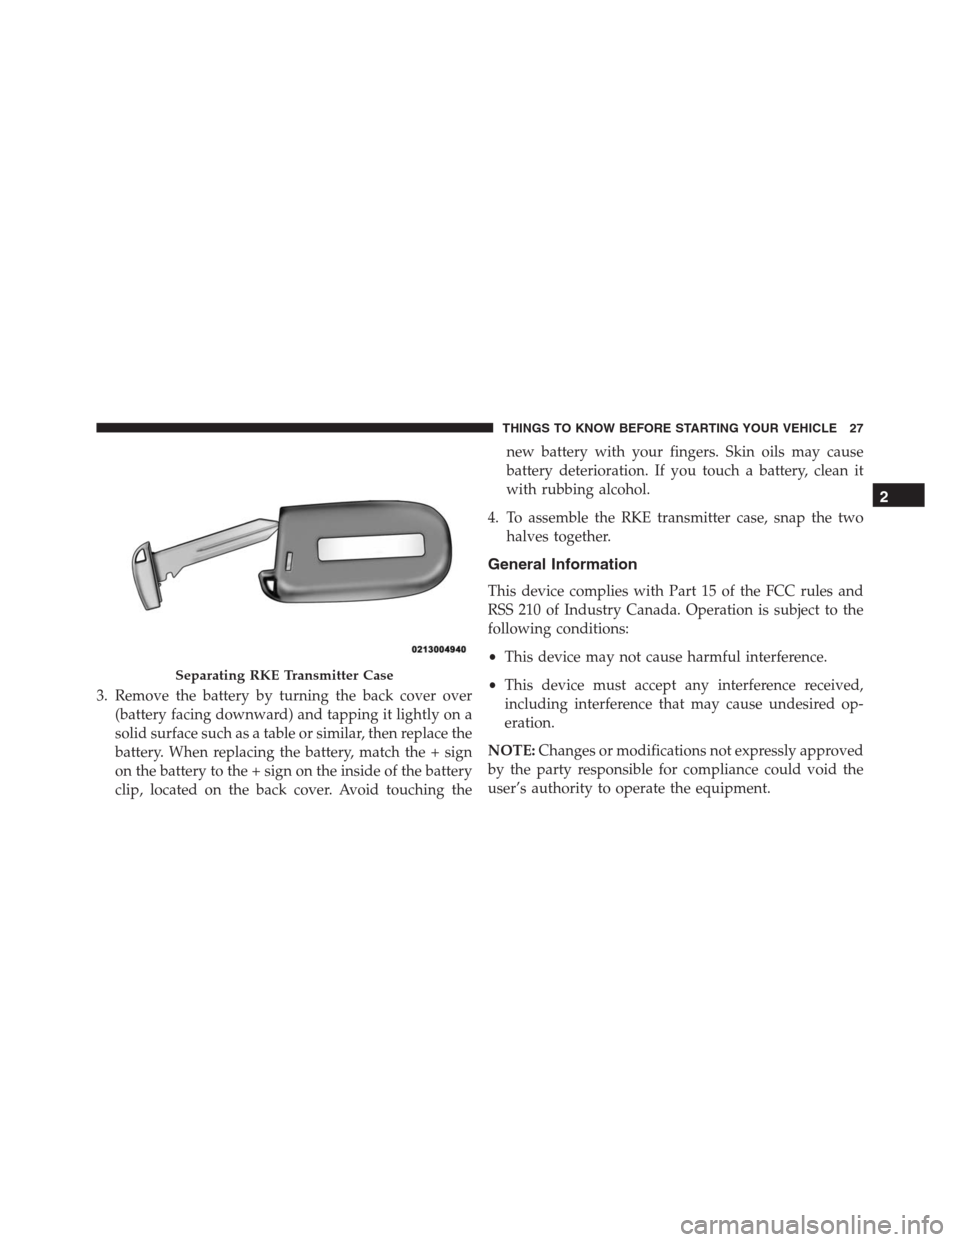
3. Remove the battery by turning the back cover over
(battery facing downward) and tapping it lightly on a
solid surface such as a table or similar, then replace the
battery. When replacing the battery, match the + sign
on the battery to the + sign on the inside of the battery
clip, located on the back cover. Avoid touching thenew battery with your fingers. Skin oils may cause
battery deterioration. If you touch a battery, clean it
with rubbing alcohol.
4. To assemble the RKE transmitter case, snap the two
halves together.
General Information
This device complies with Part 15 of the FCC rules and
RSS 210 of Industry Canada. Operation is subject to the
following conditions:
•This device may not cause harmful interference.
•This device must accept any interference received,
including interference that may cause undesired op-
eration.
NOTE:Changes or modifications not expressly approved
by the party responsible for compliance could void the
user’s authority to operate the equipment.
Separating RKE Transmitter Case
2
THINGS TO KNOW BEFORE STARTING YOUR VEHICLE 27
Page 32 of 636

To Enter Remote Start Mode
Push and release the REMOTE START button
on the RKE transmitter twice within five sec-
onds. The parking lights will flash, vehicle
doors will lock, and the horn will chirp twice (if
programmed). Once the vehicle has started, the engine
will run for 15 minutes.
NOTE:
•If your power door locks were unlocked, Remote Start
will automatically lock the doors.
•If an engine fault is present or fuel level is low, the
vehicle will start and then shut down in 10 seconds.
•The park lamps will turn on and remain on during
Remote Start mode.•For security, power window and power sunroof op-
eration (if equipped) are disabled when the vehicle is
in the Remote Start mode.
•The engine can be started two consecutive times (two
15-minute cycles) with the RKE transmitter. However,
the ignition switch must be cycled to the ON/RUN
position before you can repeat the start sequence for a
third cycle.
To Exit Remote Start Mode Without Driving The
Vehicle
Push and release the REMOTE START button one time or
allow the engine to run for the entire 15-minute cycle.
NOTE:To avoid unintentional shut downs, the system
will disable the one time push of the REMOTE START
button for two seconds after receiving a valid Remote
Start request.
30 THINGS TO KNOW BEFORE STARTING YOUR VEHICLE
Page 46 of 636

NOTE:If the window runs into any obstacle during
“Auto Up,” it will reverse direction and then go back
down. Remove the obstacle and use the window switch
again to close the window. Any impact due to rough road
conditions may trigger the auto reverse function unex-
pectedly during “Auto-Up.” If this happens, pull the
switch lightly to the first detent and hold it to close the
window manually.
WARNING!
There is no anti-pinch protection when the window
is almost closed. Be sure to clear all objects from the
window before closing.
Resetting The Auto Up Feature
Should the “Auto Up” feature stop working, the window
probably needs to be reset. To reset “Auto Up”:1. Pull the window switch up to close the window
completely and continue to hold the switch up for an
additional two seconds after the window is closed.
2. Push the window switch down firmly to the second
detent to open the window completely and continue
to hold the switch down for an additional two seconds
after the window is fully open.
Window Lockout Button
The Window Lockout button on the driver’s door allows
you to disable the window controls on the rear doors. To
disable the window controls on the rear doors, push the
Window Lockout button. To enable the window controls,
push the Window Lockout button again.
44 THINGS TO KNOW BEFORE STARTING YOUR VEHICLE
Page 50 of 636

NOTE:
•In the event of a power malfunction to the liftgate, an
emergency liftgate latch release can be used to open
the liftgate. The emergency liftgate latch release can be
accessed through a snap-in cover located on the lift-
gate trim panel.
•If liftgate is left open for an extended period of time,
the liftgate may need to be closed manually to reset
power liftgate functionality.
WARNING!
During power operation, personal injury or cargo
damage may occur. Ensure the liftgate travel path is
clear. Make sure the liftgate is closed and latched
before driving away.NOTE:
•The power liftgate buttons will not operate if the
vehicle is in gear or the vehicle speed is above 0 mph
(0 km/h).
•The power liftgate will not operate in temperatures
below �22°F (�30°C) or temperatures above 150°F
(65°C). Be sure to remove any buildup of snow or ice
from the liftgate before pushing any of the power
liftgate switches.
•If anything obstructs the power liftgate while it is
closing or opening, the liftgate will automatically
reverse to the closed or open position, provided it
meets sufficient resistance.
•There are also pinch sensors attached to the side of the
liftgate. Light pressure anywhere along these strips
will cause the liftgate to return to the open position.
48 THINGS TO KNOW BEFORE STARTING YOUR VEHICLE
Page 54 of 636

the START or ON/RUN position. If the driver or
outboard front seat passenger is unbelted, the Seat Belt
Reminder Light will turn on and remain on until both
outboard front seat belts are buckled.
The BeltAlert warning sequence begins after the vehicle
speed is over 5 MPH (8 km/h) by blinking the Seat Belt
Reminder Light and sounding an intermittent chime.
Once the sequence starts, it will continue for the entire
duration or until the respective seat belts are buckled.
After the sequence completes, the Seat Belt Reminder
Light remains illuminated until the respective seat belts
are buckled. The driver should instruct all other occu-
pants to buckle their seat belts. If an outboard front seat
belt is unbuckled while traveling at speeds greater than 5
MPH (8 km/h), BeltAlert will provide both audio and
visual notification.
The outboard front passenger seat BeltAlert is not active
when the outboard front passenger seat is unoccupied.BeltAlert may be triggered when an animal or heavy
object is on the outboard front passenger seat or when the
seat is folded flat (if equipped). It is recommended that
pets be restrained in the rear seat (if equipped) in pet
harnesses or pet carriers that are secured by seat belts,
and cargo is properly stowed.
BeltAlert can be activated or deactivated by your autho-
rized dealer. FCA US LLC does not recommend deacti-
vating BeltAlert.
NOTE:If BeltAlert has been deactivated, the Seat Belt
Reminder Light will continue to illuminate while the
driver ’s or outboard front passenger ’s (if equipped with
BeltAlert) seat belt remains unbuckled.
Lap/Shoulder Belts
All seating positions in your vehicle are equipped with
lap/shoulder belts.
52 THINGS TO KNOW BEFORE STARTING YOUR VEHICLE
Page 69 of 636

NOTE:
•If you have difficulties or problems resetting the Active
Head Restraints, see an authorized dealer.
•For safety reasons, have the Active Head Restraints
checked by a qualified specialist at an authorized
dealer.
Supplemental Restraint System (SRS)
Air Bag System Components
Your vehicle may be equipped with the following air bag
system components:
•Occupant Restraint Controller (ORC)
•Air Bag Warning Light
•Steering Wheel and Column
•Instrument Panel•Knee Impact Bolsters
•Advanced Front Air Bags
•Supplemental Side Air Bags
•Supplemental Knee Air Bags
•Front and Side Impact Sensors
•Seat Belt Pretenioners
•Seat Belt Buckle Switch
•Seat Track Position Sensors
Advanced Front Air Bags
This vehicle has Advanced Front Air Bags for both the
driver and front passenger as a supplement to the seat
belt restraint systems. The driver ’s Advanced Front Air
Bag is mounted in the center of the steering wheel. The
passenger ’s Advanced Front Air Bag is mounted in the
instrument panel, above the glove compartment. The
2
THINGS TO KNOW BEFORE STARTING YOUR VEHICLE 67
Page 73 of 636

Knee Impact Bolsters
The Knee Impact Bolsters help protect the knees of the
driver and front passenger, and position the front occu-
pants for improved interaction with the Advanced Front
Air Bags.
WARNING!
•Do not drill, cut, or tamper with the knee impact
bolsters in any way.
•Do not mount any accessories to the knee impact
bolsters such as alarm lights, stereos, citizen band
radios, etc.
Supplemental Driver Knee Air Bag
This vehicle is equipped with a Supplemental Driver
Knee Air Bag mounted in the instrument panel below the
steering column. The Supplemental Driver Knee Air Bag
provides enhanced protection during a frontal impact by
working together with the seat belts, pretensioners, and
Advanced Front Air Bags.
Supplemental Side Air Bags
Your vehicle is equipped with two types of side air bags:
1. Supplemental Seat-Mounted Side Air Bags (SABs):
Located in the outboard side of the front seats. The
SABs are marked with “SRS AIRBAG” or “AIRBAG”
air bag label sewn into the outboard side of the seats.
2
THINGS TO KNOW BEFORE STARTING YOUR VEHICLE 71
Page 80 of 636

Enhanced Accident Response System
In the event of an impact, if the communication network
remains intact, and the power remains intact, depending
on the nature of the event, the ORC will determine
whether to have the Enhanced Accident Response Sys-
tem perform the following functions:
•Cut off fuel to the engine.
•Flash hazard lights as long as the battery has power or
until the ignition is placed in the “OFF” position.
•Turn on the interior lights, which remain on as long as
the battery has power or until the ignition is placed in
the “OFF” position.
•Unlock the doors automatically.
System Reset Procedure
In order to reset the Enhanced Accident Response System
functions after an event, the ignition switch must be
changed from ignition START or ON/RUN to ignition
OFF.
Air Bag Warning Light
The air bags must be ready to inflate for your
protection in a collision. The Occupant Re-
straint Controller (ORC) monitors the internal
circuits and interconnecting wiring associated
with air bag system electrical components.
The ORC monitors the readiness of the electronic parts of
the air bag system whenever the ignition is in the START
or ON/RUN position. If the ignition is in the OFF
position or in the ACC position, the air bag system is not
on and the air bags will not inflate.
78 THINGS TO KNOW BEFORE STARTING YOUR VEHICLE