Page 170 of 636

Automatic Headlight Leveling — HID Headlights
Only
This feature prevents the headlights from interfering
with the vision of oncoming drivers. Headlight leveling
automatically adjusts the height of the headlight beam in
reaction to changes in vehicle pitch.
Adaptive Bi-Xenon High Intensity Discharge
Headlights — If Equipped
This system automatically swivels the headlight beam
pattern horizontally to provide increased illumination in
the direction the vehicle is steering.
NOTE:
•Each time the Adaptive Headlight System is turned on,
the headlights will initialize by performing a brief
sequence of rotations.
•The Adaptive Headlight System is active only when
the vehicle is moving forward.The Adaptive Headlight System can be turned On or Off
using the Uconnect® System, refer to “Uconnect® Set-
tings” in “Understanding Your Instrument Panel” for
further information.
Headlight Delay
To aid in your exit, your vehicle is equipped with a
headlight delay that will leave the headlights on for
approximately up to 90 seconds. This delay is initiated
when the ignition is turned OFF while the headlight
switch is on, and then the headlight switch is cycled off.
Headlight delay can be cancelled by either turning the
headlight switch on then off, or by turning the ignition
ON.
NOTE:If your vehicle is equipped with a touchscreen,
this feature can be programmed through the Uconnect®
system. Refer to “Uconnect® Settings” in “Understand-
ing Your Instrument Panel” for further information.
168 UNDERSTANDING THE FEATURES OF YOUR VEHICLE
Page 171 of 636
If your vehicle is not equipped with a touchscreen, this
feature can be programmed through the Driver Informa-
tion Display (DID). Refer to “Driver Information Display
(DID)” in “Understanding Your Instrument Panel” for
further information.
Parking Lights And Panel Lights
To turn on the parking lights and instrument
panel lights, rotate the headlight switch clockwise.
To turn off the parking lights, rotate the headlight switch
back to the O (Off) position.
Fog Lights — If Equipped
The fog lights are turned on by rotating the headlight
switch to the parking light or headlight position and
pushing in the headlight rotary control.The fog lights will operate only when the parking lights
are on or when the vehicle headlights are on low beam.
An indicator light located in the instrument cluster will
illuminate when the fog lights are on. The fog lights will
Fog Light Operation
3
UNDERSTANDING THE FEATURES OF YOUR VEHICLE 169
Page 172 of 636

turn off when the switch is pushed a second time, when
the headlight switch is rotated to the off position, or the
high beam is selected.
Interior Lights
Courtesy and dome lights are turned on when the front
doors are opened or when the dimmer control (rotating
wheel on the right side of the headlight switch) is rotated
to its farthest upward position. If your vehicle is
equipped with Remote Keyless Entry (RKE) and the
UNLOCK button is pressed on the RKE transmitter the
courtesy and dome lights will turn on. When a door is
open and the interior lights are on, rotating the dimmer
control all the way down, to the OFF detent, will cause all
the interior lights to go out. This is also known as the
“Party” mode because it allows the doors to stay open for
extended periods of time without discharging the vehi-
cle’s battery.The brightness of the instrument panel lighting can be
regulated by rotating the dimmer control up (brighter) or
down (dimmer). When the headlights are on you can
supplement the brightness of the odometer, trip odom-
eter, radio and overhead console by rotating the control
to its farthest position up until you hear a click. This
feature is termed the “Parade” mode and is useful when
headlights are required during the day.
170 UNDERSTANDING THE FEATURES OF YOUR VEHICLE
Page 173 of 636
Lights-On Reminder
If the headlights, parking lights, or cargo lights are left on
after the ignition is turned OFF, a chime will sound when
the driver ’s door is opened.
Battery Saver
To protect the life of your vehicle’s battery, load shedding
is provided for both the interior and exterior lights.
If the ignition is OFF and any door is left ajar for 10
minutes or the dimmer control is rotated all the way up
to the dome ON position for 10 minutes, the interior
lights will automatically turn off.
NOTE:Battery saver mode is cancelled if the ignition is
ON.
If the headlights remain on while the ignition is cycled
OFF, the exterior lights will automatically turn off after
eight minutes. If the headlights are turned on and left on
for eight minutes while the ignition is OFF, the exterior
lights will automatically turn off.
Dimmer Control
3
UNDERSTANDING THE FEATURES OF YOUR VEHICLE 171
Page 177 of 636

Flash-To-Pass
You can signal another vehicle with your headlights by
partially pulling the multifunction lever toward the steer-
ing wheel. This will cause the high beam headlights to
turn on until the lever is released.
High/Low Beam Switch
Push the multifunction lever toward the instrument
panel to switch the headlights to high beam. Pulling the
multifunction back toward the steering wheel will turn
the low beams back on, or shut the high beams off.
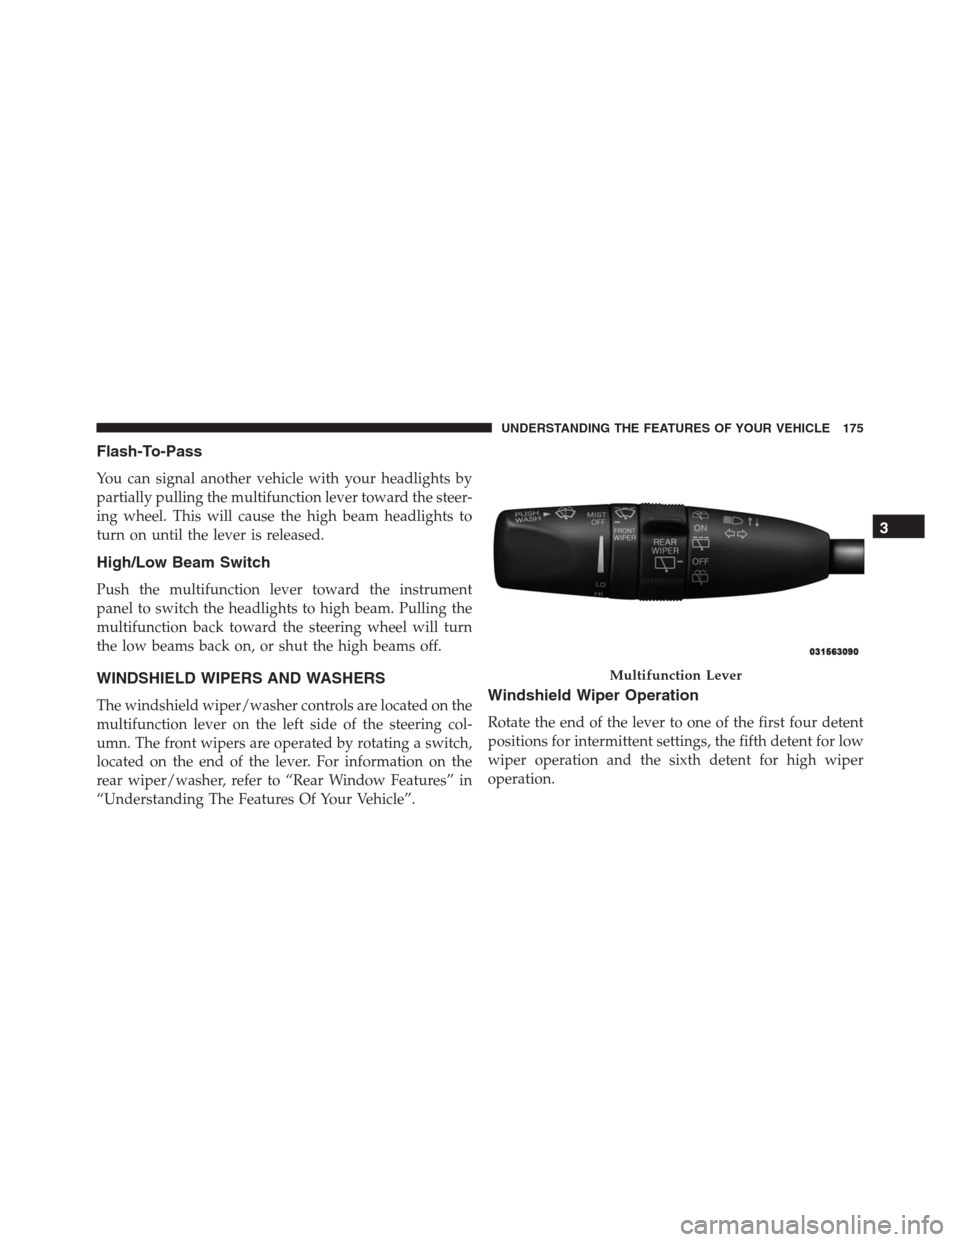
WINDSHIELD WIPERS AND WASHERS
The windshield wiper/washer controls are located on the
multifunction lever on the left side of the steering col-
umn. The front wipers are operated by rotating a switch,
located on the end of the lever. For information on the
rear wiper/washer, refer to “Rear Window Features” in
“Understanding The Features Of Your Vehicle”.Windshield Wiper Operation
Rotate the end of the lever to one of the first four detent
positions for intermittent settings, the fifth detent for low
wiper operation and the sixth detent for high wiper
operation.
Multifunction Lever
3
UNDERSTANDING THE FEATURES OF YOUR VEHICLE 175
Page 288 of 636

INSTRUMENT CLUSTER DESCRIPTIONS
1. Tachometer
Indicates the engine speed in revolutions per minute
(RPM x 1000).
2. Seat Belt Reminder Light
When the ignition switch is first turned to the
ON/RUN position, this light will turn on for four
to eight seconds as a bulb check. During the bulb
check, if the driver’s seat belt is unbuckled, a chime will
sound. After the bulb check or when driving, if the driver
or front passenger seat belt remains unbuckled, the Seat
Belt Indicator Light will flash or remain on continuously.
Refer to “Occupant Restraints” in “Things To Know
Before Starting Your Vehicle” for further information.3. Anti-Lock Brake (ABS) Light
This light monitors the Anti-Lock Brake System
(ABS). The light will turn on when the ignition
switch is turned to the ON/RUN position and
may stay on for as long as four seconds.
If the ABS light remains on or turns on while driving, it
indicates that the Anti-Lock portion of the brake system
is not functioning and that service is required. However,
the conventional brake system will continue to operate
normally if the BRAKE warning light is not on.
If the ABS light is on, the brake system should be serviced
as soon as possible to restore the benefits of Anti-Lock
brakes. If the ABS light does not turn on when the
ignition switch is turned to the ON/RUN position, have
the light inspected by an authorized dealer.
4. High Beam Indicator
Indicates that headlights are on high beam.
286 UNDERSTANDING YOUR INSTRUMENT PANEL
Page 297 of 636
21. Park/Headlight ON Indicator — If Equipped
This indicator will illuminate when the park
lights or headlights are turned on.
DRIVER INFORMATION DISPLAY (DID)
The Driver Information Display (DID) features a driver-
interactive display that is located in the instrument
cluster.
The DID Menu items consists of the following:
•Speedometer Main Gauge
•MPH <-> KM/H
•Vehicle Info
Driver Information Display (DID) Location
4
UNDERSTANDING YOUR INSTRUMENT PANEL 295
Page 320 of 636

next to the setting, showing that setting has been se-
lected. Then press the arrow back button on the touch-
screen.
NOTE:When Day or Night is selected for the Display
Mode, the usage of the Parade Mode feature will cause
the radio to activate the Display Brightness Day control
even though the headlights are on.
•Display Brightness With Headlights ON
When in this display, you may select the brightness with
the headlights on. Adjust the brightness with the “+” and
“–” setting buttons on the touchscreen or by selecting any
point on the scale between the “+” and “–” buttons on the
touchscreen. Then press the arrow back button on the
touchscreen.NOTE:To make changes to the�Display Brightness with
Headlights ON�setting, the headlights must be on and
the interior dimmer switch must not be in the�party�or
�parade�positions.
•Display Brightness With Headlights OFF
When in this display, you may select the brightness with
the headlights off. Adjust the brightness with the “+” and
“–” setting buttons on the touchscreen or by selecting any
point on the scale between the “+” and “–” buttons on the
touchscreen. Then press the arrow back button on the
touchscreen.
NOTE:To make changes to the�Display Brightness with
Headlights OFF�setting, the headlights must be off and
the interior dimmer switch must not be in the�party�or
�parade�positions.
318 UNDERSTANDING YOUR INSTRUMENT PANEL