2015 JEEP GRAND CHEROKEE manual transmission
[x] Cancel search: manual transmissionPage 172 of 717
To Deactivate
1. Pull the multifunction lever toward you (or rearward
in car) to manually deactivate the system (normal
operation of low beams).
2. Push back on the multifunction lever once again to
reactivate the system.
Daytime Running Lights — If Equipped
The Daytime Running Lights (low intensity) come on
whenever the engine is running, and the transmission is
not in the PARK position. The lights will remain on until
the ignition is switched to the OFF or ACC position or the
parking brake is engaged.
NOTE:If a turn signal is activated, the DRL lamp on the
same side of the vehicle will turn off for the duration of
the turn signal activation. Once the turn signal is no
longer active, the DRL lamp will illuminate.
The headlight switch must be used for normal nighttime
driving.
Automatic Headlight Leveling — HID Headlights
Only
This feature prevents the headlights from interfering
with the vision of oncoming drivers. Headlight leveling
automatically adjusts the height of the headlight beam in
reaction to changes in vehicle pitch.
Adaptive Bi-Xenon High Intensity Discharge
Headlights — If Equipped
This system automatically swivels the headlight beam
pattern horizontally to provide increased illumination in
the direction the vehicle is steering.
170 UNDERSTANDING THE FEATURES OF YOUR VEHICLE
Page 327 of 717
•Show Command List
When in this display, you may change the Show Com-
mand List settings. To change the Show Command List
settings, press the “Show Command List” button on the
touchscreen and select from “Always,” “With Help” or
“Never.” Press the back arrow button on the touchscreen
to return to the previous menu.
Clock & Date
After pressing the “Clock” button on the touchscreen the
following settings will be available:
•Set Time
When in this display, you may set the time and format
manually. Press the “Set Time” button then choose from
a 12 hour or 24 hour format. Press the corresponding
arrow above and below the current time to adjust, then
select AM or PM. Press the back arrow button on the
touchscreen to return to the previous menu.
•Set Date
When in this display, you may set the date manually.
Press the “Set Date” button then press the corresponding
arrows above and below the current date to adjust. Press
the back arrow button on the touchscreen to return to the
previous menu.
Safety/Assistance
After pressing the “Safety/Assistance” button on the
touchscreen the following settings will be available:
•ParkSense®
The ParkSense® system will scan for objects behind the
vehicle when the transmission shift lever/gear selector is
in REVERSE and the vehicle speed is less than 11 mph (18
km/h). It will provide an alert (audible and/or visual) to
indicate the proximity to other objects. The system can be
enabled with Sound Only, or Sound and Display. To
change the ParkSense® status, press and release the
4
UNDERSTANDING YOUR INSTRUMENT PANEL 325
Page 433 of 717
The electronically-controlled transmission provides a
precise shift schedule. The transmission electronics are
self-calibrating; therefore, the first few shifts on a new
vehicle may be somewhat abrupt. This is a normal
condition, and precision shifts will develop within a few
hundred miles (kilometers).
Only shift from DRIVE to PARK or REVERSE when the
accelerator pedal is released and the vehicle is stopped.
Be sure to keep your foot on the brake pedal when
shifting between these gears.
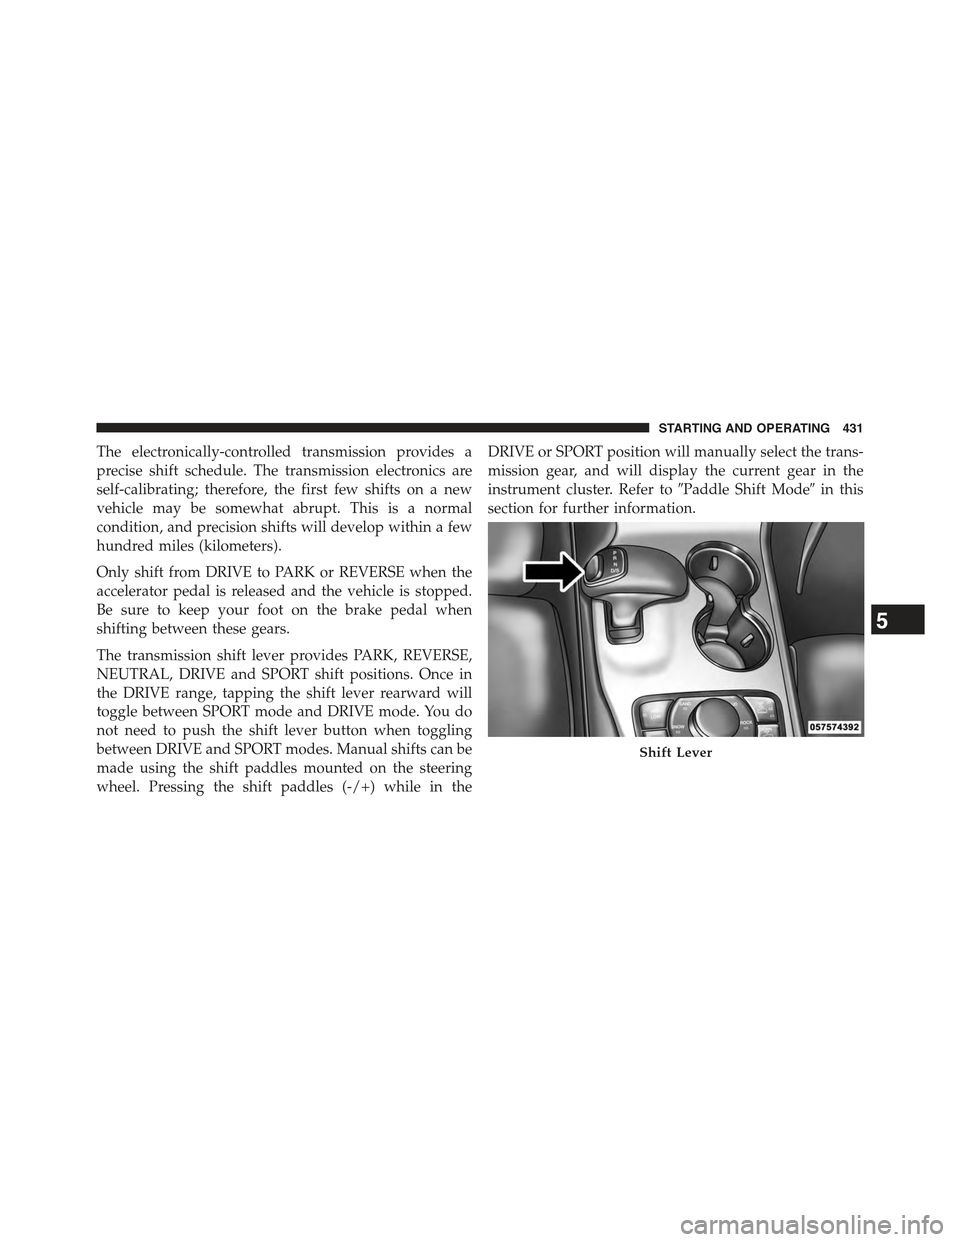
The transmission shift lever provides PARK, REVERSE,
NEUTRAL, DRIVE and SPORT shift positions. Once in
the DRIVE range, tapping the shift lever rearward will
toggle between SPORT mode and DRIVE mode. You do
not need to push the shift lever button when toggling
between DRIVE and SPORT modes. Manual shifts can be
made using the shift paddles mounted on the steering
wheel. Pressing the shift paddles (-/+) while in the
DRIVE or SPORT position will manually select the trans-
mission gear, and will display the current gear in the
instrument cluster. Refer to#Paddle Shift Mode#in this
section for further information.
Shift Lever
5
STARTING AND OPERATING 431
Page 440 of 717
NOTE:Even if the transmission can be reset, we recom-
mend that you visit your authorized dealer at your
earliest possible convenience. Your authorized dealer has
diagnostic equipment to determine if the problem could
recur.
If the transmission cannot be reset, authorized dealer
service is required.
Paddle Shift Mode
Paddle Shift mode is a driver-interactive transmission
feature providing manual shift control, giving you more
control of the vehicle. Paddle Shift allows you to maxi-
mize engine braking, eliminate undesirable upshifts and
downshifts, and improve overall vehicle performance.
This system can also provide you with more control
during passing, city driving, cold slippery conditions,
mountain driving, trailer towing, and many other situa-
tions.
Operation
When the transmission is in DRIVE or SPORT mode, it
will operate automatically, shifting between the eight
available gears. To activate Paddle Shift mode, simply tap
one of the steering wheel-mounted shift paddles (+/-)
while in DRIVE or SPORT mode. Tapping (-) to enter
Paddle Shift mode will downshift the transmission to the
next lower gear, while using (+) to enter Paddle Shift
mode will retain the current gear. When Paddle Shift
mode is active, the current transmission gear is displayed
in the instrument cluster.
In Paddle Shift mode, the transmission will shift up or
down when (+/-) is manually selected by the driver,
unless an engine lugging or overspeed condition would
result. It will remain in the selected gear until another
upshift or downshift is chosen, except as described
below.
438 STARTING AND OPERATING
Page 441 of 717

•The transmission will automatically downshift as the
vehicle slows (to prevent engine lugging) and will
display the current gear.
•The transmission will automatically downshift to first
gear when coming to a stop. After a stop, the driver
should manually upshift (+) the transmission as the
vehicle is accelerated.
•You can start out, from a stop, in first or second gear
(or third gear, in 4LO range, Snow mode, or Sand
mode). Tapping (+) (at a stop) will allow starting in
second gear. Starting out in second gear can be helpful
in snowy or icy conditions.
•If a requested downshift would cause the engine to
over-speed, that shift will not occur.
•The system will ignore attempts to upshift at too low
of a vehicle speed.
•Holding the (-) paddle depressed will downshift the
transmission to the lowest gear possible at the current
speed.
•Transmission shifting will be more noticeable when
Paddle Shift mode is enabled.
•The system may revert to automatic shift mode if a
fault or overheat condition is detected.
NOTE:When Selec-Speed or Hill Descent Control is
enabled, Paddle Shift mode is not active. Pushing the
(+/-) shift paddles in Selec-Speed or Hill Descent Control
simply limits the highest allowed gear. Shifts below and
up to that gear will occur automatically.
To disengage Paddle Shift mode, push and hold the (+)
shift paddle until#D#or#S#is once again indicated in the
instrument cluster. You can shift in or out of Paddle Shift
mode at any time without taking your foot off the
accelerator pedal.
5
STARTING AND OPERATING 439
Page 448 of 717

6. After the shift is completed and the NEUTRAL (N)
light stays on, release the NEUTRAL (N) button.
7. Shift the transmission into REVERSE.
8. Release the brake pedal for five seconds and ensure
that there is no vehicle movement.
NOTE:If shift conditions/interlocks are not met, a “To
Tow Vehicle Safely, Read Neutral Shift Procedure in
Owners Manual” message will flash from the Driver
Information Display (DID). Refer to “Driver Information
Display (DID)” in “Understanding Your Instrument
Panel” for further information.
Shifting Out Of NEUTRAL (N)
Use the following procedure to prepare your vehicle for
normal usage.
1. Bring the vehicle to a complete stop.
2. Firmly apply the parking brake.
3. Start the engine.
4. Press and hold the brake pedal.
5. Shift the transmission into NEUTRAL (N).
NEUTRAL (N) Switch
446 STARTING AND OPERATING
Page 467 of 717

Traction Downhill
When descending mountains or hills, use Hill Descent or
Selec-Speed Control to avoid repeated heavy braking.
If not equipped with Hill Descent or Selec-Speed Control
use the following procedure:
Shift the transmission into a low gear, and the transfer
case into 4WD LOW range. Let the vehicle go slowly
down the hill with all four wheels turning against engine
compression drag. This will permit you to control the
vehicle speed and direction.
When descending mountains or hills, repeated braking
can cause brake fade with loss of braking control. Avoid
repeated heavy braking by downshifting the transmis-
sion whenever possible.
After Driving Off-Road
Off-road operation puts more stress on your vehicle than
does most on-road driving. After going off-road, it is
always a good idea to check for damage. That way you
can get any problems taken care of right away and have
your vehicle ready when you need it.
•Completely inspect the underbody of your vehicle.
Check tires, body structure, steering, suspension, and
exhaust system for damage.
•Inspect the radiator for mud and debris and clean as
required.
•Check threaded fasteners for looseness, particularly on
the chassis, drivetrain components, steering, and sus-
pension. Retighten them, if required, and torque to the
values specified in the Service Manual.
•Check for accumulations of plants or brush. These
things could be a fire hazard. They might hide damage
to fuel lines, brake hoses, axle pinion seals, and
propeller shafts.
5
STARTING AND OPERATING 465
Page 556 of 717
Towing Tips
Before setting out on a trip, practice turning, stopping
and backing the trailer up in an area away from heavy
traffic.
Automatic Transmission
The DRIVE range can be selected when towing. The
transmission controls include a drive strategy to avoid
frequent shifting when towing. However, if frequent
shifting does occur while in DRIVE, you can use the
Paddle Shift switches to manually select a lower gear.
NOTE:Using a lower gear while operating the vehicle
under heavy loading conditions, will improve perfor-
mance and extend transmission life by reducing exces-
sive shifting and heat buildup. This action will also
provide better engine braking.
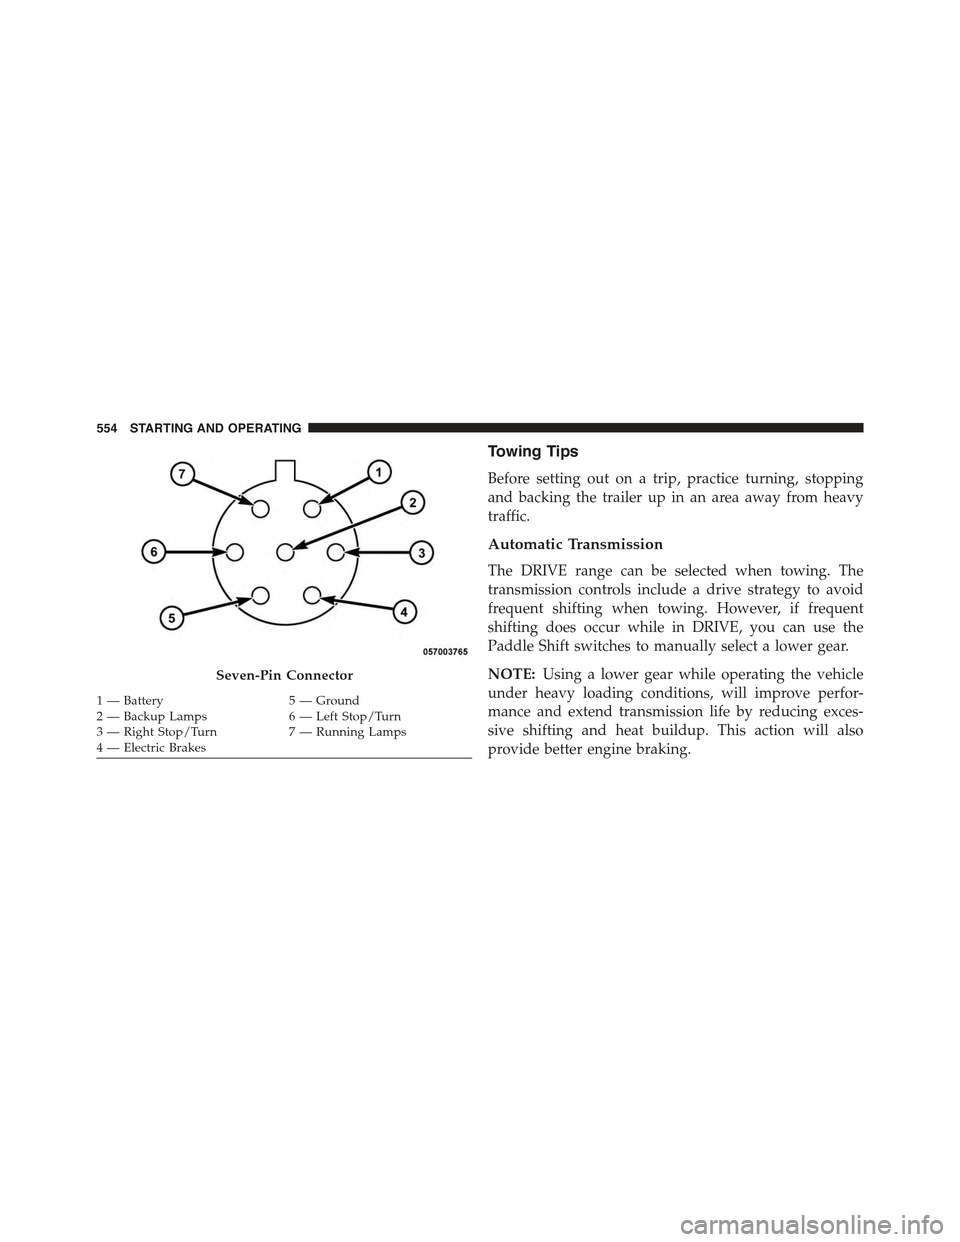
Seven-Pin Connector
1—Battery5—Ground2—BackupLamps6—LeftStop/Turn3—RightStop/Turn7—RunningLamps4 — Electric Brakes
554 STARTING AND OPERATING