2015 JEEP COMPASS audio
[x] Cancel search: audioPage 61 of 132

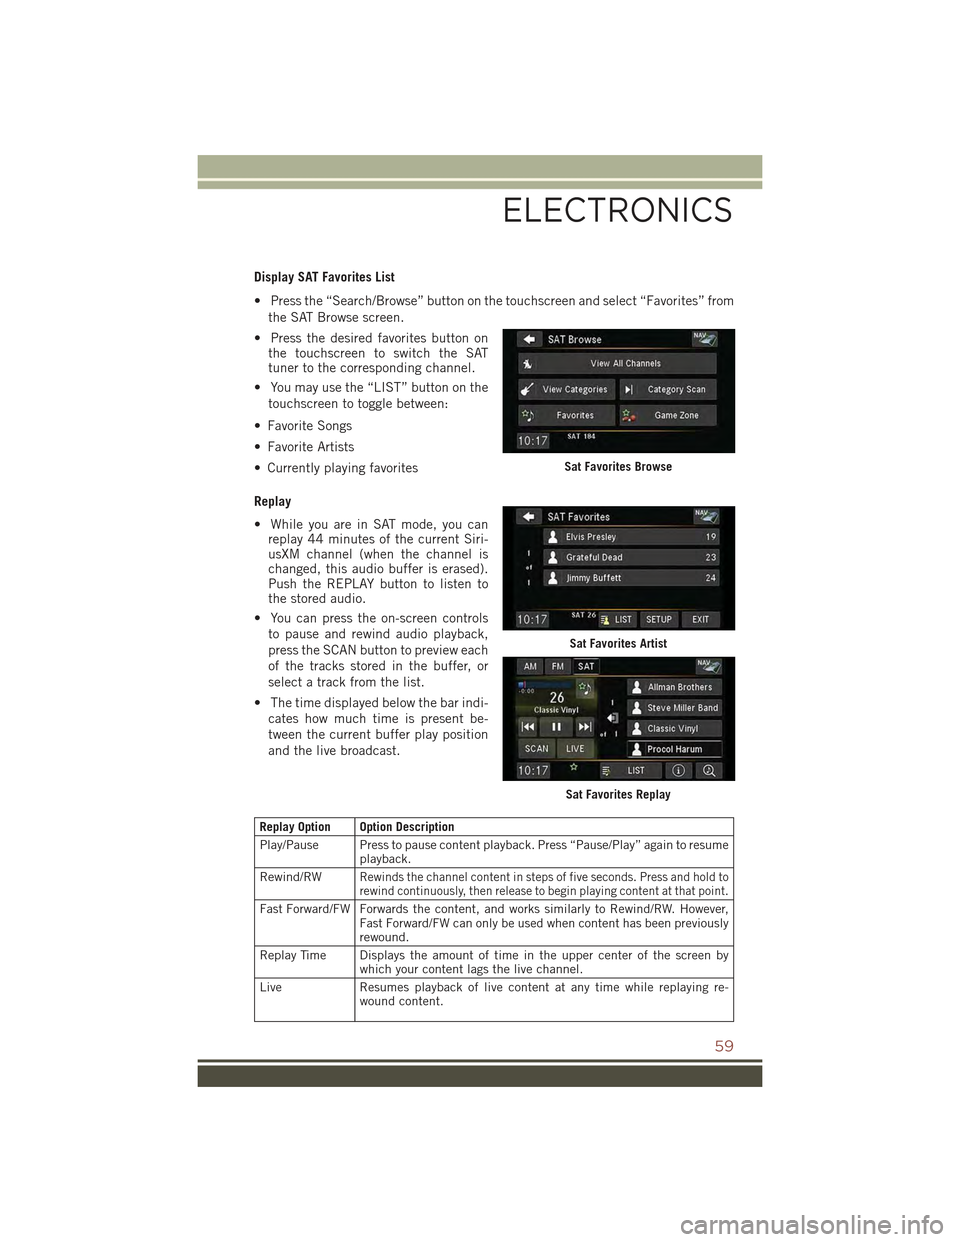
Display SAT Favorites List
• Press the “Search/Browse” button on the touchscreen and select “Favorites” from
the SAT Browse screen.
• Press the desired favorites button onthe touchscreen to switch the SATtuner to the corresponding channel.
• You may use the “LIST” button on the
touchscreen to toggle between:
• Favorite Songs
• Favorite Artists
• Currently playing favorites
Replay
• While you are in SAT mode, you canreplay 44 minutes of the current Siri-usXM channel (when the channel ischanged, this audio buffer is erased).Push the REPLAY button to listen tothe stored audio.
• You can press the on-screen controls
to pause and rewind audio playback,
press the SCAN button to preview each
of the tracks stored in the buffer, or
select a track from the list.
• The time displayed below the bar indi-
cates how much time is present be-
tween the current buffer play position
and the live broadcast.
Replay Option Option Description
Play/Pause Press to pause content playback. Press “Pause/Play” again to resumeplayback.
Rewind/RWRewinds the channel content in steps of five seconds. Press and hold torewind continuously, then release to begin playing content at that point.
Fast Forward/FW Forwards the content, and works similarly to Rewind/RW. However,Fast Forward/FW can only be used when content has been previouslyrewound.
Replay Time Displays the amount of time in the upper center of the screen bywhich your content lags the live channel.
Live Resumes playback of live content at any time while replaying re-wound content.
Sat Favorites Browse
Sat Favorites Artist
Sat Favorites Replay
ELECTRONICS
59
Page 63 of 132

STEERING WHEEL AUDIO CONTROLS
The steering wheel audio controls are located on the rear surface of the steering wheel.
Right Switch
• Push the switch up or down to in-
crease or decrease the volume.
• Push the button in the center to
change modes AM/FM/CD/SAT.
Left Switch
• Push the switch up or down to search
for the next listenable station or select
the next or previous CD track.
• Push the button in the center to select
the next preset station (radio) or to
change CDs if equipped with a CD
Changer.
iPod®/USB/MP3 CONTROL
There are many ways to play music from iPod®/MP3 players or USB devices through
your vehicle's sound system.
The remote USB port, located in the glove box, allows you to connect an iPod®into
the vehicle's sound system.
•Non-Touchscreen Radios:To hear audio from devices connected to the USB port,
press the “AUX” button on the radio faceplate.
•Touchscreen Radios:To hear audio from devices connected to the USB port, push
the MEDIA button on the faceplate, then press the “AUX” or “iPod®” button on the
touchscreen.
When connected to this feature:
• The iPod®can be controlled using the
radio buttons to Play, Browse, and List
the iPod®or external devices contents.
• The iPod®battery charges when
plugged into the USB port (if sup-
ported by the specific audio device).
• Compatible iPod®devices may also be
controllable using voice commands.
Refer to the Owner's Manual on the DVD for details.
Steering Wheel Audio Controls(Rearview Of Steering Wheel)
iPod®/USB/MP3 Control
ELECTRONICS
61
Page 64 of 132

NOTE:
The USB port supports certain Mini, Classic, Nano, Touch, and iPhone®devices. The
USB port also supports playing music from compatible external USB Mass Storage
Class memory devices. For supported audio file formats, refer to the USB Port section
in the Owner's Manual on the DVD. Refer to UconnectPhone.com website for a list of
tested iPod®s. Some iPod®software versions may not fully support the USB port
features. Please visit Apple’s website for iPod®software updates.
WARNING!
Do not plug in or remove the iPod®or external device while driving. Failure to
follow this warning could result in a collision.
Uconnect® PHONE
• To determine if your vehicle is equipped with Uconnect®Phone, push the
Uconnect®Phone buttonlocated on the radio faceplate. If your vehicle has
this feature, you will hear a voice prompt. If not, you will see a message on the
radio stating “Uconnect phone not available.”
• The Uconnect®Phone is a voice-activated, hands-free, in-vehicle communica-
tions system with Voice Command Capability (see Voice Command section).
NOTE:
To access the tutorial, push the Uconnect®Phone buttonand after the BEEP,
say “tutorial.” Push any button on the faceplate or press any button on the
touchscreen to cancel the “tutorial.”
• The Uconnect®Phone allows you to dial a phone number with your mobile phone
using simple voice commands.
• Refer to your vehicle Owner's Manual on the DVD for further details.
NOTE:
The Uconnect®Phone requires a mobile phone equipped with the Bluetooth®
Hands-Free Profile Version 1.0 or higher. For Uconnect®Customer Support: U.S.
residents - visit UconnectPhone.com or call 1–877–855–8400. Canadian Residents
- call 1-800-465–2001 (English) or 1-800-387-9983 (French). This site will
provide specific instructions based on the type of mobile phone being paired.
Phone Pairing
NOTE:
Pairing is a one-time initial setup before using the phone. Prior to starting the pairing
procedure ensure all additional phones within the vehicle have their Bluetooth®disabled.
• Activate Bluetooth®on the phone you are pairing.
• Push the “Phone”button to begin.
• Wait for the “ready” prompt and BEEP.
• After the BEEP, say ”setup” or “Uconnect device setup.”
ELECTRONICS
62
Page 66 of 132

Making A Phone Call
• Push the “Phone” button.
• After the BEEP, say “dial” (or “call” a name).
• After the BEEP, say number (or name).
Receiving A Call — Accept (And End)
• When an incoming call rings/is announced on Uconnect®, push the “Phone”
button.
• To end a call, push the “Phone” button.
Mute (Or Unmute) Microphone During Call
• During a call, push the “Voice Command” button.
• After the BEEP, say “mute” (or “mute off”).
Transfer Ongoing Call Between Handset And Vehicle
• During a call, push the “Voice Command” button.
• After the BEEP, say “transfer call.”
Changing The Volume
• Start a dialogue by pushing the “Phone” button, then adjust the volume
during a normal call.
• Use the radio ON/OFF VOLUME rotary knob to adjust the volume to a comfortable
level while the Uconnect®system is speaking. Please note the volume setting for
Uconnect®is different than the audio system.
WARNING!
• Any voice commanded system should be used only in safe driving conditions
following applicable laws regarding phone use. Your attention should be
focused on safely operating the vehicle. Failure to do so may result in a
collision causing you and others to be severely injured or killed.
• In an emergency, to use Uconnect®Phone, your mobile phone must be:
• turned on,
• paired to Uconnect®Phone,
• and have network coverage.
ELECTRONICS
64
Page 69 of 132

Voice Text Reply
• If equipped with Uconnect®Voice Command, your Uconnect®430N / 730N radio
may be able to play incoming Short Message Service (SMS) messages (text
messages) through the vehicle's sound system.
• It also allows you to respond by selecting from various predefined phrases.
• Not all phones are compatible with this feature. Refer to the phone compatibility
list at UconnectPhone.com. Connected mobile phones must be bluetooth-
compatible and paired with your radio.
• Push the “Voice Command” buttonand after the BEEP, say “SMS” to get
started.
NOTE:
To access the tutorial, push the “Voice Command” button. After the BEEP,
say “tutorial.” Push any button on the faceplate or press any button on the
touchscreen to cancel the tutorial.
WARNING!
Any voice commanded system should be used only in safe driving conditions
following applicable laws regarding phone use. Your attention should be focused
on safely operating the vehicle. Failure to do so may result in a collision causing
you and others to be severely injured or killed.
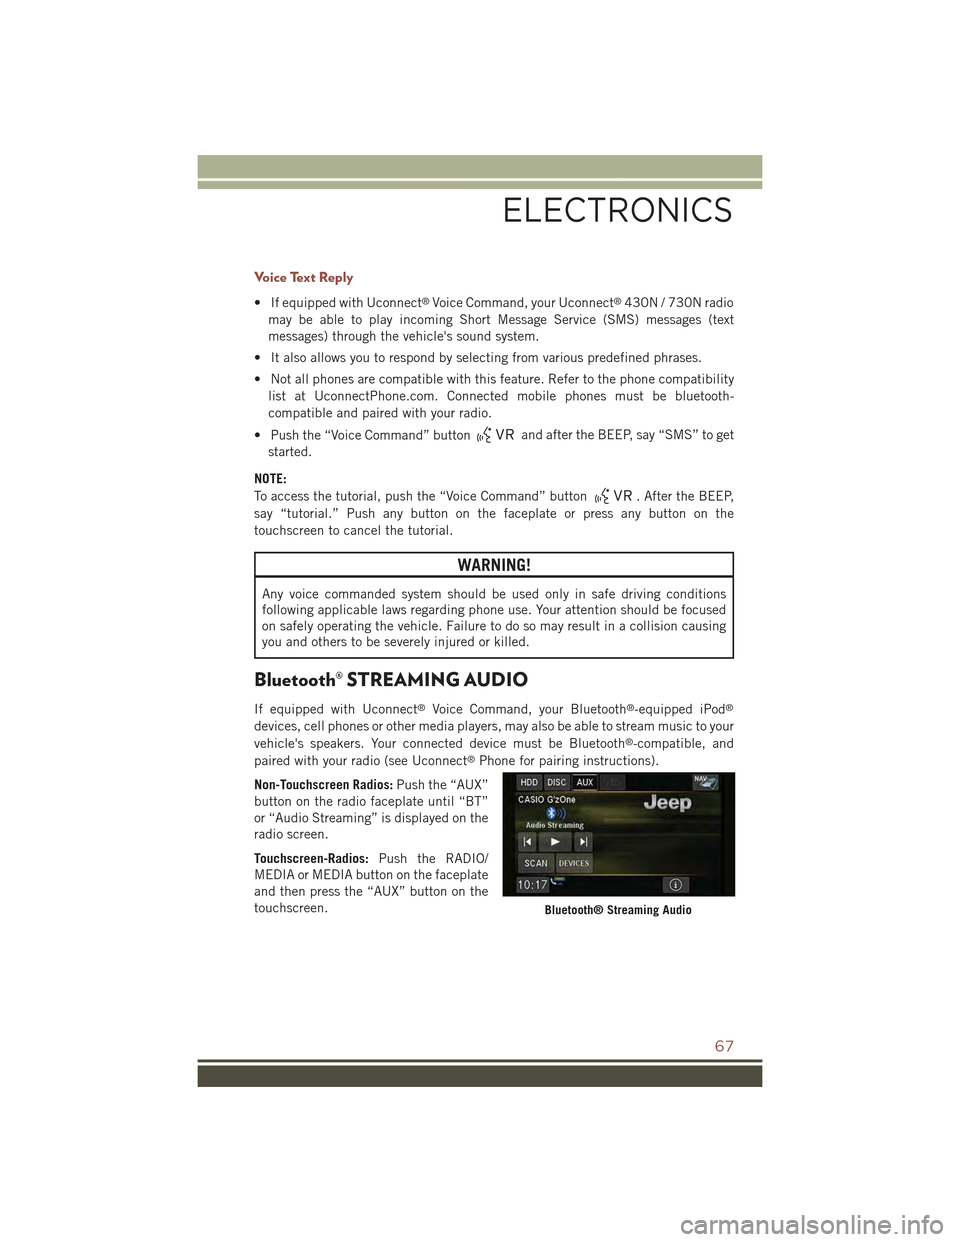
Bluetooth® STREAMING AUDIO
If equipped with Uconnect®Voice Command, your Bluetooth®-equipped iPod®
devices, cell phones or other media players, may also be able to stream music to your
vehicle's speakers. Your connected device must be Bluetooth®-compatible, and
paired with your radio (see Uconnect®Phone for pairing instructions).
Non-Touchscreen Radios:Push the “AUX”
button on the radio faceplate until “BT”
or “Audio Streaming” is displayed on the
radio screen.
Touchscreen-Radios:Push the RADIO/
MEDIA or MEDIA button on the faceplate
and then press the “AUX” button on the
touchscreen.Bluetooth® Streaming Audio
ELECTRONICS
67
Page 124 of 132

FREQUENTLY ASKED QUESTIONS
GETTING STARTED
• How do I install my LATCH Equipped Child Seat? pg. 15
• How do my heated seats operate? pg. 23
ELECTRONICS
• Which radio is in my vehicle?
• Uconnect®130 pg. 38
• Uconnect®130 with Satellite Radio pg. 40
• Uconnect®230 pg. 43
• Uconnect®430/430N pg. 46
• How do I activate the Audio Jack?
• Uconnect®130 pg. 46
• Uconnect®130 with Satellite Radio pg. 46
• Uconnect®230 pg. 46
• Uconnect®430/430N pg. 51
• How do I set the clock on my radio?
• Uconnect®130 pg. 44
• Uconnect®130 with Satellite Radio pg. 44
• Uconnect®230 pg. 44
• Uconnect®430/430N pg. 47
• How do I use the Navigation feature? pg. 54
• How do I pair my cell phone via Bluetooth®with the Uconnect®Hands-Free Voice
Activation System? pg. 62
• How do I configure my Universal Garage Door Opener (HomeLink®)? pg. 71
UTILITY
• How do I know how much I can tow with my Jeep Compass? pg. 78
WHAT TO DO IN EMERGENCIES
• What do I do if my TPMS warning light is blinking? pg. 81
• How do I change a flat tire? pg. 87
• How do I Jump-Start my vehicle? pg. 94
MAINTAINING YOUR VEHICLE
• Where is my Fuse Block located? pg. 113
• What type of oil do I use? pg. 106
• How often should I change my engine’s oil? pg. 108
• What should my tire pressure be set at? pg. 115
FAQ (How To?)
122
Page 125 of 132

Adding Engine Coolant (Antifreeze)..108
Adding Washer Fluid.........108
Air Bag
Advance Front Air Bag . . . . . .14
Air Bags . . . . . . . . . . . . . . .14
Air Bag Warning Light . . . . . . .14
Front Air Bag . . . . . . . . . . . .14
Rollover...............14
Side Impacts . . . . . . . . . . . .14
Air bag Light . . . . . . . . . . . . . .80Air Cleaner, Engine (Engine Air CleanerFilter)................108Air Conditioner Maintenance....108Air Conditioning............33Air Conditioning Refrigerant.....108Air Conditioning System.......108Air Recirculation..........32,33AlarmArm The System..........12Disarm The System........12Vehicle Security Alarm......12Alarm, Panic . . . . . . . . . . . . . .10Alarm (Security Alarm)......12,85Antifreeze (Engine Coolant) . .106, 108Capacities............106Disposal..............108Anti-Lock Warning Light........80Appearance Care...........108Assistance Towing...........80Audio Jack........39,42,46,51Audio Settings........39,41,44Audio Systems (Radio).........38Automatic Temperature Control(ATC) . . . . . . . . . . . . . . . . .33Automatic Transmission........31Fluid Type . . . . . . . . . . . .107Overheating............87Axle Fluid . . . . . . . . . . . . . . .107
Back-Up Camera............30Battery..............94,108Body Mechanism Lubrication....108Brake Fluid..............107Brakes.................108Brake System.............108Master Cylinder.........108Break-In Recommendations, NewVehicle................25
Bulb Replacement..........118
Calibration, Compass.........68
Capacities, Antifreeze (Engine
Coolant)..............106
Capacities, Fluid...........106
Caps, Filler
Oil (Engine) . . . . . . . . . . . .108
Car Washes . . . . . . . . . . . . . .108
CD (Compact Disc)Player.........39,42,45,50Change Oil Indicator..........85Changing A Flat Tire . . . . . . . . . .87Charging System Light.........80Child Restraint.............15CleaningWheels..............108Windshield Wiper Blades....108Climate Control.............32Clock Setting.......38,41,44,47Cluster Warning/Indicator LightsAnti-Lock Brake (ABS) Light . . .80ChargingSystem Light......80Electronic Stability Control (ESC)Activation/Malfunction IndicatorLight . . . . . . . . . . . . . . . .84Electronic Throttle Control (ETC)Indicator Light...........81Front Fog Light Indicator.....85High Beam Indicator.......84Instrument Cluster WarningLights . . . . . . . . . . . . . . . .80Malfunction Indicator Light(MIL) . . . . . . . . . . . . . . . . .84Oil Pressure Warning Light....80Tire Pressure Monitoring System(TPMS) Light............81Turn Signal Indicator.......84Vehicle Security Light.......85Clutch . . . . . . . . . . . . . . . . .108Clutch Fluid . . . . . . . . . . . . . .108Compact Spare Tire . . . . . . . . . .116Compass Calibration..........68Coolant (Antifreeze).........106Cooling System............108Adding Coolant (Antifreeze) . .108Coolant Level...........108Disposal of Used Coolant....108
INDEX
123
Page 127 of 132

High Beam . . . . . . . . . . . . .26
Head Restraints............19
Heated Mirrors...........32,33
Heated Seats..............23
High Beam Indicator..........84
High Beam/Low Beam Select (Dimmer)
Switch................26
HomeLink®(Garage Door Opener) . .71
Hood Release.............101
Instrument Cluster............8Indicators..............9Instrument Cluster WarningLights . . . . . . . . . . . .8, 80, 84Instrument Panel Cover.......108Instrument Panel Lens Cleaning . .108Integrated Power Module (Fuses) . .113Interior and Instrument Lights . . .6, 7Interior Appearance Care.......108Intermittent Wipers (Delay Wipers) . .27Introduction...............2Inverter Outlet (115V).........74Inverter, Power.............74iPod®/USB/MP3 Control........61Bluetooth®Streaming Audio . . .67
Jacking Instructions..........88Jack Location..............87Jack Operation...........87,88Jump Starting..............94
Key Fob . . . . . . . . . . . . . . . . .10Arm The Alarm...........12Disarm The Alarm.........12Lock The Doors...........10Panic Alarm............10Remote Start . . . . . . . . . . . .11Unlock The Doors . . . . . . . . .10Key Fob Programmable Features . . .69
Lane Change and Turn Signals....27Lane Change Assist..........27LATCH (Lower Anchors and Tether forCHildren). . . . . . . . . . . . . . .15LightsCruise . . . . . . . . . . . . . . . .85Engine Temperature Warning . . .83Fog . . . . . . . . . . . . . . . . .85
Four-Wheel Drive Indicator....85
Headlights.............26
High Beam Indicator.......84
Hill Descent Control Indicator . .85
Low Fuel . . . . . . . . . . . . . .80
Park . . . . . . . . . . . . . . . . .26
Seat Belt Reminder........83
Security Alarm...........85
Tire Pressure Monitoring
(TPMS)...............81Transmission Warning.......83Tu r n S i g n a l . . . . . . . . . . 2 6 , 2 7LocksLiftgate, Tailgate..........10Lubrication, Body...........108Lumbar Support............21
Maintenance Free Battery......108Maintenance, General . . . . . . . .108Maintenance Procedures.......108Maintenance Record . . . . . . . . .112Maintenance Schedule . . . . . . . .108Malfunction Indicator Light (CheckEngine) . . . . . . . . . . . . . . . .84Manual TransmissionLubricant Selection.......107Master Cylinder (Brakes).......108Media Center Radio . . . . . . . .43, 46MOPAR®Accessories.........121
Navigation................54Navigation System (Uconnect®gps)..55Navigation Voice Prompt Volume . . .54New Vehicle Break-In Period.....25
Oil Change Indicator..........85Oil, Engine...........106, 108Capacity..............106Change Interval.........108Checking.............108Disposal..............108Filter............106, 108Filter Disposal..........108Materials Added to........108Recommendation.....106, 108Viscosity.............108Oil Filter, Selection..........108Oil Pressure Light...........80
INDEX
125