2015 JAGUAR XF AUX
[x] Cancel search: AUXPage 3 of 16

3
DRIVER CONTROLSVEHICLE ACCESS
The Smart key may not be detected if it is placed in
a metal container, or if it is shielded by a device with
a back-lit LCD screen, (e.g., laptop, smart phone,
etc). Keep the Smart key clear of such devices
when attempting Keyless entry or Keyless starting.
Do not leave your Smart key in the trunk, as the
vehicle WILL NOT automatically unlock (should it
become shielded).
25. Steering wheel adjustment.
26. Instruments dimmer control.
27. Rear fog lamps.
28. Trunk release.
29. Forward alert.
30. Power folding mirror adjuster.
31. Power folding mirror selectors.
32. Window controls.
33. Rear window isolator.
Trunk release
With the vehicle unlocked, press 28 or the release button
under the chrome finisher at the rear of the vehicle.
Rear seat release
The rear seat release handles are located inside the
Luggage compartment. Pull one or both handles to
release the seat backs and fold forward. Head restraints
can be removed if required.
Unlocking mode alternatives
Single-point entry allows only the driver’s door to
unlock with a single press. A second press unlocks all
other doors and the trunk.
Multi-point entry will unlock all of the doors and the
trunk with a single press.
To change between modes, with the vehicle unlocked,
press the lock and unlock buttons simultaneously for 3
seconds. The hazard warning lamps will flash twice to
confirm the change.
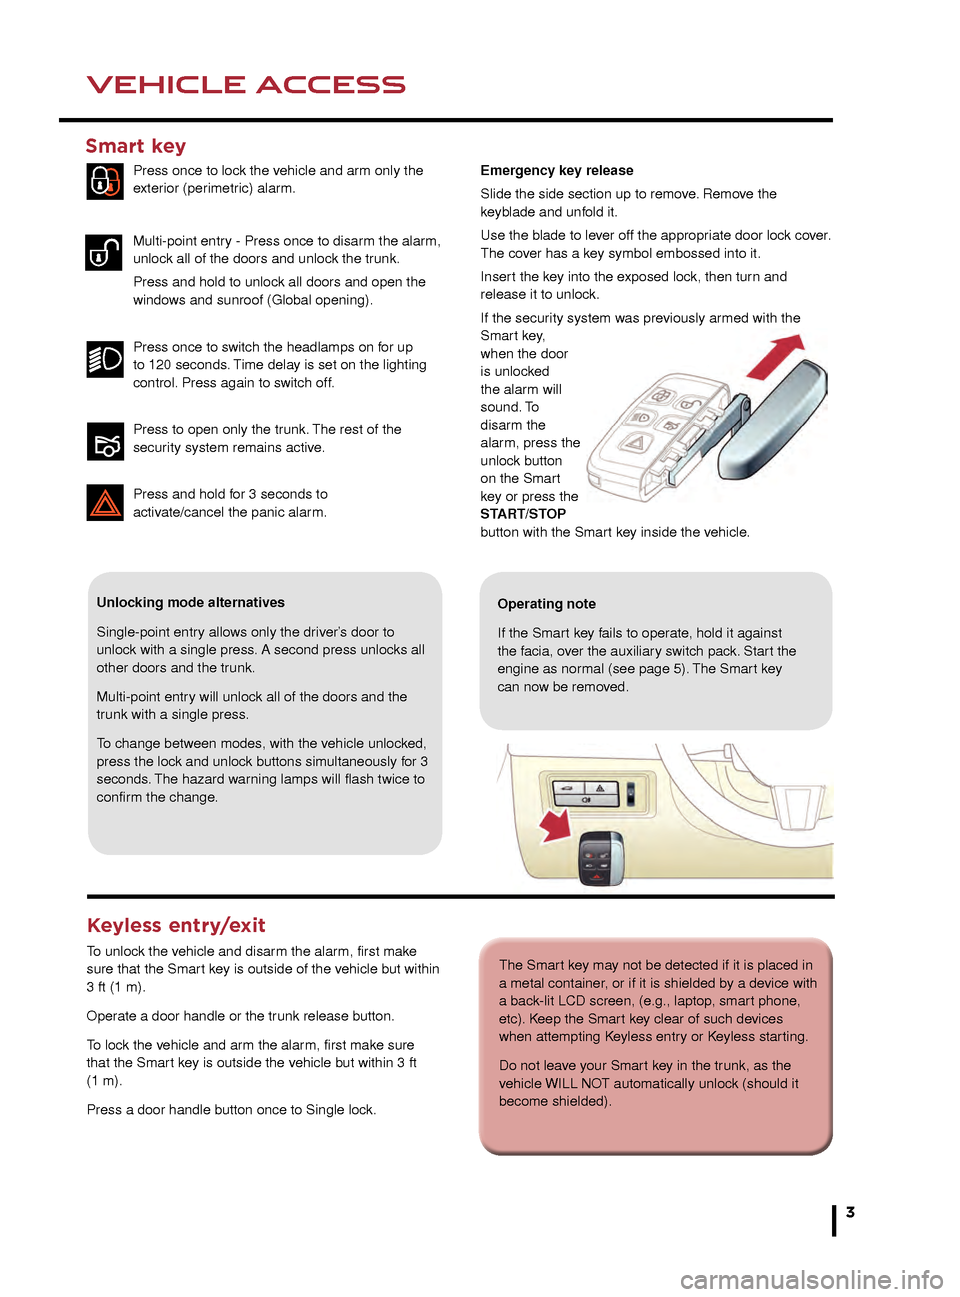
Smart key
Press once to lock the vehicle and arm only the
exterior (perimetric) alarm.
Multi-point entry - Press once to disarm the alarm,
unlock all of the doors and unlock the trunk.
Press and hold to unlock all doors and open the
windows and sunroof (Global opening).
Press once to switch the headlamps on for up
to 120 seconds. Time delay is set on the lighting
control. Press again to switch off.
Press to open only the trunk. The rest of the
security system remains active.
Press and hold for 3 seconds to
activ
ate/cancel the panic alarm.
Keyless entry/exit
To unlock the vehicle and disarm the alarm, first make
sure that the Smart key is outside of the vehicle but within
3 ft (1 m).
Operate a door handle or the trunk release button.
To lock the vehicle and arm the alarm, first make sure
that the Smart key is outside the vehicle but within 3 ft
(1 m).
Press a door handle button once to Single lock.
Operating note
If the Smart key fails to operate, hold it against
the facia, over the auxiliary switch pack. Start the
engine as normal (see page 5). The Smart key
can now be removed.
Emergency key release
Slide the side section up to remove. Remove the
keyblade and unfold it.
Use the blade to lever off the appropriate door lock cover.
The cover has a key symbol embossed into it.
Insert the key into the exposed lock, then turn and
release it to unlock.
If the security system was previously armed with the
Smart key,
when the door
is unlocked
the alarm will
sound. To
disarm the
alarm, press the
unlock button
on the Smart
key or press the
START/STOP
button with the Smart key inside the vehicle.
JJM189640151.indd 326/02/2014 16:29:07
Page 12 of 16

AUDIO AND TOUCH SCREEN
12
AUDIO AND TOUCH SCREEN
CD player and portable media
Select the My music menu.
1. Select to display all of the options. Select a source.
2. Settings menu. Select to switch traffic and news
announcements on or off.
3. Use Track list or Browse to find a track. Select the
track to play.
4. Use Upload to load discs. The CD/DVD player
will accommodate one CD or DVD disc at a time, but
with Stored CD, up to 10 CD’s can be loaded onto the
virtual CD store. While a disc is loading, a % count up is
displayed on the soft key. If the hard drive is full, select
Replace to overwrite an existing CD.
5. Touch and release to skip up or down to the next or
previous track. Touch and hold to scan forwards or back
through the current track.
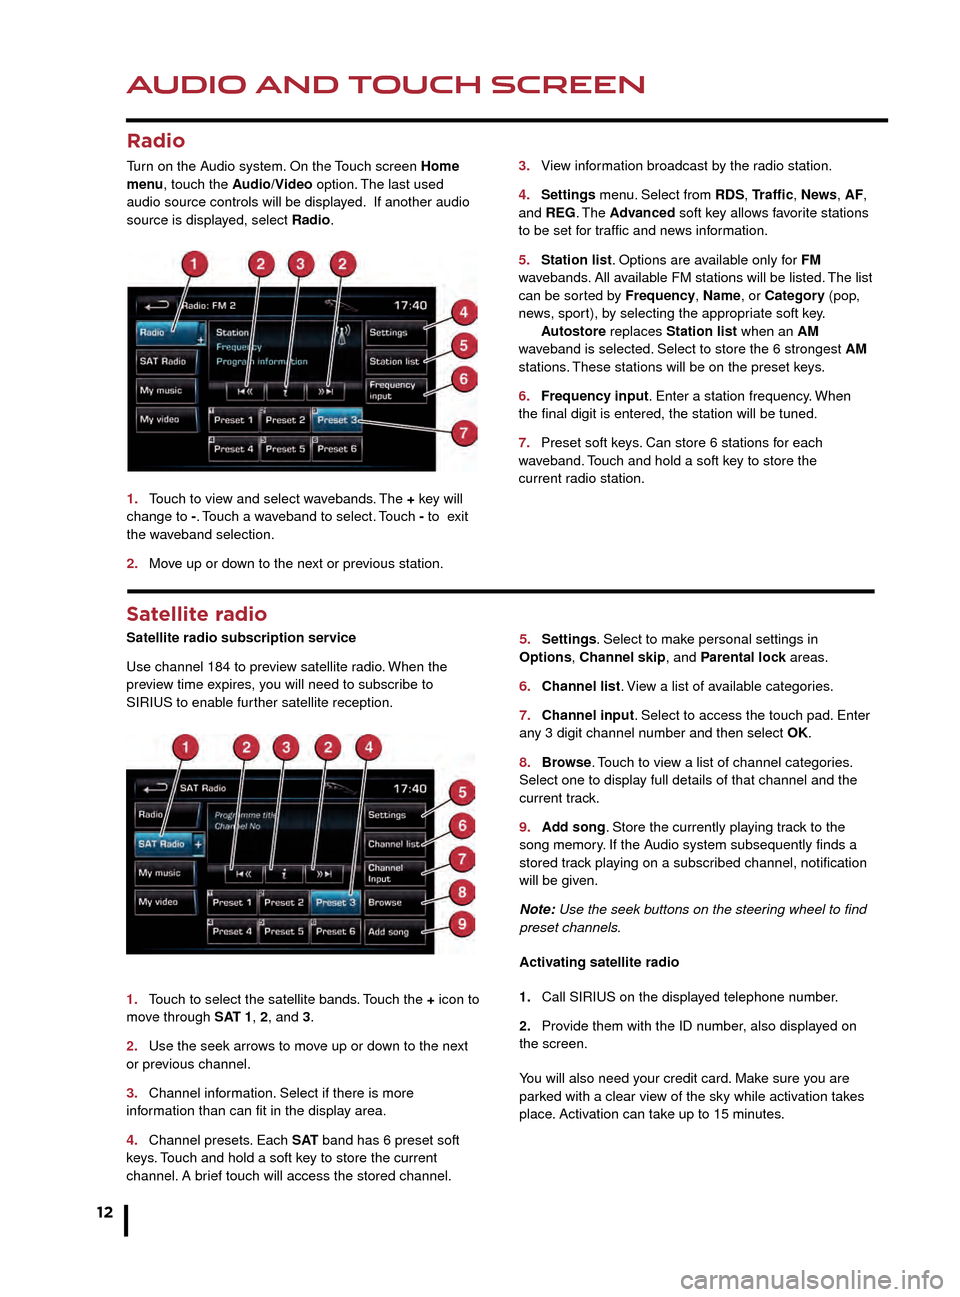
Satellite radio
Satellite radio subscription service
Use channel 184 to preview satellite radio. When the
preview time expires, you will need to subscribe to
SIRIUS to enable further satellite reception.
1.
T
ouch to select the satellite bands. Touch the + icon to
move through SAT 1, 2, and 3.
2.
Use the seek arro
ws to move up or down to the next
or previous channel.
3.
Channel inf
ormation. Select if there is more
information than can fit in the display area.
4.
Channel presets
. Each S AT band has 6 preset soft
keys. Touch and hold a soft key to store the current
channel. A brief touch will access the stored channel. 5.
Settings . Select to make personal settings in
Options, Channel skip, and Parental lock areas.
6.
Channel list
. View a list of available categories.
7.
Channel input
. Select to access the touch pad. Enter
any 3 digit channel number and then select OK.
8.
Br
owse. Touch to view a list of channel categories.
Select one to display full details of that channel and the
current track.
9.
Ad
d song. Store the currently playing track to the
song memory. If the Audio system subsequently finds a
stored track playing on a subscribed channel, notification
will be given.
Note: Use the seek buttons on the steering wheel to find
preset channels.
Activating satellite radio
1.
Call SIRIUS on the displa
yed telephone number.
2.
Pro
vide them with the ID number, also displayed on
the screen.
You will also need your credit card. Make sure you are
parked with a clear view of the sky while activation takes
place. Activation can take up to 15 minutes.
3.
Vie
w information broadcast by the radio station.
4
.
Settings
menu. Select from RDS, Traffic, News, AF,
and REG. The Advanced soft key allows favorite stations
to be set for traffic and news information.
5.
Station list
. Options are available only for FM
wavebands. All available FM stations will be listed. The list
can be sorted by Frequency, Name, or Category (pop,
news, sport), by selecting the appropriate soft key.
A
utostore replaces Station list when an AM
waveband is selected. Select to store the 6 strongest AM
stations. These stations will be on the preset keys.
6.
Frequenc
y input. Enter a station frequency. When
the final digit is entered, the station will be tuned.
7.
Preset soft k
eys. Can store 6 stations for each
w
aveband. Touch and hold a soft key to store the
current r
adio station.
Radio
Turn on the Audio system. On the Touch screen Home
menu, touch the Audio/Video option. The last used
audio source controls will be displayed. If another audio
source is displayed, select Radio.
1.
T
ouch to view and select wavebands. The + key will
change to -. Touch a waveband to select. Touch - to exit
the waveband selection.
2.
Mo
ve up or down to the next or previous station.
Connecting portable media
Connecting ports for auxiliary devices, iPod, and USB
storage devices, are located inside the center console
cubby box.
iPod and USB devices can be operated from the Touch
screen. Devices connected to the 3.5mm AUX socket are
controlled only from the device itself.
JJM189640151.indd 1226/02/2014 16:29:30
Page 13 of 16

AUDIO AND TOUCH SCREENAUDIO AND TOUCH SCREEN
13
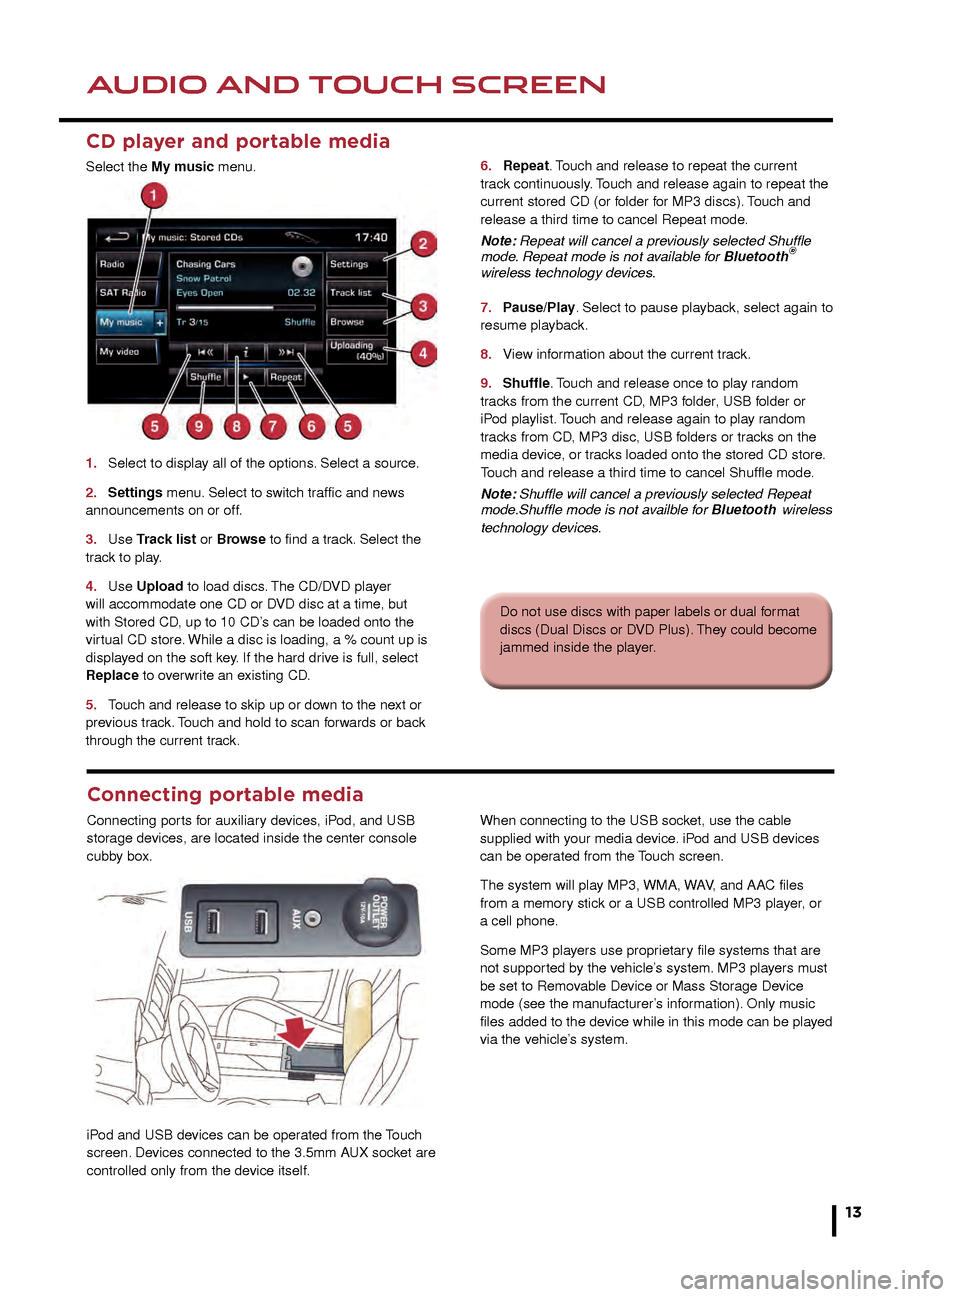
CD player and portable media
Select the My music menu.
1.
Select to displa
y all of the options. Select a source.
2
.
Settings
menu. Select to switch traffic and news
announcements on or off.
3.
Use
Track list or Browse to find a track. Select the
track to play.
4.
Use
Upload to load discs. The CD/DVD player
will accommodate one CD or DVD disc at a time, but
with Stored CD, up to 10 CD’s can be loaded onto the
virtual CD store. While a disc is loading, a % count up is
displayed on the soft key. If the hard drive is full, select
Replace to overwrite an existing CD.
5.
T
ouch and release to skip up or down to the next or
previous track. Touch and hold to scan forwards or back
through the current track. 6.
Repeat . Touch and release to repeat the current
track continuously. Touch and release again to repeat the
current stored CD (or folder for MP3 discs). Touch and
release a third time to cancel Repeat mode.
Note: Repeat will cancel a previously selected Shuffle
mode. Repeat mode is not available for Bluetooth
®
wireless technology devices.
7.
P
ause/Play. Select to pause playback, select again to
resume playback.
8.
Vie
w information about the current track.
9.
Shuffle
. Touch and release once to play random
tracks from the current CD, MP3 folder, USB folder or
iPod playlist. Touch and release again to play random
tracks from CD, MP3 disc, USB folders or tracks on the
media device, or tracks loaded onto the stored CD store.
Touch and release a third time to cancel Shuffle mode.
Note: Shuffle will cancel a previously selected Repeat
mode.Shuffle mode is not availble for Bluetooth
wireless
technology devices.
5. Settings. Select to make personal settings in
Options, Channel skip, and Parental lock areas.
6. Channel list. View a list of available categories.
7. Channel input. Select to access the touch pad. Enter
any 3 digit channel number and then select OK.
8. Browse. Touch to view a list of channel categories.
Select one to display full details of that channel and the
current track.
9. Add song. Store the currently playing track to the
song memory. If the Audio system subsequently finds a
stored track playing on a subscribed channel, notification
will be given.
Note: Use the seek buttons on the steering wheel to find
preset channels.
Activating satellite radio
1. Call SIRIUS on the displayed telephone number.
2. Provide them with the ID number, also displayed on
the screen.
You will also need your credit card. Make sure you are
parked with a clear view of the sky while activation takes
place. Activation can take up to 15 minutes.
3.
View information broadcast by the radio station.
4. Settings menu. Select from RDS, Traffic, News, AF
, and REG. The Advanced soft key allows favorite stations
to be set for traffic and news information.
5. Station list. Options are available only for FM
wavebands. All available FM stations will be listed. The list
can be sorted by Frequency, Name, or Category (pop,
news, sport), by selecting the appropriate soft key.
Autostore replaces Station list when an AM
waveband is selected. Select to store the 6 strongest AM
stations. These stations will be on the preset keys.
6. Frequency input. Enter a station frequency. When
the final digit is entered, the station will be tuned.
7. Preset soft keys. Can store 6 stations for each
waveband. Touch and hold a soft key to store the
current radio station.
Do not use discs with paper labels or dual format
discs (Dual Discs or DVD Plus). They could become
jammed inside the player.
Connecting portable media
Connecting ports for auxiliary devices, iPod, and USB
storage devices, are located inside the center console
cubby box.
iPod and USB devices can be operated from the Touch
screen. Devices connected to the 3.5mm AUX socket are
controlled only from the device itself.When connecting to the USB socket, use the cable
supplied with your media device. iPod and USB devices
can be operated from the Touch screen.
The system will play MP3, WMA, WAV, and AAC files
from a memory stick or a USB controlled MP3 player, or
a cell phone.
Some MP3 players use proprietary file systems that are
not supported by the vehicle’s system. MP3 players must
be set to Removable Device or Mass Storage Device
mode (see the manufacturer’s information). Only music
files added to the device while in this mode can be played
via the vehicle’s system.
JJM189640151.indd 1326/02/2014 16:29:31