2015 INFINITI QX80 ECO mode
[x] Cancel search: ECO modePage 5 of 32

3
Destination Send-to-Vehicle – Find and download point-of interest inf\
ormation from
Google Maps™ mapping service.
Connected Search – Select “Connected Search” from the Destinati\
on menu on the vehicle’s
Navigation System to conduct a point-of-interest search within a certain\
distance of the
vehicle’s location.
Drive Zone – Monitor the movement of your vehicle within a specified \
region. Set up
boundaries in the Monitoring section of the INFINITI Connection web port\
al.
Max Speed Alert – Set a maximum speed on the INFINITI Connection web \
portal. You will
receive notifications if your vehicle exceeds the maximum speed setting.\
Mobile Information Service – Receive the latest news headlines, stock\
quotes and sports
scores by setting up preferences on the Mobile Information Service page \
in the INFINITI
Connection web portal.
Valet Alert – Use to set up a 0.2-mile radius around your vehicle.
• Activate alerts by pressing the “Connect to Voice Menu” button on \
the INFINITI Connection
screen or by pressing the key on the map screen.
• At the prompt, say “Valet Alert” and then “Activate” or “\
Deactivate”.
For more information, refer to the “Viewing technical information (section 7)” of your Navigation System Owner’s Manual.
Theater Package (if so equipped)
With this entertainment system, you can play video
files via a DVD or CD, providing images and sound
both from the front and rear display screens.
You can also connect auxiliary devices, such as video
games, camcorders or portable video players, to the
auxiliary jacks. (Your device will be controlled through
its own control panel.)
Rear Auxiliary Mode allows rear seat passengers to
independently display different sources on each screen.
Use the remote controller, provided with the system,
to operate the rear display screens.
Use the headphones, also provided with the system,
to listen to audio wirelessly and independently.
For the best audio sound quality, please make sure
you are facing the monitor directly in front of you.
To watch or control videos on the front display, make sure the vehicle i\
s in the P (PARK)
position and the parking brake is applied.
To reduce driver distraction, movies will not be shown on the front display while the vehicle is
in any drive position.
To access standard DVD controls on the front display while playing a DVD\
on the rear display,
press the DISC•AUX button on the audio control panel while the vehicle is in the P (PARK)
position and the parking brake is applied.
For more information, refer to the “Monitor, climate, audio, phone and voice recognition systems (sect\
ion 4)” of your Owner’s Manual.
Page 8 of 32

6
Loose Fuel Cap
A LOOSE FUEL CAP warning message will appear
in the vehicle information display 1 when the
fuel-filler cap is not tightened correctly.
To tighten, turn the cap clockwise until a single
click is heard.
The warning message will extinguish when the
vehicle detects the fuel-filler cap is properly tightened and the reset \
button 2 is pressed.
If the cap is not properly tightened, the Malfunction Indicator Light may illuminate.
For more information, refer to the “Instruments and controls (section 2)” and the “Pre-driving checks and adjustments (section 3)” of your Owner’s Manual.
1
essential information
2
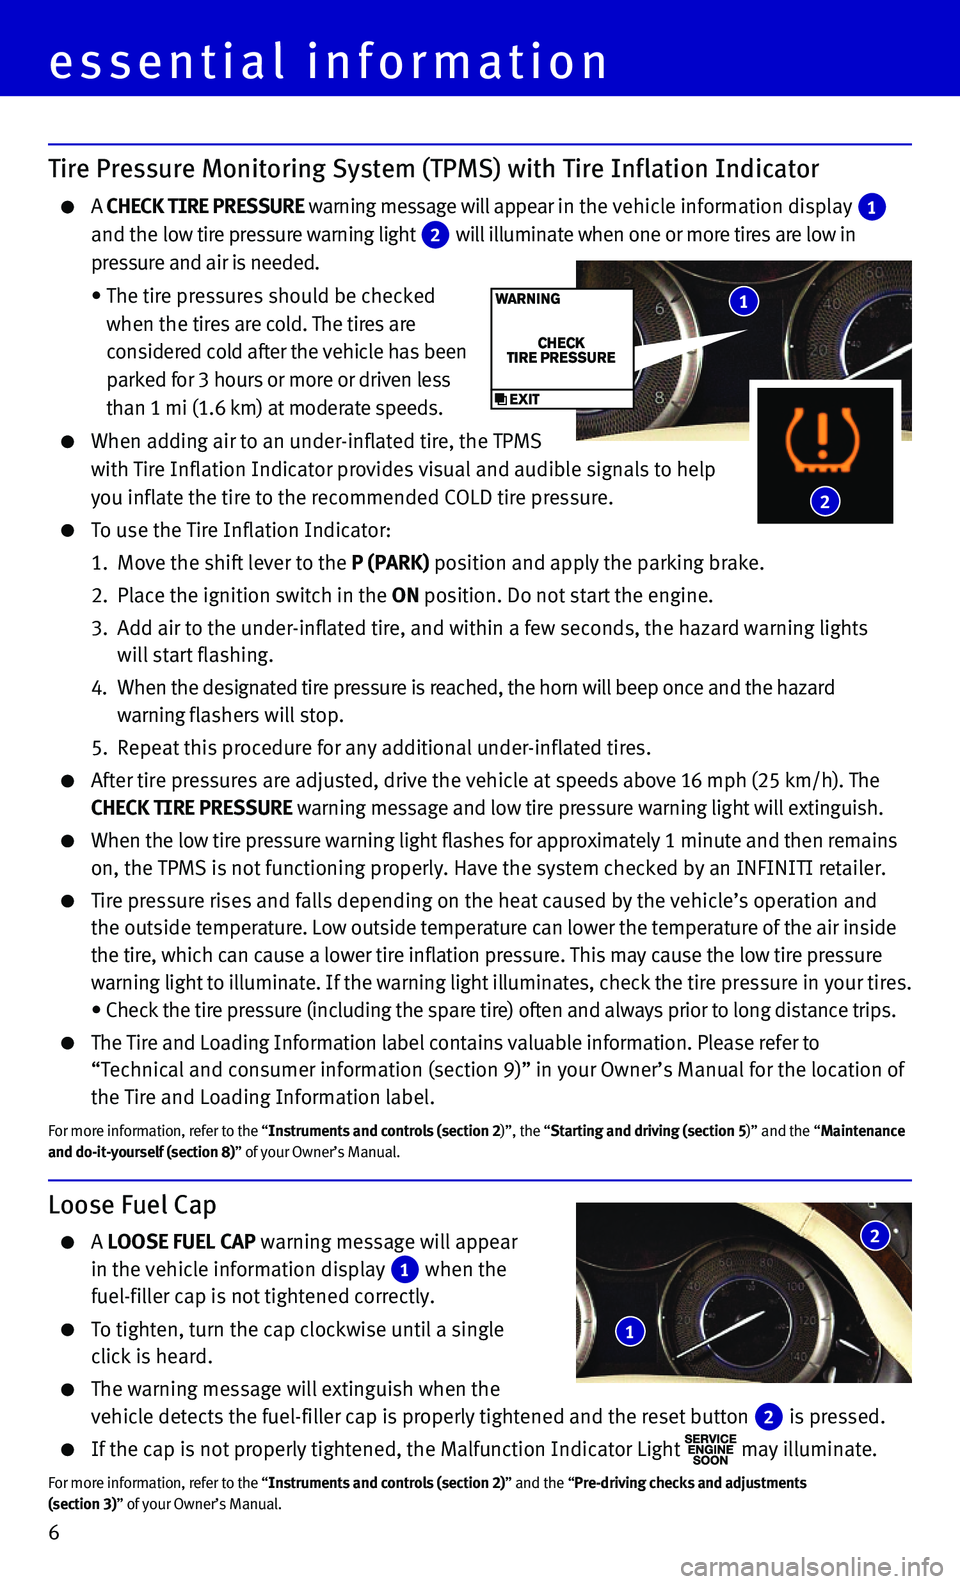
Tire Pressure Monitoring System (TPMS) with Tire Inflation Indicator
A CHECK TIRE PRESSURE warning message will appear in the vehicle information display 1 and the low tire pressure warning light 2 will illuminate when one or more tires are low in
pressure and air is needed.
• The tire pressures should be checked
when the tires are cold. The tires are
considered cold after the vehicle has been
parked for 3 hours or more or driven less
than 1 mi (1.6 km) at moderate speeds.
When adding air to an under-inflated tire, the TPMS
with Tire Inflation Indicator provides visual and audible signals to hel\
p
you inflate the tire to the recommended COLD tire pressure.
To use the Tire Inflation Indicator:
1. Move the shift lever to the P (PARK) position and apply the parking brake.
2. Place the ignition switch in the ON position. Do not start the engine.
3. Add air to the under-inflated tire, and within a few seconds, the hazard\
warning lights
will start flashing.
4. When the designated tire pressure is reached, the horn will beep once an\
d the hazard
warning flashers will stop.
5. Repeat this procedure for any additional under-inflated tires.
After tire pressures are adjusted, drive the vehicle at speeds above 16 mph (25 km/h). The
CHECK TIRE PRESSURE warning message and low tire pressure warning light will extinguish.
When the low tire pressure warning light flashes for approximately 1 min\
ute and then remains
on, the TPMS is not functioning properly. Have the system checked by an \
INFINITI retailer.
Tire pressure rises and falls depending on the heat caused by the vehicl\
e’s operation and
the outside temperature. Low outside temperature can lower the temperature of the ai\
r inside
the tire, which can cause a lower tire inflation pressure. This may caus\
e the low tire pressure
warning light to illuminate. If the warning light illuminates, check the\
tire pressure in your tires.
• Check the tire pressure (including the spare tire) often and always pr\
ior to long distance trips.
The Tire and Loading Information label contains valuable information. Pl\
ease refer to
“Technical and consumer information (section 9)” in your Owner’\
s Manual for the location of
the Tire and Loading Information label.
For more information, refer to the “Instruments and controls (section 2)”, the “Starting and driving (section 5)” and the “Maintenance and do-it-yourself (section 8)” of your Owner’s Manual.
1
2
Page 10 of 32

8
first drive features
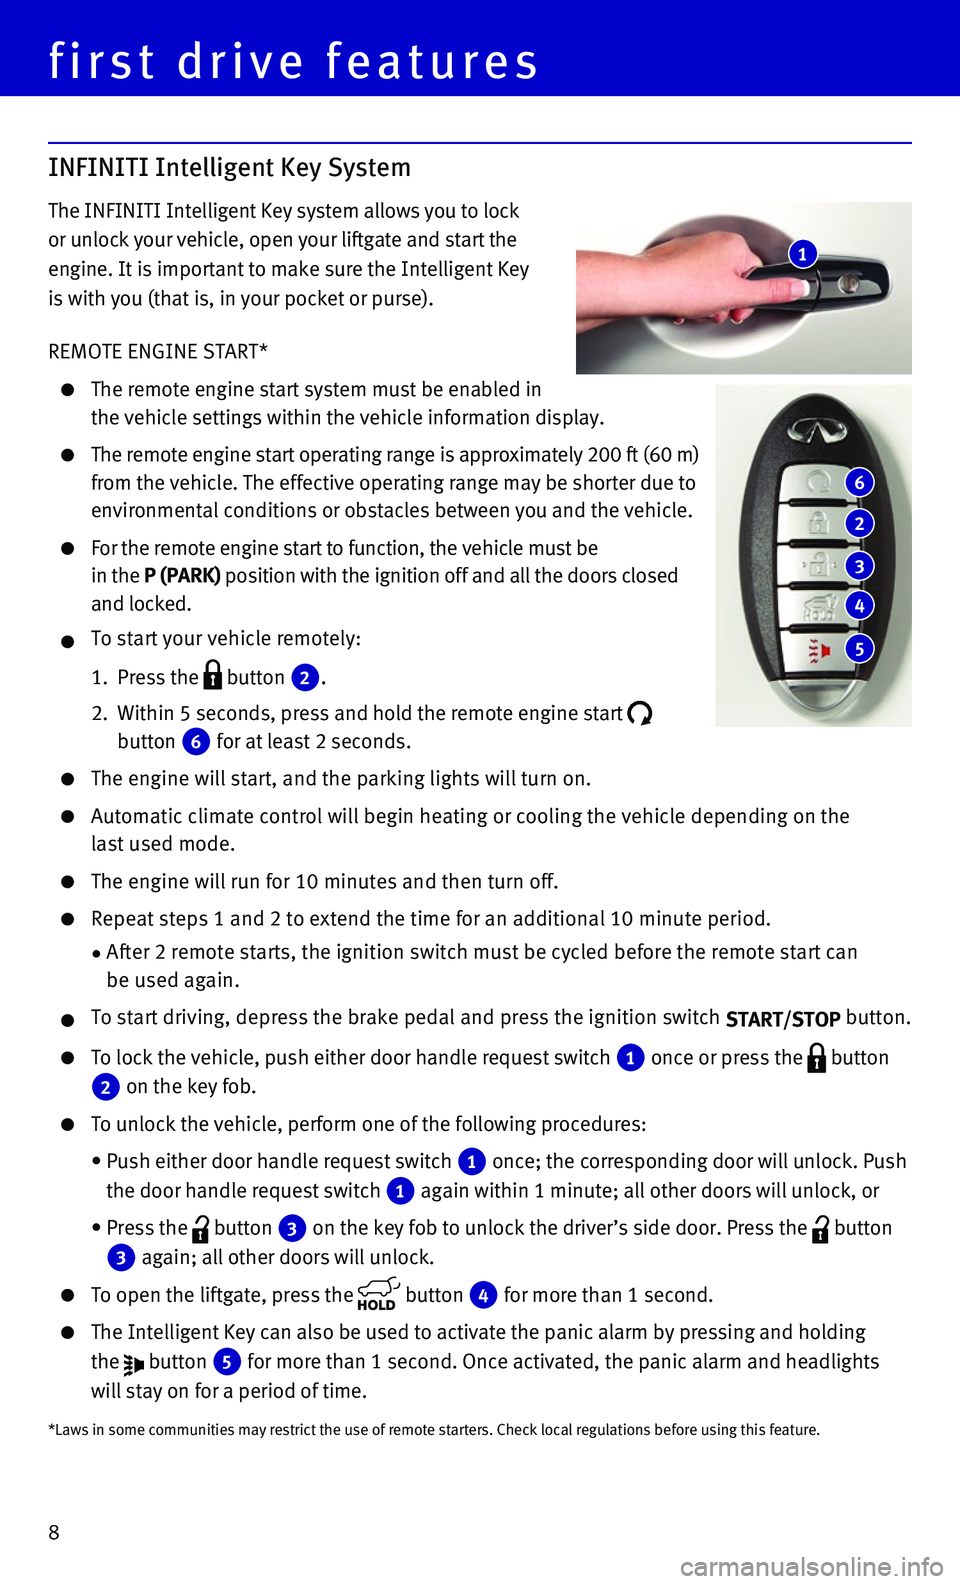
INFINITI Intelligent Key System
The INFINITI Intelligent Key system allows you to lock
or unlock your vehicle, open your liftgate and start the
engine. It is important to make sure the Intelligent Key
is with you (that is, in your pocket or purse).
REMOTE ENGINE START*
The remote engine start system must be enabled in
the vehicle settings within the vehicle information display.
The remote engine start operating range is approximately 200 ft (60 m)\
from the vehicle. The effective operating range may be shorter due to
environmental conditions or obstacles between you and the vehicle.
For the remote engine start to function, the vehicle must be
in the P (PARK) position with the ignition off and all the doors closed
and locked.
To start your vehicle remotely:
1. Press the button 2.
2. Within 5 seconds, press and hold the remote engine start button 6 for at least 2 seconds.
The engine will start, and the parking lights will turn on.
Automatic climate control will begin heating or cooling the vehicle depe\
nding on the
last used mode.
The engine will run for 10 minutes and then turn off.
Repeat steps 1 and 2 to extend the time for an additional 10 minute peri\
od.
• After 2 remote starts, the ignition switch must be cycled before the rem\
ote start can
be used again.
To start driving, depress the brake pedal and press the ignition switch \
START/STOP button.
To lock the vehicle, push either door handle request switch 1 once or press the button
2 on the key fob.
To unlock the vehicle, perform one of the following procedures:
• Push either door handle request switch 1 once; the corresponding door will unlock. Push
the door handle request switch 1 again within 1 minute; all other doors will unlock, or
• Press the button 3 on the key fob to unlock the driver’s side door. Press the button
3 again; all other doors will unlock.
To open the liftgate, press the button 4 for more than 1 second.
The Intelligent Key can also be used to activate the panic alarm by pres\
sing and holding
the button 5 for more than 1 second. Once activated, the panic alarm and headlights
will stay on for a period of time.
*Laws in some communities may restrict the use of remote starters. Check\
local regulations before using this feature.
1
6
2
3
4
5
Page 19 of 32

17
7 AUTOMATIC INTAKE AIR CONTROL
In the automatic mode, air intake will be controlled automatically.
This mode helps to adjust the inside vehicle temperature more effectivel\
y.
To manually control air recirculation inside the vehicle, press the air \
recirculation
button 8. The indicator light on the button will illuminate.
To return to the automatic control mode, press and hold the auto-recircu\
lation
button 7 until the indicator light on the button illuminates.
9 UPPER VENT BUTTON
When the upper vent button is pressed, the air flow against the driver’s or
passenger’s upper body becomes gentle. The indicator light on the button will illuminate.\
In this mode, air from the upper ventilator flows to control the cabin t\
emperature without
blowing air directly on the occupants.
10 A/C BUTTON
Press the A/C button to manually turn the A/C on or off.
When on, this system not only provides cooler air but also removes humid\
ity from the air to
help avoid window fogging.
11 REAR BUTTON
This button will allow the front controls to operate
the front or rear climate control systems.
To operate the rear climate control system from
the front, press the REAR button so that the light
illuminates and the “Rear Air-conditioning” screen
is displayed.
To adjust the front climate control system, press
the REAR button again.
For more information, refer to the “Instrument and controls (section 2)” and the “Monitor, climate, audio, phone and voice recognition systems (section 4)” of your Owner’s Manual.
Rear Climate Controls
To activate the system:
1. Press the REAR button 1 on the front control
panel until the Rear Air-conditioning screen is
displayed.
• The indicator light will illuminate.
• The Fan Speed, Temperature, AUTO and OFF buttons will now control the rear climate control system.
2. Press the REAR button 1 again, and the screen will return to what was
previously displayed.
• The indicator light will stay illuminated to indicate that the Rear clim\
ate control
system is active.
1
Page 20 of 32

18
first drive features
FM/AM/SiriusXM®* Satellite Radio With CD/DVD Player
1 ON•OFF BUTTON /VOL (volume) CONTROL KNOB
Press the ON•OFF button to turn the system on or off.
Turn the VOL (volume) control knob right or left to increase or decrease the volume\
.
2 SEEK/CAT AND TRACK BUTTONS
To scan quickly and stop at the previous or next broadcast station, pres\
s the
SEEK·CAT button or the TRACK button.
For satellite radio, press the SEEK·CAT button or the TRACK button to switch to the
first channel of the previous or next category.
To change tracks on a CD, press the SEEK·CAT button or the TRACK button.
To rewind or fast forward a track on a CD, press and hold the SEEK·CAT button
or the TRACK button.
*SiriusXM® Satellite Radio is only available on vehicles equipped with an optional\
SiriusXM® Satellite Radio subscription service.
4
1
5 6 2
3
OFF button 2 — Turns off the rear climate control
system and REAR button indicator light.
Fan speed control buttons 3 — Press or to
increase or decrease fan speed.
Temperature increase and decrease buttons 4 —
Adjusts the rear temperature up or down .
AUTO button 5 — System automatically works to keep air flow and fan speed at a
constant temperature.
MODE button 6 — Changes the air flow mode. The air flow modes are:
The air outlet is fixed at foot level.
The air outlet is fixed at the head and foot level.
The air outlet is fixed at the head level.
For more information, refer to the “Monitor, climate, audio, phone and voice recognition systems (secti\
on 4)” of your Owner’s Manual.
2 5 3 4 6
Page 22 of 32

20
first drive features
Intelligent Cruise Control (ICC) (if so equipped)
The Intelligent Cruise Control (ICC) automatically
maintains a selected distance from the vehicle
traveling in front of you according to that vehicle’s
speed (up to the set speed) or the set speed when
the road ahead is clear.
This system may not function properly due to
road conditions when direct sunlight, rain, mud,
snow or other road spray cause the sensor to
become blocked.
VEHICLE-TO-VEHICLE DISTANCE CONTROL MODE
To set Vehicle-To-Vehicle Distance Control mode,
press the CRUISE ON/OFF button 1 on the steering
wheel for less than 1.5 seconds. The indicator
light 2 will illuminate.
Accelerate to the desired speed.
Push down on the COAST/SET switch 3 on the steering wheel
and release it. Cruise control will be set to the desired speed.
Press the distance button 4 on the steering wheel repeatedly to change
the set distance between long, middle and short.
When a vehicle is not detected ahead of you in the lane, the set distanc\
e and set vehicle
speed indicator lights will illuminate 5 in set mode.
When a vehicle is detected ahead of you in the lane, the vehicle ahead detection, set distance
and set vehicle speed indicator lights will illuminate 6 in set mode.
TO SET CONVENTIONAL FIXED SPEED CRUISE CONTROL MODE:
While cruise control is off, press the CRUISE ON/OFF button on the steering wheel and hold it
down for more than 1.5 seconds. The CRUISE indicator light will illuminate.
Accelerate to the desired speed.
Push down on the COAST/SET switch on the steering wheel and release it. The SET indicator
light will illuminate. Cruise control should be set to the desired speed\
.
TO SWITCH BETWEEN THE TWO CRUISE CONTROL MODES:
When one of the two cruise modes is in use, you must turn the system off\
and then turn it
on again to select the other cruise control mode.
For more information, refer to the “Starting and driving (section 5)” of your Owner’s Manual.
3
1
4
2 5
6
Page 23 of 32

21
Trip Computer
When the button 1 is pressed, the
following modes will appear on the vehicle
information display 2:
• MPG – Displays the current and average fuel
consumption since the last reset.
• MPG/MPH – Displays the average fuel consumption
and speed since the last reset.
• TIME/MILES – Displays the elapsed time and
distance driven since the last reset.
• RANGE – Displays the estimated distance to empty
(dte) the vehicle can be driven before refueling.
• OUTSIDE TEMP – Displays the temperature outside your vehicle.
• SETTING – Allows you to set reminders for alerts and maintenance intervals o\
r change
the language and units used in the system.
— Press the button 3 to cycle through the various setting modes.
— Press the button 1 to choose the selected mode.
• WARNING – Displays when a warning is present.
Press the button 3 for approximately 1 second to reset the currently displayed trip
odometer to zero.
For more information, refer to the “Instruments and controls (section 2)” of your Owner’s Manual.
1
3
2
system guide
Page 24 of 32

22
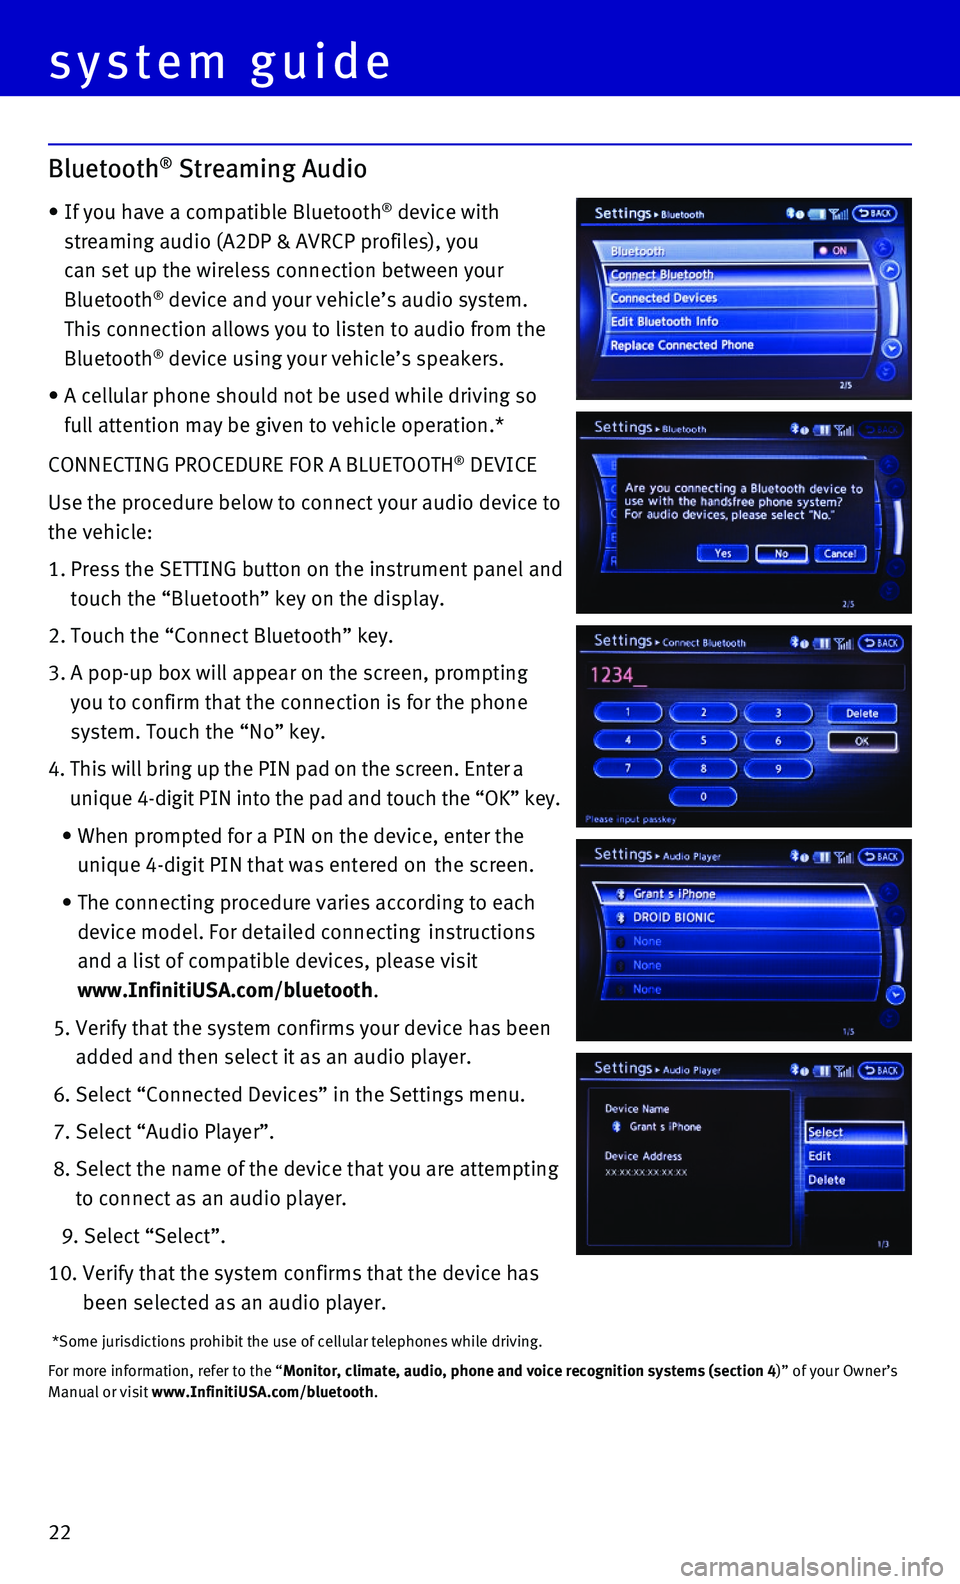
CONNECTING PROCEDURE FOR A BLUETOOTH® DEVICE
Use the procedure below to connect your audio device to
the vehicle:
1. Press the SETTING button on the instrument panel and
touch the “Bluetooth” key on the display.
2. Touch the “Connect Bluetooth” key.
3. A pop-up box will appear on the screen, prompting
you to confirm that the connection is for the phone
system. Touch the “No” key.
4. This will bring up the PIN pad on the screen. Enter a
unique 4-digit PIN into the pad and touch the “OK” key.
• When prompted for a PIN on the device, enter the
unique 4-digit PIN that was entered on the screen.
• The connecting procedure varies according to each
device model. For detailed connecting instructions
and a list of compatible devices, please visit
www.InfinitiUSA.com/bluetooth.
5. Verify that the system confirms your device has been
added and then select it as an audio player.
6. Select “Connected Devices” in the Settings menu.
7. Select “Audio Player”.
8. Select the name of the device that you are attempting
to connect as an audio player.
9. Select “Select”.
10. Verify that the system confirms that the device has
been selected as an audio player.
*Some jurisdictions prohibit the use of cellular telephones while drivin\
g.
For more information, refer to the “Monitor, climate, audio, phone and voice recognition systems (section 4\
)” of your Owner’s Manual or visit www.InfinitiUSA.com/bluetooth.
system guide
Bluetooth® Streaming Audio
• If you have a compatible Bluetooth® device with
streaming audio (A2DP & AVRCP profiles), you
can set up the wireless connection between your
Bluetooth® device and your vehicle’s audio system.
This connection allows you to listen to audio from the
Bluetooth® device using your vehicle’s speakers.
• A cellular phone should not be used while driving so
full attention may be given to vehicle operation.*