2015 INFINITI QX80 light
[x] Cancel search: lightPage 16 of 32

14
first drive features
Headlight Control
Turn the headlight control switch to the
position 1 to turn on the front parking, side marker,
tail, license plate and instrument panel lights.
Turn the switch to the position 2 to turn on
the headlights.
AUTOLIGHT SYSTEM
The autolight system will automatically turn the headlights on when it i\
s dark and off when it
is light. The system will keep the headlights on for a period of time af\
ter you turn the ignition
off and all doors are closed.
To activate the autolight system, turn the headlight control switch to t\
he AUTO position 3
then push the ignition switch to ON. To deactivate the autolight system, turn the headlight
control switch to the OFF, position 1 or position 2.
HIGH BEAM SELECT
Push the headlight control switch forward 4 to
select the high beam function. The blue indicator
light illuminates in the instrument panel.
Pull the headlight switch back to the original
position to select the low beam. The blue indicator
light extinguishes.
Pull and release the headlight control switch 5 to flash the headlight high beams on
and off.
HIGH BEAM ASSIST
The High Beam Assist system will operate when the vehicle is driven at a\
pproximately
22 mph (35 km/h) and above. If an oncoming vehicle or leading vehicle \
appears in front of
your vehicle when the high beam is on, the headlights will automatically\
be switched to the
low beam.
Following the procedure below only activates the High Beam Assist system\
. This does not
necessarily turn on the high beam even if there is no other traffic. Bot\
h ambient light and
traffic conditions have to be correct for the high beam to illuminate.
To activate High Beam Assist, turn the headlight control switch to the AUTO position 3 and
push the headlight control switch 4 forward to turn on the high beam. The high beam assist
indicator light will illuminate.
FOG LIGHT SWITCH
The headlights must be on and the low beams
selected for the fog lights to operate.
Turn the switch (inside collar) to the position 6
to turn the fog lights on.
Turn the switch (inside collar) to the OFF position to
turn the fog lights off.
1
2
3
4
5
6
Page 19 of 32

17
7 AUTOMATIC INTAKE AIR CONTROL
In the automatic mode, air intake will be controlled automatically.
This mode helps to adjust the inside vehicle temperature more effectivel\
y.
To manually control air recirculation inside the vehicle, press the air \
recirculation
button 8. The indicator light on the button will illuminate.
To return to the automatic control mode, press and hold the auto-recircu\
lation
button 7 until the indicator light on the button illuminates.
9 UPPER VENT BUTTON
When the upper vent button is pressed, the air flow against the driver’s or
passenger’s upper body becomes gentle. The indicator light on the button will illuminate.\
In this mode, air from the upper ventilator flows to control the cabin t\
emperature without
blowing air directly on the occupants.
10 A/C BUTTON
Press the A/C button to manually turn the A/C on or off.
When on, this system not only provides cooler air but also removes humid\
ity from the air to
help avoid window fogging.
11 REAR BUTTON
This button will allow the front controls to operate
the front or rear climate control systems.
To operate the rear climate control system from
the front, press the REAR button so that the light
illuminates and the “Rear Air-conditioning” screen
is displayed.
To adjust the front climate control system, press
the REAR button again.
For more information, refer to the “Instrument and controls (section 2)” and the “Monitor, climate, audio, phone and voice recognition systems (section 4)” of your Owner’s Manual.
Rear Climate Controls
To activate the system:
1. Press the REAR button 1 on the front control
panel until the Rear Air-conditioning screen is
displayed.
• The indicator light will illuminate.
• The Fan Speed, Temperature, AUTO and OFF buttons will now control the rear climate control system.
2. Press the REAR button 1 again, and the screen will return to what was
previously displayed.
• The indicator light will stay illuminated to indicate that the Rear clim\
ate control
system is active.
1
Page 20 of 32

18
first drive features
FM/AM/SiriusXM®* Satellite Radio With CD/DVD Player
1 ON•OFF BUTTON /VOL (volume) CONTROL KNOB
Press the ON•OFF button to turn the system on or off.
Turn the VOL (volume) control knob right or left to increase or decrease the volume\
.
2 SEEK/CAT AND TRACK BUTTONS
To scan quickly and stop at the previous or next broadcast station, pres\
s the
SEEK·CAT button or the TRACK button.
For satellite radio, press the SEEK·CAT button or the TRACK button to switch to the
first channel of the previous or next category.
To change tracks on a CD, press the SEEK·CAT button or the TRACK button.
To rewind or fast forward a track on a CD, press and hold the SEEK·CAT button
or the TRACK button.
*SiriusXM® Satellite Radio is only available on vehicles equipped with an optional\
SiriusXM® Satellite Radio subscription service.
4
1
5 6 2
3
OFF button 2 — Turns off the rear climate control
system and REAR button indicator light.
Fan speed control buttons 3 — Press or to
increase or decrease fan speed.
Temperature increase and decrease buttons 4 —
Adjusts the rear temperature up or down .
AUTO button 5 — System automatically works to keep air flow and fan speed at a
constant temperature.
MODE button 6 — Changes the air flow mode. The air flow modes are:
The air outlet is fixed at foot level.
The air outlet is fixed at the head and foot level.
The air outlet is fixed at the head level.
For more information, refer to the “Monitor, climate, audio, phone and voice recognition systems (secti\
on 4)” of your Owner’s Manual.
2 5 3 4 6
Page 21 of 32

19
Conventional (Fixed Speed) Cruise Control
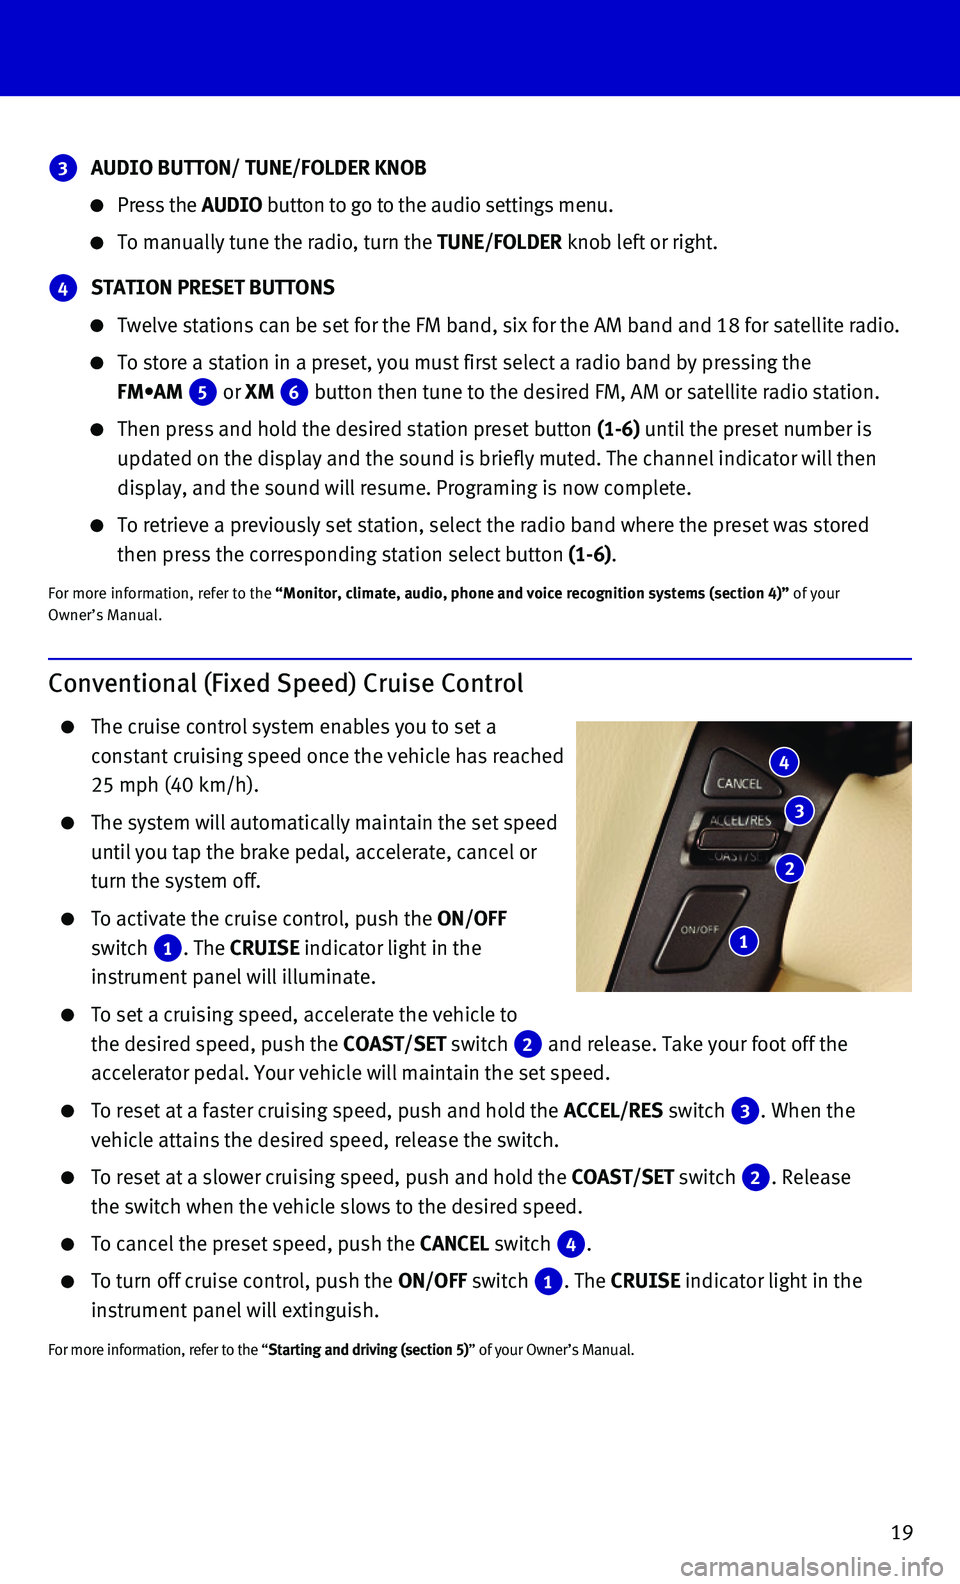
The cruise control system enables you to set a
constant cruising speed once the vehicle has reached
25 mph (40 km/h).
The system will automatically maintain the set speed
until you tap the brake pedal, accelerate, cancel or
turn the system off.
To activate the cruise control, push the ON/OFF
switch 1. The CRUISE indicator light in the
instrument panel will illuminate.
To set a cruising speed, accelerate the vehicle to
the desired speed, push the COAST/SET switch 2 and release. Take your foot off the
accelerator pedal. Your vehicle will maintain the set speed.
To reset at a faster cruising speed, push and hold the ACCEL/RES switch 3. When the
vehicle attains the desired speed, release the switch.
To reset at a slower cruising speed, push and hold the COAST/SET switch 2. Release
the switch when the vehicle slows to the desired speed.
To cancel the preset speed, push the CANCEL switch 4.
To turn off cruise control, push the ON/OFF switch 1. The CRUISE indicator light in the
instrument panel will extinguish.
For more information, refer to the “Starting and driving (section 5)” of your Owner’s Manual.
4
3
2
1
3 AUDIO BUTTON/ TUNE/FOLDER KNOB
Press the AUDIO button to go to the audio settings menu.
To manually tune the radio, turn the TUNE/FOLDER knob left or right.
4 STATION PRESET BUTTONS
Twelve stations can be set for the FM band, six for the AM band and 18 f\
or satellite radio.
To store a station in a preset, you must first select a radio band by pr\
essing the
FM•AM 5 or XM 6 button then tune to the desired FM, AM or satellite radio station.
Then press and hold the desired station preset button (1-6) until the preset number is
updated on the display and the sound is briefly muted. The channel indic\
ator will then
display, and the sound will resume. Programing is now complete.
To retrieve a previously set station, select the radio band where the pr\
eset was stored
then press the corresponding station select button (1-6).
For more information, refer to the “Monitor, climate, audio, phone and voice recognition systems (secti\
on 4)” of your Owner’s Manual.
Page 22 of 32

20
first drive features
Intelligent Cruise Control (ICC) (if so equipped)
The Intelligent Cruise Control (ICC) automatically
maintains a selected distance from the vehicle
traveling in front of you according to that vehicle’s
speed (up to the set speed) or the set speed when
the road ahead is clear.
This system may not function properly due to
road conditions when direct sunlight, rain, mud,
snow or other road spray cause the sensor to
become blocked.
VEHICLE-TO-VEHICLE DISTANCE CONTROL MODE
To set Vehicle-To-Vehicle Distance Control mode,
press the CRUISE ON/OFF button 1 on the steering
wheel for less than 1.5 seconds. The indicator
light 2 will illuminate.
Accelerate to the desired speed.
Push down on the COAST/SET switch 3 on the steering wheel
and release it. Cruise control will be set to the desired speed.
Press the distance button 4 on the steering wheel repeatedly to change
the set distance between long, middle and short.
When a vehicle is not detected ahead of you in the lane, the set distanc\
e and set vehicle
speed indicator lights will illuminate 5 in set mode.
When a vehicle is detected ahead of you in the lane, the vehicle ahead detection, set distance
and set vehicle speed indicator lights will illuminate 6 in set mode.
TO SET CONVENTIONAL FIXED SPEED CRUISE CONTROL MODE:
While cruise control is off, press the CRUISE ON/OFF button on the steering wheel and hold it
down for more than 1.5 seconds. The CRUISE indicator light will illuminate.
Accelerate to the desired speed.
Push down on the COAST/SET switch on the steering wheel and release it. The SET indicator
light will illuminate. Cruise control should be set to the desired speed\
.
TO SWITCH BETWEEN THE TWO CRUISE CONTROL MODES:
When one of the two cruise modes is in use, you must turn the system off\
and then turn it
on again to select the other cruise control mode.
For more information, refer to the “Starting and driving (section 5)” of your Owner’s Manual.
3
1
4
2 5
6
Page 28 of 32

26
system guide
Navigation System
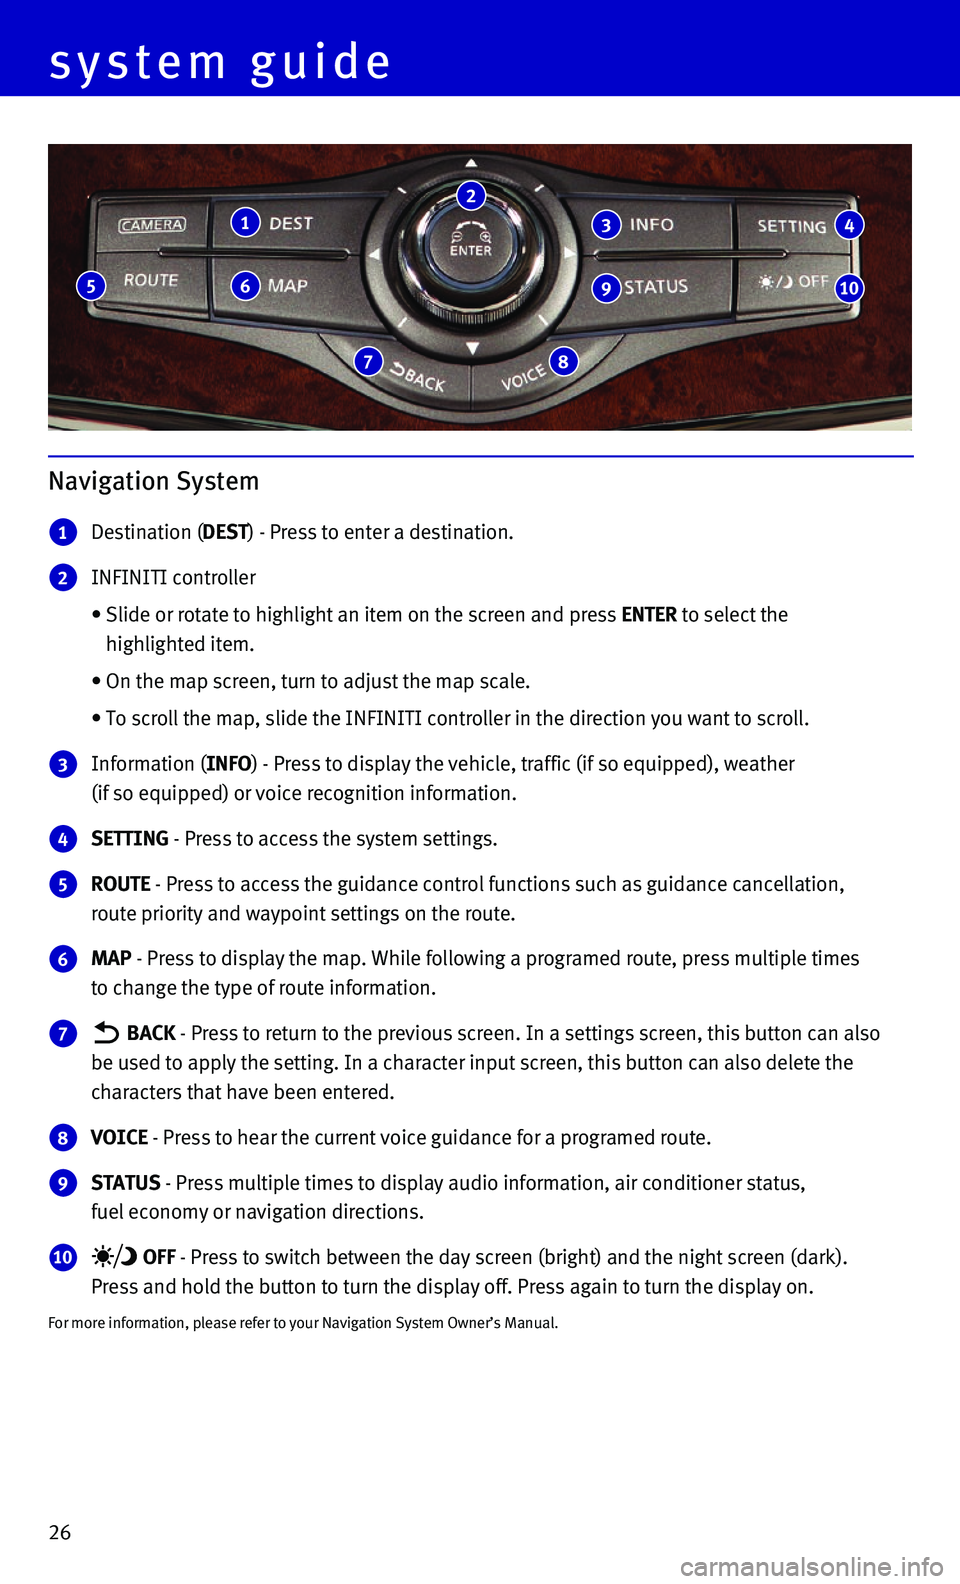
1 Destination (DEST) - Press to enter a destination.
2 INFINITI controller
• Slide or rotate to highlight an item on the screen and press ENTER to select the
highlighted item.
• On the map screen, turn to adjust the map scale.
• To scroll the map, slide the INFINITI controller in the direction you wa\
nt to scroll.
3 Information (INFO) - Press to display the vehicle, traffic (if so equipped), weather
(if so equipped) or voice recognition information.
4 SETTING - Press to access the system settings.
5 ROUTE - Press to access the guidance control functions such as guidance cance\
llation,
route priority and waypoint settings on the route.
6 MAP - Press to display the map. While following a programed route, press mu\
ltiple times
to change the type of route information.
7 BACK - Press to return to the previous screen. In a settings screen, this bu\
tton can also
be used to apply the setting. In a character input screen, this button c\
an also delete the
characters that have been entered.
8 VOICE - Press to hear the current voice guidance for a programed route.
9 STATUS - Press multiple times to display audio information, air conditioner st\
atus,
fuel economy or navigation directions.
10 OFF - Press to switch between the day screen (bright) and the night scree\
n (dark).
Press and hold the button to turn the display off. Press again to turn t\
he display on.
For more information, please refer to your Navigation System Owner’s \
Manual.
1
6
7 8
5
2
3
9
4
10
Page 29 of 32

27
HomeLink® Universal Transceiver
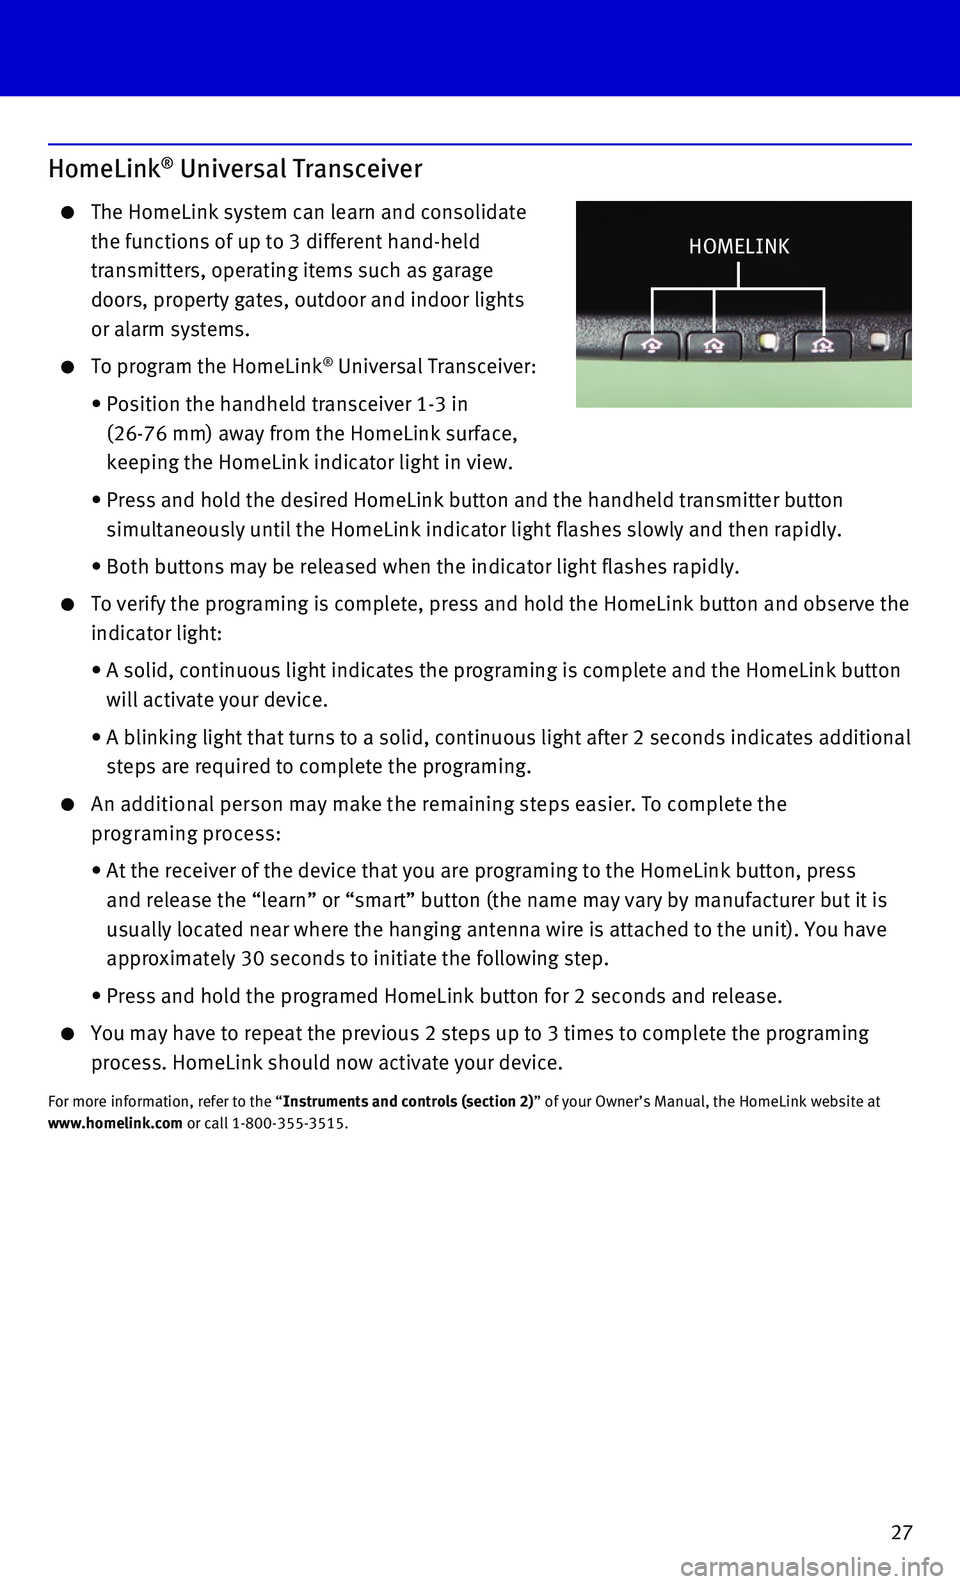
The HomeLink system can learn and consolidate
the functions of up to 3 different hand-held
transmitters, operating items such as garage
doors, property gates, outdoor and indoor lights
or alarm systems.
To program the HomeLink® Universal Transceiver:
• Position the handheld transceiver 1-3 in
(26-76 mm) away from the HomeLink surface,
keeping the HomeLink indicator light in view.
• Press and hold the desired HomeLink button and the handheld transmitter \
button
simultaneously until the HomeLink indicator light flashes slowly and the\
n rapidly.
• Both buttons may be released when the indicator light flashes rapidly.
To verify the programing is complete, press and hold the HomeLink button\
and observe the
indicator light:
• A solid, continuous light indicates the programing is complete and the H\
omeLink button
will activate your device.
• A blinking light that turns to a solid, continuous light after 2 seconds\
indicates additional
steps are required to complete the programing.
An additional person may make the remaining steps easier. To complete the
programing process:
• At the receiver of the device that you are programing to the HomeLink bu\
tton, press
and release the “learn” or “smart” button (the name may var\
y by manufacturer but it is
usually located near where the hanging antenna wire is attached to the u\
nit). You have
approximately 30 seconds to initiate the following step.
• Press and hold the programed HomeLink button for 2 seconds and release.
You may have to repeat the previous 2 steps up to 3 times to complete th\
e programing
process. HomeLink should now activate your device.
For more information, refer to the “Instruments and controls (section 2)” of your Owner’s Manual, the HomeLink website at www.homelink.com or call 1-800-355-3515.
HOMELINK