2015 INFINITI QX60 HYBRID heater
[x] Cancel search: heaterPage 218 of 580

HOW TO USE THE SETTING
BUTTON
Press the SETTING button. This screen displays
and adjusts various settings and functions that
are available for your vehicle. Use the INFINITI
controller to select an item and then press the
ENTER button. When the amber indicator next to
an item is illuminated, the feature is enabled.
Menu ItemResult
Audio For additional information, refer to “Audio system” in this section.
Display Adjusts the settings for the display screen.
Brightness/Contrast Adjusts the brightness or contrast of the map background.
Display off Toggles the display screen on and off. The amber indicator is illuminated when the display is set to “On”. When the display is set to “Off” and a
control panel, audio or heater and air conditioner button is pressed, the display will resume until that operation is finished. To turn the display
back on, press and hold the
OFF button for approximately 2 seconds or return to the display setting screen and adjust the setting.
Background Color Adjusts the display screen between day and night mode.
Switch Beeps Toggles on and off the beep sound that is heard when a control panel button is pressed.
Camera Toggles the predictive course lines on or off when the rear view camera is displayed on screen. For additional information, refer to “RearView
Monitor” in this section.
Clock Adjusts the clock settings.
LHA1304
4-8Monitor, climate, audio, phone and voice recognition systems
Page 227 of 580

Menu ItemResult
Display Control Select the “ON” key for either the left or right display to alternately enable or disable the display fo the left or right rear passengers. If the display
is enabled, select the key (DVD, USB, front AUX or rear AUX) that you wish to have displayed on the corresponding screen. The front AUX set-
ting is for devices plugged into the AUX jacks in the center console. The rear AUX setting is for the devices plugged into the AUX jacks on the
back of the center console.
Auto Display Toggles ON or OFF the Auto Display option. When Auto Display is ON, the rear displays will automatically turn on when a movie is played from a
DVD or USB device.
Rear Speaker Toggles ON or OFF the Rear Speaker volume.
ECO DRIVE (if so equipped) To adjust the ECO pedal driver’s assist, select the “Standard”, “Soft” or “OFF” key and adjust it with the INFINITI controller. For additional infor- mation about ECO DRIVE system, refer to “ECO pedal system” in the “Starting and driving” section of this manual.
Others Select the “Others” key using the INFINITI controller. The voice recognition, language and units setting screen will be displayed.
Display Adjustment To adjust the display settings, select the “Display Adjustment” key. The following settings are available: Brightness/
Contrast Adjusts the brightness or contrast of the map background.
Display off Toggles the display screen on and off. The amber indicator is illuminated when the display is set to “On”. When the display is set to “Off” and a
control panel, audio or heater and air conditioner button is pressed, the display will resume until that operation is finished. To turn the display bac k
on, press and hold the
OFF button for approximately 2 seconds or return to the display setting screen and adjust the setting.
Background
Color Adjusts the display screen between day and night mode.
Color Theme Changes the color of the background, arrows and bars on the screen. Choose between “Black”, “Brown”, or “Silver”.
Language/Units Select which settings you want to change using the INFINITI controller.
Select Language Select to change language that will be shown on the display.
Select Units Select the “US” (mi, °F, MPG) key or the “Metric” (km, °C, L/100 km) key to change the units shown on the display.
Voice Recognition For additional information on Voice Recognition settings, refer to “INFINITI Voice Recognition System” in this section.
Camera Settings Select the “Camera” key. The Camera Settings screen will appear. When this option is on (indicator light illuminated) , the predictive course lines
will be displayed when the RearView Monitor is displayed on the screen. For additional information, refer to “RearView Monitor” in this section.
Image Viewer For additional information about these settings, refer to “Image Viewer” in this section.
Monitor, climate, audio, phone and voice recognition systems4-17
Page 252 of 580

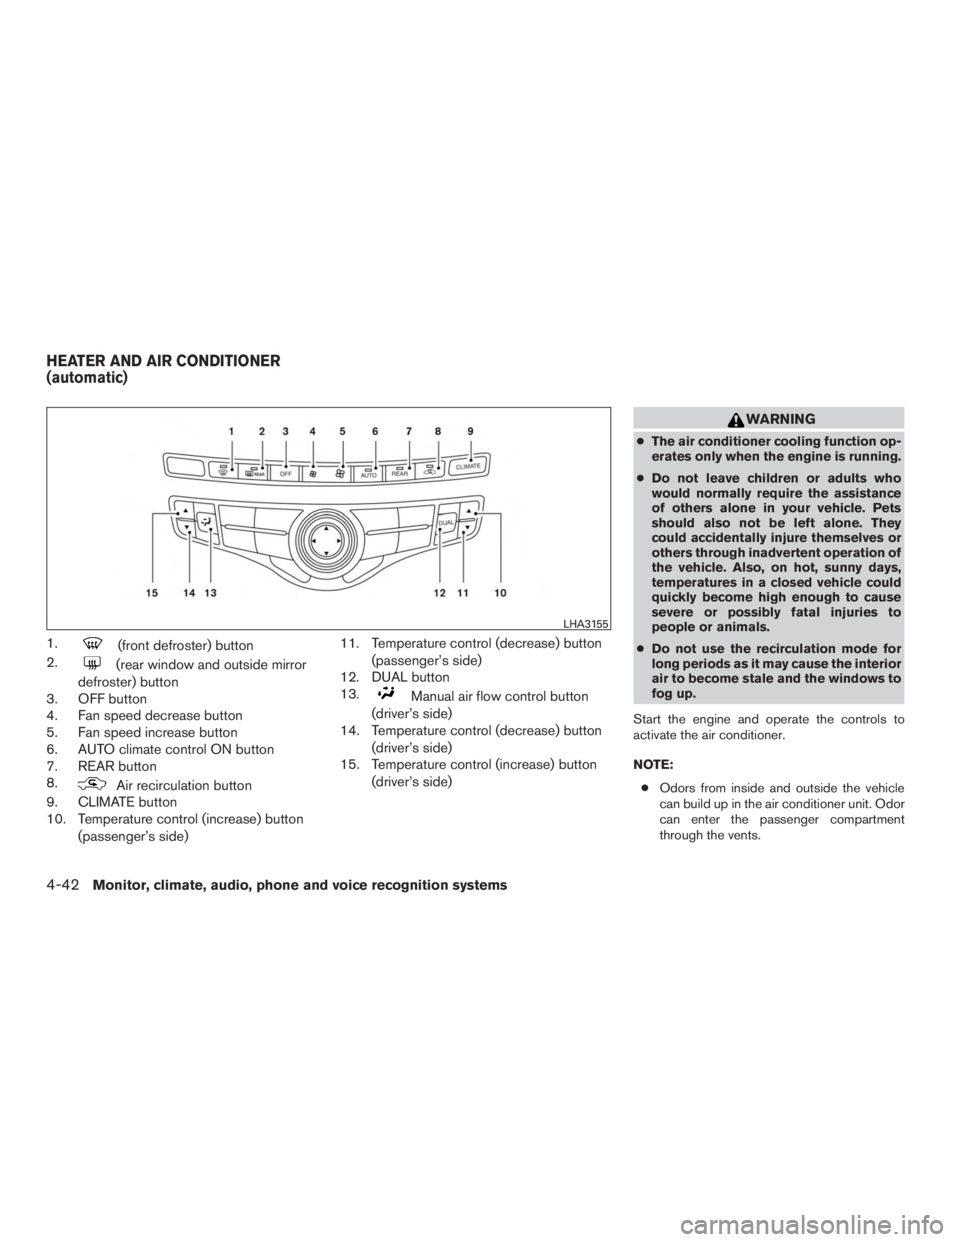
1.(front defroster) button
2.
(rear window and outside mirror
defroster) button
3. OFF button
4. Fan speed decrease button
5. Fan speed increase button
6. AUTO climate control ON button
7. REAR button
8.
Air recirculation button
9. CLIMATE button
10. Temperature control (increase) button
(passenger’s side) 11. Temperature control (decrease) button
(passenger’s side)
12. DUAL button
13.
Manual air flow control button
(driver’s side)
14. Temperature control (decrease) button
(driver’s side)
15. Temperature control (increase) button
(driver’s side)
WARNING
●The air conditioner cooling function op-
erates only when the engine is running.
● Do not leave children or adults who
would normally require the assistance
of others alone in your vehicle. Pets
should also not be left alone. They
could accidentally injure themselves or
others through inadvertent operation of
the vehicle. Also, on hot, sunny days,
temperatures in a closed vehicle could
quickly become high enough to cause
severe or possibly fatal injuries to
people or animals.
● Do not use the recirculation mode for
long periods as it may cause the interior
air to become stale and the windows to
fog up.
Start the engine and operate the controls to
activate the air conditioner.
NOTE: ● Odors from inside and outside the vehicle
can build up in the air conditioner unit. Odor
can enter the passenger compartment
through the vents.
LHA3155
HEATER AND AIR CONDITIONER
(automatic)
4-42Monitor, climate, audio, phone and voice recognition systems
Page 253 of 580

●When parking, set the heater and air condi-
tioner controls to turn off air recirculation to
allow fresh air into the passenger compart-
ment. This should help reduce odors inside
the vehicle.
AUTOMATIC OPERATION
Cooling and/or dehumidified heating
(AUTO)
This mode may be used all year round as the
system automatically works to keep a constant
temperature. Air flow distribution, intake air con-
trol, and fan speed are also controlled automati-
cally.
1. Press the AUTO button on. (The indicator on the button will illuminate and AUTO will be
displayed.)
2. Operate the driver’s side temperature con- trol buttons.
● Adjust the temperature display to about
75°F (24°C) for normal operation.
● The temperature of the passenger compart-
ment will be maintained automatically. Air
flow distribution, intake air control, and fan
speed are also controlled automatically. ●
A visible mist may be seen coming from the
ventilators in hot, humid conditions as the air
is cooled rapidly. This does not indicate a
malfunction.
Dehumidified defrosting or defogging
1. Press thefront defroster button on.
(The indicator light on the button will come
on.)
2. Operate the temperature control buttons to set the desired temperature.
● To quickly remove ice from the outside of the
windows, use the fan speed control dial to
set the fan speed to maximum.
● As soon as possible after the windshield is
clean, press the AUTO button to return to
the automatic mode.
● When the
front defroster button is
pressed, the air conditioner will automati-
cally be turned on at outside temperatures
above 36°F (2°C) . The air recirculate mode
automatically turns off, allowing outside air
to be drawn into the passenger compart-
ment to further improve the defogging per-
formance.
MANUAL OPERATION
Fan speed control
Press the fan control buttonsto manually
control the fan speed.
Press the AUTO button to return to automatic
control of the fan speed.
Air recirculation
Press theair recirculation button to recir-
culate interior air inside the vehicle. The
indicator light on the button will come on.
The air recirculation cannot be activated when
the air conditioner is in the
front defrosting
mode.
Automatic intake air control
In the AUTO mode, the intake air will be con-
trolled automatically. To manually control the in-
take air, press the
air recirculation button.
To return to the automatic control mode, press
and hold the
air recirculation button for
about 2 seconds. The indicator light will flash
twice, and then the intake air will be controlled
automatically.
Monitor, climate, audio, phone and voice recognition systems4-43
Page 257 of 580

Rear Heating (A/C off)1. Press the REAR button to display the Rear Air-conditioning screen on the front display
when the rear automatic air conditioning
system is on.
2. Press the AUTO button. The AUTO indicator light will illuminate and “AUTO” will appear
on the display.
3. If the A/C indicator light illuminates on the touchscreen, touch the A/C button.
4. Press the temperature increase and de- crease buttons (driver’s side) to set the de-
sired temperature. ●
Do not set the temperature lower than the
outside air temperature. Doing so may cause
the temperature to not be controlled prop-
erly.
● To dehumidify the air, touch the A/C button
on the touchscreen before turning on the
heater.
Turning the system off 1. Press the REAR button on the front control panel until the Rear Air-conditioning screen
is displayed.
2. Press the OFF button. The rear climate con- trols will turn OFF.
LHA2168
Monitor, climate, audio, phone and voice recognition systems4-47
Page 264 of 580

●This copyright protected technology
cannot be used without a permit from
Macrovision Corporation. It is limited
to personal use, etc., as long as the
permit from Macrovision Corporation
is not issued.
● Modifying or disassembling is prohib-
ited.
● Dolby digital is manufactured under li-
cense from Dolby Laboratories, Inc.
● Dolby and the double D mark “
”
are trademarks of Dolby Laboratories,
Inc.
● DTS and DTS Digital Surround “
”
are registered trademarks of Digital
Theater Systems, Inc.
USB (Universal Serial Bus)
Connection Port
WARNING
Do not connect, disconnect or operate the
USB device while driving. Doing so can be
a distraction. If distracted you could lose
control of your vehicle and cause an acci-
dent or serious injury.
CAUTION
● Do not force the USB device into the
USB port. Inserting the USB device
tilted or up-side-down into the port may
damage the port. Make sure that the
USB device is connected correctly into
the USB port.
● Do not grab the USB port cover (if so
equipped) when pulling the USB device
out of the port. This could damage the
port and the cover.
● Do not leave the USB cable in a place
where it can be pulled unintentionally.
Pulling the cable may damage the port.
The vehicle is not equipped with a USB device.
USB devices should be purchased separately as
necessary.
This system cannot be used to format USB de-
vices. To format a USB device, use a personal
computer.
In some states/area, the USB device for the front
seats plays only sound without images for regu-
latory reasons, even when the vehicle is parked.
This system supports various USB memory de-
vices, USB hard drives and iPod® players. Some
USB devices may not be supported by this sys-
tem. ●
Partitioned USB devices may not play cor-
rectly.
● Some characters used in other languages
(Chinese, Japanese, etc.) may not appear
properly in the display. Using English lan-
guage characters with a USB device is rec-
ommended.
General notes for USB use:
Refer to your device manufacturer’s owner infor-
mation regarding the proper use and care of the
device.
Notes for iPod® use:
iPod® is a trademark of Apple Inc., registered in
the U.S. and other countries. ● Improperly plugging in the iPod® may cause
a checkmark to be displayed on and off
(flickering) . Always make sure that the
iPod® is connected properly.
● An iPod® nano (1st Generation) may remain
in fast forward or rewind mode if it is con-
nected during a seek operation. In this case,
please manually reset the iPod®.
● An iPod® nano (2nd Generation) will con-
tinue to fast-forward or rewind if it is discon-
nected during a seek operation.
4-54Monitor, climate, audio, phone and voice recognition systems
Page 363 of 580

Battery...................................... 5-105
Draining of coolant water ......................5-106
Tire equipment ............................... 5-106
Special winter equipment ......................5-106Driving on snow or ice
........................ 5-106
Engine block heater (if so equipped) ............5-107
Active noise control .............................. 5-107
Page 467 of 580

ENGINE BLOCK HEATER (if so
equipped)
Engine block heaters are used to assist with cold
temperature starting.
The engine block heater should be used when
the outside temperature is 20°F (-7°C) or lower.
WARNING
●Do not use your engine block heater
with an ungrounded electrical system or
a 2-pronged adapter. You can be seri-
ously injured by an electrical shock if
you use an ungrounded connection.
● Disconnect and properly store the en-
gine block heater cord before starting
the engine. Damage to the cord could
result in an electrical shock and can
cause serious injury.
● Use a heavy-duty 3-wire, 3-pronged ex-
tension cord rated for at least 10 A. Plug
the extension cord into a Ground Fault
Interrupt (GFI) protected, grounded
110-VAC outlet. Failure to use the
proper extension cord or a grounded
outlet can result in a fire or electrical
shock and cause serious personal
injury. To use the engine block heater:
1. Turn the engine off.
2. Open the hood and unwrap the engine block heater cord.
3. Plug the engine block heater cord into a grounded 3-wire, 3-pronged extension
cord.
4. Plug the extension cord into a Ground Fault Interrupt (GFI) protected, grounded 110-
volt AC (VAC) outlet.
5. The engine block heater must be plugged in for at least2-4hours, depending on outside
temperatures, to properly warm the engine
coolant. Use an appropriate timer to turn the
engine block heater on.
6. Before starting the engine, unplug and prop- erly store the cord to keep it away from
moving parts.
Front Microphone
LSD2157
ACTIVE NOISE CONTROL
Starting and driving5-107