2015 INFINITI Q70 HYBRID display
[x] Cancel search: displayPage 14 of 32

12
essential information
Clock Set/Adjustment
DIGITAL CLOCK ADJUSTMENT
To adjust the time and the appearance of the clock
on the display:
1. Press the SETTING button on the control panel.
2. Touch the Others key.
3. Touch the Clock key.
The following settings can be adjusted:
• On-screen Clock: The clock in the upper right corner of the display can be turned ON or O\
FF.
• Clock Format (24h): The clock can be set to 12 hours or 24 hours. • Offset (hour): The time can be adjusted by increasing or decreasing per hour. • Offset (min): The time can be adjusted by increasing or decreasing per minute. • Daylight Savings Time: The application of daylight savings time can be turned ON or OFF. • Time Zone: Adjust the time zone. Choose a time zone from the available list.
Press the BACK button to return to the previous screen.
For more information, refer to the “Monitor, climate, audio, phone and voice recognition systems (secti\
on 4)” of your
Owner’s Manual.
Loose Fuel Cap
A LOOSE FUEL CAP warning message will appear in the
vehicle information display
1 when the fuel-filler
cap is not tightened correctly.
To tighten, turn the cap clockwise until a single click
is heard.
The warning message will extinguish when the vehicle
detects the fuel-filler cap is properly tightened and the
reset button
2 is pressed for more than 1 second.
If the cap is not properly tightened, the Malfunction
Indicator Light
may illuminate.
For more information, refer to the “Instruments and controls (section 2)” and
the “Pre-driving checks and adjustments (section 3)” of your Owner’s Manual.
2
1
Fuel-filler Door
The fuel-filler door is located on the passenger’s side of
the vehicle.
When the doors of the vehicle are locked or unlocked,
the fuel-filler door is automatically locked or unlocked
at the same time.
To open the door, push the upper left side of the door.
For more information, refer to the “Pre-driving checks and adjustments (section 3)” of your Owner’s Manual.
Page 20 of 32

18
first drive features
Automatic Climate Controls
1 AUTO BUTTON The automatic mode may be used year-round. Press the AUTO button to turn the system
on. The system will automatically control the inside temperature (autom\
atic cooling and/
or dehumidified heating), air flow distribution and fan speed.
2 CLIMATE BUTTON Press the CLIMATE button to adjust your automatic climate controls using the climate
settings on the control panel display screen.
3 DRIVER’S SIDE TEMPERATURE CONTROL BUTTONS Press the driver’s side temperature control buttons up for warmer air or down for
cooler air.
4 DRIVER’S SIDE MANUAL AIR FLOW CONTROL BUTTON Press the driver’s side manual air flow button to manually control th\
e driver’s side air
flow modes.
The following air flow indicator modes will display on the control panel\
display screen:
Air flows from the center and side vents.
Air flows from the center, side and foot vents.
Air flows mainly from the foot vents.
Air flows from the defroster and foot vents.
5 PASSENGER’S SIDE TEMPERATURE CONTROL BUTTONS To manually adjust the passenger’s side temperature, press the passen\
ger’s side
temperature control buttons up
for warmer air or down for cooler air.
6 PASSENGER’S SIDE MANUAL AIR FLOW CONTROL BUTTON Press the passenger’s side manual air flow button to manually control\
the passenger’s
side air flow modes.
The following air flow indicator modes will display on the control panel\
display screen:
Air flows from the center and side vents.
Air flows from the center, side and foot vents.
Air flows mainly from the foot vents.
Air flows from the defroster and foot vents.
46
89127110112
35
Page 22 of 32

20
FM/AM/SiriusXM® Satellite Radio with CD/DVD (if so equipped) Player
1 ON•OFF BUTTON/VOL (volume) CONTROL KNOB
Press the ON•OFF button to turn the system on or off.
Turn the VOL (volume) control knob right or left to increase or decrease the volume.
2 AUDIO BUTTON/TUNE/FOLDER CONTROL KNOB
To manually tune the radio, turn the TUNE/FOLDER control knob left or right.
Press the AUDIO button to access the audio settings screen.
3 SEEK•CAT/TRACK BUTTON
To scan quickly and stop at the previous or next broadcast station, pres\
s the or
end of the SEEK•CAT/TRACK button.
For satellite radio, press the or end of the SEEK•CAT/TRACK button to switch to
the first channel of the previous or next category.
To change tracks on a CD, press the or end of the SEEK•CAT/TRACK button.
To rewind or fast forward a track on a CD, press and hold the or end of the
SEEK•CAT/TRACK button.
4 STATION PRESET BUTTONS
Twelve stations can be set for the FM band, 6 for the AM band and 18 for\
satellite radio.
To store a station in a preset, you must first select a radio band by pr\
essing the FM•AM
button
5 or
XM button
6 then tune to the desired FM, AM or satellite
radio station.
Then press and hold the desired station preset button (1-6) until the preset number is
updated on the display and the sound is briefly muted. The channel indic\
ator will then
display, and the sound will resume. Programing is now complete.
To retrieve a previously set station, select the radio band where the pr\
eset was stored
then press the corresponding station select button (1-6).
*SiriusXM® Satellite Radio is only available on vehicles equipped with an optional\
satellite radio subscription service.
For more information, refer to the “Monitor, climate, audio, phone and voice recognition systems (secti\
on 4)” of your
Owner’s Manual.
1
356
2
4
first drive features
Page 23 of 32

21
USB (Universal Serial Bus) Connection Port/iPod® Interface
The USB port 1 is located in the center console
under the arm rest.
When a compatible USB memory device or iPod®
is plugged into the USB port, compatible audio and
video files stored on the device can be played
through the vehicle’s audio system and front display.
For more information, refer to the “Monitor, climate, audio, phone and voice
recognition systems (section 4)” of your Owner’s Manual.
Conventional (Fixed Speed) Cruise Control
The cruise control system enables you to set a
constant cruising speed once the vehicle has reached
25 mph (40km/h).
The system will automatically maintain the set speed
until you tap the brake pedal, accelerate, cancel or
turn the system off.
To activate the cruise control, push the ON/OFF switch
1 . The
CRUISE
indicator light in the
instrument panel will illuminate.
To set cruising speed, accelerate the vehicle to the desired speed, push\
the COAST/SET switch
2 and release. The
CRUISE/SET
indicator light
in the instrument panel will illuminate. Take
your foot off the accelerator pedal. Your vehicle will maintain the set \
speed.
To reset at a faster cruising speed, push and hold the ACCEL/RES switch 3 . When the
vehicle attains the desired speed, release the switch.
To reset at a slower cruising speed, push and hold the COAST/SET switch
2. Release the
switch when the vehicle slows to the desired speed.
To cancel the preset speed, push the CANCEL switch
4 .
To turn off cruise control, push the ON/OFF switch 1 . Both the CRUISE indicator light and
the SET indicator light in the instrument panel will extinguish.
For more information, refer to the “Starting and driving (section 5)” of your Owner’s Manual.
1
3
2
4
1
Page 25 of 32

23
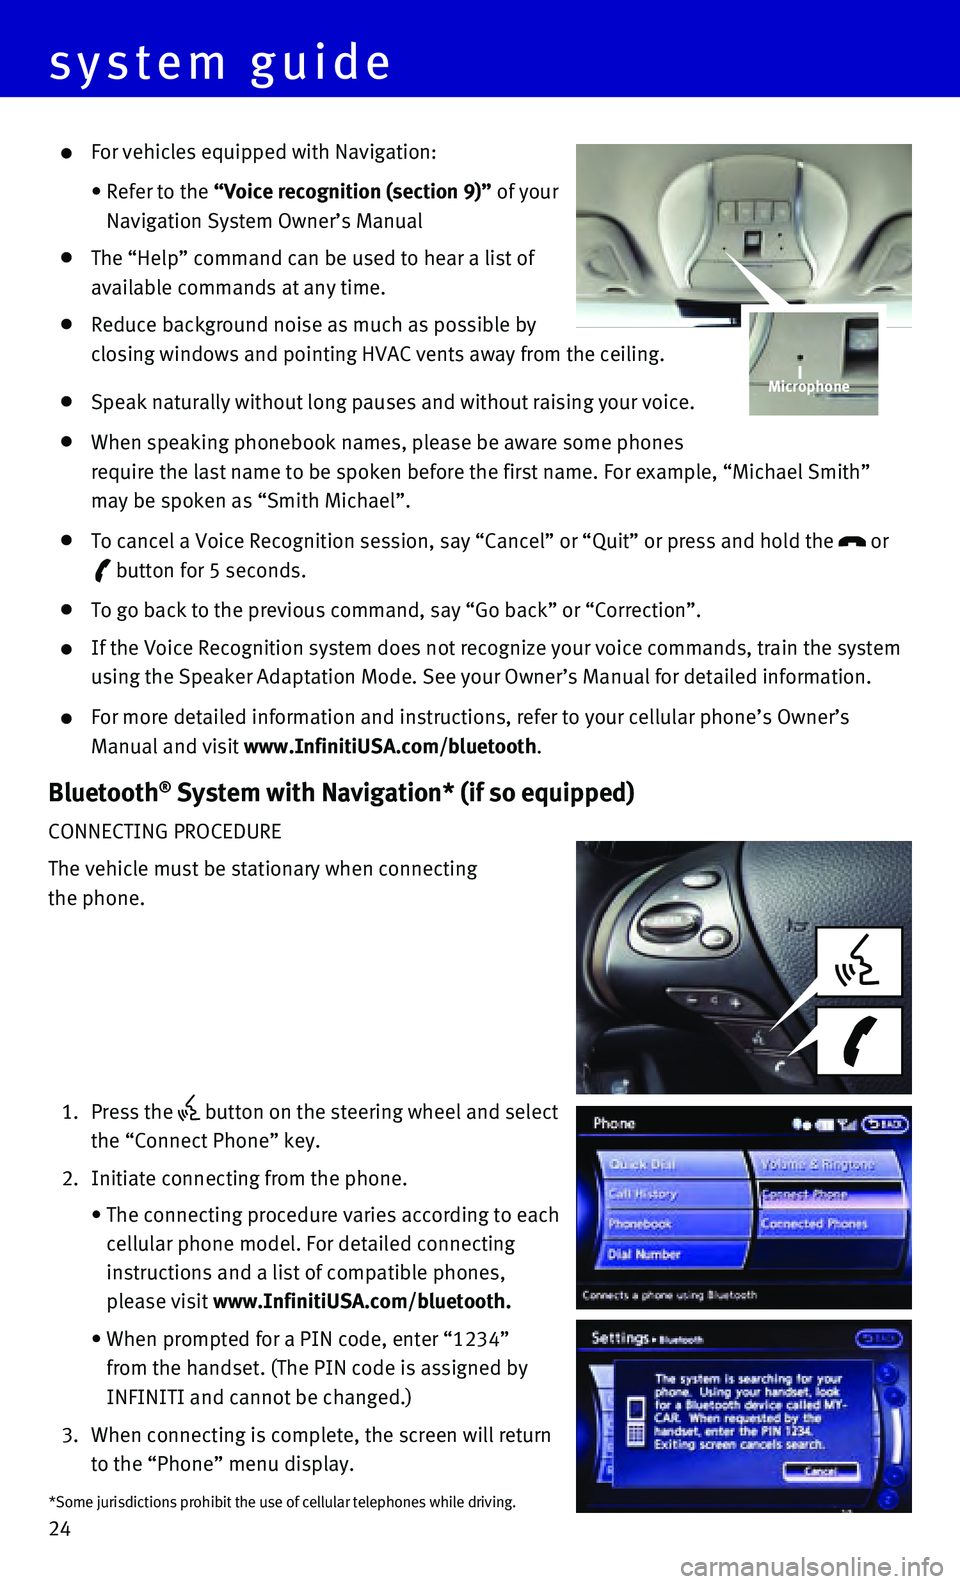
Bluetooth® Hands-free Phone System
A cellular telephone should not be used while driving
so full attention may be given to vehicle operation.*
SYSTEM OPERATING TIPS
Press the or button to interrupt the voice
prompts at any time and speak a command after
the tone.
For vehicles not equipped with Navigation:
• To use the system faster, you may speak the second
level commands with the main menu command on the main menu. For example, press the
or button and after the tone say “Call Redial”.
system guide
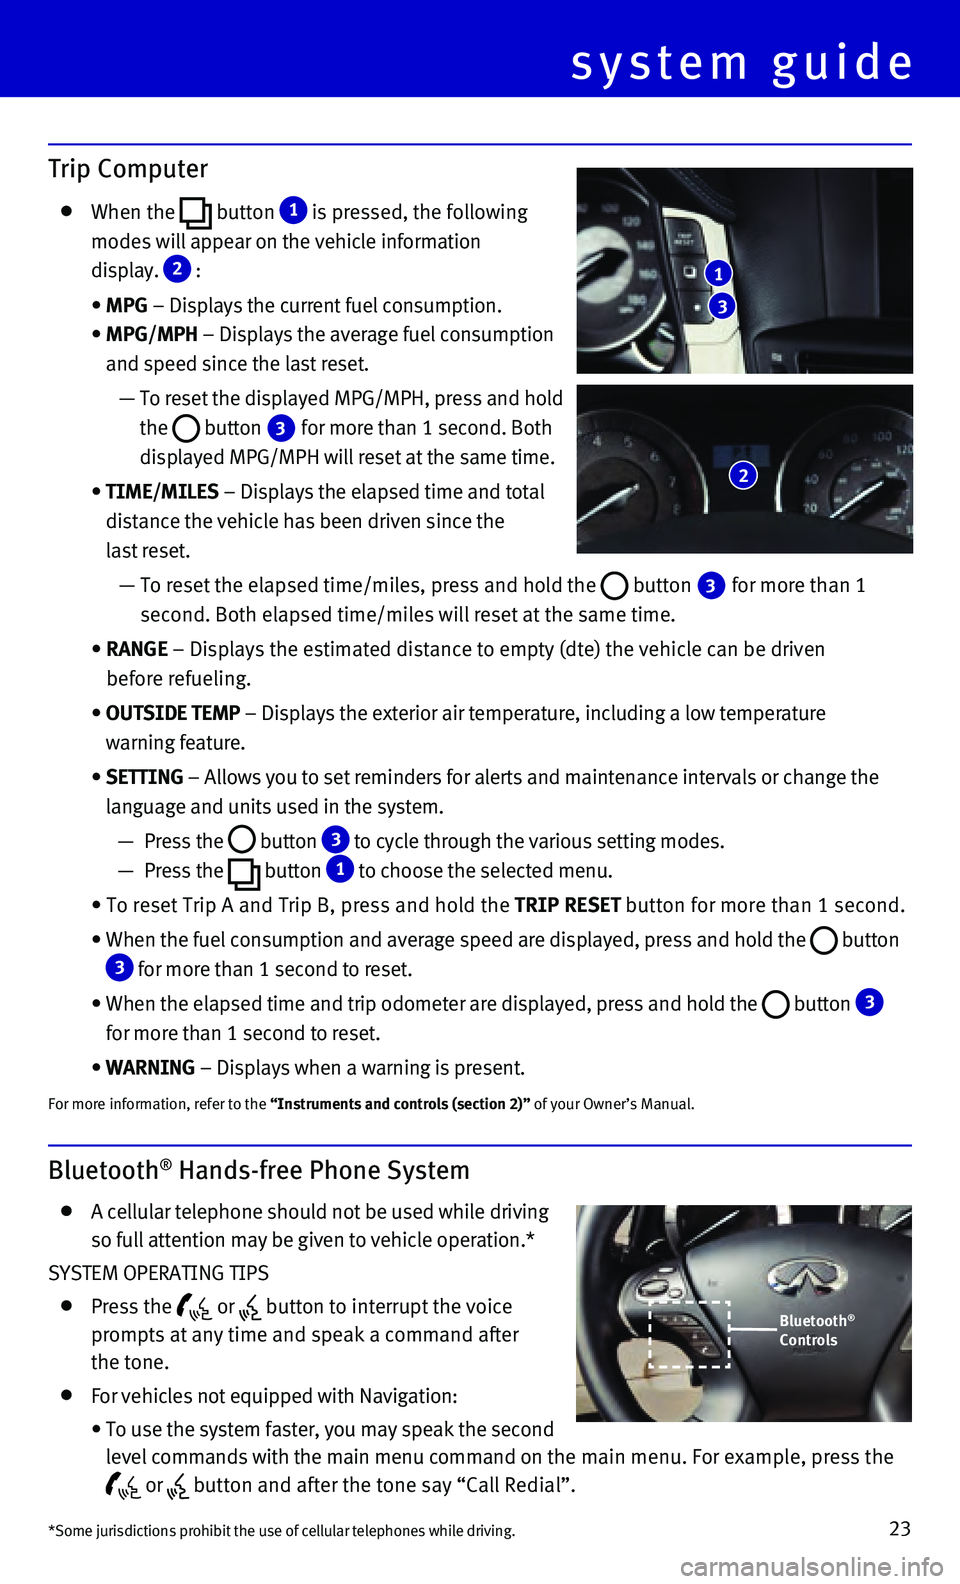
Trip Computer
When the button 1 is pressed, the following
modes will appear on the vehicle information
display.
2 :
• MPG – Displays the current fuel consumption.
• MPG/MPH – Displays the average fuel consumption
and speed since the last reset.
— To reset the displayed MPG/MPH, press and hold
the
button 3 for more than 1 second. Both
displayed MPG/MPH will reset at the same time.
• TIME/MILES – Displays the elapsed time and total
distance the vehicle has been driven since the
last reset.
— To reset the elapsed time/miles, press and hold the button 3 for more than 1
second. Both elapsed time/miles will reset at the same time.
• RANGE – Displays the estimated distance to empty (dte) the vehicle can b\
e driven
before refueling.
• OUTSIDE TEMP – Displays the exterior air temperature, including a low temperature\
warning feature.
• SETTING – Allows you to set reminders for alerts and maintenance intervals o\
r change the
language and units used in the system.
— Press the button 3 to cycle through the various setting modes.
— Press the button
1 to choose the selected menu.
• To reset Trip A and Trip B, press and hold the TRIP RESET button for more than 1 second.
• When the fuel consumption and average speed are displayed, press and hol\
d the button 3 for more than 1 second to reset.
• When the elapsed time and trip odometer are displayed, press and hold th\
e button 3
for more than 1 second to reset.
• WARNING – Displays when a warning is present.
For more information, refer to the “Instruments and controls (section 2)” of your Owner’s Manual.
3
1
2
*Some jurisdictions prohibit the use of cellular telephones while drivin\
g.
Bluetooth®
Controls
Page 26 of 32

24
For vehicles equipped with Navigation:
• Refer to the “Voice recognition (section 9)” of your
Navigation System Owner’s Manual
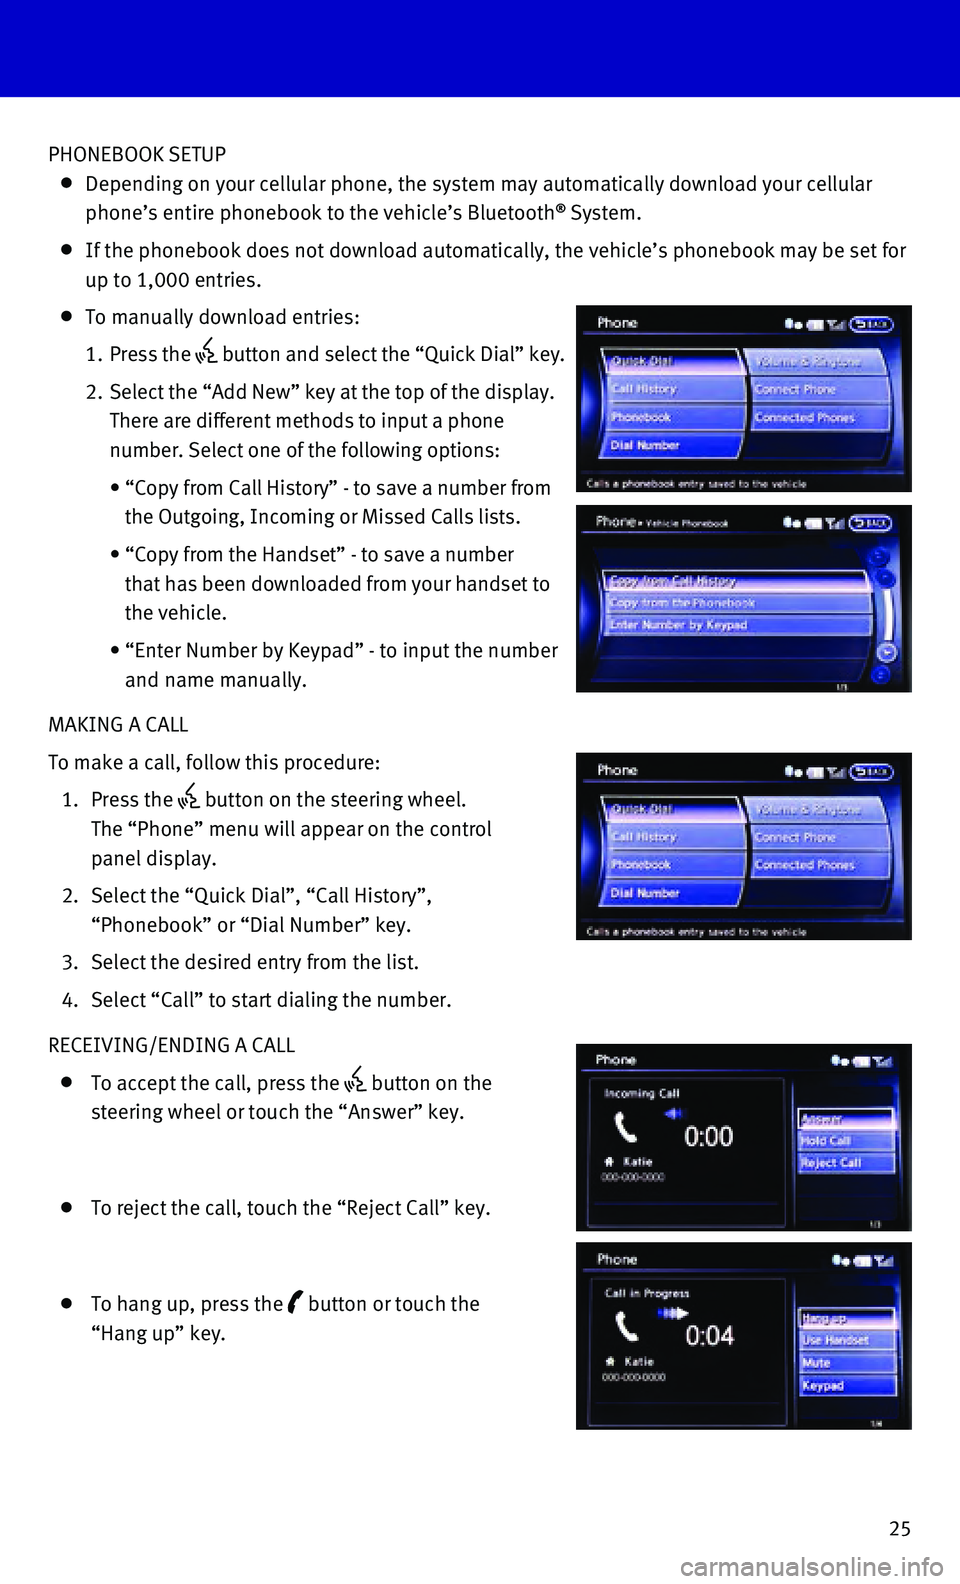
The “Help” command can be used to hear a list of
available commands at any time.
Reduce background noise as much as possible by
closing windows and pointing HVAC vents away from the ceiling.
Speak naturally without long pauses and without raising your voice.
When speaking phonebook names, please be aware some phones
require the last name to be spoken before the first name. For example, “\
Michael Smith”
may be spoken as “Smith Michael”.
To cancel a Voice Recognition session, say “Cancel” or “Quit”\
or press and hold the or
button for 5 seconds.
To go back to the previous command, say “Go back” or “Correctio\
n”.
If the Voice Recognition system does not recognize your voice commands, \
train the system
using the Speaker Adaptation Mode. See your Owner’s Manual for detail\
ed information.
For more detailed information and instructions, refer to your cellular p\
hone’s Owner’s
Manual and visit www.InfinitiUSA.com/bluetooth.
Bluetooth® System with Navigation* (if so equipped)
CONNECTING PROCEDURE
The vehicle must be stationary when connecting
the phone.
1. Press the button on the steering wheel and select
the “Connect Phone” key.
2. Initiate connecting from the phone.
• The connecting procedure varies according to each
cellular phone model. For detailed connecting
instructions and a list of compatible phones,
please visit www.InfinitiUSA.com/bluetooth.
• When prompted for a PIN code, enter “1234”
from the handset. (The PIN code is assigned by
INFINITI and cannot be changed.)
3. When connecting is complete, the screen will return
to the “Phone” menu display.
Microphone
*Some jurisdictions prohibit the use of cellular telephones while drivin\
g.
system guide
Page 27 of 32

25
PHONEBOOK SETUP
Depending on your cellular phone, the system may automatically download \
your cellular
phone’s entire phonebook to the vehicle’s Bluetooth® System.
If the phonebook does not download automatically, the vehicle’s phone\
book may be set for
up to 1,000 entries.
To manually download entries:
1. Press the button and select the “Quick Dial” key.
2. Select the “Add New” key at the top of the display.
There are different methods to input a phone
number. Select one of the following options:
• “Copy from Call History” - to save a number from
the Outgoing, Incoming or Missed Calls lists.
• “Copy from the Handset” - to save a number
that has been downloaded from your handset to
the vehicle.
• “Enter Number by Keypad” - to input the number
and name manually.
MAKING A CALL
To make a call, follow this procedure:
1. Press the button on the steering wheel.
The “Phone” menu will appear on the control
panel display.
2. Select the “Quick Dial”, “Call History”,
“Phonebook” or “Dial Number” key.
3. Select the desired entry from the list.
4. Select “Call” to start dialing the number.
RECEIVING/ENDING A CALL
To accept the call, press the
button on the
steering wheel or touch the “Answer” key.
To reject the call, touch the “Reject Call” key.
To hang up, press the button or touch the
“Hang up” key.
Page 29 of 32

27
1
234
98
1110
76
5
Navigation System (if so equipped)
1 Touch-screen display
2 DEST (Destination) – Press to enter a destination.
3 INFO (Information) – Press to display the vehicle, traffic (if so equi\
pped), weather (if so
equipped) or Voice Recognition information.
4 SETTING – Press to access the system settings.
5 INFINITI Controller
• ENTER – Press the ENTER button to select the highlighted item on the screen.
• Center Dial – Turn the dial to highlight an item on the screen, adjus\
t a setting or adjust the
map scale.
• Slide the controller (push upward/downward/leftward/rightward) to sele\
ct an item on the
screen, to adjust a setting or scroll the map in eight directions.
6 ROUTE – Press to access guidance control functions, such as guidance cance\
llation, route
priority or waypoint setting on the route.