Page 117 of 384

441
Features of your vehicle
MIRRORS
Inside rearview mirror
Adjust the rearview mirror so that the
center view through the rear window is
seen. Make this adjustment before you
start driving.
Day/night rearview mirror
Make this adjustment before you start
driving and while the day/night lever is in
the day position.
Pull the day/night lever toward you to
reduce glare from the headlights of the
vehicles behind you during night driving.
Remember that you lose some rearview
clarity in the night position.Blue Link
®center
(Blue Link) button
Press the (Blue Link) button to request
inquiries, consultation,
POI download, Manual service, or
Diagnostic service, etc related to blue
Link service.
Press the (Blue Link) button to finish
the call.
For the details, refer to the Blue Link
®
Owner’s Guide.
WARNING - Rear visibility
Do not place objects in the rear
seat or cargo area which would
interfere with your vision through
the rear window.
WARNING
Do not modify the inside mirror and
do not install a wide mirror. It could
result in injury, during an accident
or deployment of the air bag.
OAM049023
Day
Night
OFS042222N
Page 122 of 384
Features of your vehicle
46 4
Instrument panel illumination
(if equipped)
Press the illumination control switch to
adjust the instrument panel illumination
intensity.
The vehicle’s parking lights or headlights
should be on to adjust the instrument
panel illumination.
Gauges
Speedometer
The speedometer indicates the speed of
the vehicle.
The speedometer is calibrated in miles
per hour and/or kilometers per hour.
Tachometer
The tachometer indicates the approxi-
mate number of engine revolutions per
minute (rpm).
Use the tachometer to select the correct
shift points and to prevent lugging and/or
over-revving the engine.
OFS042039NOFS042041LOFS040038
Page 130 of 384
Features of your vehicle
54 4
Seat belt warning
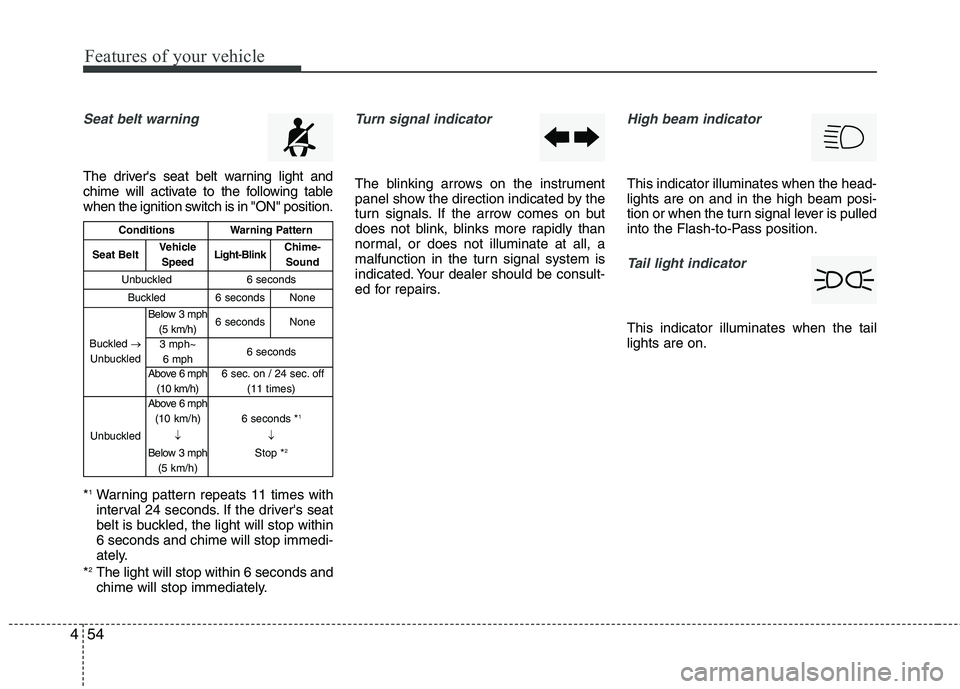
The driver's seat belt warning light and
chime will activate to the following table
when the ignition switch is in "ON" position.
*
1Warning pattern repeats 11 times with
interval 24 seconds. If the driver's seat
belt is buckled, the light will stop within
6 seconds and chime will stop immedi-
ately.
*
2The light will stop within 6 seconds and
chime will stop immediately.
Turn signal indicator
The blinking arrows on the instrument
panel show the direction indicated by the
turn signals. If the arrow comes on but
does not blink, blinks more rapidly than
normal, or does not illuminate at all, a
malfunction in the turn signal system is
indicated. Your dealer should be consult-
ed for repairs.
High beam indicator
This indicator illuminates when the head-
lights are on and in the high beam posi-
tion or when the turn signal lever is pulled
into the Flash-to-Pass position.
Tail light indicator
This indicator illuminates when the tail
lights are on.
ConditionsWarning Pattern
Seat BeltVehicle
SpeedLight-BlinkChime-
Sound
Unbuckled6 seconds
Buckled6 secondsNone
Buckled →
Unbuckled
Below 3 mph
(5 km/h)6 secondsNone
3 mph~
6 mph6 seconds
Above 6 mph
(10 km/h)6 sec. on / 24 sec. off
(11 times)
Unbuckled
Above 6 mph
(10 km/h)
↓
Below 3 mph
(5 km/h)6 seconds *1
↓
Stop *2
Page 143 of 384
467
Features of your vehicle
LIGHTING
Battery saver function
The purpose of this feature is to pre-
vent the battery from being dis-
charged. The system automatically
turns off the parking lights when the
driver removes the ignition key (smart
key : turns off the engine) and opens
the driver-side door.
With this feature, the parking lights will
be turned off automatically if the driver
parks on the side of road at night.
If necessary, to keep the lights on
when the ignition key is removed
(smart key : turns off the engine), per-
form the following:
1) Open the driver-side door.
2) Turn the parking lights OFF and ON
again using the light switch on the
steering column.
Headlamp delay (if equipped)
If you turn the ignition switch to the ACC
or OFF position with the headlights ON,
the headlights remain on for about 5 min-
utes. However, if the driver’s door is
opened and closed, the headlights are
turned off after 15 seconds.
The headlights can be turned off by
pressing the lock button on the transmit-
ter (or smart key) twice or turning the
light switch to the OFF or Auto position.
However, if you turn the light switch to the
Auto position when it is dark outside, the
headlights will not be turned off.
Headlamp welcome function
(if equipped)
When the headlight switch is in the ON or
AUTO position and all doors (and tail-
gate) are closed and locked, if you press
the door unlock button on the transmitter
(or smart key), the headlights will come
on for about 15 seconds.
If the headlight switch is in the AUTO
position, the function can only operate at
night.
At this time, if you press the door unlock
button again or door lock button on the
transmitter (or smart key), the headlights
will turn off immediately.
CAUTION
If the driver gets out of the vehicle
through other doors (other than the
driver's door), the battery saver
function does not operate and the
headlamp delay does not turn off
automatically. This will cause the
battery to be discharged. In this
case, make sure to turn off the lamp
before getting out of the vehicle.
Page 144 of 384
Features of your vehicle
68 4
Daytime running light
(if equipped)
Daytime Running Lights (DRL) will turn
on when the light switch is in the AUTO
position or DRL position.
Daytime Running Lights (DRL) can make
it easier for others to see the front of your
vehicle during the day. DRL can be help-
ful in many different driving conditions,
and it is especially helpful after dawn and
before sunset.
The DRL system will turn OFF when:
1. The headlight is ON.
2. Engine stops.
3. If the multifuntion switch is on DRL
OFF position or OFF position.
4. Parking brake ON.
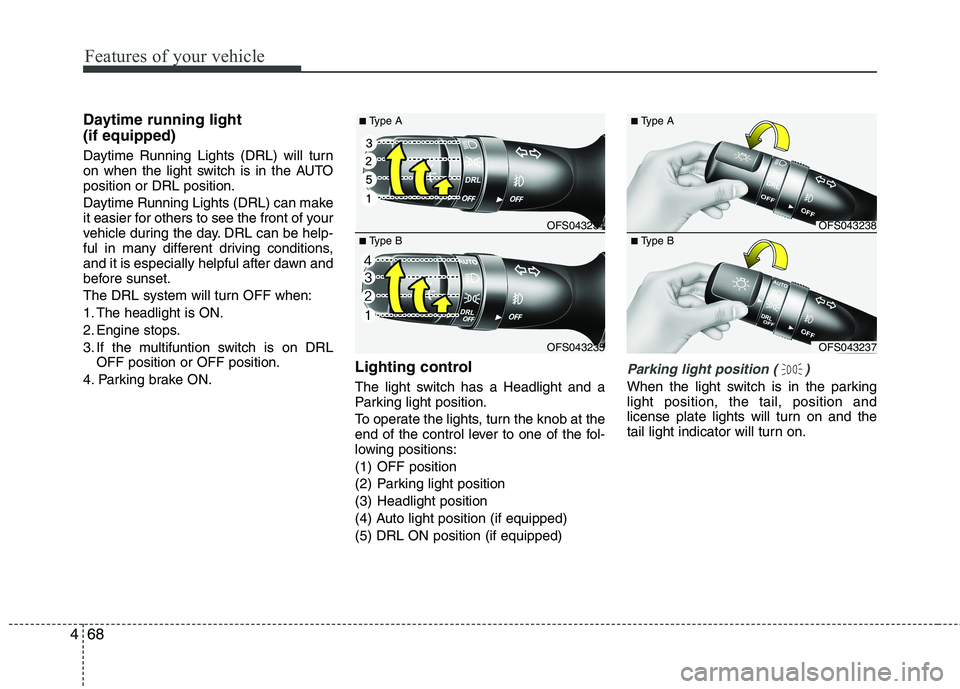
Lighting control
The light switch has a Headlight and a
Parking light position.
To operate the lights, turn the knob at the
end of the control lever to one of the fol-
lowing positions:
(1) OFF position
(2) Parking light position
(3) Headlight position
(4) Auto light position (if equipped)
(5) DRL ON position (if equipped)
Parking light position ( )
When the light switch is in the parking
light position, the tail, position and
license plate lights will turn on and the
tail light indicator will turn on.
OFS043234
OFS043235
■Type A
■Type BOFS043238
OFS043237
■Type A
■Type B
Page 145 of 384
469
Features of your vehicle
Headlight position ( )
When the light switch is in the headlight
position the head, tail, license and instru-
ment panel lights will turn on.
✽ ✽
NOTICE
The ignition switch must be in the ON
position to turn on the headlights.
Auto light position (if equipped)
When the light switch is in the AUTO light
position, the taillights and headlights will
be turned ON or OFF automatically
depending on the amount of light outside
the vehicle.
CAUTION
Never place anything over sensor
(1) located on the instrument
panel. This will ensure better auto-
light system control.
Don’t clean the sensor using a
window cleaner. The cleaner may
leave a light film which could inter-
fere with sensor operation.
If your vehicle has window tint or
other types of metallic coating on
the front windshield, the Auto light
system may not work properly.
OFS043240
OFS043239
■Type A
■Type B
OFS043084
Page 146 of 384
Features of your vehicle
70 4
High beam operation
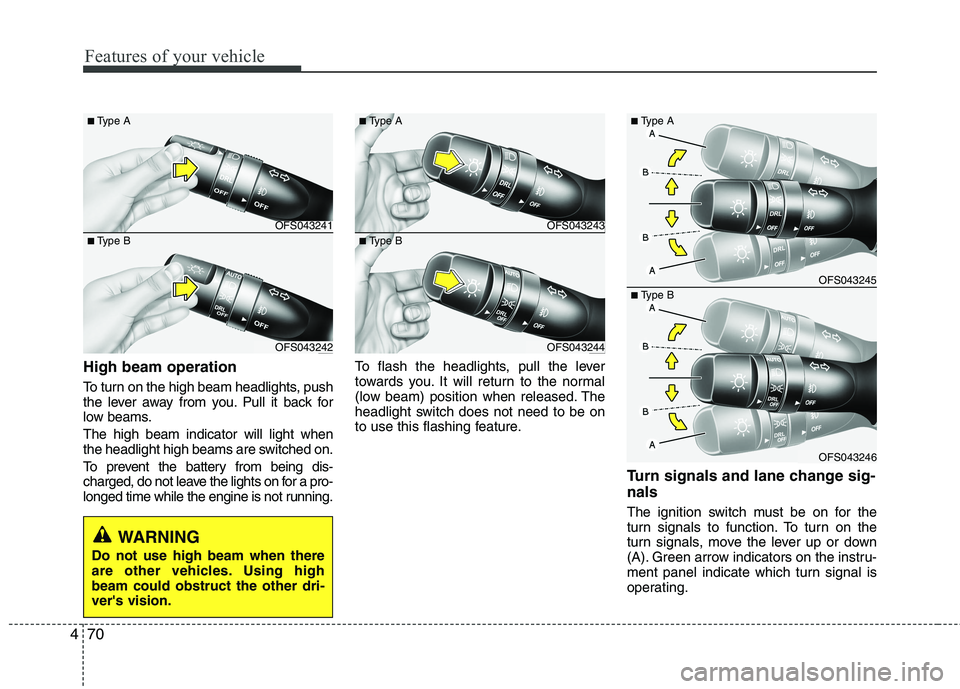
To turn on the high beam headlights, push
the lever away from you. Pull it back for
low beams.
The high beam indicator will light when
the headlight high beams are switched on.
To prevent the battery from being dis-
charged, do not leave the lights on for a pro-
longed time while the engine is not running.To flash the headlights, pull the lever
towards you. It will return to the normal
(low beam) position when released. The
headlight switch does not need to be on
to use this flashing feature.
Turn signals and lane change sig-
nals
The ignition switch must be on for the
turn signals to function. To turn on the
turn signals, move the lever up or down
(A). Green arrow indicators on the instru-
ment panel indicate which turn signal is
operating.
WARNING
Do not use high beam when there
are other vehicles. Using high
beam could obstruct the other dri-
ver's vision.
OFS043241
OFS043242
■Type A
■Type BOFS043243
OFS043244
■Type A
■Type B
OFS043245
OFS043246
■Type A
■Type B
Page 147 of 384
471
Features of your vehicle
They will self-cancel after a turn is com-
pleted. If the indicator continues to flash
after a turn, manually return the lever to
the OFF position.
To signal a lane change, move the turn
signal lever slightly and hold it in position
(B). The lever will return to the OFF posi-
tion when released.
If an indicator stays on and does not
flash or if it flashes abnormally, one of the
turn signal bulbs may be burned out and
will require replacement.
✽ ✽
NOTICE
If an indicator flash is abnormally quick
or slow, a bulb may be burned out or
have a poor electrical connection in the
circuit.
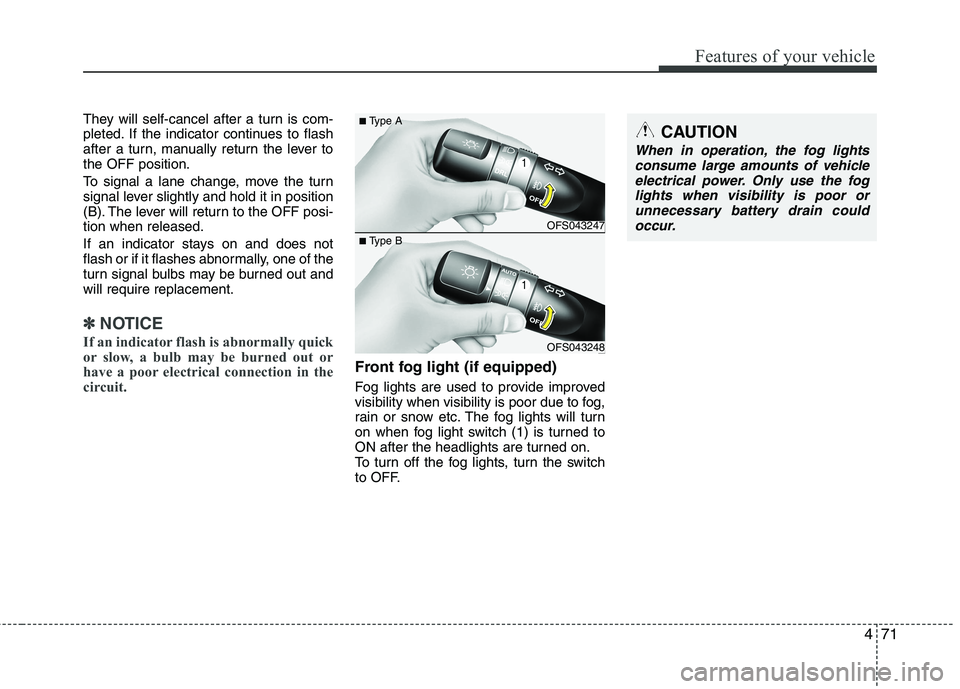
Front fog light (if equipped)
Fog lights are used to provide improved
visibility when visibility is poor due to fog,
rain or snow etc. The fog lights will turn
on when fog light switch (1) is turned to
ON after the headlights are turned on.
To turn off the fog lights, turn the switch
to OFF.
CAUTION
When in operation, the fog lights
consume large amounts of vehicle
electrical power. Only use the fog
lights when visibility is poor or
unnecessary battery drain could
occur.
OFS043247
OFS043248
■Type A
■Type B