Page 260 of 384
What to do in an emergency
14 6
4. Remove the wheel lug nut wrench,
jack, jack handle, and spare tire
from the vehicle.
5. Block both the front and rear of the
wheel that is diagonally opposite
the jack position.6. Insert the screwdriver into the
groove of the wheel cap and pry
gently to remove the wheel cap (If
equipped).
7. Loosen the wheel lug nuts coun-
terclockwise one turn each, but do
not remove any nut until the tire
has been raised off the ground.
WARNING- Changing a tire
To prevent vehicle movement
while changing a tire, always
set the parking brake fully,
and always block the wheel
diagonally opposite the wheel
being changed.
We recommend that the
wheels of the vehicle be
blocked, and that no person
remain in a vehicle that is
being jacked.
OFS060009OFS062010
Page 261 of 384
615
What to do in an emergency
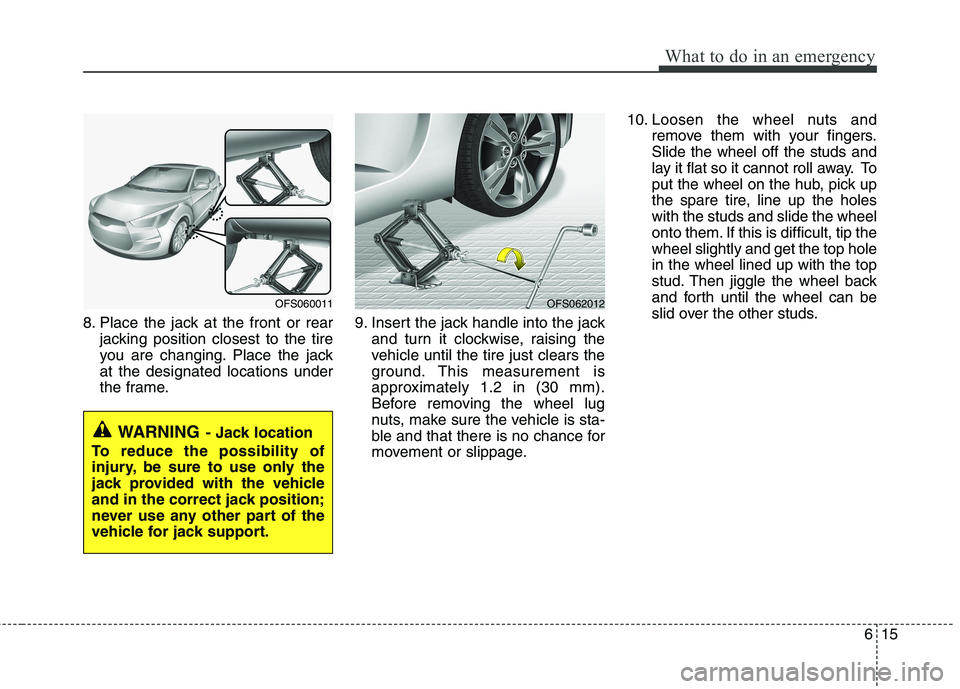
8. Place the jack at the front or rear
jacking position closest to the tire
you are changing. Place the jack
at the designated locations under
the frame.9. Insert the jack handle into the jack
and turn it clockwise, raising the
vehicle until the tire just clears the
ground. This measurement is
approximately 1.2 in (30 mm).
Before removing the wheel lug
nuts, make sure the vehicle is sta-
ble and that there is no chance for
movement or slippage.10. Loosen the wheel nuts and
remove them with your fingers.
Slide the wheel off the studs and
lay it flat so it cannot roll away. To
put the wheel on the hub, pick up
the spare tire, line up the holes
with the studs and slide the wheel
onto them. If this is difficult, tip the
wheel slightly and get the top hole
in the wheel lined up with the top
stud. Then jiggle the wheel back
and forth until the wheel can be
slid over the other studs.
WARNING- Jack location
To reduce the possibility of
injury, be sure to use only the
jack provided with the vehicle
and in the correct jack position;
never use any other part of the
vehicle for jack support.
OFS060011OFS062012
Page 262 of 384
What to do in an emergency
16 6
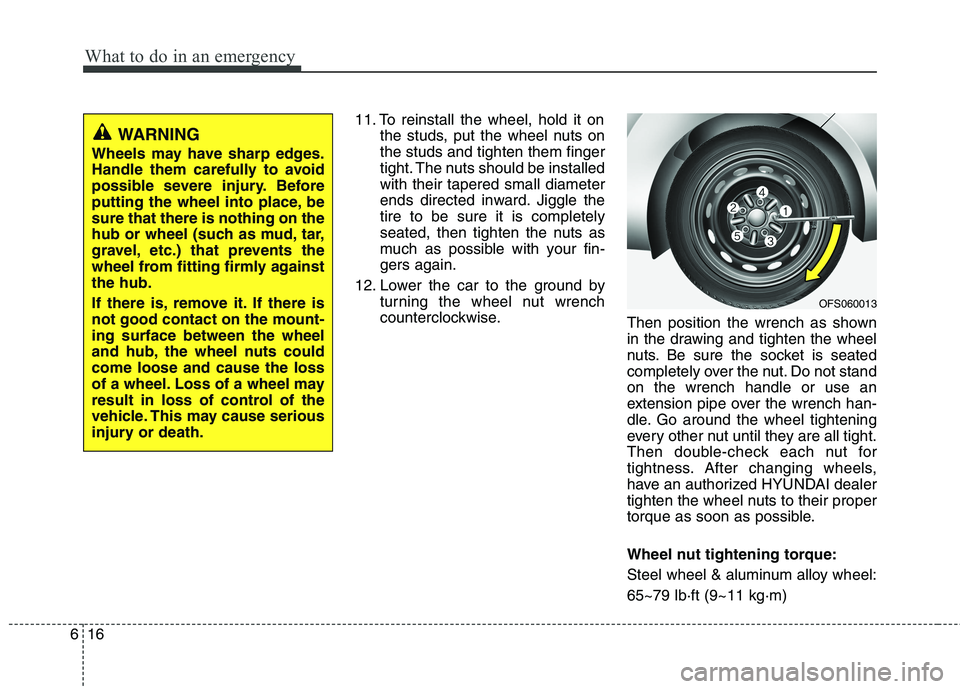
11. To reinstall the wheel, hold it on
the studs, put the wheel nuts on
the studs and tighten them finger
tight. The nuts should be installed
with their tapered small diameter
ends directed inward. Jiggle the
tire to be sure it is completely
seated, then tighten the nuts as
much as possible with your fin-
gers again.
12. Lower the car to the ground by
turning the wheel nut wrench
counterclockwise.
Then position the wrench as shown
in the drawing and tighten the wheel
nuts. Be sure the socket is seated
completely over the nut. Do not stand
on the wrench handle or use an
extension pipe over the wrench han-
dle. Go around the wheel tightening
every other nut until they are all tight.
Then double-check each nut for
tightness. After changing wheels,
have an authorized HYUNDAI dealer
tighten the wheel nuts to their proper
torque as soon as possible.
Wheel nut tightening torque:
Steel wheel & aluminum alloy wheel:
65~79 lb·ft (9~11 kg·m)
WARNING
Wheels may have sharp edges.
Handle them carefully to avoid
possible severe injury. Before
putting the wheel into place, be
sure that there is nothing on the
hub or wheel (such as mud, tar,
gravel, etc.) that prevents the
wheel from fitting firmly against
the hub.
If there is, remove it. If there is
not good contact on the mount-
ing surface between the wheel
and hub, the wheel nuts could
come loose and cause the loss
of a wheel. Loss of a wheel may
result in loss of control of the
vehicle. This may cause serious
injury or death.
OFS060013
Page 263 of 384
617
What to do in an emergency
If you have a tire gauge, remove the
valve cap and check the air pressure.
If the pressure is lower than recom-
mended, drive slowly to the nearest
service station and inflate to the cor-
rect pressure. If it is too high, adjust it
until it is correct. Always reinstall the
valve cap after checking or adjusting
tire pressure. If the cap is not
replaced, air may leak from the tire. If
you lose a valve cap, buy another and
install it as soon as possible.
After you have changed wheels,
always secure the flat tire in its place
and return the jack and tools to their
proper storage locations.To prevent the jack, jack handle,
wheel lug nut wrench and spare tire
from rattling while the vehicle is in
motion, store them properly.CAUTION
Your vehicle has metric threads
on the wheel studs and nuts.
Make certain during wheel
removal that the same nuts that
were removed are reinstalled -
or, if replaced, that nuts with
metric threads and the same
chamfer configuration are used.
Installation of a non-metric
thread nut on a metric stud or
vice-versa will not secure the
wheel to the hub properly and
will damage the stud so that it
must be replaced.
Note that most lug nuts do not
have metric threads. Be sure to
use extreme care in checking
for thread style before installing
aftermarket lug nuts or wheels.
If in doubt, consult an author-
ized HYUNDAI dealer.
WARNING- Wheel studs
If the studs are damaged, they
may lose their ability to retain
the wheel. This could lead to the
loss of the wheel and a collision
resulting in serious injuries.
WARNING - Inadequate
spare tire pressure
Check the inflation pressures as
soon as possible after installing
the spare tire. Adjust it to the
specified pressure, if necessary.
Refer to “Tires and wheels” sec-
tion 8.
Page 265 of 384
619
What to do in an emergency
Do not use tire chains on the com-
pact spare tire. Because of the small-
er size, a tire chain will not fit proper-
ly. This could damage the vehicle
and result in loss of the chain.
Do not use the compact spare tire
on any other vehicle because this
tire has been designed especially
for your vehicle.
The compact spare tire’s tread life is
shorter than a regular tire. Inspect
your compact spare tire regularly
and replace worn compact spare
tires with the same size and design,
mounted on the same wheel.
The compact spare tire should not
be used on any other wheels, nor
should standard tires, snow tires,
wheel covers or trim rings be used
with the compact spare wheel. If
such use is attempted, damage to
these items or other car compo-
nents may occur.
Do not use more than one compact
spare tire at a time.
Do not tow a trailer while the com-
pact spare tire is installed.
Page 268 of 384
What to do in an emergency
22 6
It is possible that some tires, espe-
cially with larger punctures or dam-
age to the sidewall, cannot be sealed
completely.
Air pressure loss in the tire may
adversely affect tire performance.
For this reason, you should avoid
abrupt steering or other driving
maneuvers, especially if the vehicle
is heavily loaded or if a trailer is in
use.
The Tire Mobility Kit is not designed
or intended as a permanent tire
repair method and is to be used for
one tire only.
This instruction shows you step by
step how to temporarily seal the
puncture simply and reliably.
Read the section "Notes on the safe
use of the Tire Mobility Kit".Notes on the safe use of the Tire
Mobility Kit
Park your car at the side of the
road so that you can work with the
Tire Mobility Kit away from moving
traffic.
To be sure your vehicle will not
move, even when you're on fairly
level ground, always set your park-
ing brake.
Only use the Tire Mobility Kit for
sealing/inflation passenger car
tires. Only punctured areas located
within the tread region of the tire
can be sealed using the tire mobil-
ity kit.
Do not use on motorcycles, bicy-
cles or any other type of tires.
When the tire and wheel are dam-
aged, do not use Tire Mobility Kit
for your safety.
Use of the Tire Mobility Kit may not
be effective for tire damage larger
than approximately 0.24 in (6 mm).
Please contact the nearest
HYUNDAI dealership if the tire
cannot be made roadworthy with
the Tire Mobility Kit. Do not use the Tire Mobility Kit if a
tire is severely damaged by driving
run flat or with insufficient air pres-
sure.
Do not remove any foreign objects
such as nails or screws that have
penetrated the tire.
Provided the car is outdoors, leave
the engine running. Otherwise
operating the compressor may
eventually drain the car battery.
Never leave the Tire Mobility Kit
unattended while it is being used.
Do not leave the compressor run-
ning for more than 10 min. at a time
or it may overheat.
Do not use the Tire Mobility Kit if
the ambient temperature is below -
22°F (-30°C).
Page 269 of 384
623
What to do in an emergency
0. Speed restriction label
1. Sealant bottle and label with
speed restriction
2. Filling hose from sealant bottle to
wheel
3. Connectors and cable for the
power outlet direct connection4. Holder for the sealant bottle
5. Compressor
6. On/off switch
7. Pressure gauge for displaying the
tire inflation pressure
8. Button for reducing tire inflation
pressure9. Hose to connect compressor and
sealant bottle or compressor and
wheel
Connectors, cable and connection
hose are stored in the compressor
housing.
Strictly follow the specified
sequence, otherwise the sealant
may escape under high pressure.
WARNING- Expired
sealant
Do not use the Tire sealant after
the sealant has expired (i.e.
found on the sealant container).
This can increase the risk of tire
failure.
WARNING - Sealant
Keep out of reach of children.
Avoid contact with eyes.
Do not swallow.
Components of the Tire Mobility Kit
OEL069020
Page 270 of 384
What to do in an emergency
24 6
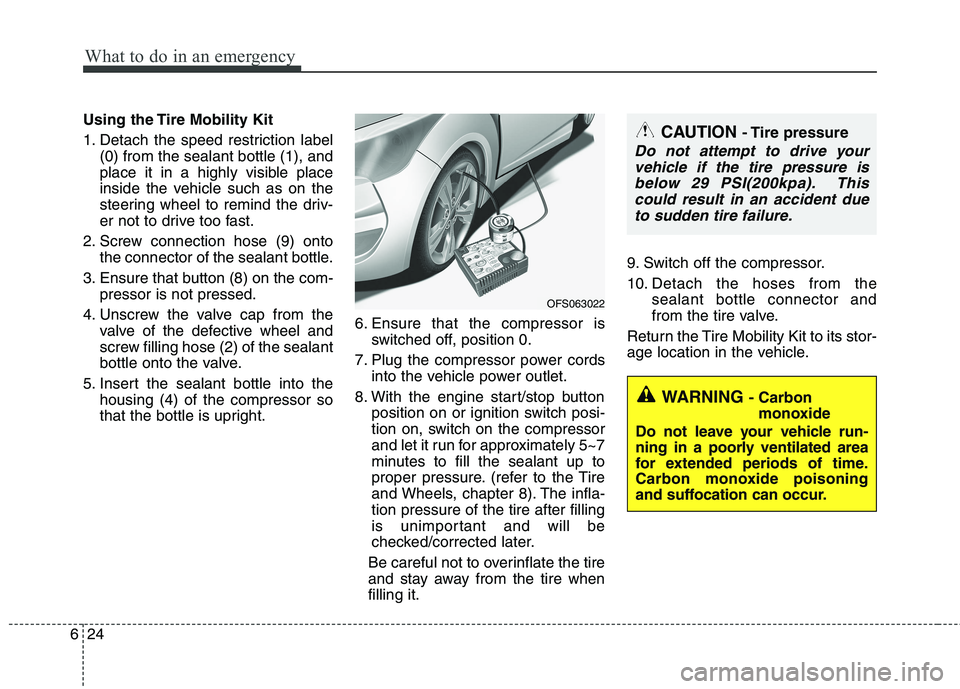
Using the Tire Mobility Kit
1. Detach the speed restriction label
(0) from the sealant bottle (1), and
place it in a highly visible place
inside the vehicle such as on the
steering wheel to remind the driv-
er not to drive too fast.
2. Screw connection hose (9) onto
the connector of the sealant bottle.
3. Ensure that button (8) on the com-
pressor is not pressed.
4. Unscrew the valve cap from the
valve of the defective wheel and
screw filling hose (2) of the sealant
bottle onto the valve.
5. Insert the sealant bottle into the
housing (4) of the compressor so
that the bottle is upright.6. Ensure that the compressor is
switched off, position 0.
7. Plug the compressor power cords
into the vehicle power outlet.
8. With the engine start/stop button
position on or ignition switch posi-
tion on, switch on the compressor
and let it run for approximately 5~7
minutes to fill the sealant up to
proper pressure. (refer to the Tire
and Wheels, chapter 8). The infla-
tion pressure of the tire after filling
is unimportant and will be
checked/corrected later.
Be careful not to overinflate the tire
and stay away from the tire when
filling it.9. Switch off the compressor.
10. Detach the hoses from the
sealant bottle connector and
from the tire valve.
Return the Tire Mobility Kit to its stor-
age location in the vehicle.CAUTION - Tire pressure
Do not attempt to drive your
vehicle if the tire pressure is
below 29 PSI(200kpa). This
could result in an accident due
to sudden tire failure.
WARNING - Carbon
monoxide
Do not leave your vehicle run-
ning in a poorly ventilated area
for extended periods of time.
Carbon monoxide poisoning
and suffocation can occur.
OFS063022