2015 HYUNDAI VELOSTER battery
[x] Cancel search: batteryPage 113 of 384
437
Features of your vehicle
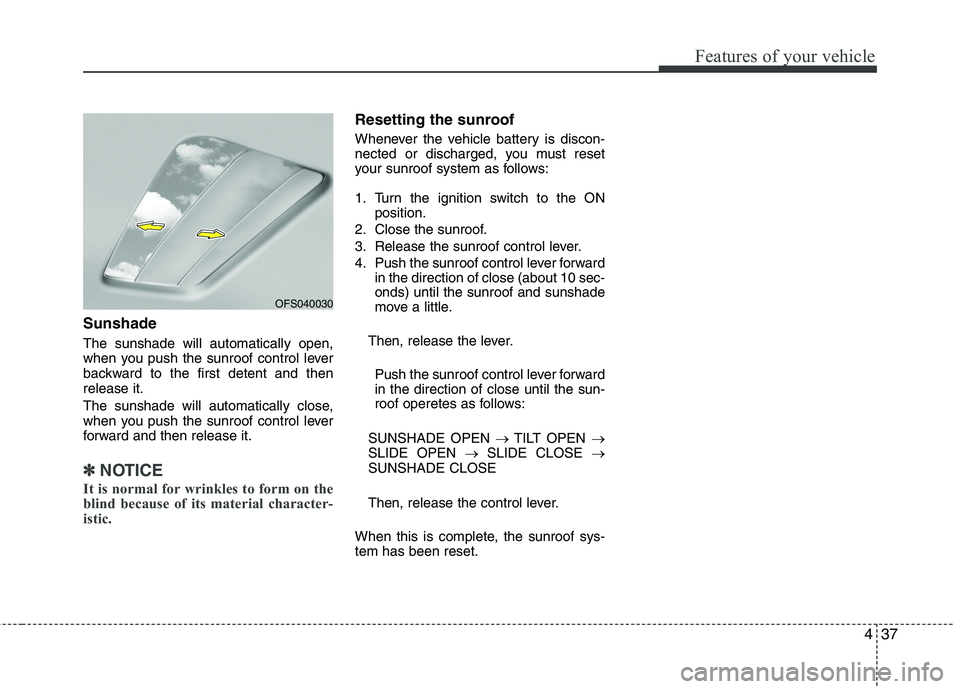
Sunshade
The sunshade will automatically open,
when you push the sunroof control lever
backward to the first detent and then
release it.
The sunshade will automatically close,
when you push the sunroof control lever
forward and then release it.
✽ ✽
NOTICE
It is normal for wrinkles to form on the
blind because of its material character-
istic.
Resetting the sunroof
Whenever the vehicle battery is discon-
nected or discharged, you must reset
your sunroof system as follows:
1. Turn the ignition switch to the ON
position.
2. Close the sunroof.
3. Release the sunroof control lever.
4. Push the sunroof control lever forward
in the direction of close (about 10 sec-
onds) until the sunroof and sunshade
move a little.
Then, release the lever.
Push the sunroof control lever forward
in the direction of close until the sun-
roof operetes as follows:
SUNSHADE OPEN →TILT OPEN →
SLIDE OPEN →SLIDE CLOSE →
SUNSHADE CLOSE
Then, release the control lever.
When this is complete, the sunroof sys-
tem has been reset.
OFS040030
Page 115 of 384
439
Features of your vehicle
(Continued)
• When you operate the steering wheel
in low temperature, abnormal noise
could occur. If temperature rises, the
noise will disappear. This is a normal
condition.
• When the charging system warning
light comes on or the voltage is low
(When the alternator (or battery) does
not operate normally or it malfunc-
tions), the steering effort may increase
and may become difficult to control
normal.Tilt steering / Tilt and telescope
steering
Tilt steering allows you to adjust the
steering wheel before you drive. You can
also raise it to give your legs more room
when you exit and enter the vehicle.
The steering wheel should be positioned
so that it is comfortable for you to drive,
while permitting you to see the instru-
ment panel warning lights and gauges.
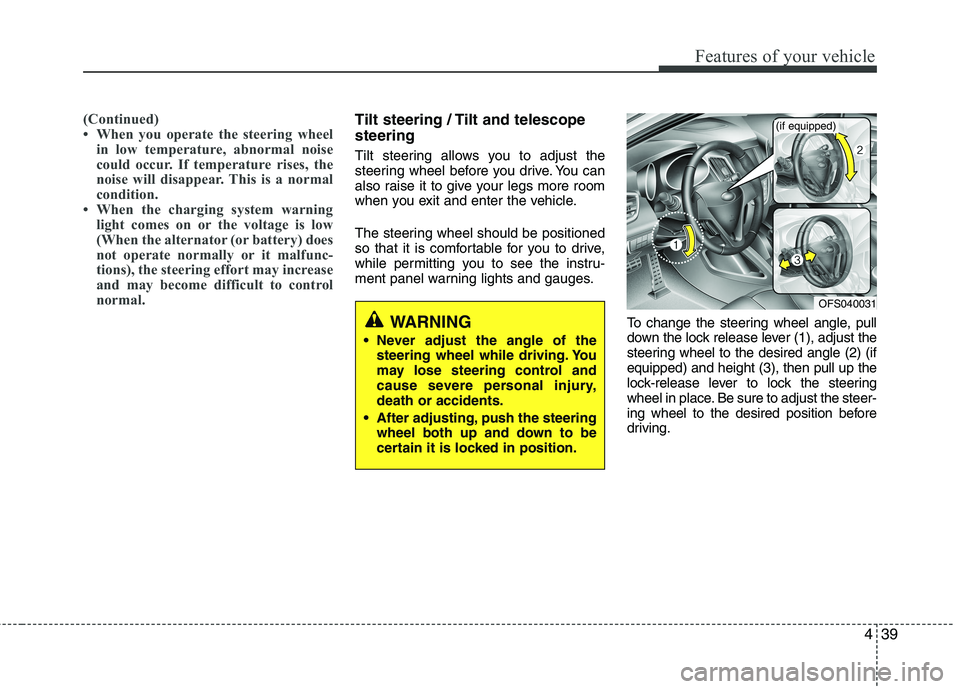
To change the steering wheel angle, pull
down the lock release lever (1), adjust the
steering wheel to the desired angle (2) (if
equipped) and height (3), then pull up the
lock-release lever to lock the steering
wheel in place. Be sure to adjust the steer-
ing wheel to the desired position before
driving.
WARNING
Never adjust the angle of the
steering wheel while driving. You
may lose steering control and
cause severe personal injury,
death or accidents.
After adjusting, push the steering
wheel both up and down to be
certain it is locked in position.
OFS040031
(if equipped)
Page 125 of 384

449
Features of your vehicle
Trip computer
The trip computer is a microcomputer
controlling the driver information system.
It displays information related to driving
on the LCD screen when the ignition
switch is in the ON position. If the battery
is disconnected, then all stored driving
information (except odometer) is reset.Press the TRIP button for less than 1
second to select any mode as follows:
Tripmeter (mi. or km)
TRIP A : Tripmeter A
TRIP B : Tripmeter B
This mode indicates the distance of indi-
vidual trips selected since the last trip-
meter reset.
The meter's working range is from 0.0 to
999.9 miles (0.0 to 999.9 km).
Pressing the RESET button for more
than 1 second, when the tripmeter (TRIP
A or TRIP B) is being displayed, clears
the tripmeter to zero (0.0).
OFS040045
Tripmeter B
Tripmeter A
Distance to empty
Average fuel consumption
Elapsed time
Average speed
OFS042141N
Page 126 of 384

Features of your vehicle
50 4
Distance to empty (mi. or km)
This mode indicates the estimated dis-
tance to empty based on the current fuel
in the fuel tank and the amount of fuel
delivered to the engine. When the
remaining distance is below 30 miles (50
km), “---” will be displayed and the dis-
tance to empty indicator will blink.
The meter’s working range is from 30 to
999 miles (50 to 999 km).Average fuel economy (if equipped)
(MPG orl/100 km)
This mode calculates the average fuel
consumption from the total fuel used and
the distance since the last average econ-
omy reset. The total fuel used is calculat-
ed from the fuel consumption input. For
an accurate calculation, drive more than
0.03 miles (50 m).
Pressing the RESET button for more than
1 second, when the average fuel econo-
my is being displayed, clears the average
fuel consumption to zero (----).
If the vehicle speed exceeds 1.6 MPH
(1km/h) after being refueled with more
than 1.6 gallons (6 l), the average fuel
economy will be cleared to zero (----).
✽
✽
NOTICE
• If the vehicle is not on level ground or
the battery power has been interrupt-
ed, the “Distance to empty” function
may not operate correctly.
The trip computer may not register
additional fuel if less than 6 liters (1.6
gallons) of fuel are added to the vehi-
cle.
• The fuel consumption and distance to
empty may vary significantly based
on driving conditions, driving habits,
and condition of the vehicle.
• The distance to empty value is an esti-
mate of the available driving distance.
This may differ from the actual driv-
ing distance available.
OFS042046NOFS042047N-1
Page 133 of 384

457
Features of your vehicle
EcoShift dual clutch transmission
shift indicator/Automatic transaxle
shift position indicator (if equipped)
The indicator
displays which
EcoShift dual
clutch transmis-
sion/ automatic
transaxle shift
lever is selected.
In DS mode, the “S” indicator displays
with “SPORTS” indicator in cluster. For
more detailed information about DS
mode, refer to the chapter 5.
Manual transaxle shift
indicator (if equipped)
This indicator informs you which gear is
desired while driving to save fuel.
For example
: Indicates that shifting up to the 3rd
gear is desired (currently the shift
lever is in the 2nd or 1st gear).
: Indicates that shifting down to the
3rd gear is desired (currently the
shift lever is in the 4th or 5th gear).
Charging system warning
light
This warning light indicates a malfunction
of either the generator or electrical
charging system.
If the warning light comes on while the
vehicle is in motion:
1. Drive to the nearest safe location.
2. With the engine off, check the genera-
tor drive belt for looseness or break-
age.
3. If the belt is adjusted properly, a mal-
function exists somewhere in the elec-
trical charging system. Have an
authorized HYUNDAI dealer check the
system as soon as possible.
✽ ✽
NOTICE
When the charging system warning light
comes on or the voltage is low (when the
alteranator (or battery) does not operate
normally or it malfunctions), the steer-
ing wheel may get heavy and become dif-
ficult to control operate abnormally.
CAUTION - EcoShift dual
clutch transmission
If the dual shift transmission sys-
tem malfunctions, the transaxle
indicator will blink. For your safe-
ty, take your vehicle to an author-
ized HYUNDAI dealer and have
the system checked.
When the clutch is overheated,
the safe protection mode oper-
ates. According to the safe protec-
tion mode, the transaxle indicator
blinks with a buzzer sound. The
buzzer beeps 3 times. In this time,
the LCD warning about safe pro-
tection mode also displays. In this
condition, the driving may not be
smooth. If you ignore this warn-
ing, the vehicle may not drive
smoothly and the system may be
malfunctioning. If this occurs,
apply the parking brake and stop
the vehicle for a few seconds
before driving off.
Page 134 of 384
Features of your vehicle
58 4
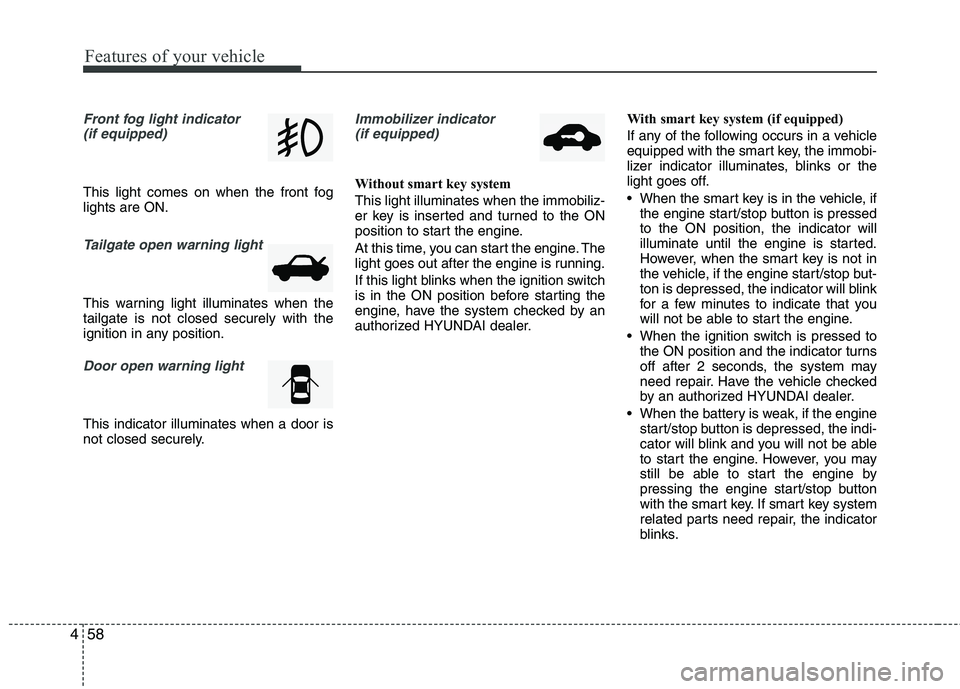
Front fog light indicator
(if equipped)
This light comes on when the front fog
lights are ON.
Tailgate open warning light
This warning light illuminates when the
tailgate is not closed securely with the
ignition in any position.
Door open warning light
This indicator illuminates when a door is
not closed securely.
Immobilizer indicator
(if equipped)
Without smart key system
This light illuminates when the immobiliz-
er key is inserted and turned to the ON
position to start the engine.
At this time, you can start the engine. The
light goes out after the engine is running.
If this light blinks when the ignition switch
is in the ON position before starting the
engine, have the system checked by an
authorized HYUNDAI dealer.With smart key system (if equipped)
If any of the following occurs in a vehicle
equipped with the smart key, the immobi-
lizer indicator illuminates, blinks or the
light goes off.
When the smart key is in the vehicle, if
the engine start/stop button is pressed
to the ON position, the indicator will
illuminate until the engine is started.
However, when the smart key is not in
the vehicle, if the engine start/stop but-
ton is depressed, the indicator will blink
for a few minutes to indicate that you
will not be able to start the engine.
When the ignition switch is pressed to
the ON position and the indicator turns
off after 2 seconds, the system may
need repair. Have the vehicle checked
by an authorized HYUNDAI dealer.
When the battery is weak, if the engine
start/stop button is depressed, the indi-
cator will blink and you will not be able
to start the engine. However, you may
still be able to start the engine by
pressing the engine start/stop button
with the smart key. If smart key system
related parts need repair, the indicator
blinks.
Page 143 of 384
467
Features of your vehicle
LIGHTING
Battery saver function
The purpose of this feature is to pre-
vent the battery from being dis-
charged. The system automatically
turns off the parking lights when the
driver removes the ignition key (smart
key : turns off the engine) and opens
the driver-side door.
With this feature, the parking lights will
be turned off automatically if the driver
parks on the side of road at night.
If necessary, to keep the lights on
when the ignition key is removed
(smart key : turns off the engine), per-
form the following:
1) Open the driver-side door.
2) Turn the parking lights OFF and ON
again using the light switch on the
steering column.
Headlamp delay (if equipped)
If you turn the ignition switch to the ACC
or OFF position with the headlights ON,
the headlights remain on for about 5 min-
utes. However, if the driver’s door is
opened and closed, the headlights are
turned off after 15 seconds.
The headlights can be turned off by
pressing the lock button on the transmit-
ter (or smart key) twice or turning the
light switch to the OFF or Auto position.
However, if you turn the light switch to the
Auto position when it is dark outside, the
headlights will not be turned off.
Headlamp welcome function
(if equipped)
When the headlight switch is in the ON or
AUTO position and all doors (and tail-
gate) are closed and locked, if you press
the door unlock button on the transmitter
(or smart key), the headlights will come
on for about 15 seconds.
If the headlight switch is in the AUTO
position, the function can only operate at
night.
At this time, if you press the door unlock
button again or door lock button on the
transmitter (or smart key), the headlights
will turn off immediately.
CAUTION
If the driver gets out of the vehicle
through other doors (other than the
driver's door), the battery saver
function does not operate and the
headlamp delay does not turn off
automatically. This will cause the
battery to be discharged. In this
case, make sure to turn off the lamp
before getting out of the vehicle.
Page 146 of 384
Features of your vehicle
70 4
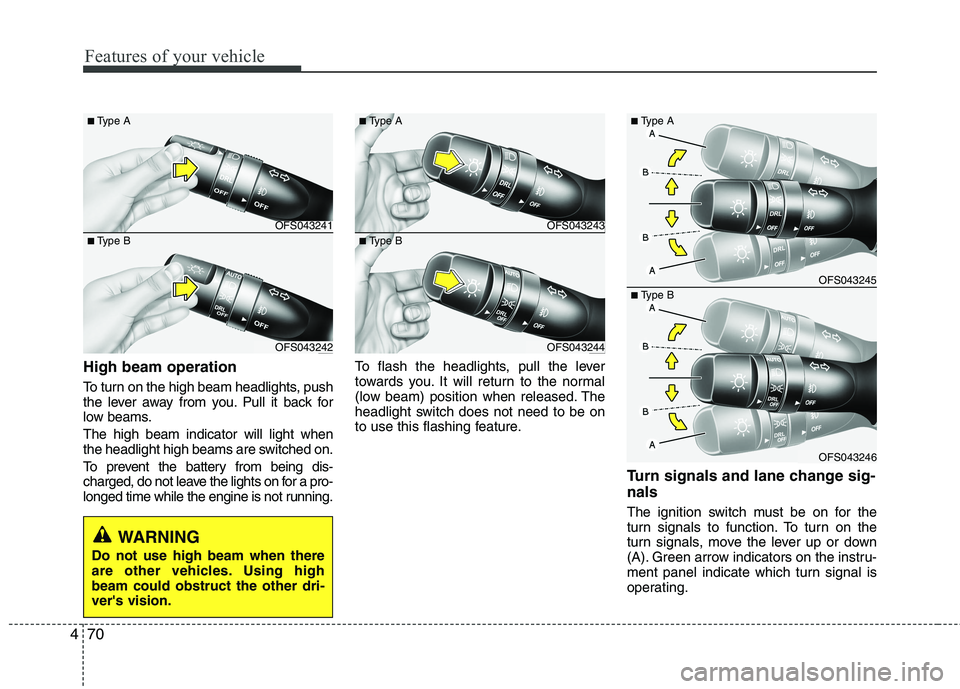
High beam operation
To turn on the high beam headlights, push
the lever away from you. Pull it back for
low beams.
The high beam indicator will light when
the headlight high beams are switched on.
To prevent the battery from being dis-
charged, do not leave the lights on for a pro-
longed time while the engine is not running.To flash the headlights, pull the lever
towards you. It will return to the normal
(low beam) position when released. The
headlight switch does not need to be on
to use this flashing feature.
Turn signals and lane change sig-
nals
The ignition switch must be on for the
turn signals to function. To turn on the
turn signals, move the lever up or down
(A). Green arrow indicators on the instru-
ment panel indicate which turn signal is
operating.
WARNING
Do not use high beam when there
are other vehicles. Using high
beam could obstruct the other dri-
ver's vision.
OFS043241
OFS043242
■Type A
■Type BOFS043243
OFS043244
■Type A
■Type B
OFS043245
OFS043246
■Type A
■Type B