2015 HYUNDAI VELOSTER ESP
[x] Cancel search: ESPPage 100 of 384

Features of your vehicle
24 4
Shelf disassembly and install-
ment
1. Disassemble the wires(1) connected
to left and right fixed hook.
2. Push the shelf(2) up and disassemble
the shelf.
3. To install the shelf, push the shelf
down at original position and fix the
wire to position(1)
WARNING
For emergency, be fully aware of
the location of the emergency
tailgate safety release lever in
this vehicle and how to open the
tailgate if you are accidentally
locked in the luggage compart-
ment.
No one should be allowed to
occupy the luggage compartment
of the vehicle at any time. The
luggage compartment is a very
dangerous location in the event
of a crash.
Use the emergency tailgate safe-
ty release for emergency only.
Use extreme caution, especially
while the vehicle is in motion.
OFS031049
CAUTION
When you close the tailgate, check
the shelf position. Be careful not to
collide the shelf and tailgate. If not,
the shelf may be damaged.
Page 108 of 384
Features of your vehicle
32 4
(Continued)
Use only approved portable plas-
tic fuel containers designed to
carry and store gasoline.
Do not use cellular phones while
refueling. Electric current and/or
electronic interference from cel-
lular phones can potentially
ignite fuel vapors causing a fire.
When refueling, always shut the
engine off. Sparks produced by
electrical components related to
the engine can ignite fuel vapors
causing a fire. Once refueling is
complete, check to make sure the
filler cap and filler door are
securely closed, before starting
the engine.
DO NOT use matches or a lighter
and DO NOT SMOKE or leave a lit
cigarette in your vehicle while at
a gas station especially during
refueling. Automotive fuel is
highly flammable and can, when
ignited, result in fire.
(Continued)(Continued)
Do not get back into a vehicle
once you have begun refueling
since you can generate static
electricity by touching, rubbing
or sliding against any item or fab-
ric (polyester, satin, nylon, etc.)
capable of producing static elec-
tricity. Static electricity discharge
can ignite fuel vapors resulting in
rapid burning. If you must re-
enter the vehicle, you should
once again eliminate potentially
dangerous static electricity dis-
charge by touching a metal part
of the vehicle, away from the fuel
filler neck, nozzle or other gaso-
line source.
When using an approved
portable fuel container, be sure to
place the container on the
ground prior to refueling. Static
electricity discharge from the
container can ignite fuel vapors
causing a fire. Once refueling has
begun, contact with the vehicle
should be maintained until the
filling is complete.
(Continued)WARNING - Refueling dan-
gers
Automotive fuels are flammable
materials. When refueling, please
note the following guidelines care-
fully. Failure to follow these guide-
lines may result in severe personal
injury, severe burns or death by fire
or explosion.
Read and follow all warnings
posted at the gas station facility.
Before refueling, note the loca-
tion of the Emergency Gasoline
Shut-Off, if available, at the gas
station facility.
Before touching the fuel nozzle,
you should eliminate potentially
dangerous static electricity dis-
charge by touching another metal
part of the vehicle, a safe dis-
tance away from the fuel filler
neck, nozzle, or other gas source.
(Continued)
Page 119 of 384
443
Features of your vehicle
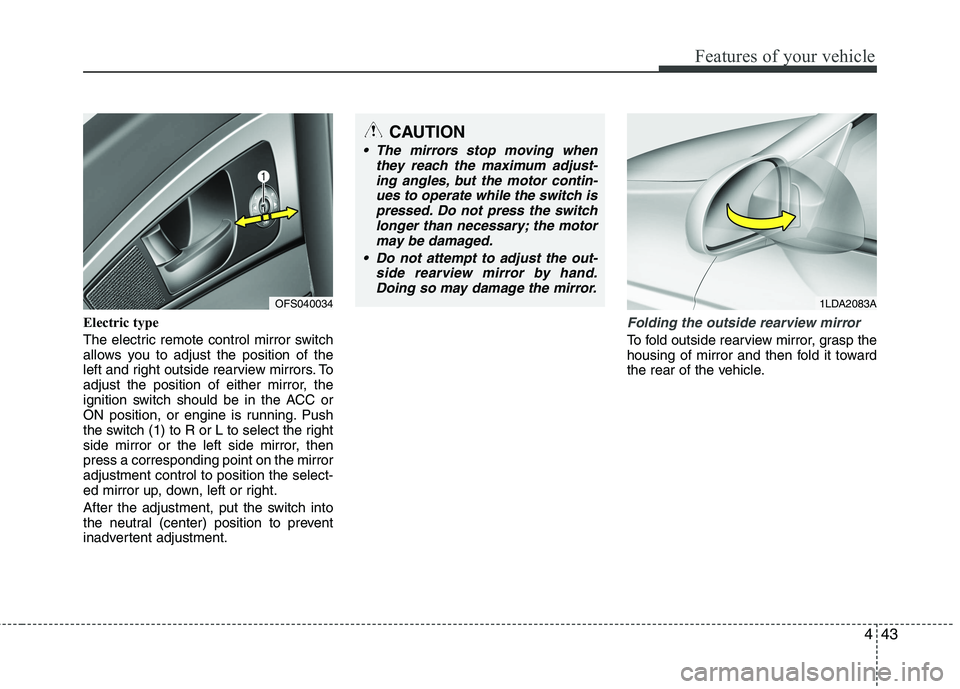
Electric type
The electric remote control mirror switch
allows you to adjust the position of the
left and right outside rearview mirrors. To
adjust the position of either mirror, the
ignition switch should be in the ACC or
ON position, or engine is running. Push
the switch (1) to R or L to select the right
side mirror or the left side mirror, then
press a corresponding point on the mirror
adjustment control to position the select-
ed mirror up, down, left or right.
After the adjustment, put the switch into
the neutral (center) position to prevent
inadvertent adjustment.Folding the outside rearview mirror
To fold outside rearview mirror, grasp the
housing of mirror and then fold it toward
the rear of the vehicle.
1LDA2083AOFS040034
CAUTION
The mirrors stop moving when
they reach the maximum adjust-
ing angles, but the motor contin-
ues to operate while the switch is
pressed. Do not press the switch
longer than necessary; the motor
may be damaged.
Do not attempt to adjust the out-
side rearview mirror by hand.
Doing so may damage the mirror.
Page 139 of 384

463
Features of your vehicle
REAR PARKING ASSIST SYSTEM (IF EQUIPPED)
The rear parking assist system assists
the driver during backward movement of
the vehicle by chiming if any object is
sensed within a distance of 47 in. (120
cm) behind the vehicle. This system is a
supplemental system and it is not intend-
ed to nor does it replace the need for
extreme care and attention of the driver.
The sensing range and objects
detectable by the back sensors are limit-
ed. Whenever backing-up, pay as much
attention to what is behind you as you
would in a vehicle without a rear parking
assist system.Operation of the rear parking
assist system
Operating condition
This system will activate when the indi-
cator on the rear parking assist OFF
button is not illuminated.
If you desire to deactivate the rear park-
ing assist system, press the rear parking
assist OFF button again. (The indicator
on the button will illuminate.) To turn the
system on, press the button again. (The
indicator on the button will go off.)
This system will activate when backing
up with the ignition switch ON.
If the vehicle is moving at a speed over
10 km/h (6 mph), the system may not
be activated correctly.
WARNING
The rear parking assist system is a
supplementary function only. The
operation of the rear parking assist
system can be affected by several
factors (including environmental
conditions). It is the responsibility
of the driver to always check the
area behind the vehicle before and
while backing up.
OFS040080 SensorsOFS040136
Page 141 of 384

465
Features of your vehicle
Rear parking assist system pre-
cautions
The rear parking assist system may
not sound sequentially depending on
the speed and shapes of the objects
detected.
The rear parking assist system may
malfunction if the vehicle bumper
height or sensor installation has been
modified or damaged. Any non-factory
installed equipment or accessories
may also interfere with the sensor per-
formance.
The sensor may not recognize objects
less than 15 in. (40 cm) from the sen-
sor, or it may sense an incorrect dis-
tance. Use caution.
When the sensor is frozen or stained
with snow, dirt, or water, the sensor
may be inoperative until the stains are
removed using a soft cloth.
Do not push, scratch or strike the sen-
sor. Sensor damage could occur.
✽ ✽
NOTICE
This system can only sense objects with-
in the range and location of the sensors;
it can not detect objects in other areas
where sensors are not installed. Also,
small or slim objects, such as poles or
objects located between sensors may not
be detected by the sensors.
Always visually check behind the vehi-
cle when backing up.
Be sure to inform any drivers of the
vehicle that may be unfamiliar with the
system regarding the systems capabili-
ties and limitations.
Self-diagnosis (if equipped)
When you shift the gear to the R
(Reverse) position and if one or more of
the below occurs you may have a mal-
function in the rear parking assist sys-
tem.
You don't hear an audible warning
sound or if the buzzer sounds intermit-
tently.
If this occurs, have your vehicle checked
by an authorized HYUNDAI dealer as
soon as possible.
WARNING
Pay close attention when the vehi-
cle is driven close to objects on the
road, particularly pedestrians, and
especially children. Be aware that
some objects may not be detected
by the sensors, due to the object’s
distance, size or material, all of
which can limit the effectiveness of
the sensor. Always perform a visu-
al inspection to make sure the vehi-
cle is clear of all obstructions
before moving the vehicle in any
direction.
WARNING
Your new vehicle warranty does not
cover any accidents or damage to
the vehicle or injuries to its occu-
pants due to a rear parking assist
system malfunction. Always drive
safely and cautiously.
Page 142 of 384
Features of your vehicle
66 4
REAR VIEW CAMERA (IF EQUIPPED)
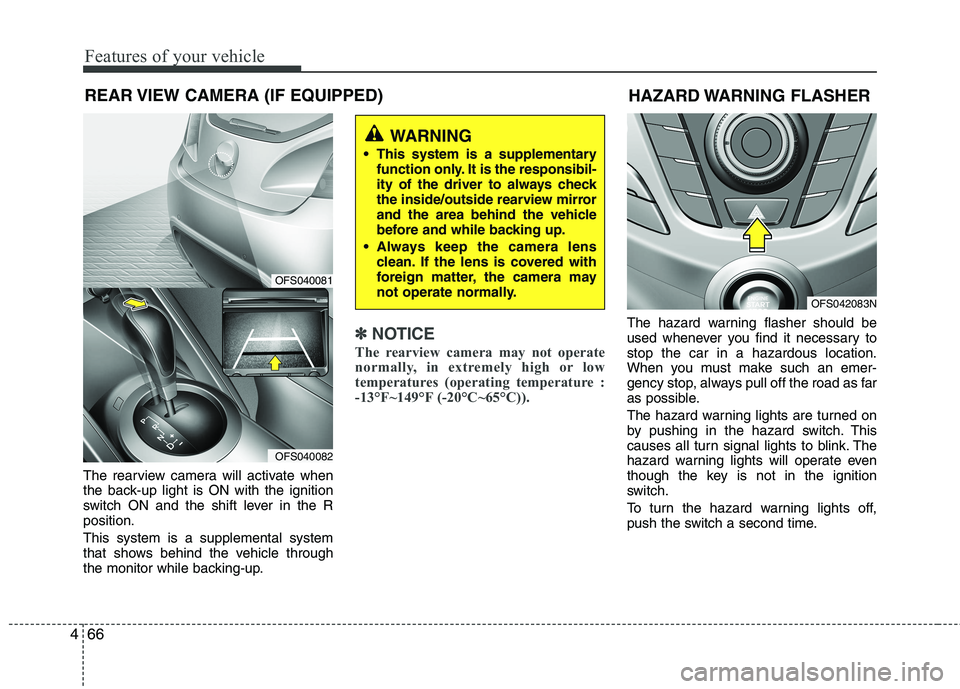
The rearview camera will activate when
the back-up light is ON with the ignition
switch ON and the shift lever in the R
position.
This system is a supplemental system
that shows behind the vehicle through
the monitor while backing-up.
✽ ✽
NOTICE
The rearview camera may not operate
normally, in extremely high or low
temperatures (operating temperature :
-13°F~149°F (-20°C~65°C)).
The hazard warning flasher should be
used whenever you find it necessary to
stop the car in a hazardous location.
When you must make such an emer-
gency stop, always pull off the road as far
as possible.
The hazard warning lights are turned on
by pushing in the hazard switch. This
causes all turn signal lights to blink. The
hazard warning lights will operate even
though the key is not in the ignition
switch.
To turn the hazard warning lights off,
push the switch a second time.
WARNING
This system is a supplementary
function only. It is the responsibil-
ity of the driver to always check
the inside/outside rearview mirror
and the area behind the vehicle
before and while backing up.
Always keep the camera lens
clean. If the lens is covered with
foreign matter, the camera may
not operate normally.
HAZARD WARNING FLASHER
OFS040081
OFS040082
OFS042083N
Page 144 of 384
Features of your vehicle
68 4
Daytime running light
(if equipped)
Daytime Running Lights (DRL) will turn
on when the light switch is in the AUTO
position or DRL position.
Daytime Running Lights (DRL) can make
it easier for others to see the front of your
vehicle during the day. DRL can be help-
ful in many different driving conditions,
and it is especially helpful after dawn and
before sunset.
The DRL system will turn OFF when:
1. The headlight is ON.
2. Engine stops.
3. If the multifuntion switch is on DRL
OFF position or OFF position.
4. Parking brake ON.
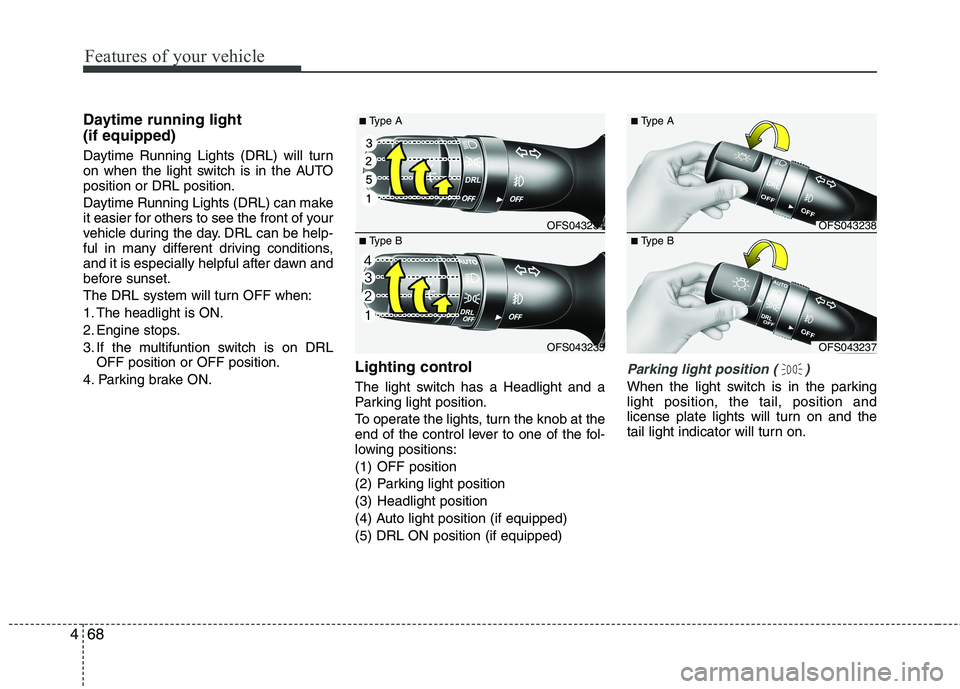
Lighting control
The light switch has a Headlight and a
Parking light position.
To operate the lights, turn the knob at the
end of the control lever to one of the fol-
lowing positions:
(1) OFF position
(2) Parking light position
(3) Headlight position
(4) Auto light position (if equipped)
(5) DRL ON position (if equipped)
Parking light position ( )
When the light switch is in the parking
light position, the tail, position and
license plate lights will turn on and the
tail light indicator will turn on.
OFS043234
OFS043235
■Type A
■Type BOFS043238
OFS043237
■Type A
■Type B
Page 172 of 384
Features of your vehicle
96 4
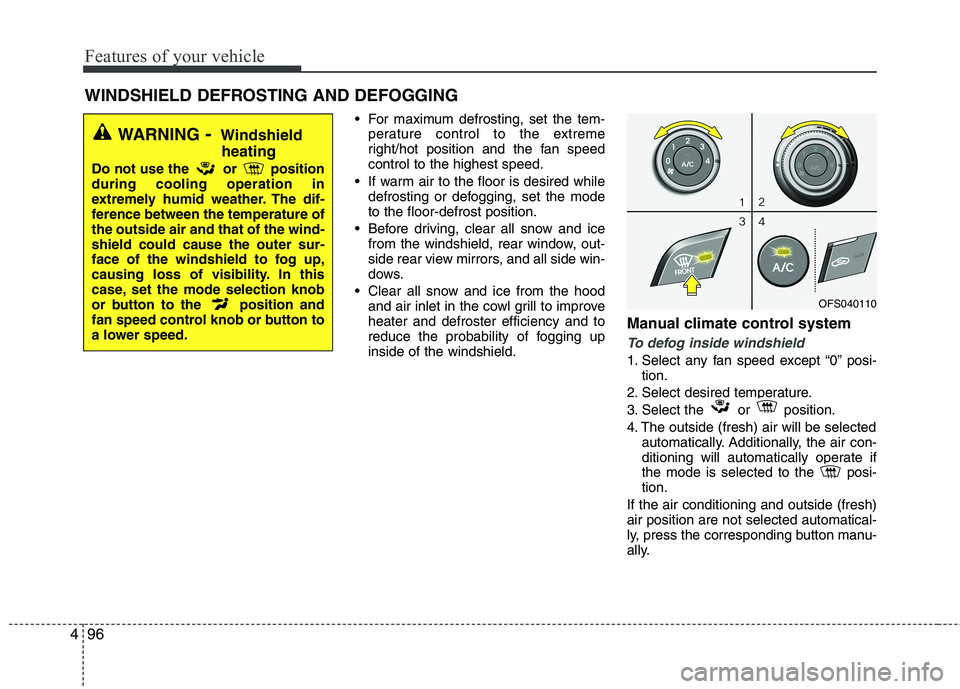
WINDSHIELD DEFROSTING AND DEFOGGING
For maximum defrosting, set the tem-
perature control to the extreme
right/hot position and the fan speed
control to the highest speed.
If warm air to the floor is desired while
defrosting or defogging, set the mode
to the floor-defrost position.
Before driving, clear all snow and ice
from the windshield, rear window, out-
side rear view mirrors, and all side win-
dows.
Clear all snow and ice from the hood
and air inlet in the cowl grill to improve
heater and defroster efficiency and to
reduce the probability of fogging up
inside of the windshield.
Manual climate control system
To defog inside windshield
1. Select any fan speed except “0” posi-
tion.
2. Select desired temperature.
3. Select the or position.
4. The outside (fresh) air will be selected
automatically. Additionally, the air con-
ditioning will automatically operate if
the mode is selected to the posi-
tion.
If the air conditioning and outside (fresh)
air position are not selected automatical-
ly, press the corresponding button manu-
ally.
WARNING- Windshield
heating
Do not use the or position
during cooling operation in
extremely humid weather. The dif-
ference between the temperature of
the outside air and that of the wind-
shield could cause the outer sur-
face of the windshield to fog up,
causing loss of visibility. In this
case, set the mode selection knob
or button to the position and
fan speed control knob or button to
a lower speed.
OFS040110