Page 604 of 653
7-63
7
Maintenance
FFUU SSEE SS
A vehicle’s electrical system is pro-
tected from electrical overload dam-
age by fuses.
This vehicle has 2 (or 3) fuse panels,
one located in the driver’s side panel
bolster, the other in the engine com-
partment near the battery.
If any of your vehicle’s lights, acces-
sories, or controls do not work, check
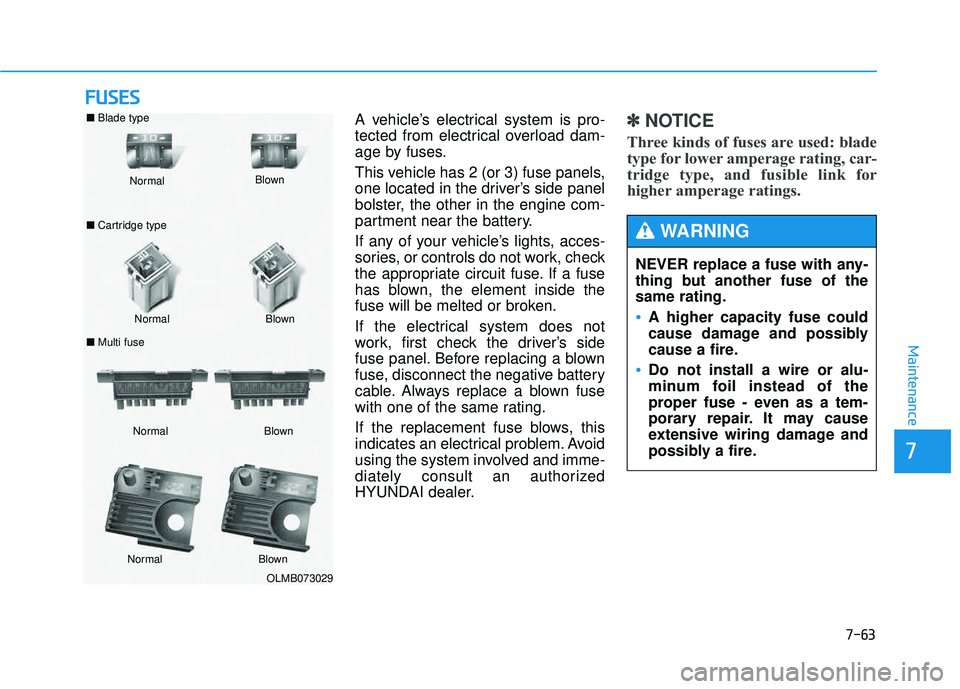
the appropriate circuit fuse. If a fuse
has blown, the element inside the
fuse will be melted or broken.
If the electrical system does not
work, first check the driver’s side
fuse panel. Before replacing a blown
fuse, disconnect the negative battery
cable. Always replace a blown fuse
with one of the same rating.
If the replacement fuse blows, this
indicates an electrical problem. Avoid
using the system involved and imme-
diately consult an authorized
HYUNDAI dealer.✽✽
NOTICE
Three kinds of fuses are used: blade
type for lower amperage rating, car-
tridge type, and fusible link for
higher amperage ratings.
NEVER replace a fuse with any-
thing but another fuse of thesame rating.
A higher capacity fuse could
cause damage and possibly
cause a fire.
Do not install a wire or alu-
minum foil instead of the
proper fuse - even as a tem-
porary repair. It may cause
extensive wiring damage and
possibly a fire.
WARNING
OLMB073029
Normal
Normal
■
Blade type
■ Cartridge type
■ Multi fuse Blown
Blown
Normal Blown
Normal Blown
Page 606 of 653
7-65
7
Maintenance
In an emergency, if you do not have
a spare fuse, use a fuse of the same
rating from a circuit you may not
need for operating the vehicle, such
as the cigarette lighter fuse.
If the headlights or other electrical
components do not work and the
fuses are OK, check the fuse panel
in the engine compartment. If a fuse
is blown, it must be replaced.Memory fuse (SHUNT connector)
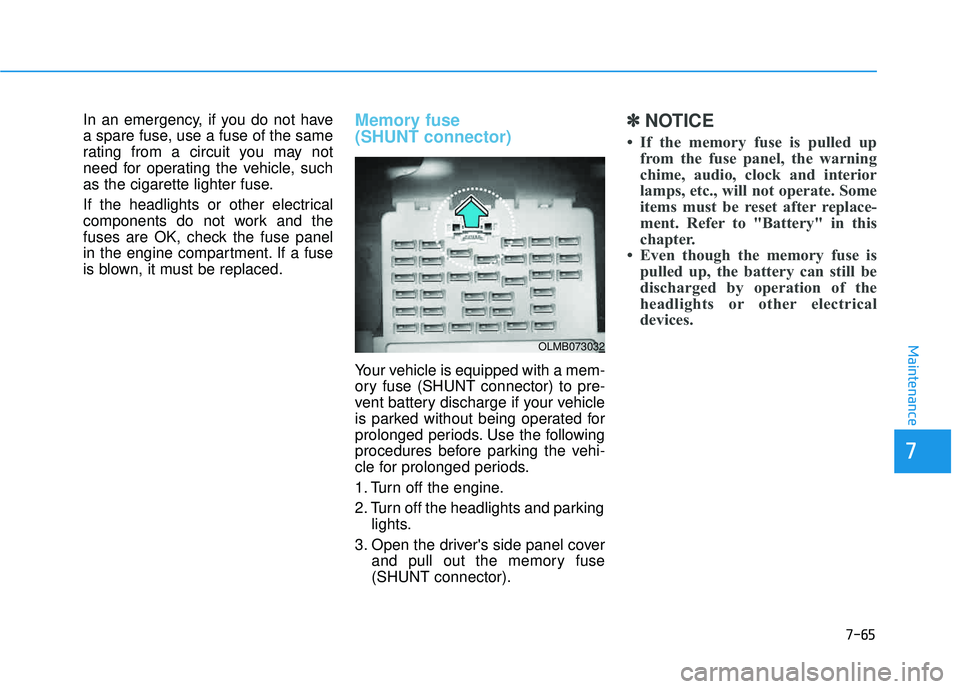
Your vehicle is equipped with a mem-
ory fuse (SHUNT connector) to pre-
vent battery discharge if your vehicle
is parked without being operated for
prolonged periods. Use the following
procedures before parking the vehi-
cle for prolonged periods.
1. Turn off the engine.
2. Turn off the headlights and parkinglights.
3. Open the driver's side panel cover and pull out the memory fuse (SHUNT connector).
✽✽ NOTICE
If the memory fuse is pulled up from the fuse panel, the warning
chime, audio, clock and interior
lamps, etc., will not operate. Some
items must be reset after replace-
ment. Refer to "Battery" in this
chapter.
Even though the memory fuse is pulled up, the battery can still be
discharged by operation of the
headlights or other electrical
devices.
OLMB073032
Page 610 of 653
7-69
7
Maintenance
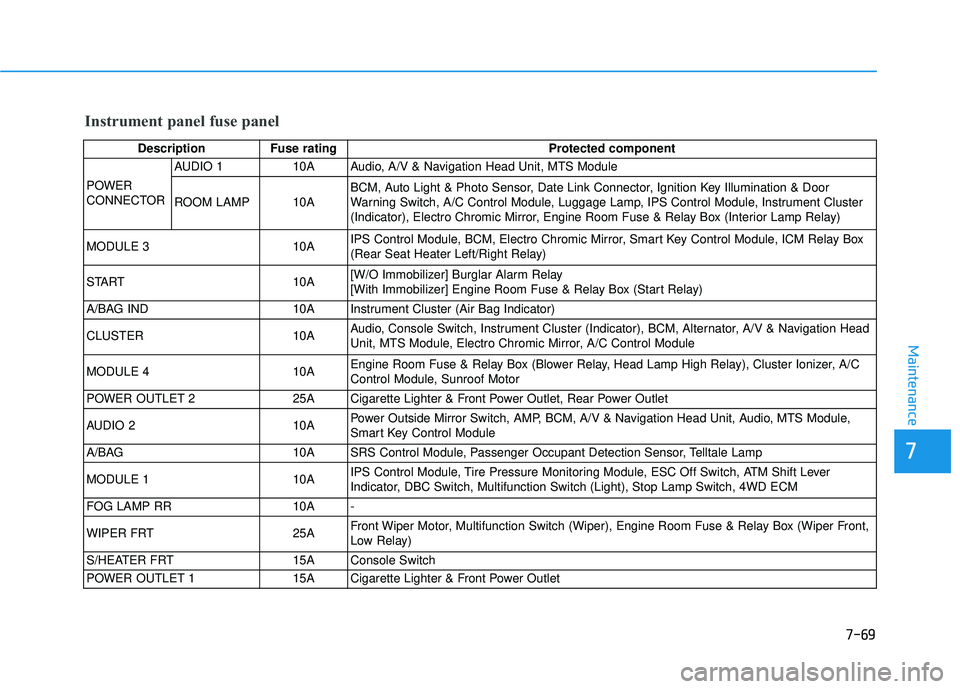
Instrument panel fuse panel
Description Fuse ratingProtected component
POWER
CONNECTOR AUDIO 1 10A Audio, A/V & Navigation Head Unit, MTS Module
ROOM LAMP 10A
BCM, Auto Light & Photo Sensor, Date Link Connector, Ignition Key Illumination & Door
Warning Switch, A/C Control Module, Luggage Lamp, IPS Control Module, Instrument Cluster
(Indicator), Electro Chromic Mirror, Engine Room Fuse & Relay Box (Interior Lamp Relay)
MODULE 3 10A IPS Control Module, BCM, Electro Chromic Mirror, Smart Key Control Module, ICM Relay Box
(Rear Seat Heater Left/Right Relay)
START 10A [W/O Immobilizer] Burglar Alarm Relay
[With Immobilizer] Engine Room Fuse & Relay Box (Start Relay)
A/BAG IND 10A Instrument Cluster (Air Bag Indicator)
CLUSTER 10A Audio, Console Switch, Instrument Cluster (Indicator), BCM, Alternator, A/V & Navigation Head
Unit, MTS Module, Electro Chromic Mirror, A/C Control Module
MODULE 4 10A Engine Room Fuse & Relay Box (Blower Relay, Head Lamp High Relay), Cluster Ionizer, A/C
Control Module, Sunroof Motor
POWER OUTLET 2 25A Cigarette Lighter & Front Power Outlet, Rear Power Outlet
AUDIO 2 10A Power Outside Mirror Switch, AMP, BCM, A/V & Navigation Head Unit, Audio, MTS Module,
Smart Key Control Module
A/BAG 10A SRS Control Module, Passenger Occupant Detection Sensor, Telltale Lamp
MODULE 1 10A IPS Control Module, Tire Pressure Monitoring Module, ESC Off Switch, ATM Shift Lever
Indicator, DBC Switch, Multifunction Switch (Light), Stop Lamp Switch, 4WD ECM
FOG LAMP RR 10A -
WIPER FRT 25A Front Wiper Motor, Multifunction Switch (Wiper), Engine Room Fuse & Relay Box (Wiper Front,
Low Relay)
S/HEATER FRT 15A Console Switch
POWER OUTLET 1 15A Cigarette Lighter & Front Power Outlet
Page 615 of 653
7-74
Maintenance
LLIIGG HH TT BB UU LLBB SS
Consult an authorized HYUNDAI
dealer to replace most vehicle light
bulbs. It is difficult to replace vehicle
light bulbs because other parts of the
vehicle must be removed before you
can get to the bulb. This is especially
true for removing the headlight
assembly to get to the bulb(s).
Removing/installing the headlight
assembly can result in damage to
the vehicle.
✽✽
NOTICE
After heavy driving, rain or wash-
ing, headlight and taillight lenses
could appear frosty. This condition
is caused by the temperature differ-
ence between the lamp inside and
the outside temperature. This is sim-
ilar to the condensation on your win-
dows inside your vehicle during the
rain and doesn’t indicate a problem
with your vehicle. If the water leaks
into the lamp bulb circuitry, have
your vehicle checked by an author-
ized HYUNDAI dealer.
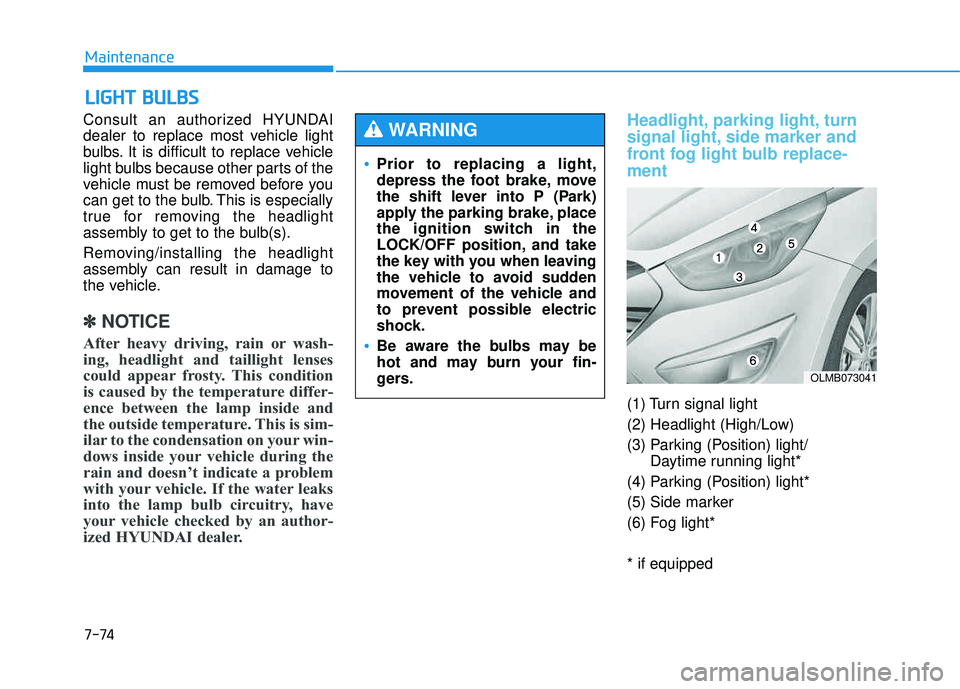
Headlight, parking light, turn
signal light, side marker and
front fog light bulb replace- ment
(1) Turn signal light
(2) Headlight (High/Low)
(3) Parking (Position) light/ Daytime running light*
(4) Parking (Position) light*
(5) Side marker
(6) Fog light* * if equipped
Prior to replacing a light,
depress the foot brake, move
the shift lever into P (Park)
apply the parking brake, place
the ignition switch in the
LOCK/OFF position, and take
the key with you when leaving
the vehicle to avoid sudden
movement of the vehicle and
to prevent possible electric
shock.
Be aware the bulbs may be
hot and may burn your fin-
gers.
WARNING
OLMB073041
Page 616 of 653
7-75
7
Maintenance
Headlight
Halogen bulb
Always handle them carefully, andavoid scratches and abrasions. If
the bulbs are lit, avoid contact with
liquids.
Never touch the glass with bare hands. Residual oil may cause the
bulb to overheat and burst when lit.
A bulb should be operated only when installed in a headlamp.
If a bulb becomes damaged or cracked, replace it immediatelyand carefully dispose of it. 1. Open the hood.
2. Remove the headlamp bulb cover
by turning it counterclockwise.
3. Disconnect the headlamp bulb socket-connector.
4. Remove the socket from the assembly by turning the socket
counterclockwise until the tabs on
the socket align with the slots on
the assembly.
OLMB073042L
Handle halogen bulbs with
care. Halogen bulbs contain
pressurized gas that will pro-
duce flying pieces of glassthat could cause injuries if
broken.
Wear eye protection when
changing a bulb. Allow the
bulb to cool down before han-dling it.
WARNING
OLMB074101
Page 623 of 653
7-82
Maintenance
Interior light bulb replacement 1. Using a flat-blade screwdriver,gently pry the lens from the interi- or lamp housing.
2. Remove the bulb by pulling it straight out.
3. Install a new bulb in the socket.
4. Align the lens tabs with the interior lamp housing notches and snap
the lens into place.
■Map lamp
OLMB073055/OLMB073056/OLMB073058/
OLMB073057/OLMB073059
■Glove box lamp
■ Luggage room lamp
■Vanity mirror
■ Room lamp
Use care not to dirty or damage
lenses, lens tabs, and plastichousings.
WARNING
Page 624 of 653
7-83
7
Maintenance
AAPPPPEEAA RRAA NN CCEE CC AA RREE
Exterior care
Exterior general caution
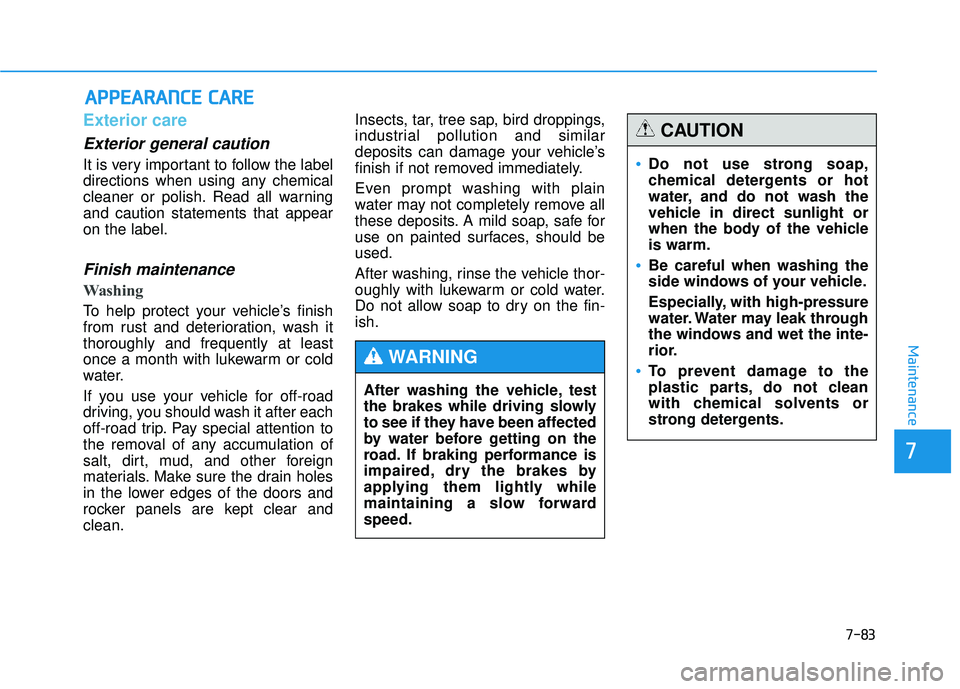
It is very important to follow the label
directions when using any chemical
cleaner or polish. Read all warningand caution statements that appearon the label.
Finish maintenance
Washing
To help protect your vehicle’s finish
from rust and deterioration, wash itthoroughly and frequently at least
once a month with lukewarm or cold
water.
If you use your vehicle for off-road
driving, you should wash it after each
off-road trip. Pay special attention to
the removal of any accumulation of
salt, dirt, mud, and other foreign
materials. Make sure the drain holes
in the lower edges of the doors and
rocker panels are kept clear andclean. Insects, tar, tree sap, bird droppings,
industrial pollution and similar
deposits can damage your vehicle’s
finish if not removed immediately.
Even prompt washing with plain
water may not completely remove all
these deposits. A mild soap, safe for
use on painted surfaces, should beused.
After washing, rinse the vehicle thor-
oughly with lukewarm or cold water.
Do not allow soap to dry on the fin-ish.
Do not use strong soap,
chemical detergents or hot
water, and do not wash the
vehicle in direct sunlight or
when the body of the vehicleis warm.
Be careful when washing the
side windows of your vehicle.
Especially, with high-pressure
water. Water may leak through
the windows and wet the inte-
rior.
To prevent damage to the
plastic parts, do not clean
with chemical solvents or
strong detergents.
CAUTION
After washing the vehicle, test
the brakes while driving slowly
to see if they have been affected
by water before getting on the
road. If braking performance is
impaired, dry the brakes by
applying them lightly while
maintaining a slow forwardspeed.
WARNING
Page 627 of 653
7-86
Maintenance
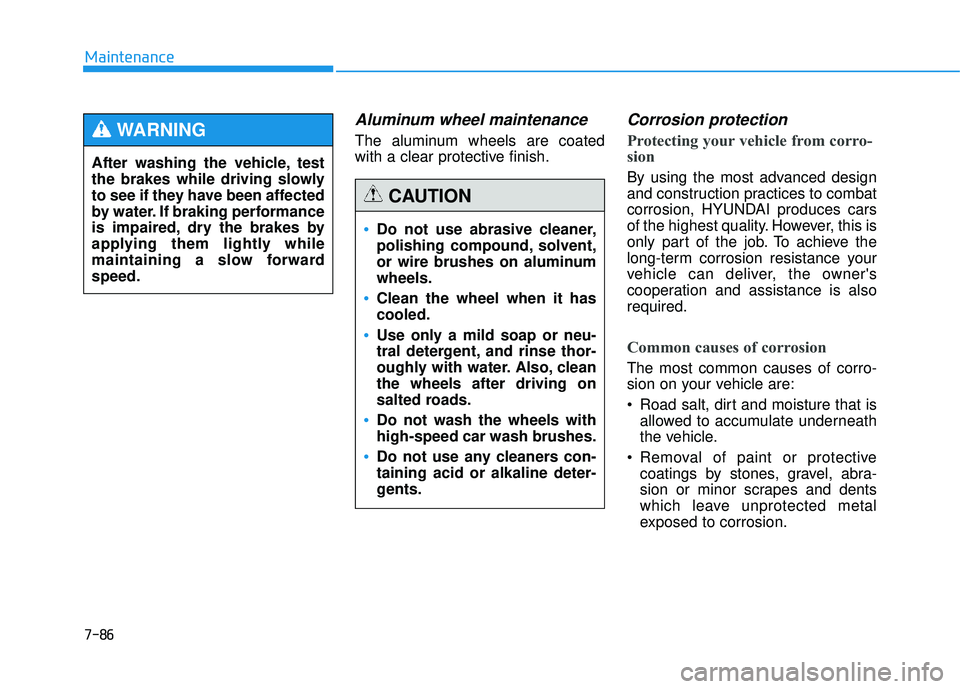
Aluminum wheel maintenance
The aluminum wheels are coated
with a clear protective finish.
Corrosion protection
Protecting your vehicle from corro-
sion
By using the most advanced design
and construction practices to combat
corrosion, HYUNDAI produces cars
of the highest quality. However, this is
only part of the job. To achieve the
long-term corrosion resistance your
vehicle can deliver, the owner's
cooperation and assistance is alsorequired.
Common causes of corrosion
The most common causes of corro-
sion on your vehicle are:
Road salt, dirt and moisture that isallowed to accumulate underneath
the vehicle.
coatings by stones, gravel, abra-
sion or minor scrapes and dents
which leave unprotected metal
exposed to corrosion.
After washing the vehicle, test
the brakes while driving slowly
to see if they have been affected
by water. If braking performance
is impaired, dry the brakes by
applying them lightly while
maintaining a slow forwardspeed.
WARNING
Do not use abrasive cleaner,
polishing compound, solvent,
or wire brushes on aluminumwheels.
Clean the wheel when it has cooled.
Use only a mild soap or neu-
tral detergent, and rinse thor-
oughly with water. Also, cleanthe wheels after driving on
salted roads.
Do not wash the wheels with high-speed car wash brushes.
Do not use any cleaners con- taining acid or alkaline deter-
gents.
CAUTION