Page 118 of 603

3-23
Convenient features of your vehicle
3
Tilt Steering / Telescope Steering
Adjust the steering wheel so it points
toward your chest, not toward your
face. Make sure you can see the
instrument panel warning lights and
gauges. After adjusting, push the
steering wheel both up and down to
be certain it is locked in position.
Always adjust the position of the
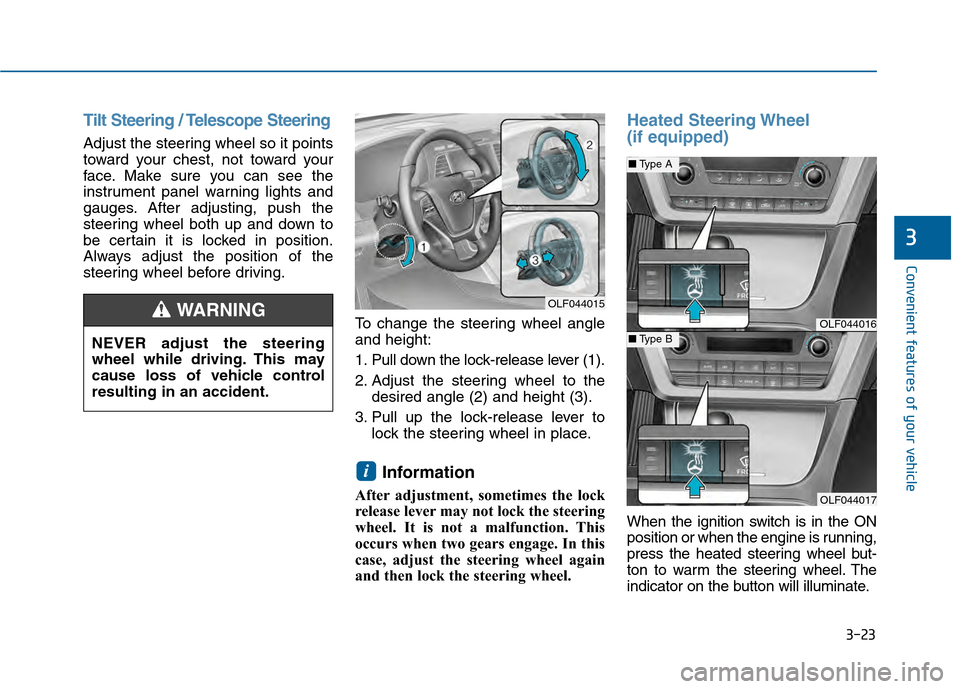
steering wheel before driving.To change the steering wheel angle
and height:
1. Pull down the lock-release lever (1).
2. Adjust the steering wheel to thedesired angle (2) and height (3).
3. Pull up the lock-release lever to lock the steering wheel in place.
Information
After adjustment, sometimes the lock
release lever may not lock the steering
wheel. It is not a malfunction. This
occurs when two gears engage. In this
case, adjust the steering wheel again
and then lock the steering wheel.
Heated Steering Wheel
(if equipped)
When the ignition switch is in the ON
position or when the engine is running,
press the heated steering wheel but-
ton to warm the steering wheel. The
indicator on the button will illuminate.
i
OLF044015
OLF044016
OLF044017
■Type A
■Type BNEVER adjust the steering
wheel while driving. This may
cause loss of vehicle control
resulting in an accident.
WARNING
Page 143 of 603

3-48
Convenient features of your vehicle
The ignition switch must be in the ON
position before you can open or
close the sunroof.
Information
In cold and wet climates, the sunroof
may not work properly due to freezing
conditions. To prevent damage to the sunroof
and the motor, do not continue to
press the sunroof control lever
after the sunroof is in the fully
open, closed or tilt position(s).
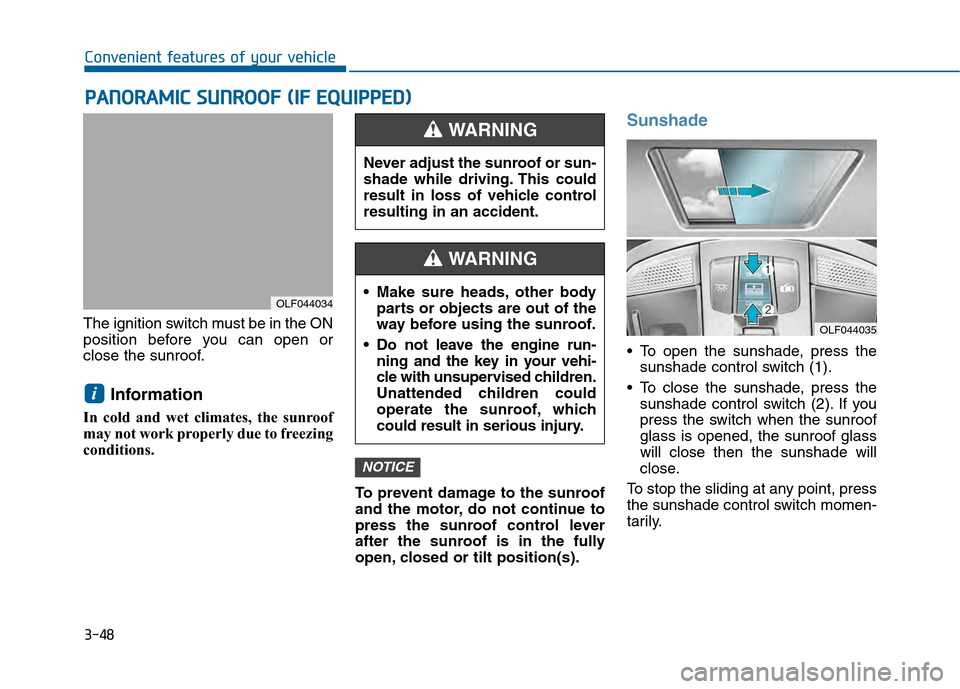
Sunshade
To open the sunshade, press thesunshade control switch (1).
To close the sunshade, press the sunshade control switch (2). If you
press the switch when the sunroof
glass is opened, the sunroof glass
will close then the sunshade will
close.
To stop the sliding at any point, press
the sunshade control switch momen-
tarily.
NOTICE
i
P P A
A N
N O
O R
RA
A M
M I
IC
C
S
S U
U N
NR
RO
O O
OF
F
(
( I
IF
F
E
E Q
Q U
UI
IP
P P
PE
ED
D )
)
OLF044034
Never adjust the sunroof or sun-
shade while driving. This could
result in loss of vehicle control
resulting in an accident.
WARNING
OLF044035
Make sure heads, other body
parts or objects are out of the
way before using the sunroof.
Do not leave the engine run- ning and the key in your vehi-
cle with unsupervised children.
Unattended children could
operate the sunroof, which
could result in serious injury.
WARNING
Page 146 of 603

3-51
Convenient features of your vehicle
3
Periodically remove any dirt thatmay accumulate on the sunroof
guide rail or between the sun-
roof and roof panel.
Do not try to open the sunroof when the temperature is below
freezing or when the sunroof is
covered with snow or ice, the
motor could be damaged.
Information
After the vehicle is washed or in a
rainstorm, be sure to wipe off any
water that is on the sunroof before
operating it.
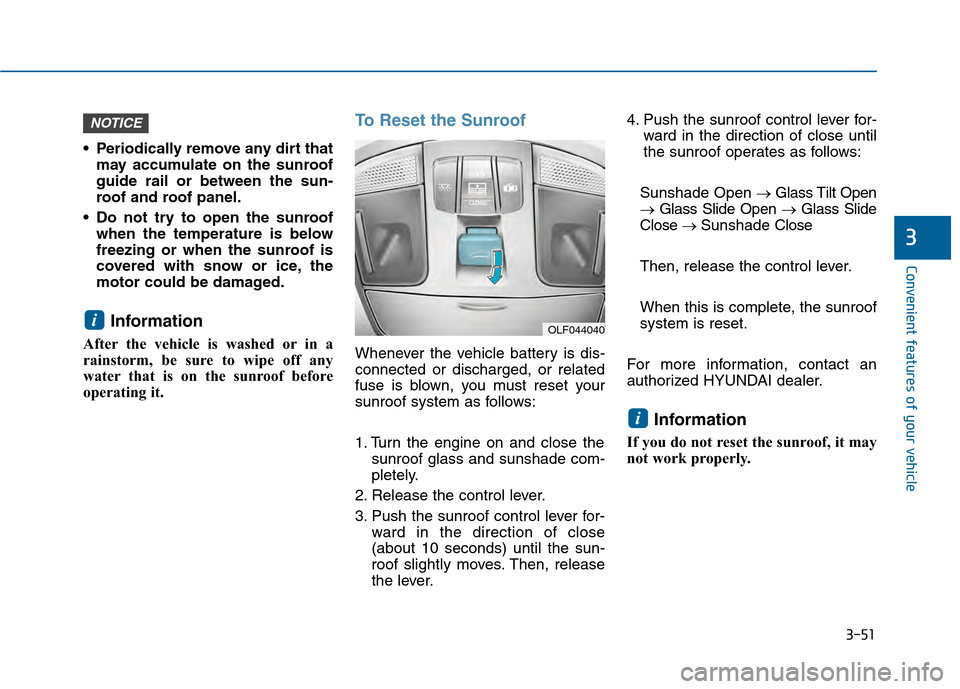
To Reset the Sunroof
Whenever the vehicle battery is dis-
connected or discharged, or related
fuse is blown, you must reset your
sunroof system as follows:
1. Turn the engine on and close the sunroof glass and sunshade com-
pletely.
2. Release the control lever.
3. Push the sunroof control lever for- ward in the direction of close
(about 10 seconds) until the sun-
roof slightly moves. Then, release
the lever. 4. Push the sunroof control lever for-
ward in the direction of close until
the sunroof operates as follows:
Sunshade Open → Glass Tilt Open
→ Glass Slide Open → Glass Slide
Close → Sunshade Close
Then, release the control lever.
When this is complete, the sunroof
system is reset.
For more information, contact an
authorized HYUNDAI dealer.
Information
If you do not reset the sunroof, it may
not work properly.
i
i
NOTICE
OLF044040
Page 147 of 603
3-52
Convenient features of your vehicle
Hood
Opening the hood
1. Park the vehicle and set the park-ing brake.
2. Pull the release lever to unlatch the hood. The hood should pop
open slightly. 3. Raise the hood slightly, push the
secondary latch up (1) inside of
the hood center and lift the hood
(2). After it has been raised about
halfway, it will raise completely by
itself.
Closing the hood
1. Before closing the hood, check thefollowing:
ment must be correctly installed.
bustible material must be removed
from the engine compartment.
2. Lower the hood halfway and push down to securely lock in place.
Then double check to be sure the
hood is secure.
E EX
X T
TE
ER
R I
IO
O R
R
F
F E
E A
A T
TU
U R
RE
ES
S
OLF044041
OLF044042N
Page 154 of 603

3-59
Convenient features of your vehicle
3
Information
• The Smart Trunk function will notwork if any of the following occurs:
- The smart key is close to a radiotransmitter such as a radio station
or an airport which can interfere
with normal operation of the
transmitter.
- The smart key is near a mobile two way radio system or a cellular
phone.
- Another vehicle's smart key is being operated close to your vehicle.
• The detecting range may decrease or increase when :
- One side of the tire is raised toreplace a tire or to inspect the vehi-
cle.
- The vehicle is parked on a slope or unpaved road, etc.
Fuel Filler Door
Opening the fuel filler door
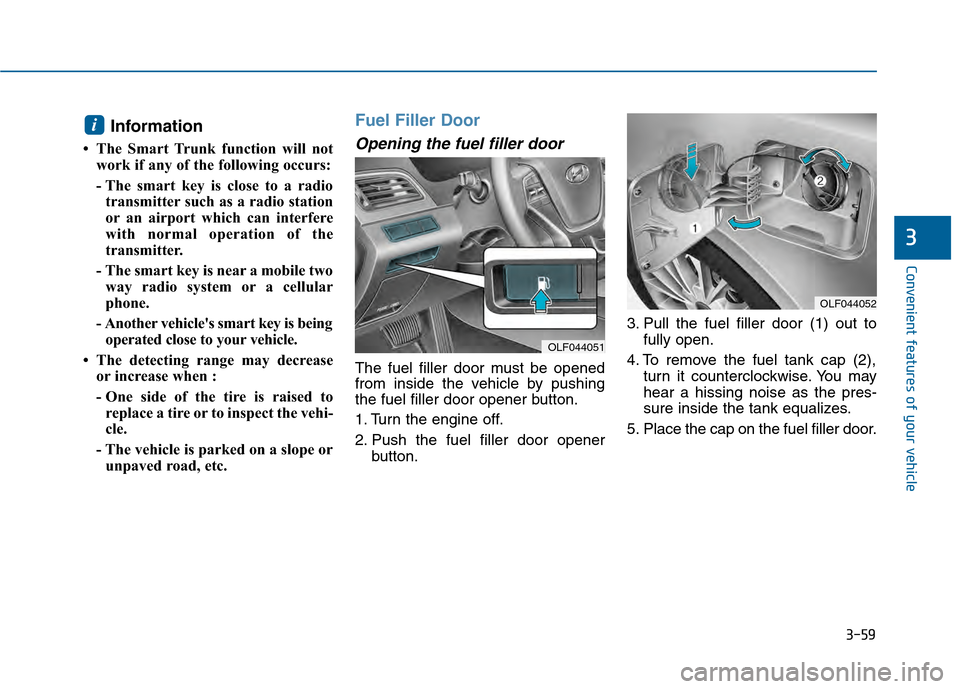
The fuel filler door must be opened
from inside the vehicle by pushing
the fuel filler door opener button.
1. Turn the engine off.
2. Push the fuel filler door opener button. 3. Pull the fuel filler door (1) out to
fully open.
4. To remove the fuel tank cap (2), turn it counterclockwise. You may
hear a hissing noise as the pres-
sure inside the tank equalizes.
5. Place the cap on the fuel filler door.
i
OLF044052
OLF044051
Page 156 of 603

3-61
Convenient features of your vehicle
3
(Continued)
Do not get back into a vehicle
once you have begun refuel-
ing. You can generate a build-
up of static electricity by
touching, rubbing or sliding
against any item or fabric
capable of producing static
electricity. Static electricity
discharge can ignite fuel
vapors causing a fire. If you
must re-enter the vehicle, you
should once again eliminate
potentially dangerous static
electricity discharge by touch-
ing a metal part of the vehicle,
away from the fuel filler neck,
nozzle or other gasoline
source, with your bare hand.
When using an approved
portable fuel container, be
sure to place the container on
the ground prior to refueling.
Static electricity discharge
from the container can ignite
fuel vapors causing a fire.(Continued)
(Continued)Once refueling has begun,
contact between your bare
hand and the vehicle should
be maintained until the filling
is complete.
Use only approved portable
plastic fuel containers designed
to carry and store gasoline.
When refueling, always move
the shift lever to the P (Park)
position, set the parking
brake, and place the ignition
switch to the LOCK/OFF posi-
tion. Sparks produced by
electrical components related
to the engine can ignite fuel
vapors causing a fire.
Do not use matches or a
lighter and do not smoke or
leave a lit cigarette in your
vehicle while at a gas station,
especially during refueling.
Do not over-fill or top-off your
vehicle tank, which can cause
gasoline spillage. (Continued)
(Continued)
If a fire breaks out during refu-
eling, leave the vicinity of the
vehicle, and immediately con-
tact the manager of the gas
station and then contact the
local fire department. Follow
any safety instructions they
provide.
If pressurized fuel sprays out,
it can cover your clothes or
skin and thus subject you to
the risk of fire and burns.
Always remove the fuel cap
carefully and slowly. If the cap
is venting fuel or if you hear a
hissing sound, wait until the
condition stops before com-
pletely removing the cap.
Always check that the fuel cap
is installed securely to pre-
vent fuel spillage in the event
of an accident.
Page 158 of 603
3-63
Convenient features of your vehicle
3
I
IN
N S
ST
T R
R U
U M
M E
EN
N T
T
C
C L
LU
U S
ST
T E
ER
R
1. Tachometer
2. Speedometer
3. Engine coolant temperature gauge
4. Fuel gauge
5. Warning and indicator lights
6. LCD display (including Trip computer)
OLF044100N/OLF044101N
■ ■
Type A
The actual cluster in the vehicle may dif-
fer from the illustration.
■ ■Type B
Page 159 of 603
3-64
Convenient features of your vehicle
1. Tachometer
2. Speedometer
3. Engine coolant temperature gauge
4. Fuel gauge
5. Warning and indicator lights
6. LCD display (including Trip computer)
OLF044504N/OLF044505N
■ ■Type C
The actual cluster in the vehicle may dif-
fer from the illustration.
■ ■Type D