2015 Hyundai Sonata Engine head
[x] Cancel search: Engine headPage 383 of 603
5-25
Driving your vehicle
5
Shift-Lock System
For your safety, the automatic trans-
mission has a shift-lock system
which prevents shifting the transmis-
sion from P (Park) into R (Reverse)
unless the brake pedal is depressed.
To shift the transmission from P
(Park) into R (Reverse):
1. Depress and hold the brake pedal.
2. Start the engine or place the igni-tion switch in the ON position.
3. Move the shift lever.
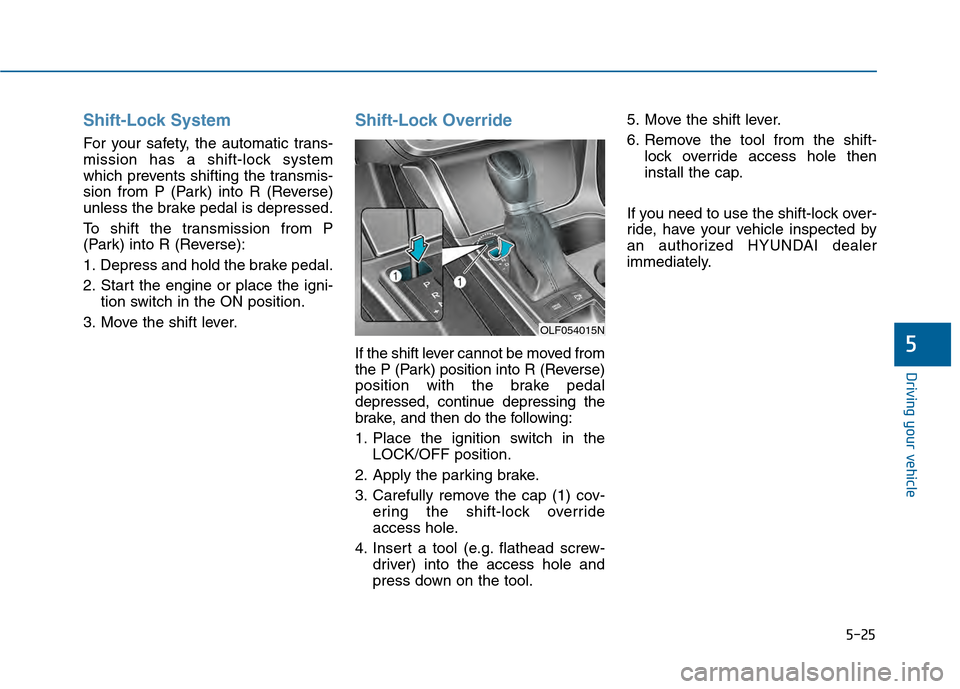
Shift-Lock Override
If the shift lever cannot be moved from
the P (Park) position into R (Reverse)
position with the brake pedal
depressed, continue depressing the
brake, and then do the following:
1. Place the ignition switch in the LOCK/OFF position.
2. Apply the parking brake.
3. Carefully remove the cap (1) cov- ering the shift-lock override
access hole.
4. Insert a tool (e.g. flathead screw- driver) into the access hole and
press down on the tool. 5. Move the shift lever.
6. Remove the tool from the shift-
lock override access hole then
install the cap.
If you need to use the shift-lock over-
ride, have your vehicle inspected by
an authorized HYUNDAI dealer
immediately.
OLF054015N
Page 398 of 603
![Hyundai Sonata 2015 Owners Manual 5-40
Driving your vehicle
Press brake pedal to deactivate
AUTO HOLD
If you did not apply the brake pedal
when you release the Auto Hold by
pressing the [AUTO HOLD] switch, a
warning will sound and a m Hyundai Sonata 2015 Owners Manual 5-40
Driving your vehicle
Press brake pedal to deactivate
AUTO HOLD
If you did not apply the brake pedal
when you release the Auto Hold by
pressing the [AUTO HOLD] switch, a
warning will sound and a m](/manual-img/35/16796/w960_16796-397.png)
5-40
Driving your vehicle
Press brake pedal to deactivate
AUTO HOLD
If you did not apply the brake pedal
when you release the Auto Hold by
pressing the [AUTO HOLD] switch, a
warning will sound and a message
will appear.
AUTO HOLD conditions not met.
Close door, hood, trunk, and fasten
seatbelt
When you press the [AUTO HOLD]
switch, if the driver's door, engine
hood and trunk are not closed or the
driver's seat belt is not fastened, a
warning will sound and a message
will appear on the LCD display. In
that time, press the [AUTO HOLD]
button after closing the driver's door,
engine hood and trunk and fastening
the seat belt.
Anti-lock Brake System (ABS)
OLF044407NOLF044409N
An Anti-Lock Braking System
(ABS) or an Electronic Stability
Control (ESC) system will not
prevent accidents due to
improper or dangerous driving
maneuvers. Even though vehi-
cle control is improved during
emergency braking, always
maintain a safe distance
between you and objects ahead
of you. Vehicle speeds should
always be reduced during
extreme road conditions. The
braking distance for cars
equipped with ABS or ESC may
be longer than for those without
these systems in the following
road conditions.(Continued)
WARNING
Page 414 of 603
5-56
Driving your vehicle
1.Turn the Smart Cruise Control System on (the cruise indicator
light will be on but the system will
not be activated).
2.Push and hold the Vehicle-to- Vehicle Distance button for more
than 2 seconds.
3.Choose between "Smart Cruise Control (SCC) Mode" and "Cruise
Control (CC) Mode".
When the system is canceled using
the CRUISE button or the CRUISE
button is used after the engine is
turned on, the SCC Mode will turn
on.
Smart Cruise Control Speed
To set Smart Cruise Control speed
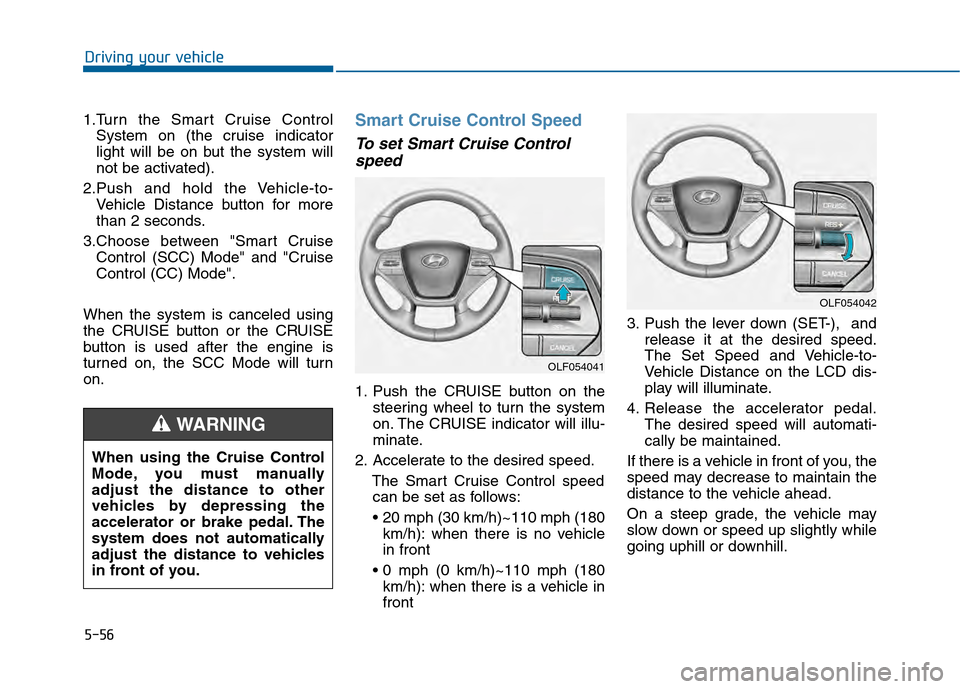
1. Push the CRUISE button on the
steering wheel to turn the system
on. The CRUISE indicator will illu-
minate.
2. Accelerate to the desired speed. The Smart Cruise Control speedcan be set as follows:
km/h): when there is no vehicle
in front
km/h): when there is a vehicle in
front 3. Push the lever down (SET-), and
release it at the desired speed.
The Set Speed and Vehicle-to-
Vehicle Distance on the LCD dis-
play will illuminate.
4. Release the accelerator pedal. The desired speed will automati-
cally be maintained.
If there is a vehicle in front of you, the
speed may decrease to maintain the
distance to the vehicle ahead.
On a steep grade, the vehicle may
slow down or speed up slightly while
going uphill or downhill.
OLF054042
OLF054041
When using the Cruise Control
Mode, you must manually
adjust the distance to other
vehicles by depressing the
accelerator or brake pedal. The
system does not automatically
adjust the distance to vehicles
in front of you.
WARNING
Page 418 of 603
5-60
Driving your vehicle
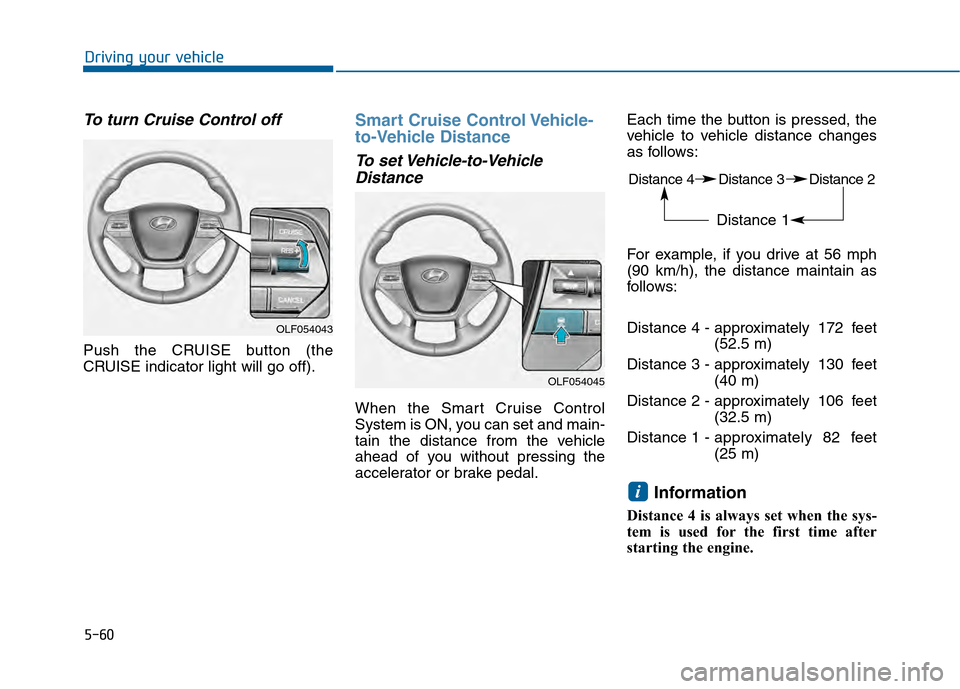
To turn Cruise Control off
Push the CRUISE button (the
CRUISE indicator light will go off).
Smart Cruise Control Vehicle-
to-Vehicle Distance
To set Vehicle-to-VehicleDistance
When the Smart Cruise Control
System is ON, you can set and main-
tain the distance from the vehicle
ahead of you without pressing the
accelerator or brake pedal. Each time the button is pressed, the
vehicle to vehicle distance changes
as follows:
For example, if you drive at 56 mph
(90 km/h), the distance maintain as
follows:
Distance 4 - approximately 172 feet
(52.5 m)
Distance 3 - approximately 130 feet (40 m)
Distance 2 - approximately 106 feet (32.5 m)
Distance 1 - approximately 82 feet
(25 m)
Information
Distance 4 is always set when the sys-
tem is used for the first time after
starting the engine.
i
OLF054043
OLF054045
Distance 4 Distance 3 Distance 2
Distance 1
Page 435 of 603
5-77
Driving your vehicle
5
BSD (Blind Spot Detection) /
LCA (Lane Change Assist)
Operating conditions
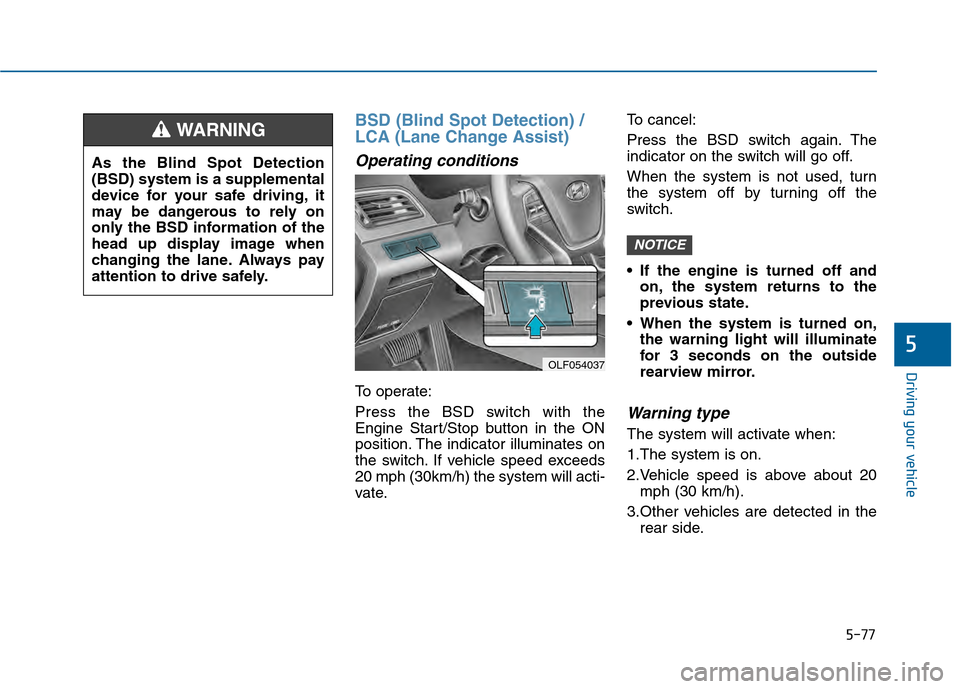
To operate:
Press the BSD switch with the
Engine Start/Stop button in the ON
position. The indicator illuminates on
the switch. If vehicle speed exceeds
20 mph (30km/h) the system will acti-
vate.To cancel:
Press the BSD switch again. The
indicator on the switch will go off.
When the system is not used, turn
the system off by turning off the
switch.
If the engine is turned off and
on, the system returns to the
previous state.
When the system is turned on, the warning light will illuminate
for 3 seconds on the outside
rearview mirror.
Warning type
The system will activate when:
1.The system is on.
2.Vehicle speed is above about 20mph (30 km/h).
3.Other vehicles are detected in the rear side.
NOTICE
OLF054037
As the Blind Spot Detection
(BSD) system is a supplemental
device for your safe driving, it
may be dangerous to rely on
only the BSD information of the
head up display image when
changing the lane. Always pay
attention to drive safely.
WARNING
Page 443 of 603
5-85
Driving your vehicle
5
If you are still stuck after rocking
the vehicle a few times, have the
vehicle pulled out by a tow vehicle
to avoid engine overheating, pos-
sible damage to the transmission,
and tire damage. See “Towing” in
chapter 6.
To prevent damage to the trans-
mission, turn OFF the ESC prior to
rocking the vehicle.
Smooth Cornering
Avoid braking or gear changing in
corners, especially when roads are
wet. Ideally, corners should always
be taken under gentle acceleration.
Driving at Night
Night driving presents more hazards
than driving in the daylight. Here are
some important tips to remember:
Slow down and keep more dis-tance between you and other vehi-
cles, as it may be more difficult to
see at night, especially in areas
where there may not be any street
lights.
Adjust your mirrors to reduce the glare from other driver's head-
lamps.
Keep your headlamps clean and properly aimed. Dirty or improperly
aimed headlamps will make it
much more difficult to see at night.
Avoid staring directly at the head- lamps of oncoming vehicles. You
could be temporarily blinded, and it
will take several seconds for your
eyes to readjust to the darkness.
NOTICE
Page 457 of 603
6-3
What to do in an emergency
If you Have a Flat Tire While
Driving
If a tire goes flat while you are driving:
Take your foot off the acceleratorpedal and let the vehicle slow down
while driving straight ahead. Do not
apply the brakes immediately or
attempt to pull off the road as this
may cause loss of vehicle control
resulting in an accident. When the
vehicle has slowed to such a speed
that it is safe to do so, brake care-
fully and pull off the road. Drive off
the road as far as possible and park
on firm, level ground. If you are on
a divided highway, do not park in
the median area between the two
traffic lanes.
When the vehicle is stopped, press the hazard warning flasher button,
move the shift lever into P(Park),
and apply the parking brake, and
place the ignition switch in the
LOCK/OFF position.
Have all passengers get out of the vehicle. Be sure they all get out on
the side of the vehicle that is away
from traffic.
When changing a flat tire, follow the instructions provided later in
this chapter.
If the Engine Doesn't Turn
Over or Turns Over Slowly
Be sure the shift lever is in N
(Neutral) or P (Park). The engine
starts only when the shift lever is in
N (Neutral) or P (Park).
Check the battery connections to be sure they are clean and tight.
Turn on the interior light. If the light dims or goes out when you operate
the starter, the battery is drained.
Do not push or pull the vehicle to
start it. This could cause damage to
your vehicle. See instructions for
"Jump Starting" provided in this
chapter.
If the Engine Turns Over
Normally but Doesn't Start
Check the fuel level and add fuel if
necessary.
If the engine still does not start, have
your vehicle checked by an author-
ized HYUNDAI dealer.
6
I I F
F
T
T H
H E
E
E
E N
N G
GI
IN
N E
E
W
W I
IL
L L
L
N
N O
O T
T
S
S T
T A
A R
RT
T
Push or pull starting the vehicle
may cause the catalytic con-
verter to overload which can
lead to damage to the emission
control system.
CAUTION
Page 488 of 603

7
Wiper Blades.........................................................7-36
Blade Inspection ..............................................................7-36
Blade Replacement .........................................................7-36
Battery...................................................................7-38
For Best Battery Service ..............................................7-39
Battery Recharging ........................................................7-39
Reset features .................................................................7-40
Tires and Wheels .................................................7-41
Tire Care ........................................................................\
....7-41
Recommended Cold Tire Inflation Pressures ...........7-42
Check Tire Inflation Pressure ......................................7-43
Tire Rotation...................................................................\
..7-44
Wheel Alignment and Tire Balance ............................7-45
Tire Replacement ............................................................7-45
Wheel Replacement ........................................................7-46
Tire Traction .....................................................................7-4\
6
Tire Maintenance ............................................................7-47
Tire Sidewall Labeling ....................................................7-47
Tire Terminology and Definitions................................7-51
All Season Tires ...............................................................7-54
Summer Tires ...................................................................7-54
Snow Tires ........................................................................\
7-54
Radial-Ply Tires ...............................................................7-55
Low Aspect Ratio Tires..................................................7-55
Fuses ......................................................................7-\
57
Instrument Panel Fuse Replacement..........................7-58
Engine Compartment Panel Fuse Replacement.......7-59
Fuse/Relay Panel Description ......................................7-61
Light Bulbs ............................................................7-69
Headlamp, Position Lamp, Turn Signal Lamp and
Side Marker Light Bulb Replacement ........................7-70
Side Repeater Lamp Replacement ..............................7-75
Rear Combination Light Bulb Replacement ..............7-76
High Mounted Stop Lamp .............................................7-80
License Plate Light Bulb Replacement ......................7-80
Interior Light Bulb Replacement .................................7-80
Appearance Care..................................................7-82
Exterior Care ....................................................................7-82\
Interior Care .....................................................................7-8\
7
Emission Control System ....................................7-89
Crankcase Emission Control System ..........................7-89
Evaporative Emission Control System Including
Onboard Refueling Vapor Recovery (ORVR)............7-89
Exhaust Emission Control System ..............................7-90
California Perchlorate Notice.............................7-93