2015 Hyundai Sonata Button
[x] Cancel search: ButtonPage 54 of 603
2-27
Safety system of your vehicle
2
When the seat belt is fully extended
from the retractor to allow the installa-
tion of a child restraint system, the
seat belt operation changes to allow
the belt to retract, but not to extend
(Automatic Locking Retractor Type).
Refer to the “Using a Child Restraint
System” section in this chapter.
Although the seat belt retractor
provides the same level of protec-
tion for seated passengers in
either emergency or automatic
locking modes, the emergency
locking mode allows seated pas-
sengers to move freely in their
seat while keeping some tension
on the belt. During a collision or
sudden stop, the retractor auto-
matically locks the belt to help
restrain your body.
To deactivate the automatic lock-
ing mode, allow the unbuckled
seat belt to fully retract.
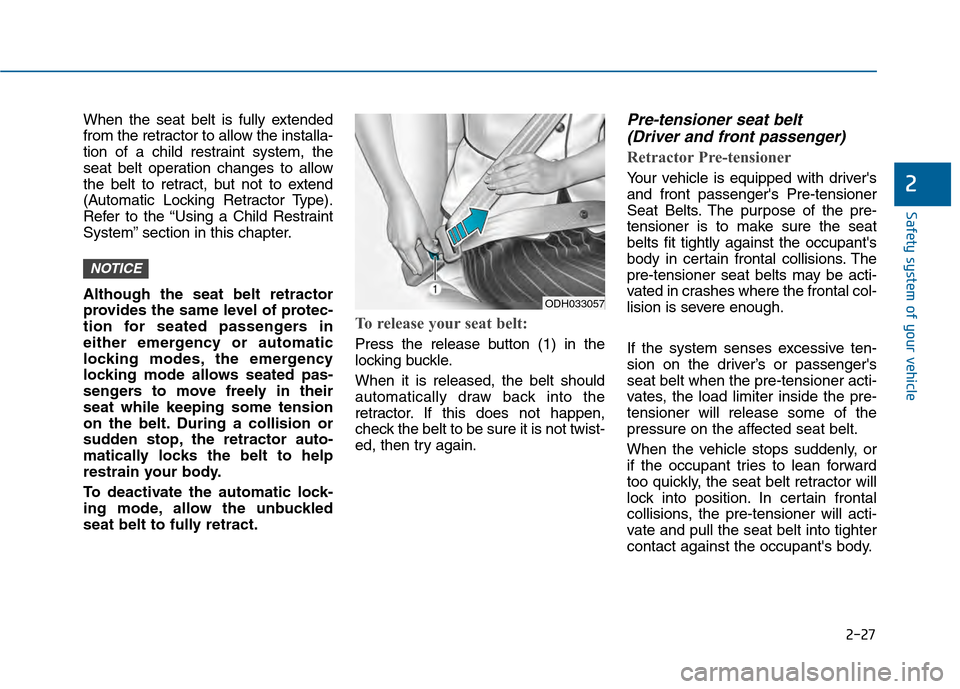
To release your seat belt:
Press the release button (1) in the
locking buckle.
When it is released, the belt should
automatically draw back into the
retractor. If this does not happen,
check the belt to be sure it is not twist-
ed, then try again.
Pre-tensioner seat belt (Driver and front passenger)
Retractor Pre-tensioner
Your vehicle is equipped with driver's
and front passenger's Pre-tensioner
Seat Belts. The purpose of the pre-
tensioner is to make sure the seat
belts fit tightly against the occupant's
body in certain frontal collisions. The
pre-tensioner seat belts may be acti-
vated in crashes where the frontal col-
lision is severe enough.
If the system senses excessive ten-
sion on the driver’s or passenger's
seat belt when the pre-tensioner acti-
vates, the load limiter inside the pre-
tensioner will release some of the
pressure on the affected seat belt.
When the vehicle stops suddenly, or
if the occupant tries to lean forward
too quickly, the seat belt retractor will
lock into position. In certain frontal
collisions, the pre-tensioner will acti-
vate and pull the seat belt into tighter
contact against the occupant's body.
NOTICE
ODH033057
Page 70 of 603
2-43
Safety system of your vehicle
2
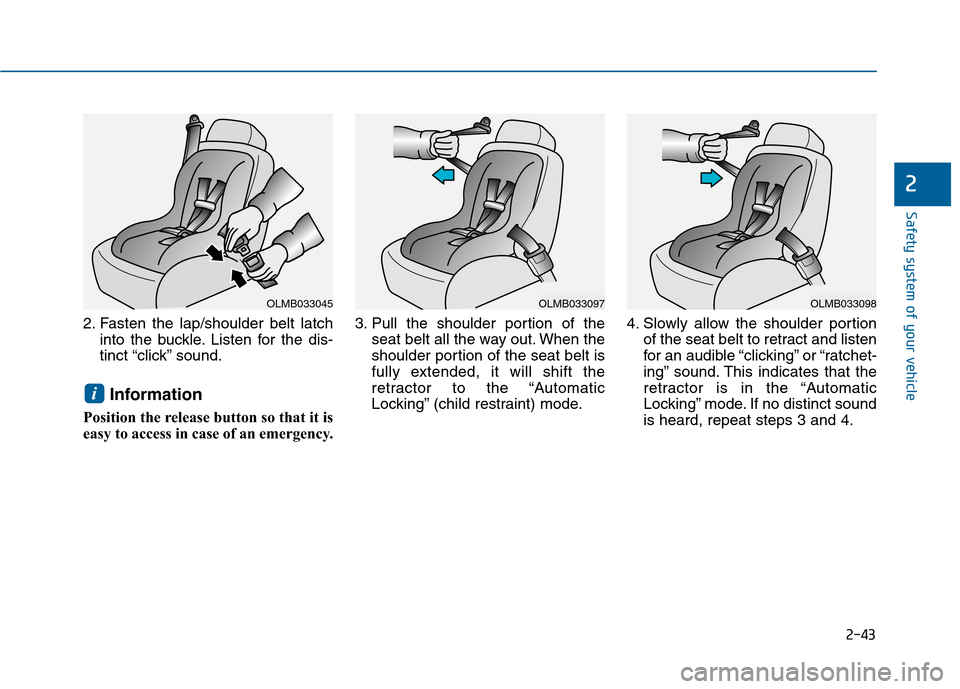
2. Fasten the lap/shoulder belt latchinto the buckle. Listen for the dis-
tinct “click” sound.
Information
Position the release button so that it is
easy to access in case of an emergency. 3. Pull the shoulder portion of the
seat belt all the way out. When the
shoulder portion of the seat belt is
fully extended, it will shift the
retractor to the “Automatic
Locking” (child restraint) mode. 4. Slowly allow the shoulder portion
of the seat belt to retract and listen
for an audible “clicking” or “ratchet-
ing” sound. This indicates that the
retractor is in the “Automatic
Locking” mode. If no distinct sound
is heard, repeat steps 3 and 4.
i
OLMB033045OLMB033097OLMB033098
Page 71 of 603

2-44
Safety system of your vehicle
5. Remove as much slack from the belt as possible by pushing down
on the child restraint system while
feeding the shoulder belt back into
the retractor.
6. Push and pull on the child restraint system to confirm that the seat
belt is holding it firmly in place. If it
is not, release the seat belt and
repeat steps 2 through 6.
7. Double check that the retractor is in the “Automatic Locking” mode
by attempting to pull more of the
seat belt out of the retractor. If you
cannot, the retractor is in the
“Automatic Locking” mode.
If your CRS manufacturer instructs or
recommends you to use a tether
anchor with the lap/shoulder belt,
refer to the previous pages for more
information. When the seat belt is allowed to
retract to its fully stowed position,
the retractor will automatically
switch from the “Automatic
Locking” mode to the emergency
lock mode for normal adult usage.
To remove the child restraint, press
the release button on the buckle and
then pull the lap/shoulder belt out of
the restraint and allow the seat belt
to retract fully.
NOTICE
If the retractor is not in the
“Automatic Locking” mode, the
child restraint can move when
your vehicle turns or stops sud-
denly. A child can be seriously
injured or killed if the child
restraint is not properly anchored
in the car, including manually
pulling the seat belt all the way
out to shift the rectractor to the
“Automatic Locking” mode.
WARNING
Page 78 of 603

2-51
Safety system of your vehicle
2
10. Side pressure sensors
11. Driver’s knee air bag module
12. Driver’s and front passenger’sseat belt buckle sensors
13. Anchor pre-tensioner
14. Occupant classification system
The SRSCM continually monitors all
SRS components while the Engine
Start/Stop button is in the ON posi-
tion to determine if a crash impact is
severe enough to require air bag
deployment or pre-tensioner seat
belt deployment.SRS warning light
The SRS (Supplement Restraint
System) air bag warning light on the
instrument panel displays the air bag
symbol depicted in the illustration.
The system checks the air bag elec-
trical system for malfunctions. The
light indicates that there is a potential
malfunction with your air bag system,
which could include your side and
curtain air bags used for rollover pro-
tection.
If your SRS malfunctions, the air
bag may not inflate properly dur-
ing an accident increasing the
risk of serious injury or death.
If any of the following condi-
tions occur, your SRS is mal-
functioning:
The light does not turn on for
approximately six seconds
when the ignition switch is in
the ON position.
The light stays on after illumi-
nating for approximately six
seconds.
The light comes on while the
vehicle is in motion.
The light blinks when the
engine is running.
Have an authorized HYUNDAI
dealer inspect the SRS as soon
as possible if any of these con-
ditions occur.
WARNING
Page 94 of 603
2-67
Safety system of your vehicle
2
Additional Safety Precautions
Passengers should not move out of
or change seats while the vehicle is
moving.A passenger who is not
wearing a seat belt during a crash or
emergency stop can be thrown
against the inside of the vehicle,
against other occupants, or be ejected
from the vehicle.
Do not use any accessories on seat
belts. Devices claiming to improve
occupant comfort or reposition the
seat belt can reduce the protection
provided by the seat belt and increase
the chance of serious injury in a crash
Do not modify the front seats.
Modification of the front seats could
interfere with the operation of the sup-
plemental restraint system sensing
components or side air bags.
Do not place items under the front
seats. Placing items under the front
seats could interfere with the opera-
tion of the supplemental restraint sys-
tem sensing components and wiring
harnesses.
Do not cause impact to the doors.
Impact to the doors when the Engine
Start/Stop button is in the ON position
may cause the air bags to inflate. Modifications to accommodate
disabilities.
If you require modifica-
tion to your vehicle to accommodate
a disability, contact the HYUNDAI
Customer Connect Center at 1-877-
378-8727.
Adding equipment to or modify- ing your air bag equipped vehicle
If you modify your vehicle by changing
your vehicle's frame, bumper system,
front end or side sheet metal or ride
height, this may affect the operation of
your vehicle's air bag system.
(Continued)
If components of the air bag
system must be discarded, or if
the vehicle must be scrapped,
certain safety precautions
must be observed. Consult an
authorized HYUNDAI dealer for
the necessary information.
Failure to follow these precau-
tions could increase the risk of
personal injury.
Page 99 of 603

3-4
Convenient features of your vehicle
Remote Key (if equipped)
Your HYUNDAI uses a remote key,
which you can use to lock or unlock
a door (and trunk) and even start the
engine.
1. Door Lock
2. Door Unlock
3. Trunk Unlock
4. Panic
Locking
To lock :
1. Close all doors, engine hood andtrunk.
2. Press the Door Lock button (1) on the remote key.
3. The hazard warning lights will blink and the chime will sound
once if the lock button is pressed
once more within four seconds.
4. Make sure the doors are locked by checking the position of the door
lock button inside the vehicle.
Information
After locking the doors, if you press
the Door Lock button again within
four seconds, the hazard warning
lights will blink and the horn will
sound one time to confirm that the
doors are locked.
i
A AC
CC
CE
E S
SS
SI
IN
N G
G
Y
Y O
O U
UR
R
V
V E
EH
H I
IC
C L
LE
E
OHG040006
Do not leave the keys in your
vehicle with unsupervised chil-
dren. Unattended children
could place the key in the igni-
tion switch and may operate
power windows or other con-
trols, or even make the vehicle
move, which could result in
serious injury or death.
WARNING
Page 100 of 603
3-5
Convenient features of your vehicle
Unlocking
To unlock:
1.Press the Door Unlock button (2)on the remote key.
2.The driver’s door will unlock. The hazard warning lights will blink two
times.
If you press the Door Unlock button
again within four seconds, then all
the doors will unlock.
Information
After unlocking the doors, the doors
will lock automatically after 30 sec-
onds unless a door is opened.
Trunk unlocking
To unlock:
1. Press the Trunk Unlock button (3) on the remote key for more than
one second.
2. The hazard warning lights will blink two times.
Once the trunk is opened and then
closed, the trunk will lock automati-
cally.
Information
• After unlocking the trunk, the trunk will lock automatically.
• The word "HOLD" is written on the button to inform you that you must
press and hold the button for more
than one second.
Panic button
Press the Panic button (4) for more
than one second. The horn sounds
and hazard warning lights flash for
about 30 seconds.
To cancel the panic mode, press any
button on the remote key.
Start-up
For more information, refer to the
“Key Ignition Switch” section in chap-
ter 5.
To prevent damaging the remote
key:
• Keep the remote key away fromwater or any liquid. If the remote
key is inoperative due to expo-
sure to water or other liquids, it
will not be covered by your man-
ufacturer’s vehicle warranty.
Avoid dropping or throwing the remote key.
Protect the remote key from extreme temperatures.
NOTICE
ii
3
Page 101 of 603
3-6
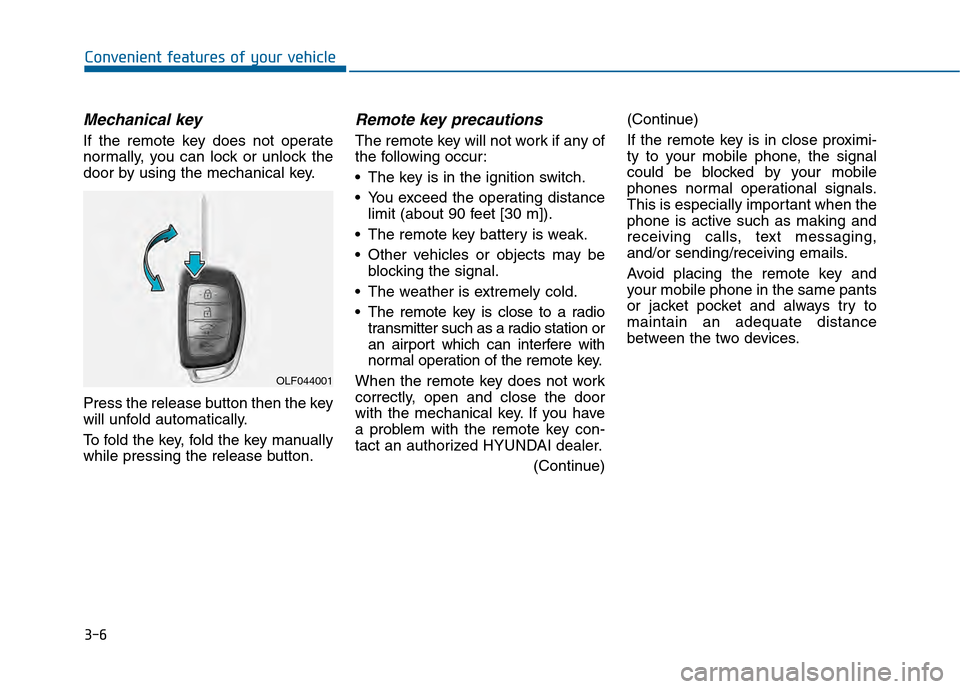
Mechanical key
If the remote key does not operate
normally, you can lock or unlock the
door by using the mechanical key.
Press the release button then the key
will unfold automatically.
To fold the key, fold the key manually
while pressing the release button.
Remote key precautions
The remote key will not work if any of
the following occur:
The key is in the ignition switch.
You exceed the operating distancelimit (about 90 feet [30 m]).
The remote key battery is weak.
Other vehicles or objects may be blocking the signal.
The weather is extremely cold.
The remote key is close to a radio transmitter such as a radio station or
an airport which can interfere with
normal operation of the remote key.
When the remote key does not work
correctly, open and close the door
with the mechanical key. If you have
a problem with the remote key con-
tact an authorized HYUNDAI dealer. (Continue)(Continue)
If the remote key is in close proximi-
ty to your mobile phone, the signal
could be blocked by your mobile
phones normal operational signals.
This is especially important when the
phone is active such as making and
receiving calls, text messaging,
and/or sending/receiving emails.
Avoid placing the remote key and
your mobile phone in the same pants
or jacket pocket and always try to
maintain an adequate distance
between the two devices.
Convenient features of your vehicle
OLF044001