Page 108 of 504
3-24
Convenient features of your vehicle
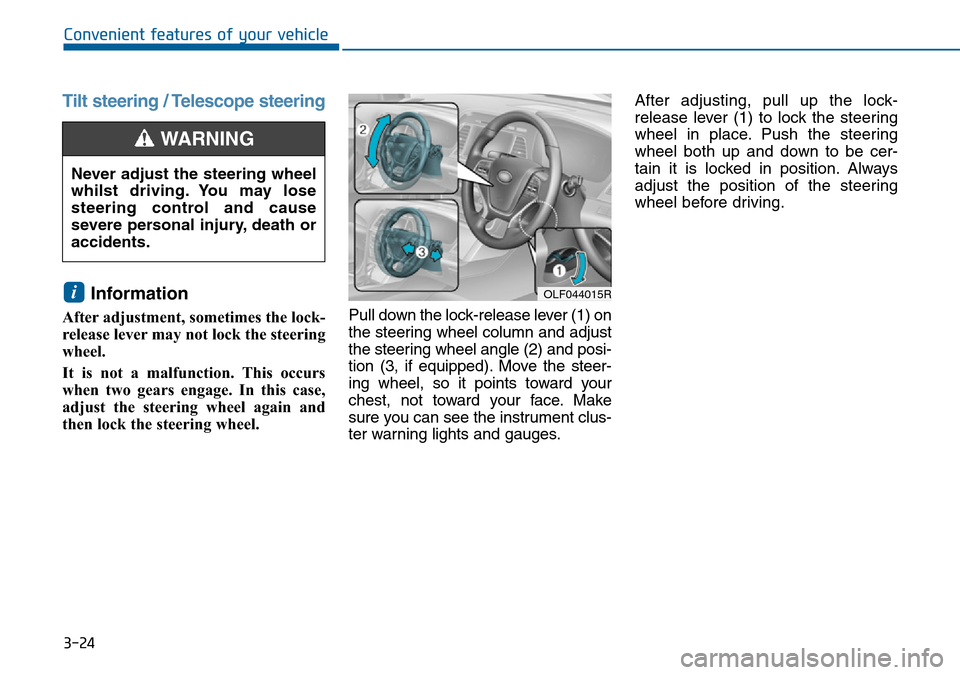
Tilt steering / Telescope steering
Information
After adjustment, sometimes the lock-
release lever may not lock the steering
wheel.
It is not a malfunction. This occurs
when two gears engage. In this case,
adjust the steering wheel again and
then lock the steering wheel.Pull down the lock-release lever (1) on
the steering wheel column and adjust
the steering wheel angle (2) and posi-
tion (3, if equipped). Move the steer-
ing wheel, so it points toward your
chest, not toward your face. Make
sure you can see the instrument clus-
ter warning lights and gauges.After adjusting, pull up the lock-
release lever (1) to lock the steering
wheel in place. Push the steering
wheel both up and down to be cer-
tain it is locked in position. Always
adjust the position of the steering
wheel before driving.
i
Never adjust the steering wheel
whilst driving. You may lose
steering control and cause
severe personal injury, death or
accidents.
WARNING
OLF044015R
Page 117 of 504
3-33
Convenient features of your vehicle
3
The ignition switch must be in the ON
position to be able to raise or lower
the windows. Each door has a power
window switch to control that door's
window. The driver has a power win-
dow lock switch which can block the
operation of passenger windows.
The power windows will operate for
approximately 30 seconds after the
ignition switch is placed in the ACC
or OFF position. However, if the front
doors are opened, the power win-
dows cannot be operated even with-
in the 30 second period.Information
• In cold and wet climates, power win-
dows may not work properly due to
freezing conditions.
• Whilst driving with the rear win-
dows down or with the sunroof (if
equipped) opened (or partially
opened), your vehicle may demon-
strate a wind buffeting or pulsation
noise. This noise is normal and can
be reduced or eliminated by taking
the following actions. If the noise
occurs with one or both of the rear
windows down, partially lower both
front windows approximately one
inch. If you experience the noise
with the sunroof open, slightly close
the sunroof.
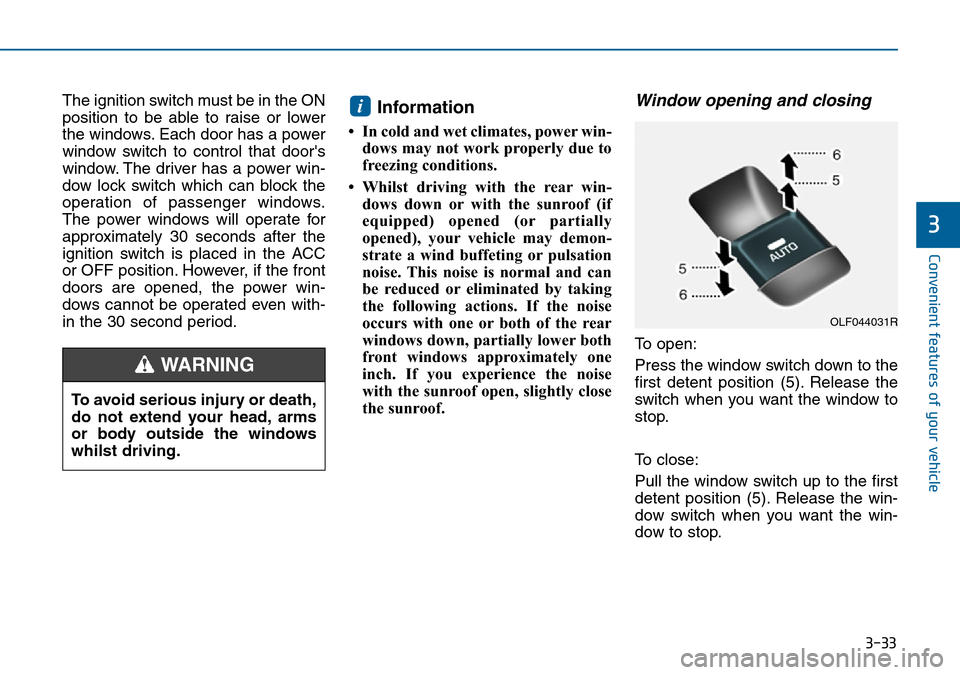
Window opening and closing
To open:
Press the window switch down to the
first detent position (5). Release the
switch when you want the window to
stop.
To close:
Pull the window switch up to the first
detent position (5). Release the win-
dow switch when you want the win-
dow to stop.
i
To avoid serious injury or death,
do not extend your head, arms
or body outside the windows
whilst driving.
WARNING
OLF044031R
Page 131 of 504
3-47
Convenient features of your vehicle
3
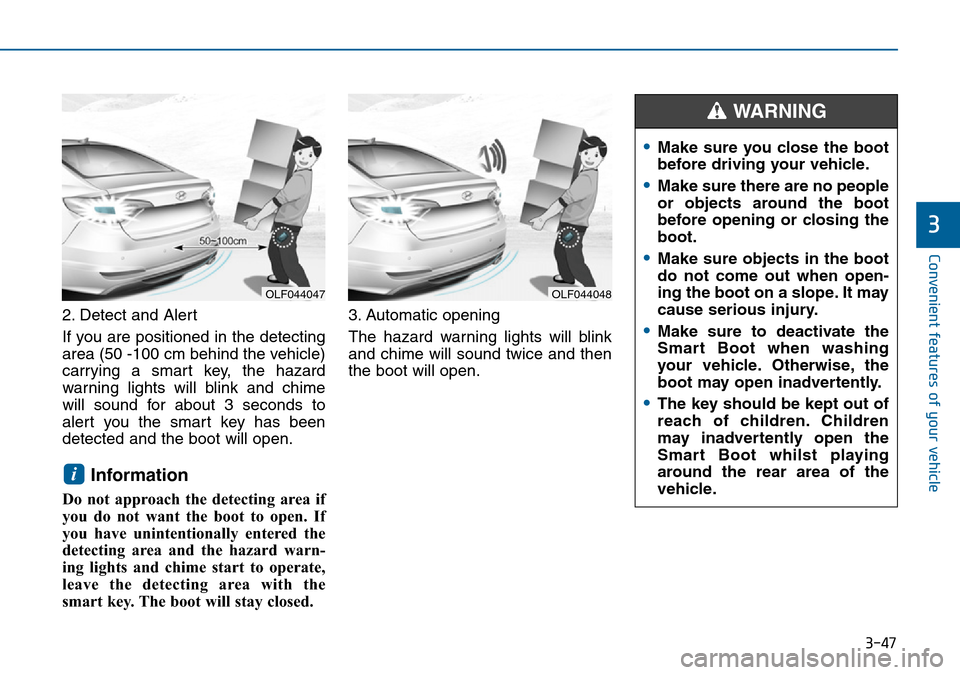
2. Detect and Alert
If you are positioned in the detecting
area (50 -100 cm behind the vehicle)
carrying a smart key, the hazard
warning lights will blink and chime
will sound for about 3 seconds to
alert you the smart key has been
detected and the boot will open.
Information
Do not approach the detecting area if
you do not want the boot to open. If
you have unintentionally entered the
detecting area and the hazard warn-
ing lights and chime start to operate,
leave the detecting area with the
smart key. The boot will stay closed. 3. Automatic opening
The hazard warning lights will blink
and chime will sound twice and then
the boot will open.
i
OLF044048OLF044047
•Make sure you close the boot
before driving your vehicle.
•Make sure there are no people
or objects around the boot
before opening or closing the
boot.
•Make sure objects in the boot
do not come out when open-
ing the boot on a slope. It may
cause serious injury.
•Make sure to deactivate the
Smart Boot when washing
your vehicle. Otherwise, the
boot may open inadvertently.
•The key should be kept out of
reach of children. Children
may inadvertently open the
Smart Boot whilst playing
around the rear area of the
vehicle.
WARNING
Page 134 of 504
3-50
Convenient features of your vehicle
Information
If the fuel filler door does not open
because ice has formed around it, tap
lightly or push on the door to break
the ice and release the door. Do not
pry on the door. If necessary, spray
around the door with an approved de-
icer fluid (do not use radiator anti-
freeze) or move the vehicle to a warm
place and allow the ice to melt.
Closing the fuel filler door
1. To install the fuel tank cap, turn it
clockwise until it “clicks” one time.
2. Close the fuel filler door until it is
latched securely.i
Petrol is highly flammable and
explosive. Failure to follow
these guidelines may result in
SERIOUS INJURY or DEATH:
•Read and follow all warnings
posted at the gas station.
•Before refuelling, note the
location of the Emergency
Petrol Shut-Off, if available, at
the gas station.
•Before touching the fuel noz-
zle, you should eliminate the
potential build-up of static
electricity by touching a metal
part of the vehicle, a safe dis-
tance away from the fuel filler
neck, nozzle, or other gas
source, with your bare hand.
(Continued)
WARNING
(Continued)
•Do not use mobile phones
whilst refuelling. Electric cur-
rent and/or electronic interfer-
ence from mobile phones can
potentially ignite fuel vapours
and cause a fire.
•Do not get back into a vehicle
once you have begun refu-
elling. You can generate a
build-up of static electricity by
touching, rubbing or sliding
against any item or fabric capa-
ble of producing static electric-
ity. Static electricity discharge
can ignite fuel vapours causing
a fire. If you must re-enter the
vehicle, you should once again
eliminate potentially danger-
ous static electricity discharge
by touching a metal part of the
vehicle, away from the fuel filler
neck, nozzle or other petrol
source, with your bare hand.
(Continued)
Page 137 of 504
3-53
Convenient features of your vehicle
3
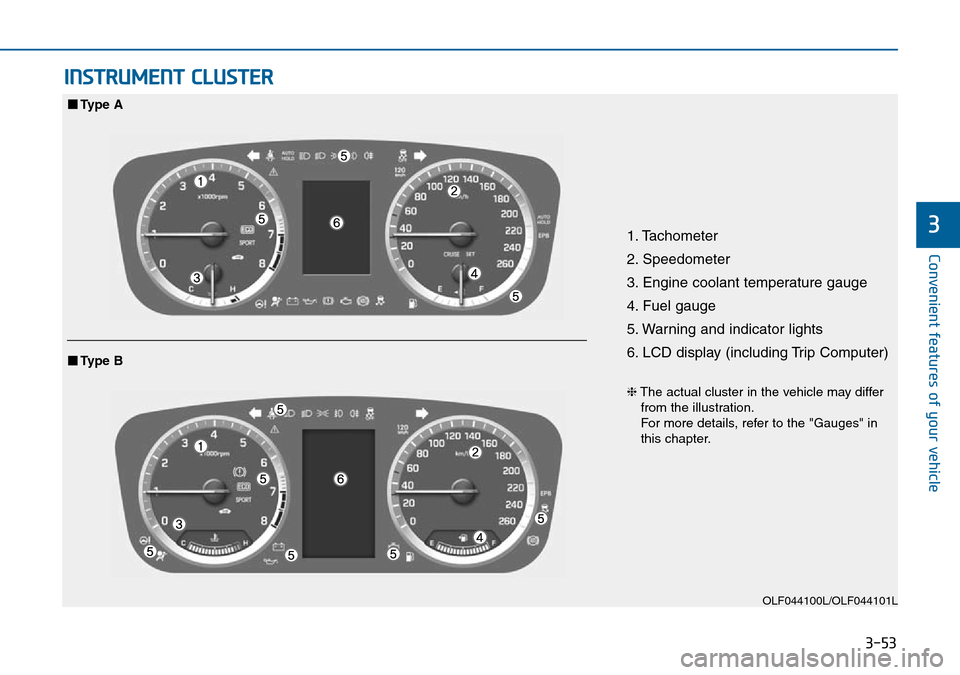
INSTRUMENT CLUSTER
1. Tachometer
2. Speedometer
3. Engine coolant temperature gauge
4. Fuel gauge
5. Warning and indicator lights
6. LCD display (including Trip Computer)
OLF044100L/OLF044101L
■Type A
❈The actual cluster in the vehicle may differ
from the illustration.
For more details, refer to the "Gauges" in
this chapter.
■Type B
Page 138 of 504
3-54
Convenient features of your vehicle
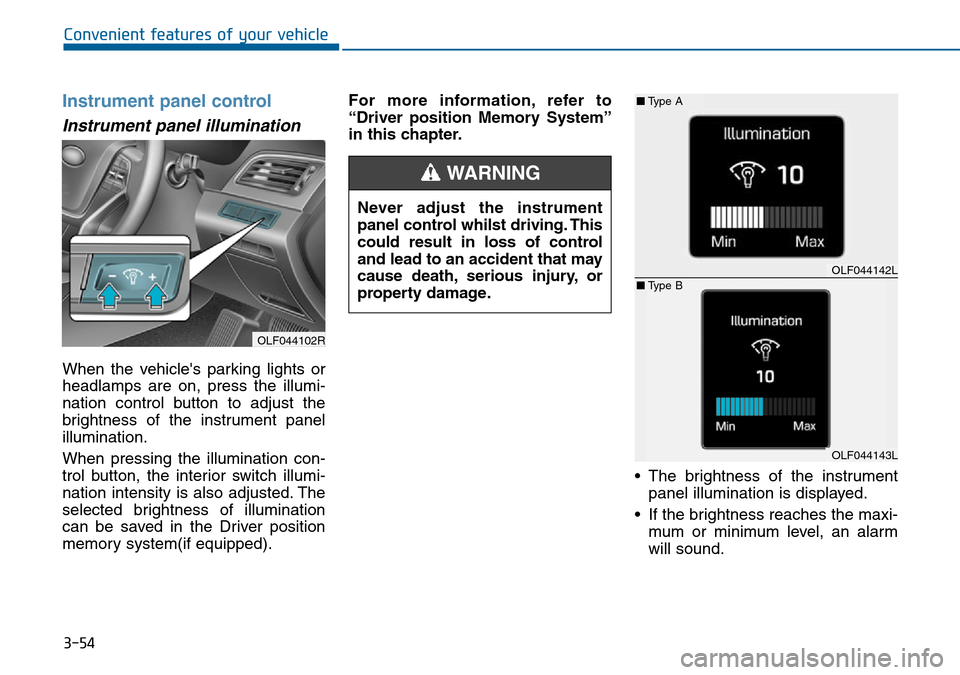
Instrument panel control
Instrument panel illumination
When the vehicle's parking lights or
headlamps are on, press the illumi-
nation control button to adjust the
brightness of the instrument panel
illumination.
When pressing the illumination con-
trol button, the interior switch illumi-
nation intensity is also adjusted. The
selected brightness of illumination
can be saved in the Driver position
memory system(if equipped).For more information, refer to
“Driver position Memory System”
in this chapter.
• The brightness of the instrument
panel illumination is displayed.
• If the brightness reaches the maxi-
mum or minimum level, an alarm
will sound. Never adjust the instrument
panel control whilst driving. This
could result in loss of control
and lead to an accident that may
cause death, serious injury, or
property damage.
WARNING
OLF044142L
OLF044143L
■Type A
■Type B
OLF044102R
Page 141 of 504
3-57
Convenient features of your vehicle
3
Information
• The fuel tank capacity is given in
chapter 8.
• The fuel gauge is supplemented by a
low fuel warning light, which will
illuminate when the fuel tank is
nearly empty.
• On inclines or curves, the fuel gauge
pointer may fluctuate or the low fuel
warning light may come on earlier
than usual due to the movement of
fuel in the tank.
Avoid driving with an extremely
low fuel level. Running out of fuel
could cause the engine to misfire
damaging the catalytic converter.
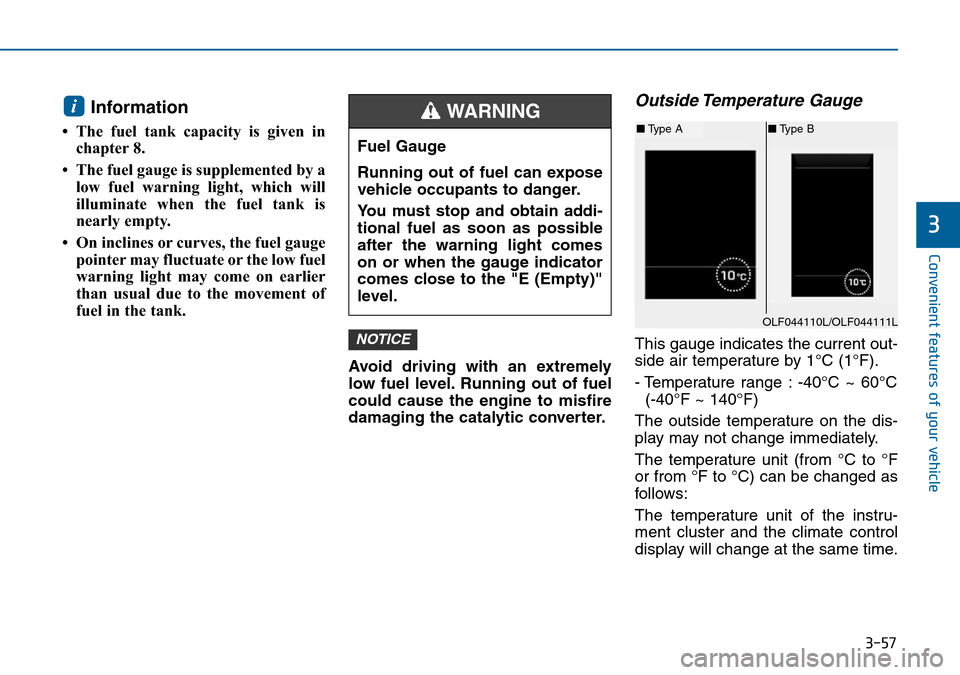
Outside Temperature Gauge
This gauge indicates the current out-
side air temperature by 1°C (1°F).
- Temperature range : -40°C ~ 60°C
(-40°F ~ 140°F)
The outside temperature on the dis-
play may not change immediately.
The temperature unit (from °C to °F
or from °F to °C) can be changed as
follows:
The temperature unit of the instru-
ment cluster and the climate control
display will change at the same time.NOTICE
i
Fuel Gauge
Running out of fuel can expose
vehicle occupants to danger.
You must stop and obtain addi-
tional fuel as soon as possible
after the warning light comes
on or when the gauge indicator
comes close to the "E (Empty)"
level.
WARNING
OLF044110L/OLF044111L
■Type A■Type B
Page 156 of 504
3-72
Convenient features of your vehicle
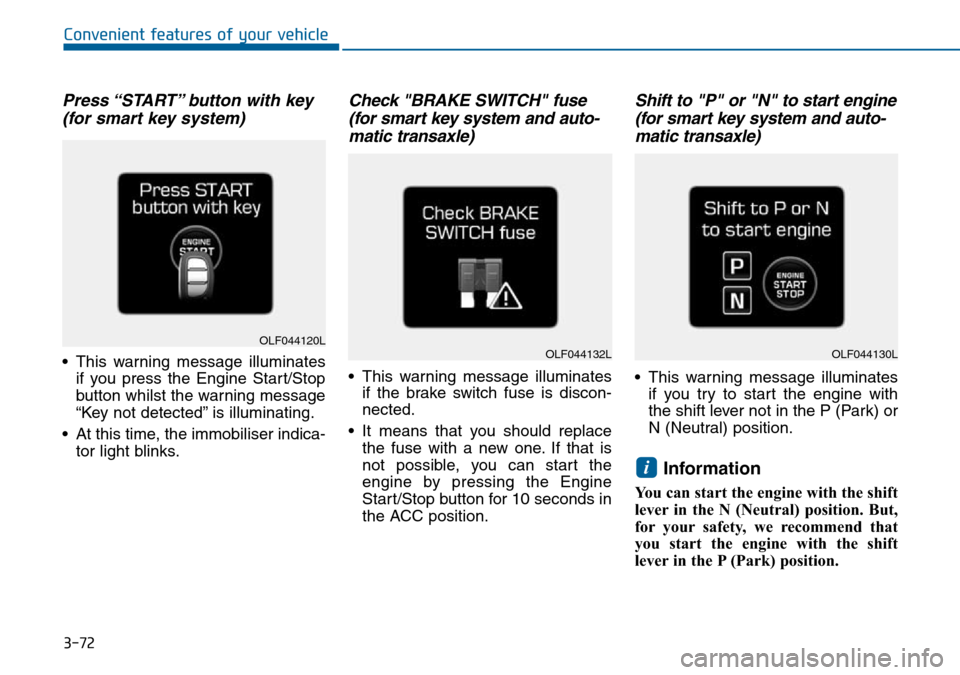
Press “START” button with key
(for smart key system)
• This warning message illuminates
if you press the Engine Start/Stop
button whilst the warning message
“Key not detected” is illuminating.
• At this time, the immobiliser indica-
tor light blinks.
Check "BRAKE SWITCH" fuse
(for smart key system and auto-
matic transaxle)
• This warning message illuminates
if the brake switch fuse is discon-
nected.
• It means that you should replace
the fuse with a new one. If that is
not possible, you can start the
engine by pressing the Engine
Start/Stop button for 10 seconds in
the ACC position.
Shift to "P" or "N" to start engine
(for smart key system and auto-
matic transaxle)
• This warning message illuminates
if you try to start the engine with
the shift lever not in the P (Park) or
N (Neutral) position.
Information
You can start the engine with the shift
lever in the N (Neutral) position. But,
for your safety, we recommend that
you start the engine with the shift
lever in the P (Park) position.
i
OLF044120LOLF044132LOLF044130L