2015 Hyundai Sonata light
[x] Cancel search: lightPage 52 of 504
2-35
Safety system of your vehicle
2
Small children are best protected
from injury in an accident when prop-
erly restrained in the rear seat by a
child restraint system that meets the
requirements of the Safety Standards
of your country. Before buying any
child restraint system, make sure that
it has a label certifying that it meets
the Safety Standard of your country.
The restraint must be appropriate for
your child's height and weight. Check
the label on the child restraint for this
information. Refer to “Child Restraint
Systems” in this chapter.Larger children
Children under age 13 and who are
too large for a booster seat must
always occupy the rear seat and use
the available lap/shoulder belts. A
seat belt should lie across the upper
thighs and be snug across the shoul-
der and chest to restrain the child
safely. Check seat belt fit periodically.
A child's squirming could put the seat
belt out of position. Children are
afforded the most safety in the event
of an accident when they are
restrained by a proper restraint sys-
tem and/or seat belts in the rear
seat.
If a larger child over age 13 must be
seated in the front seat, the child
must be securely restrained by the
available lap/shoulder belt and the
seat should be placed in the rear-
most position.
If the shoulder belt portion slightly
touches the child’s neck or face, try
placing the child closer to the centre
of the vehicle. If the shoulder belt still
touches their face or neck, they need
to be returned to an appropriate
booster seat in the rear seat.
•Always make sure larger chil-
dren’s seat belts are worn and
properly adjusted.
•NEVER allow the shoulder
belt to contact the child’s
neck or face.
•Do not allow more than one
child to use a single seat belt.
WARNING
Page 71 of 504
2-54
Safety system of your vehicle
How does the air bag system
operate?
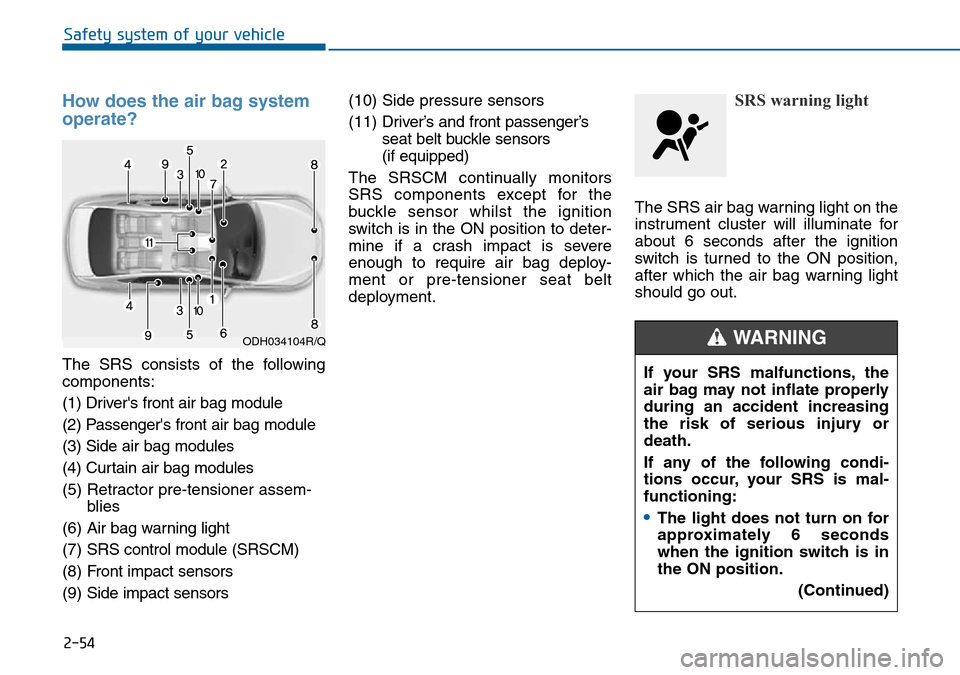
The SRS consists of the following
components:
(1) Driver's front air bag module
(2) Passenger's front air bag module
(3) Side air bag modules
(4) Curtain air bag modules
(5) Retractor pre-tensioner assem-
blies
(6) Air bag warning light
(7) SRS control module (SRSCM)
(8) Front impact sensors
(9) Side impact sensors(10) Side pressure sensors
(11) Driver’s and front passenger’s
seat belt buckle sensors
(if equipped)
The SRSCM continually monitors
SRS components except for the
buckle sensor whilst the ignition
switch is in the ON position to deter-
mine if a crash impact is severe
enough to require air bag deploy-
ment or pre-tensioner seat belt
deployment.
SRS warning light
The SRS air bag warning light on the
instrument cluster will illuminate for
about 6 seconds after the ignition
switch is turned to the ON position,
after which the air bag warning light
should go out.
If your SRS malfunctions, the
air bag may not inflate properly
during an accident increasing
the risk of serious injury or
death.
If any of the following condi-
tions occur, your SRS is mal-
functioning:
•The light does not turn on for
approximately 6 seconds
when the ignition switch is in
the ON position.
(Continued)
WARNING ODH034104R/Q
Page 72 of 504
2-55
Safety system of your vehicle
2
During a frontal collision, sensors will
detect the vehicle’s deceleration. If the
rate of deceleration is high enough,
the control unit will inflate the front air
bags, at the time and with the force
needed.
The front air bags help protect the
driver and front passenger by
responding to frontal impacts in
which seat belts alone cannot provide
adequate restraint. When needed,
the side air bags help provide protec-
tion in the event of a side impact.
• Air bags are activated (able to
inflate if necessary) only when the
ignition switch is in the ON position.
• Air bags inflate in the event of cer-
tain frontal or side collisions to help
protect the occupants from serious
physical injury.
• There is no single speed at which
the air bags will inflate. Generally,
air bags are designed to inflate
based upon the severity of a colli-
sion and its direction. These two
factors determine whether the sen-
sors produce an electronic deploy-
ment/inflation signal..• Air bag deployment depends on a
number of factors including vehicle
speed, angles of impact and the
density and stiffness of the vehicles
or objects which your vehicle
impacts during a collision. The
determining factors are not limited
to those mentioned above.
• The front air bags will completely
inflate and deflate in an instant. It is
virtually impossible for you to see
the air bags inflate during an acci-
dent. It is much more likely that you
will simply see the deflated air bags
hanging out of their storage com-
partments after the collision. (Continued)
•The light stays on after illumi-
nating for approximately 6
seconds.
•The light comes on whilst the
vehicle is in motion.
•The light blinks when the
engine is running.
We recommend that an autho-
rised HYUNDAI dealer inspect
the SRS as soon as possible if
any of these conditions occur.
Page 82 of 504
2-65
Safety system of your vehicle
2
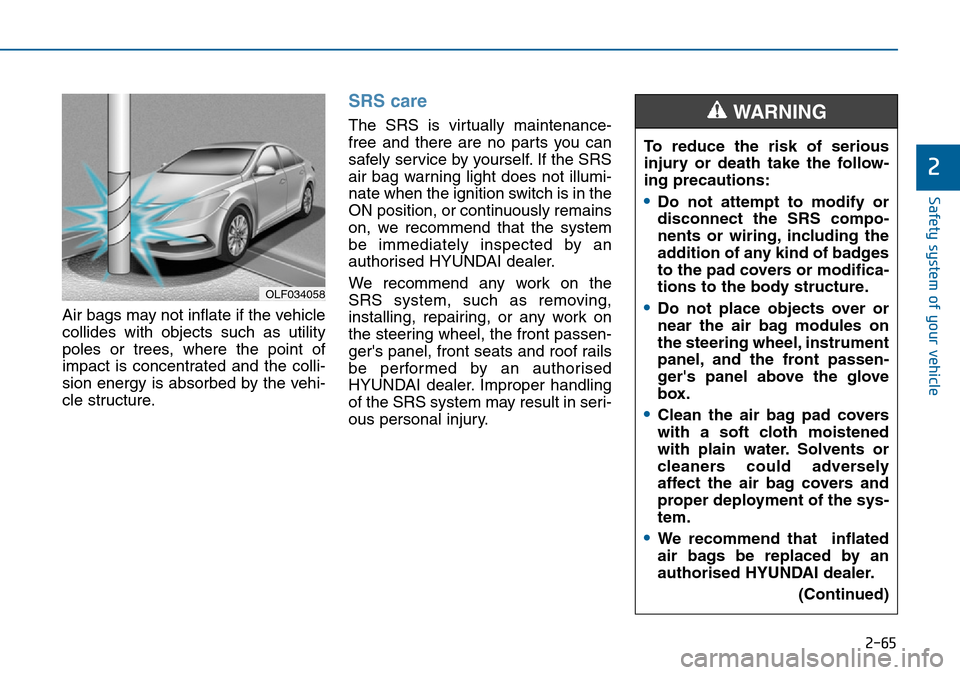
Air bags may not inflate if the vehicle
collides with objects such as utility
poles or trees, where the point of
impact is concentrated and the colli-
sion energy is absorbed by the vehi-
cle structure.
SRS care
The SRS is virtually maintenance-
free and there are no parts you can
safely service by yourself. If the SRS
air bag warning light does not illumi-
nate when the ignition switch is in the
ON position, or continuously remains
on, we recommend that the system
be immediately inspected by an
authorised HYUNDAI dealer.
We recommend any work on the
SRS system, such as removing,
installing, repairing, or any work on
the steering wheel, the front passen-
ger's panel, front seats and roof rails
be performed by an authorised
HYUNDAI dealer. Improper handling
of the SRS system may result in seri-
ous personal injury.
OLF034058
To reduce the risk of serious
injury or death take the follow-
ing precautions:
•Do not attempt to modify or
disconnect the SRS compo-
nents or wiring, including the
addition of any kind of badges
to the pad covers or modifica-
tions to the body structure.
•Do not place objects over or
near the air bag modules on
the steering wheel, instrument
panel, and the front passen-
ger's panel above the glove
box.
•Clean the air bag pad covers
with a soft cloth moistened
with plain water. Solvents or
cleaners could adversely
affect the air bag covers and
proper deployment of the sys-
tem.
•We recommend that inflated
air bags be replaced by an
authorised HYUNDAI dealer.
(Continued)
WARNING
Page 86 of 504
Information mode ............................................................3-62
User settings mode.........................................................3-64
Warning messages ..........................................................3-69
Trip computer .......................................................3-77
Overview............................................................................3-77
Trip modes ........................................................................3-77
Trip A/B .............................................................................3-77
Fuel economy ...................................................................3-78
Warning and indicator lights ..............................3-81
Warning lights ..................................................................3-81
Indicator lights .................................................................3-88
Light .......................................................................3-92
Exterior lights ..................................................................3-92
Welcome system..............................................................3-97
Interior lights ....................................................................3-99
Wipers and washers ..........................................3-104
Windscreen wipers ......................................................3-104
Windscreen washers ...................................................3-106
Driver assist system ..........................................3-108
Rearview camera...........................................................3-108
Rear parking assist system ........................................3-109
Parking assist system ..................................................3-112
Defroster .............................................................3-115
Rear window defroster ...............................................3-115
Manual climate control system........................3-117
Heating and air conditioning......................................3-118
System operation ..........................................................3-123
System maintenance ....................................................3-125
Checking the amount of air conditioner refrigerant
and compressor lubricant ...........................................3-126
Automatic climate control system ...................3-127
Automatic heating and air conditioning ..................3-128
Manual heating and air conditioning .......................3-129
System operation ..........................................................3-135
System maintenance ....................................................3-138
Checking the amount of air conditioner refrigerant
and compressor lubricant ...........................................3-138
Windscreen defrosting and defogging ...........3-139
Manual climate control system .................................3-139
Automatic climate control system ............................3-140
Defogging logic..............................................................3-141
Climate control additional features.................3-143
Automatic ventilation ...................................................3-143
Sunroof inside air recirculation.................................3-143
Storage compartment ........................................3-144
Centre console storage ...............................................3-144
Glove box ........................................................................3-145
Sunglasses holder .........................................................3-145
Multi box .........................................................................3-146
3
Page 87 of 504
Convenient features of your vehicle
3
Interior features.................................................3-147
Ashtray ............................................................................3-147
Cup holder.......................................................................3-147
Sunvisor ...........................................................................3-149
Power outlet ...................................................................3-149
Cigarette lighter ............................................................3-151
Clock .................................................................................3-152
Clothes hanger ..............................................................3-153
Floor mat anchor(s)......................................................3-153
Rear curtain....................................................................3-154
Side curtain.....................................................................3-155
3
Page 88 of 504
3-4
Convenient features of your vehicle
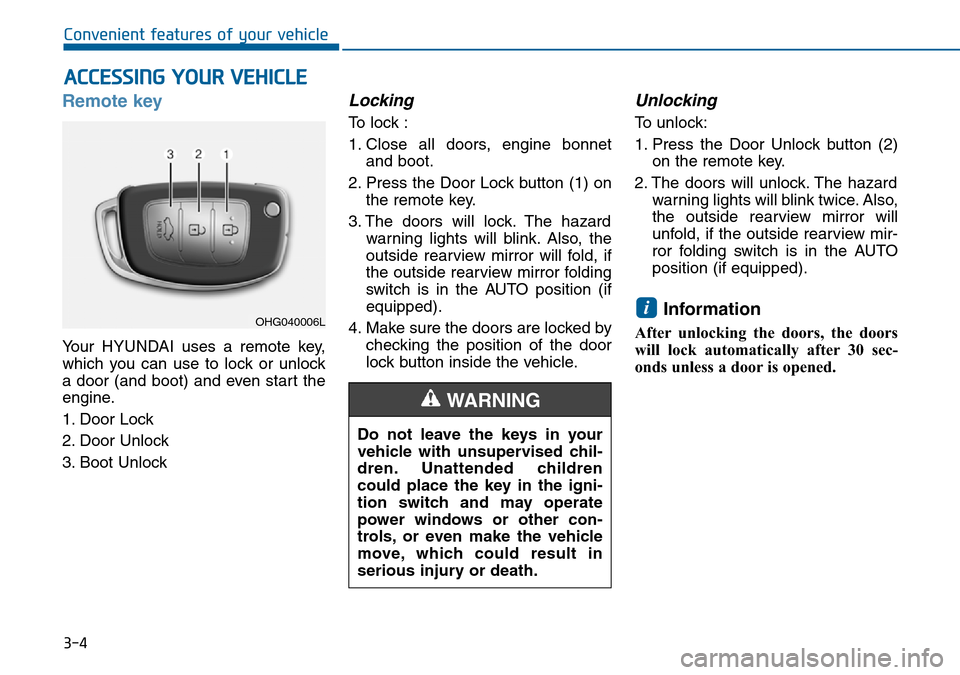
Remote key
Your HYUNDAI uses a remote key,
which you can use to lock or unlock
a door (and boot) and even start the
engine.
1. Door Lock
2. Door Unlock
3. Boot Unlock
Locking
To lock :
1. Close all doors, engine bonnet
and boot.
2. Press the Door Lock button (1) on
the remote key.
3. The doors will lock. The hazard
warning lights will blink. Also, the
outside rearview mirror will fold, if
the outside rearview mirror folding
switch is in the AUTO position (if
equipped).
4. Make sure the doors are locked by
checking the position of the door
lock button inside the vehicle.
Unlocking
To unlock:
1. Press the Door Unlock button (2)
on the remote key.
2. The doors will unlock. The hazard
warning lights will blink twice. Also,
the outside rearview mirror will
unfold, if the outside rearview mir-
ror folding switch is in the AUTO
position (if equipped).
Information
After unlocking the doors, the doors
will lock automatically after 30 sec-
onds unless a door is opened.
i
ACCESSING YOUR VEHICLE
Do not leave the keys in your
vehicle with unsupervised chil-
dren. Unattended children
could place the key in the igni-
tion switch and may operate
power windows or other con-
trols, or even make the vehicle
move, which could result in
serious injury or death.
WARNING
OHG040006L
Page 89 of 504
3-5
Convenient features of your vehicle
Boot unlocking
To unlock:
1. Press the Boot Unlock button (3)
on the remote key for more than
1 second.
2. The hazard warning lights will
blink twice. Once the boot is
opened and then closed, the boot
will lock automatically.
Information
• After unlocking the boot, the boot
will lock automatically.
• The word "HOLD" is written on the
button to inform you that you must
press and hold the button for more
than 1 second.
Start-up
For detailed information refer to “Key
Ignition Switch” in chapter 5.
To prevent damaging the remote
key:
• Keep the remote key away from
water or any liquid. If the remote
key is inoperative due to expo-
sure to water or other liquids, it
will not be covered by your man-
ufacturer’s vehicle warranty.
• Avoid dropping or throwing the
remote key.
• Protect the remote key from
extreme temperatures.
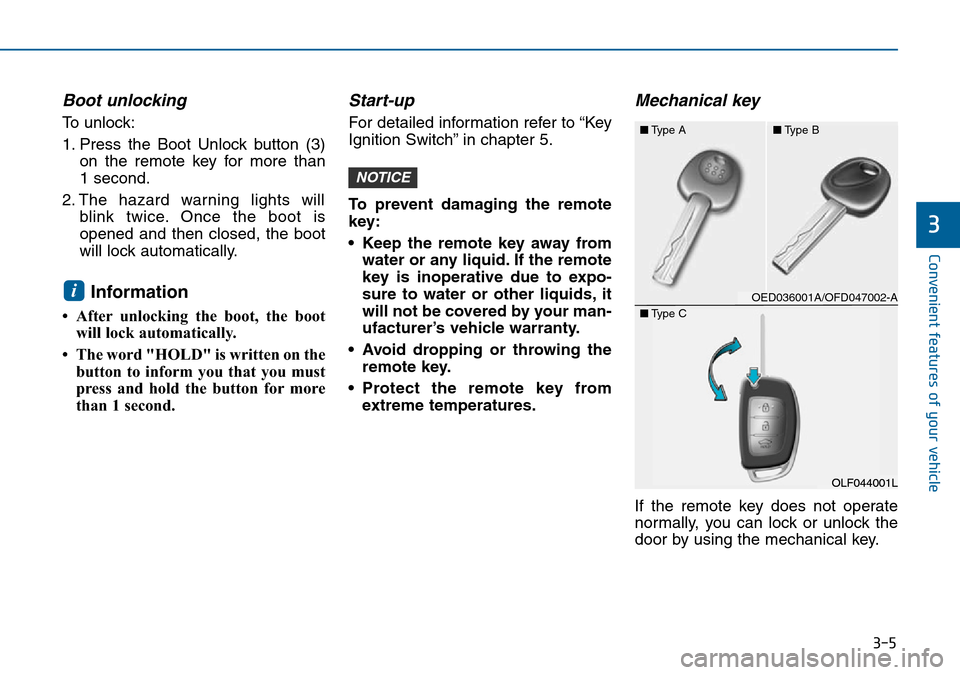
Mechanical key
If the remote key does not operate
normally, you can lock or unlock the
door by using the mechanical key.
NOTICE
i
3
OED036001A/OFD047002-A ■Type A■Type B
OLF044001L
OLF044001L ■Type C