2015 Hyundai Santa Fe Sport change time
[x] Cancel search: change timePage 149 of 785
Features of your vehicle
56 4
Electric power steering (EPS)
The power steering uses a motor to
assist you in steering the vehicle. If
the engine is off or if the power steer-
ing system becomes inoperative, the
vehicle may still be steered, but it will
require increased steering effort.
The motor driven power steering is
controlled by a power steering con-
trol unit which senses the steering
wheel torque and vehicle speed to
command the motor.
The steering becomes heavier as the
vehicle’s speed increases and
becomes lighter as the vehicle’s
speed decreases for optimum steer-
ing control.
Should you notice any change in the
effort required to steer during normal
vehicle operation, have the power
steering checked by an authorized
HYUNDAI dealer.
✽NOTICE
The following symptoms may occur
during normal vehicle operation:
• The EPS warning light does not
illuminate.
• The steering gets heavy immedi-
ately after turning the ignition
switch on. This happens as the sys-
tem performs the EPS system
diagnostics. When the diagnostics
is completed, the steering wheel
will return to its normal condition.
• A click noise may be heard from
the EPS relay after the ignition
switch is turned to the ON or
LOCK (OFF) position.
• A motor noise may be heard when
the vehicle is at a stop or at a low
driving speed.
• If the Electric Power Steering
System does not operate normally,
the warning light will illuminate on
the instrument cluster. The steer-
ing wheel may become difficult to
control or operate abnormally.
Take your vehicle to an authorized
HYUNDAI dealer and have the
vehicle checked as soon as possible.
(Continued)
STEERING WHEEL
CAUTION
• If the Electric Power Steering
System does not operate nor-
mally, the warning light will
illuminate on the instrument
cluster. The steering wheel
may become difficult to con-
trol or operate abnormally.
Take your vehicle to an
authorized HYUNDAI dealer
and have the vehicle checked
as soon as possible.
• When you operate the steer-
ing wheel in low temperature,
abnormal noise could occur. If
temperature rises, the noise
will disappear. This is a normal
condition.
• When the vehicle is stationary,
if you turn the steering wheel
all the way to the left or right
continuously, the steering
wheel becomes heavier from
the end. But this is for your
safety, not system malfunc-
tion. As time passes, the
steering wheel return to its
normal condition.
Page 166 of 785
473
Features of your vehicle
This device complies with Industry
Canada Standard RSS-210.
Operation is subject to the following
two conditions:
1. This device may not cause harm-
ful interference, and
2. This device must accept any inter-
ference received, including inter-
ference that may cause undesired
operation.
NVS
®is a registered trademark and
Z-Nav™ is a trademark of the Gentex
Corporation, Zeeland, Michigan.
HomeLink
®is a registered trademark
owned by Johnson Controls,
Incorporated, Milwaukee, Wisconsin.
Electric chromic mirror (ECM)
with HomeLink®system, compass
and Blue Link®(if equipped)
Your vehicle may be equipped with a
Gentex Automatic-Dimming Mirror
with a Z-Nav™ Electronic Compass
Display and an Integrated
HomeLink
®Wireless Control System.
During nighttime driving, this feature
will automatically detect and reduce
rearview mirror glare while the com-
pass indicates the direction the vehi-
cle is pointed. The HomeLink
®
Universal Transceiver allows you to
activate your garage door(s), electric
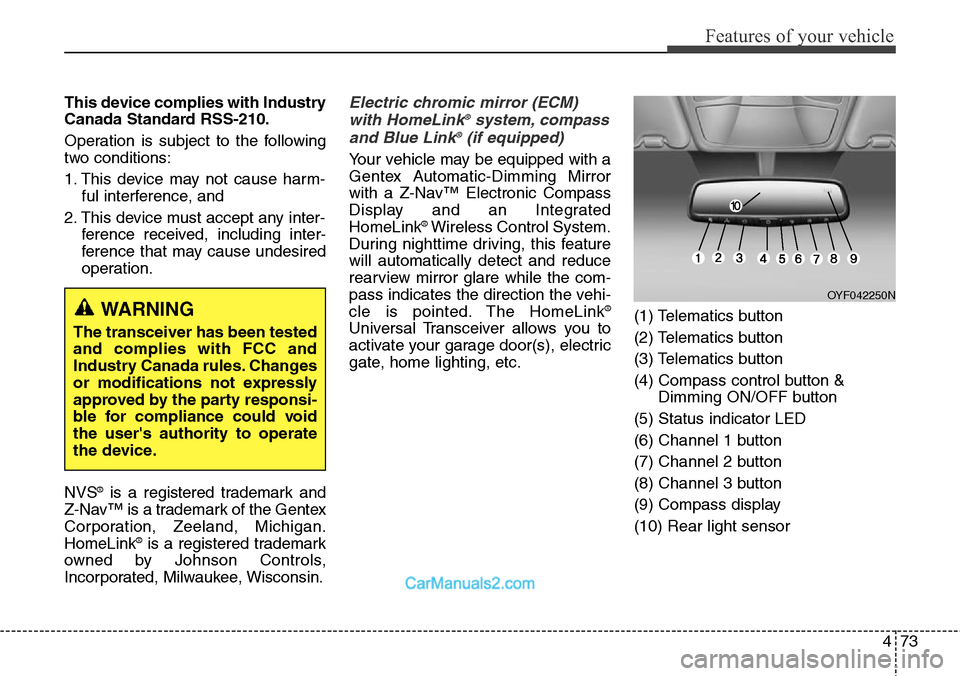
gate, home lighting, etc.(1) Telematics button
(2) Telematics button
(3) Telematics button
(4) Compass control button &
Dimming ON/OFF button
(5) Status indicator LED
(6) Channel 1 button
(7) Channel 2 button
(8) Channel 3 button
(9) Compass display
(10) Rear light sensor
WARNING
The transceiver has been tested
and complies with FCC and
Industry Canada rules. Changes
or modifications not expressly
approved by the party responsi-
ble for compliance could void
the user's authority to operate
the device.
OYF042250N
Page 171 of 785
Features of your vehicle
78 4
Programming
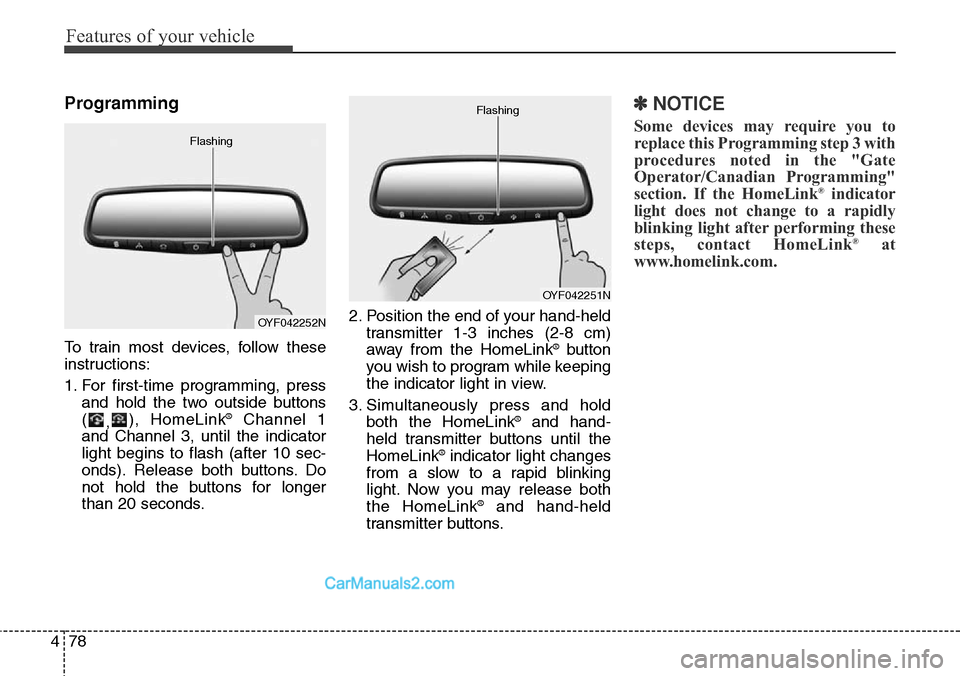
To train most devices, follow these
instructions:
1. For first-time programming, press
and hold the two outside buttons
(
,), HomeLink
®Channel 1
and Channel 3, until the indicator
light begins to flash (after 10 sec-
onds). Release both buttons. Do
not hold the buttons for longer
than 20 seconds.2. Position the end of your hand-held
transmitter 1-3 inches (2-8 cm)
away from the HomeLink
®button
you wish to program while keeping
the indicator light in view.
3. Simultaneously press and hold
both the HomeLink
®and hand-
held transmitter buttons until the
HomeLink
®indicator light changes
from a slow to a rapid blinking
light. Now you may release both
the HomeLink
®and hand-held
transmitter buttons.
✽NOTICE
Some devices may require you to
replace this Programming step 3 with
procedures noted in the "Gate
Operator/Canadian Programming"
section. If the HomeLink
®indicator
light does not change to a rapidly
blinking light after performing these
steps, contact HomeLink
®at
www.homelink.com.
OYF042252N Flashing
OYF042251N Flashing
Page 173 of 785
Features of your vehicle
80 4
Reprogramming a single HomeLink®
button
To program a device to HomeLink®
using a HomeLink®button previously
trained, follow these steps:
1.Press and hold the desired
HomeLink
®button. DO NOT
release the button.
2.The indicator light will begin to flash
after 20 seconds. Without releasing
the HomeLink
®button, proceed
with "Programming" step 2.
For questions or comments, contact
HomeLink
®at www.homelink.comor
1-800-355-3515.Erasing HomeLink
®buttons
Individual buttons cannot be erased.
However, to erase all three pro-
grammed buttons:
1. Press and hold the two outer
HomeLink
®buttons until the indi-
cator light begins to flash after 10
seconds.
2. Release both buttons. Do not hold
for longer than 20 seconds.
The Integrated HomeLink
®Wireless
Control System is now in the training
(learn) mode and can be pro-
grammed at any time following the
appropriate steps in the
Programming sections above.FCC ID: NZLTLMHL4
IC: 4112A-TLMHL4
This device complies with Industry
Canada Standard RSS-210.
Operation is subject to the following
two conditions:
1. This device may not cause harm-
ful interference, and
2. This device must accept any inter-
ference received, including inter-
ference that may cause undesired
operation.
CAUTION
The transceiver has been tested
and complies with FCC and
Industry Canada rules. Changes
or modifications not expressly
approved by the party responsi-
ble for compliance could void
the user's authority to operate
the device.
Page 184 of 785
491
Features of your vehicle
Service Mode
Service Interval
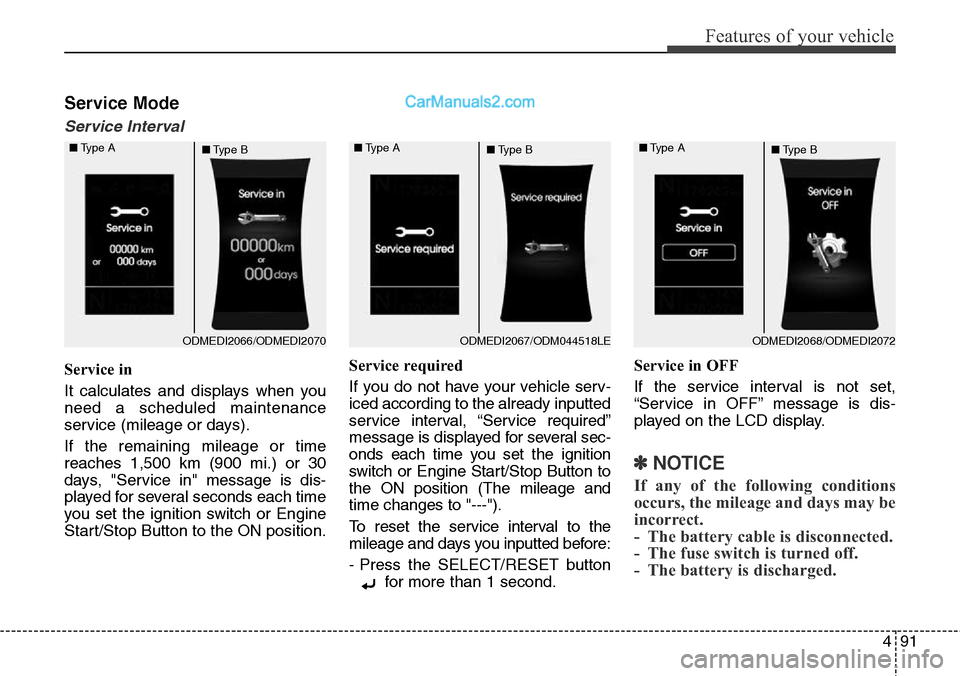
Service in
It calculates and displays when you
need a scheduled maintenance
service (mileage or days).
If the remaining mileage or time
reaches 1,500 km (900 mi.) or 30
days, "Service in" message is dis-
played for several seconds each time
you set the ignition switch or Engine
Start/Stop Button to the ON position.Service required
If you do not have your vehicle serv-
iced according to the already inputted
service interval, “Service required”
message is displayed for several sec-
onds each time you set the ignition
switch or Engine Start/Stop Button to
the ON position (The mileage and
time changes to "---").
To reset the service interval to the
mileage and days you inputted before:
- Press the SELECT/RESET button
for more than 1 second.Service in OFF
If the service interval is not set,
“Service in OFF” message is dis-
played on the LCD display.
✽NOTICE
If any of the following conditions
occurs, the mileage and days may be
incorrect.
- The battery cable is disconnected.
- The fuse switch is turned off.
- The battery is discharged.
ODMEDI2066/ODMEDI2070 ■Type A
■Type BODMEDI2067/ODM044518LE ■Type A
■Type BODMEDI2068/ODMEDI2072 ■Type A
■Type B
Page 186 of 785
493
Features of your vehicle
Two Press Unlock (if equipped)
• Off:
The two press unlock function will
be deactivated. Therefore, all doors
will unlock if the door is unlocked.
• On:
The driver’s door will unlock if the
door is unlocked. When the door is
unlocked again within 4 seconds,
all doors will unlock.
Power Tailgate (if equipped)
If this item is checked, the power tail-
gate system function will be activat-
ed.
Smart Tailgate (if equipped)
If this item is checked, the Smart
Tailgate system function will be acti-
vated.Horn Feedback (if equipped)
• Off:
The Horn feedback operation will
be deactivated.
• On:
After locking the door by pressing
the lock button on the transmitter, if
you press the lock button again
within 4 seconds, the warning
sound will operate once to indicate
that all doors are locked.Lamp
Head Lamp Delay (if equipped)
If this item is checked, the headlamp
delay and headlamp welcome func-
tion will be activated.
Welcome Light (if equipped)
If this item is checked, the welcome
light function of the puddle lamp will
be activated.
Auto Triple Turn (One-touch triple
turn signal) (if equipped)
If this item is checked, the lane
change signals will blink 3 times when
the turn signal lever is moved slightly.
One Touch Turn Signal (if equipped)
• Off:
The one touch turn signal function
will be deactivated.
• 3, 5, 7 Flashing :
The lane change signals will blink
3, 5, or 7 times when the turn sig-
nal lever is moved slightly.
For more details, refer to ''Light'' in this
chapter.
Page 189 of 785
Features of your vehicle
96 4
Warning Messages
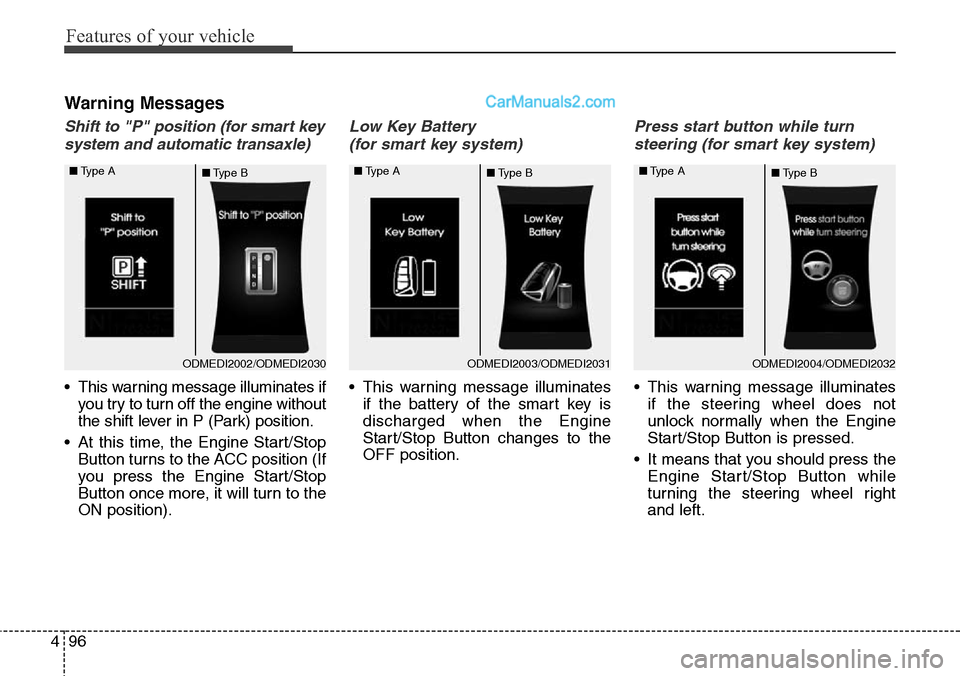
Shift to "P" position (for smart key
system and automatic transaxle)
• This warning message illuminates if
you try to turn off the engine without
the shift lever in P (Park) position.
• At this time, the Engine Start/Stop
Button turns to the ACC position (If
you press the Engine Start/Stop
Button once more, it will turn to the
ON position).
Low Key Battery
(for smart key system)
• This warning message illuminates
if the battery of the smart key is
discharged when the Engine
Start/Stop Button changes to the
OFF position.
Press start button while turn
steering (for smart key system)
• This warning message illuminates
if the steering wheel does not
unlock normally when the Engine
Start/Stop Button is pressed.
• It means that you should press the
Engine Start/Stop Button while
turning the steering wheel right
and left.
ODMEDI2003/ODMEDI2031 ■Type A
■Type BODMEDI2004/ODMEDI2032 ■Type A
■Type BODMEDI2002/ODMEDI2030 ■Type A
■Type B
Page 222 of 785
4129
Features of your vehicle
One-touch triple turn signal
(One Touch Turn Signal)
To activate the one-touch lane
change function, move the turn sig-
nal lever slightly and then release it.
The lane change signals will blink 3
(5 or 7, if equipped) times.
You can activate/deactivate the One
Touch Turn Signal function or choose
the number of blinking (3, 5, or 7)
from the User Settings Mode on the
LCD display (if equipped).
✽NOTICE
If an indicator flash is abnormally
quick or slow, a bulb may be burned
out or have a poor electrical connec-
tion in the circuit.
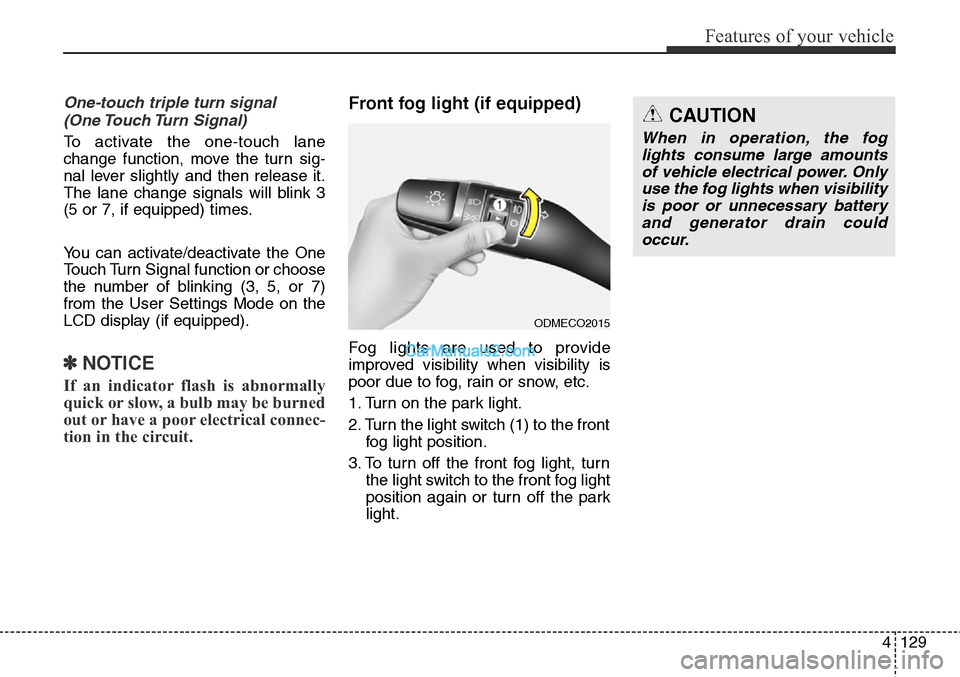
Front fog light (if equipped)
Fog lights are used to provide
improved visibility when visibility is
poor due to fog, rain or snow, etc.
1. Turn on the park light.
2. Turn the light switch (1) to the front
fog light position.
3. To turn off the front fog light, turn
the light switch to the front fog light
position again or turn off the park
light.
ODMECO2015
CAUTION
When in operation, the fog
lights consume large amounts
of vehicle electrical power. Only
use the fog lights when visibility
is poor or unnecessary battery
and generator drain could
occur.