Page 404 of 550
Driving your vehicle56
5 Remember, your vehicle does not
require extended warm-up. After the
engine has started, allow the engine to
run for 10 to 20 seconds prior to plac-
ing the vehicle in gear. In very cold
weather, however, give your engine a
slightly longer warm-up period.
Don't "labour" or "over-rev" the engine. Labouring is driving too slowly in too
high a gear resulting engine bucking. If
this happens, shift to a lower gear.
Over-revving is racing the engine
beyond its safe limit. This can be avoid-
ed by shifting at the recommended
speeds.
Use your air conditioning sparingly. The air conditioning system is operat-
ed by engine power so your fuel econ-
omy is reduced when you use it.
Open windows at high speeds can reduce fuel economy.
Fuel economy is less in crosswinds and headwinds. To help offset some of
this loss, slow down when driving in
these conditions. Keeping a vehicle in good operating con-
dition is important both for economy and
safety. Therefore, we recommend that
you contact a HYUNDAI authorised
repairer to perform scheduled inspec-
tions and maintenance
WARNING
- Engine off dur-
ing motion
Never turn the engine off to coast
down hills or anytime the vehicle is
in motion. The power steering and
power brakes will not function
properly without the engine run-
ning. Instead, keep the engine on
and downshift to an appropriate
gear for engine braking effect. In
addition, turning off the ignition
whilst driving could engage the
steering wheel lock resulting in
loss of vehicle steering which
could cause serious injury or
death.
EL(FL) UK 5.QXP 12/16/2014 8:10 PM Page 56
Page 452 of 550
What to do in an emergency30
6Using the TyreMobilityKit
1. Detach the speed restriction label
(0) from the sealant bottle (1), and
place it in a highly visible place
inside the vehicle such as on the
steering wheel to remind the driv-
er not to drive too fast.
2. Screw connection hose (9) onto the connector of the sealant bottle.
3. Ensure that button (8) on the com- pressor is not pressed.
4. Unscrew the valve cap from the valve of the defective wheel and
screw filling hose (2) of the sealant
bottle onto the valve.
5. Insert the sealant bottle into the housing of the compressor (4) so
that the bottle is upright. 6. Ensure that the compressor is
switched off, position 0. 7. Connect between compressor and
the vehicle power outlet using the
cable and connectors.
OEL069019
OEL043150R
WARNING
Only use the front passenger
side power outlet when con-
necting the power cord.
EL(FL) UK 6.QXP 12/16/2014 8:13 PM Page 30
Page 458 of 550
What to do in an emergency36
6Emergency towingIf towing is necessary, we recommend
you to have it done by a HYUNDAI
authorised repairer or a commercial
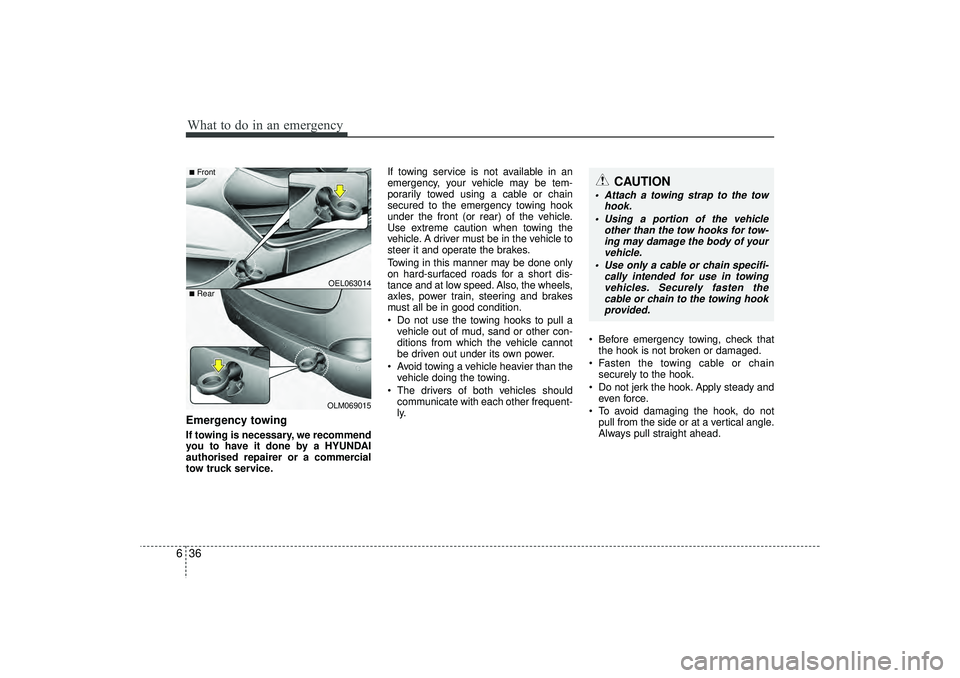
tow truck service. If towing service is not available in an
emergency, your vehicle may be tem-
porarily towed using a cable or chain
secured to the emergency towing hook
under the front (or rear) of the vehicle.
Use extreme caution when towing the
vehicle. A driver must be in the vehicle to
steer it and operate the brakes.
Towing in this manner may be done only
on hard-surfaced roads for a short dis-
tance and at low speed. Also, the wheels,
axles, power train, steering and brakes
must all be in good condition.
Do not use the towing hooks to pull a
vehicle out of mud, sand or other con-
ditions from which the vehicle cannot
be driven out under its own power.
Avoid towing a vehicle heavier than the vehicle doing the towing.
The drivers of both vehicles should communicate with each other frequent-
ly. Before emergency towing, check that
the hook is not broken or damaged.
Fasten the towing cable or chain securely to the hook.
Do not jerk the hook. Apply steady and even force.
To avoid damaging the hook, do not pull from the side or at a vertical angle.
Always pull straight ahead.
CAUTION
Attach a towing strap to the tow hook.
Using a portion of the vehicle other than the tow hooks for tow-ing may damage the body of yourvehicle.
Use only a cable or chain specifi- cally intended for use in towingvehicles. Securely fasten thecable or chain to the towing hook provided.
OEL063014OLM069015
■Front■Rear
EL(FL) UK 6.QXP 12/16/2014 8:13 PM Page 36
Page 459 of 550
637
What to do in an emergency
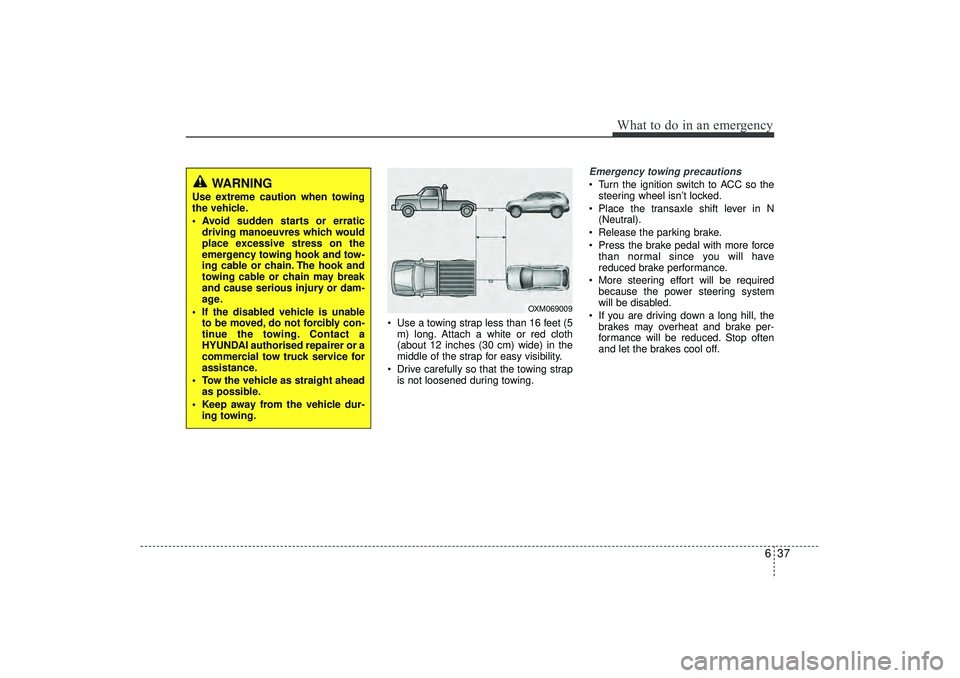
Use a towing strap less than 16 feet (5m) long. Attach a white or red cloth
(about 12 inches (30 cm) wide) in the
middle of the strap for easy visibility.
Drive carefully so that the towing strap is not loosened during towing.
Emergency towing precautions Turn the ignition switch to ACC so thesteering wheel isn’t locked.
Place the transaxle shift lever in N (Neutral).
Release the parking brake.
Press the brake pedal with more force than normal since you will have
reduced brake performance.
More steering effort will be required because the power steering system
will be disabled.
If you are driving down a long hill, the brakes may overheat and brake per-
formance will be reduced. Stop often
and let the brakes cool off.
WARNING
Use extreme caution when towing
the vehicle.
Avoid sudden starts or erratic driving manoeuvres which would
place excessive stress on the
emergency towing hook and tow-
ing cable or chain. The hook and
towing cable or chain may break
and cause serious injury or dam-
age.
If the disabled vehicle is unable to be moved, do not forcibly con-
tinue the towing. Contact a
HYUNDAI authorised repairer or a
commercial tow truck service for
assistance.
Tow the vehicle as straight ahead as possible.
Keep away from the vehicle dur- ing towing.
OXM069009
EL(FL) UK 6.QXP 12/16/2014 8:13 PM Page 37
Page 470 of 550
Maintenance10
7Whilst operating your vehicle: Note any changes in the sound of the
exhaust or any smell of exhaust fumes
in the vehicle.
Check for vibrations in the steering wheel. Notice any increased steering
effort or looseness in the steering
wheel, or change in its straight-ahead
position.
Notice if your vehicle constantly turns slightly or “pulls” to one side when trav-
elling on smooth, level road.
When stopping, listen and check for unusual sounds, pulling to one side,
increased brake pedal travel or “hard-
to-push” brake pedal.
If any slipping or changes in the oper- ation of your transaxle occurs, check
the transaxle fluid level.
Check manual transaxle operation, including clutch operation.
Check automatic transaxle P (Park) function.
Check parking brake.
Check for fluid leaks under your vehicle (water dripping from the air condition-
ing system during or after use is nor-
mal).
At least monthly: Check coolant level in the enginecoolant reservoir.
Check the operation of all exterior lights, including the stoplights, turn sig-
nals and hazard warning flashers.
Check the inflation pressures of all tyres including the spare.At least twice a year (i.e., every Spring and Fall) : Check radiator, heater and air condi- tioning hoses for leaks or damage.
Check windscreen washer spray and wiper operation. Clean wiper blades
with clean cloth dampened with wash-
er fluid.
Check headlight alignment.
Check muffler, exhaust pipes, shields and clamps.
Check the lap/shoulder belts for wear and function.
Check for worn tyres and loose wheel lug nuts.
At least once a year : Clean body and door drain holes.
Lubricate door hinges and checks, andbonnet hinges.
Lubricate door and bonnet locks and latches.
Lubricate door rubber weatherstrips.
Check the air conditioning system.
Check the power steering fluid level.
Inspect and lubricate automatic transaxle linkage and controls.
Clean battery and terminals.
Check the brake (and clutch) fluid level.
EL(FL) UK 7.QXP 3/4/2015 9:04 PM Page 10
Page 511 of 550
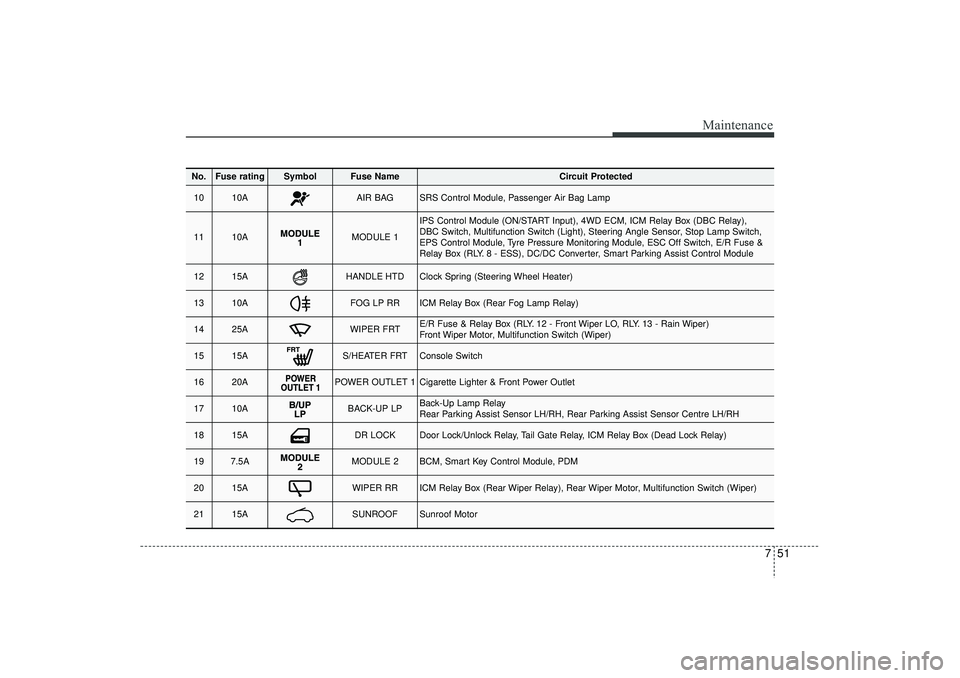
751
Maintenance
No.
Fuse rating
Symbol
Fuse Name
Circuit Protected
10
10A
AIR BAG
SRS Control Module, Passenger Air Bag Lamp
11
10A
MODULE 1
IPS Control Module (ON/START Input), 4WD ECM, ICM Relay Box (DBC Relay),
DBC Switch, Multifunction Switch (Light), Steering Angle Sensor, Stop Lamp Switch,
EPS Control Module, Tyre Pressure Monitoring Module, ESC Off Switch, E/R Fuse &
Relay Box (RLY. 8 - ESS), DC/DC Converter, Smart Parking Assist Control Module
12
15A
HANDLE HTD
Clock Spring (Steering Wheel Heater)
13
10A
FOG LP RR
ICM Relay Box (Rear Fog Lamp Relay)
14
25A
WIPER FRT
E/R Fuse & Relay Box (RLY. 12 - Front Wiper LO, RLY. 13 - Rain Wiper)
Front Wiper Motor, Multifunction Switch (Wiper)
15
15A
S/HEATER FRT
Console Switch
16
20A
POWER OUTLET 1
Cigarette Lighter & Front Power Outlet
17
10A
BACK-UP LP
Back-Up Lamp Relay
Rear Parking Assist Sensor LH/RH, Rear Parking Assist Sensor Centre LH/RH
18
15A
DR LOCK
Door Lock/Unlock Relay, Tail Gate Relay, ICM Relay Box (Dead Lock Relay)
19
7.5A
MODULE 2
BCM, Smart Key Control Module, PDM
20
15A
WIPER RR
ICM Relay Box (Rear Wiper Relay), Rear Wiper Motor, Multifunction Switch (Wiper)
21
15A
SUNROOF
Sunroof Motor
EL(FL) UK 7.QXP 3/4/2015 9:07 PM Page 51
Page:
< prev 1-8 9-16 17-24