Page 109 of 385

433
Features of your vehicle
Electric power steering (EPS)
Power steering uses the motor to assist
you in steering the vehicle. If the engine
is off or if the power steering system
becomes inoperative, the vehicle may
still be steered, but it will require
increased steering effort.
The motor driven power steering is con-
trolled by the power steering control unit
which senses the steering wheel torque
and vehicle speed to command the
motor.
The steering effort becomes heavier as
the vehicle’s speed increases and
becomes lighter as the vehicle’s speed
decreases for better control of the steer-
ing wheel.
Should you notice any change in the
effort required to steer during normal
vehicle operation, have the power steer-
ing checked by a HYUNDAI authorised
repairer.
✽NOTICE
The following symptoms may occur dur-
ing normal vehicle operation:
• The EPS warning light does not illu-
minate.
(Continued)(Continued)
• The steering effort is high immediate-
ly after turning the ignition switch on.
This happens as the EPS system per-
forms the diagnostics. When the diag-
nostics is completed, the steering
effort will return to its normal condi-
tion.
• A click noise may be heard from the
EPS relay after the ignition switch is
turned to the ON or LOCK position.
• Motor noise may be heard when the
vehicle is at a stop or at a low driving
speed.
• If the Electric Power Steering System
does not operate normally, the warn-
ing light will illuminate on the instru-
ment cluster. The steering wheel may
become difficult to control or operate
abnormally. Take your vehicle to a
HYUNDAI authorised repairer and
have the vehicle checked as soon as
possible.
• The steering effort increases if the
steering wheel is rotated continuously
when the vehicle is not in motion.
However, after a few minutes, it will
return to its normal conditions.
• When you operate the steering wheel
in low temperature, abnormal noise
could occur. If temperature rises, the
noise will disappear. This is a normal
condition.
Tilt steering
Tilt steering allows you to adjust the
steering wheel before you drive. You can
also raise it to give your legs more room
when you exit and enter the vehicle.
The steering wheel should be positioned
so that it is comfortable for you to drive,
whilst permitting you to see the instru-
ment panel warning lights and gauges.
STEERING WHEEL
WARNING
• Never adjust the angle of the
steering wheel whilst driving. You
may lose steering control and
cause severe personal injury,
death or accidents.
• After adjusting, push the steering
wheel both up and down to be
certain it is locked in position.
procarmanuals.com
Page 111 of 385

435
Features of your vehicle
Inside rearview mirror
Adjust the rearview mirror so that the
centre view through the rear window is
seen. Make this adjustment before you
start driving.
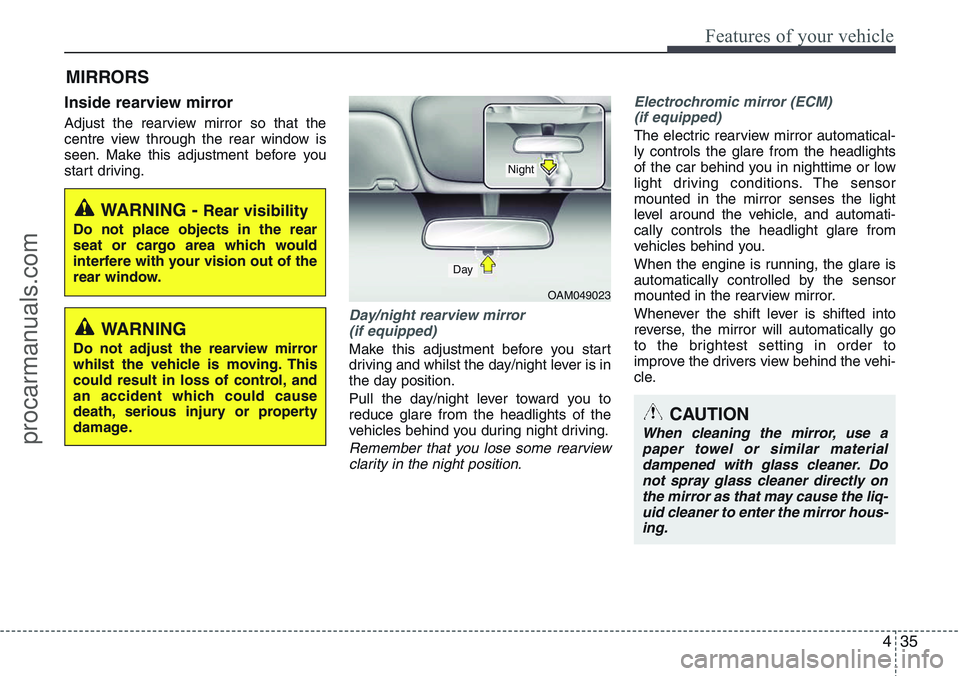
Day/night rearview mirror
(if equipped)
Make this adjustment before you start
driving and whilst the day/night lever is in
the day position.
Pull the day/night lever toward you to
reduce glare from the headlights of the
vehicles behind you during night driving.
Remember that you lose some rearview
clarity in the night position.Electrochromic mirror (ECM)
(if equipped)
The electric rearview mirror automatical-
ly controls the glare from the headlights
of the car behind you in nighttime or low
light driving conditions. The sensor
mounted in the mirror senses the light
level around the vehicle, and automati-
cally controls the headlight glare from
vehicles behind you.
When the engine is running, the glare is
automatically controlled by the sensor
mounted in the rearview mirror.
Whenever the shift lever is shifted into
reverse, the mirror will automatically go
to the brightest setting in order to
improve the drivers view behind the vehi-
cle.
MIRRORS
OAM049023
CAUTION
When cleaning the mirror, use a
paper towel or similar material
dampened with glass cleaner. Do
not spray glass cleaner directly on
the mirror as that may cause the liq-
uid cleaner to enter the mirror hous-
ing.
Day
Night
WARNING - Rear visibility
Do not place objects in the rear
seat or cargo area which would
interfere with your vision out of the
rear window.
WARNING
Do not adjust the rearview mirror
whilst the vehicle is moving. This
could result in loss of control, and
an accident which could cause
death, serious injury or property
damage.
procarmanuals.com
Page 115 of 385

439
Features of your vehicle
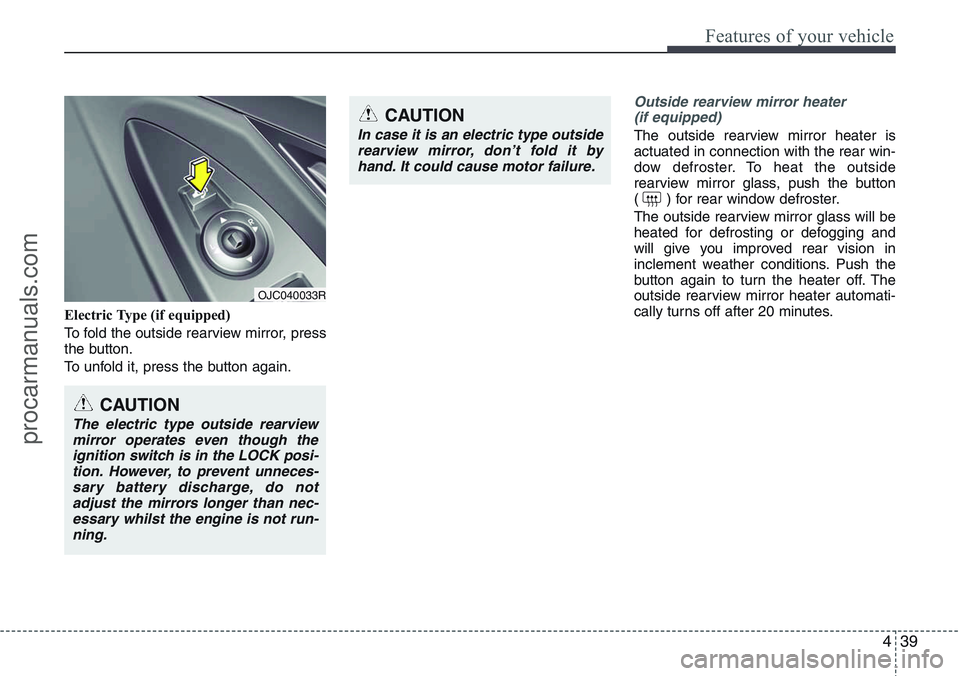
Electric Type (if equipped)
To fold the outside rearview mirror, press
the button.
To unfold it, press the button again.
Outside rearview mirror heater
(if equipped)
The outside rearview mirror heater is
actuated in connection with the rear win-
dow defroster. To heat the outside
rearview mirror glass, push the button
( ) for rear window defroster.
The outside rearview mirror glass will be
heated for defrosting or defogging and
will give you improved rear vision in
inclement weather conditions. Push the
button again to turn the heater off. The
outside rearview mirror heater automati-
cally turns off after 20 minutes.
CAUTION
In case it is an electric type outside
rearview mirror, don’t fold it by
hand. It could cause motor failure.
CAUTION
The electric type outside rearview
mirror operates even though the
ignition switch is in the LOCK posi-
tion. However, to prevent unneces-
sary battery discharge, do not
adjust the mirrors longer than nec-
essary whilst the engine is not run-
ning.
OJC040033R
procarmanuals.com
Page 116 of 385
Features of your vehicle
40 4
INSTRUMENT CLUSTER
OJC040040R/OJC040041R* The actual cluster in the vehicle may differ from the illustration.
■Type A
■ Type B1. Tachometer
2. Turn signal indicators
3. Speedometer
4. Warning and indicator lights
5. Engine temperature gauge
6. Fuel gauge
7. Odometer/Tripmeter*
* if equipped
procarmanuals.com
Page 117 of 385
441
Features of your vehicle
Instrument panel illumination
(if equipped)
Rotate the illumination control switch to
adjust the instrument panel illumination
intensity. For instrument cluster type A,
the vehicle’s parking lights or headlights
should be on to adjust the instrument
panel illumination.
Gauges
Speedometer
The speedometer indicates the forward
speed of the vehicle.
The speedometer is calibrated in kilome-
ters per hour and/or miles per hour.
Tachometer
The tachometer indicates the approxi-
mate number of engine revolutions per
minute (rpm).
Use the tachometer to select the correct
shift points and to prevent lugging and/or
over-revving the engine.
OJC040048
OJC040049
■
Kilometer per hour Kilometer per hour
- Type A
■
Mile per hour Mile per hour
- Type AOJC040046
OJC040047
■
P P
etr etr
ol ol-
Type A
- Type B
■
Diesel Diesel
- Type A
- Type B - Type B
- Type B
OYN049044R
procarmanuals.com
Page 118 of 385

Features of your vehicle
42 4
The tachometer pointer may move slight-
ly when the ignition switch is in ON posi-
tion with the engine OFF. This movement
is normal and will not affect the accuracy
of the tachometer once the engine is run-
ning.
Engine temperature gauge
This gauge shows the temperature of the
engine coolant when the ignition switch
is ON. The gauge is supplemented by a
Engine coolant temperature warning
light, which illuminates when the engine
is overheating.
Do not continue driving with an overheat-
ed engine. If your vehicle overheats, refer
to “If the engine overheats” in section 6.
CAUTION
If the gauge shows beyond the nor-
mal range area toward the “130”
position, it indicates overheating
that may damage the engine.
WARNING
Never remove the radiator cap
when the engine is hot. The engine
coolant is under pressure and
could cause severe burns. Wait
until the engine is cool before
adding coolant to the reservoir.
CAUTION
Do not operate the engine within
the tachometer's RED ZONE.
This may cause severe engine dam-
age.
OJC040050 ■Type A
■Type B
procarmanuals.com
Page 119 of 385

443
Features of your vehicle
Fuel gauge
The fuel gauge indicates the approxi-
mate amount of fuel remaining in the fuel
tank.
The fuel tank capacity is given in
section 8.The fuel gauge is supplement-
ed by a low fuel warning light, which will
illuminate when the fuel tank is nearly
empty.
On inclines or curves, the fuel gauge
may fluctuate or the low fuel warning light
may come on earlier than usual due to
the movement of fuel in the tank.
: The arrow indicates the fuel filler lid
is in the left side of the vehicle.
Odometer (km or mi.)
The odometer indicates the total dis-
tance the vehicle has been driven.
You will also find the odometer useful to
determine when periodic maintenance
should be performed.
✽NOTICE
It is forbidden to alter the odometer of
all vehicles with the intent to change the
mileage registered on the odometer. The
alteration may void your warranty cov-
erage.
WARNING- Fuel gauge
Running out of fuel can expose
vehicle occupants to danger.
You must stop and obtain addition-
al fuel as soon as possible after the
warning light comes on or when the
gauge indicator comes close to the
“0” level.
CAUTION
Avoid driving with a very low fuel
level. Running out of fuel could
cause the engine to misfire, damag-
ing the catalytic converter.OJC040051 ■Type A
■Type BOJC040100 ■Type A
■Type B
procarmanuals.com
Page 121 of 385

445
Features of your vehicle
Distance to empty (if equipped)
(km or mi.)
This mode indicates the estimated dis-
tance to empty based on the current fuel
in the fuel tank and the amount of fuel
delivered to the engine. When the
remaining distance is below 50 km (30
miles), “---” will be displayed.
The meter’s working range is from 50 to
999 km (30 to 999 miles).Average fuel consumption (if equipped)
(l/100 km or MPG)
This mode calculates the average fuel
consumption from the total fuel used and
the distance since the last average con-
sumption reset. The total fuel used is cal-
culated from the fuel consumption input.
For an accurate calculation, drive more
than 50 m (0.03 miles).
Pressing the RESET button for more
than 1 second, when the average fuel
consumption is being displayed, clears
the average fuel consumption to zero (--
.-).Average refuel consumption
(l/100 km or MPG)
This mode calculates the average fuel
consumption from the total fuel used and
the distance since the last average con-
sumption reset. The total fuel used is cal-
culated from the fuel consumption input.
For an accurate calculation, drive more
than 50 m (0.03 miles).
The average refuel consumption resets
to zero (--.-) when the vehicle is refueled.
OJC040102 ■Type A
■Type BOJC040103 ■Type A
■Type BOJC040107 ■Type A
■Type B
procarmanuals.com