2015 HYUNDAI IX20 ECO mode
[x] Cancel search: ECO modePage 170 of 385

Features of your vehicle
94 4
Temperature conversion
If the battery has been discharged or dis-
connected, the temperature mode dis-
play will reset to Centigrade.
This is normal condition. You can switch
the temperature mode between
Centigrade to Fahrenheit as follows:
Whilst pressing the AUTO button, press
the OFF button for 3 seconds or more.
The display will change from Centigrade
to Fahrenheit, or from Fahrenheit to
Centigrade.
Air intake control
This is used to select outside (fresh) air
position or recirculated air position.
To change the air intake control position,
push the control button.Recirculated air position
The indicator light on the
button illuminates when the
recirculated air position is
selected.
With the recirculated air
position selected, air from
passenger compartment
will be drawn through the
heating system and heated
or cooled according to the
function selected.
Outside (fresh) air position
The indicator light on the
button does not illuminate
when the outside (fresh) air
position is selected.
With the outside (fresh) air
position selected, air enters
the vehicle from outside and
is heated or cooled accord-
ing to the function selected.
OJC040072 ■Type A
■Type B
procarmanuals.com
Page 185 of 385

4109
Features of your vehicle
If necessary, contact a HYUNDAI autho-
rised repairer to obtain a luggage net.
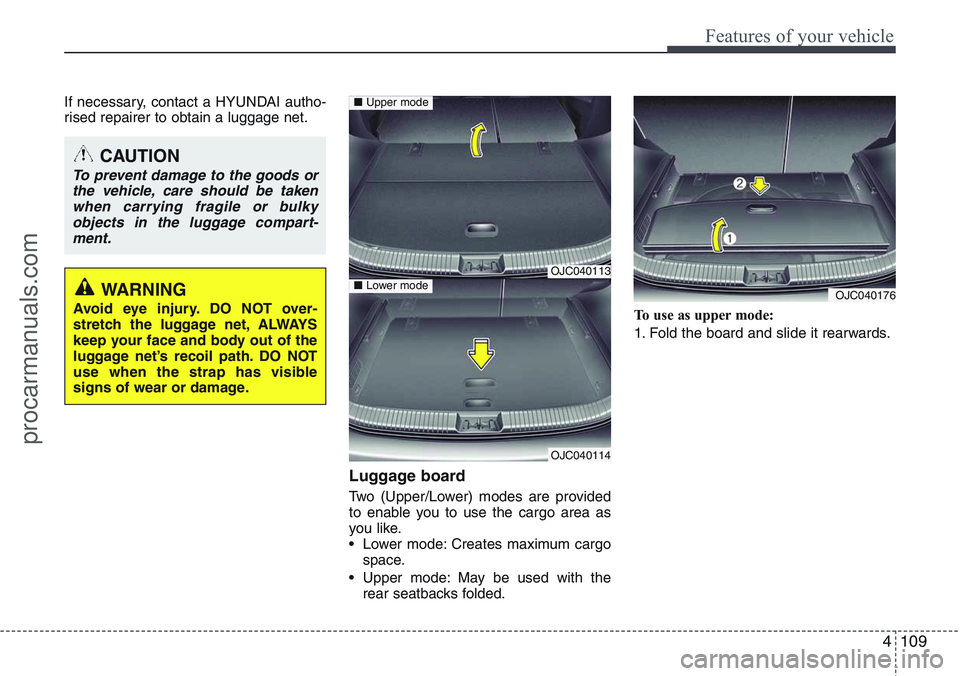
Luggage board
Two (Upper/Lower) modes are provided
to enable you to use the cargo area as
you like.
• Lower mode: Creates maximum cargo
space.
• Upper mode: May be used with the
rear seatbacks folded.To use as upper mode:
1. Fold the board and slide it rearwards.
CAUTION
To prevent damage to the goods or
the vehicle, care should be taken
when carrying fragile or bulky
objects in the luggage compart-
ment.
WARNING
Avoid eye injury. DO NOT over-
stretch the luggage net, ALWAYS
keep your face and body out of the
luggage net’s recoil path. DO NOT
use when the strap has visible
signs of wear or damage.OJC040176
OJC040113
OJC040114
■Upper mode
■Lower mode
procarmanuals.com
Page 188 of 385

Features of your vehicle
112 4
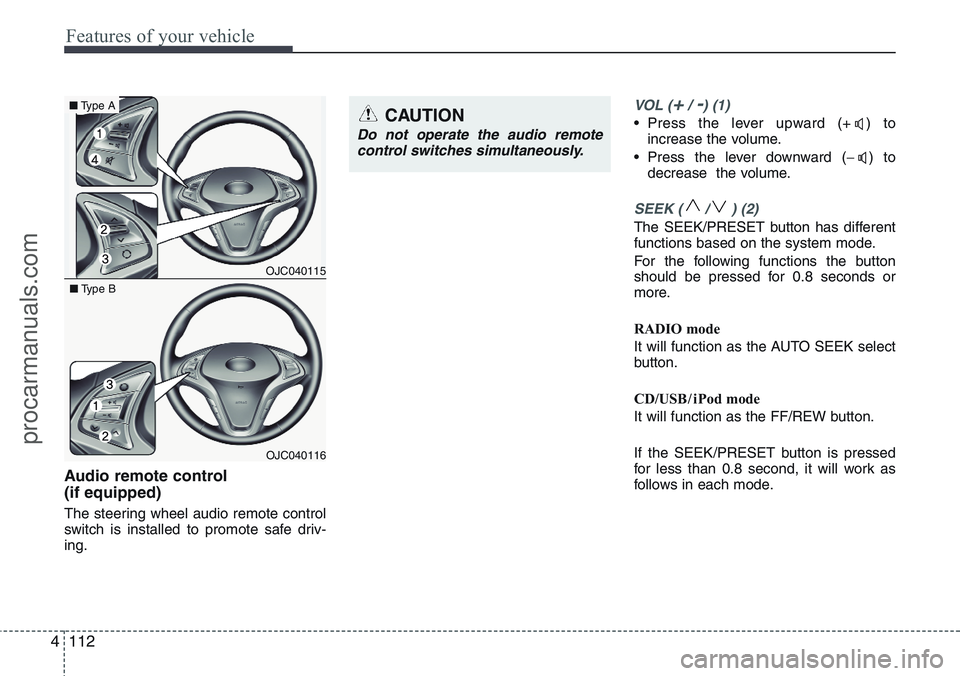
Audio remote control
(if equipped)
The steering wheel audio remote control
switch is installed to promote safe driv-
ing.
VOL (+/ -) (1)
• Press the lever upward (+ ) to
increase the volume.
• Press the lever downward (−) to
decrease the volume.
SEEK ( / ) (2)
The SEEK/PRESET button has different
functions based on the system mode.
For the following functions the button
should be pressed for 0.8 seconds or
more.
RADIO mode
It will function as the AUTO SEEK select
button.
CD/USB / i Pod mode
It will function as the FF/REW button.
If the SEEK/PRESET button is pressed
for less than 0.8 second, it will work as
follows in each mode.
CAUTION
Do not operate the audio remote
control switches simultaneously.
OJC040115
■Type A
OJC040116 ■Type B
procarmanuals.com
Page 193 of 385

4117
Features of your vehicle
Using RADIO, SETUP, VOLUME
and AUDIO CONTROL
1. Button
Turns on FM mode. Each press of the
button will change the band in
the order of FM1
➟FM2➟FMA➟FM1...
2. Button
Turns on AM mode. Each press of the
button will change the band in
the order of AM
➟AMA➟AM...
3. Button
TA (Traffic announcement) Channels in
FM, CD, AUX mode, turns on/off the
reception of TA channels of RDS.
4. Button
• When the is pressed, it will
automatically tune to the next lower
station.
• When the is pressed, it will
automatically tune to the next higher
station.
5. Button & Knob
• Turns the audio system on/off when
the ignition switch is on ACC or ON.
• If the knob is turned clockwise/counter-
clockwise, the volume will increase
/decrease.
• Depending on the model if the ignition
switch is not on ACC or ON position.
the “Battery Discharge” warning
appears on LCD after 10 seconds of
power-up, and automatically turns off
after 1 hours of operation.
6. PRESET Buttons
• Press ~ buttons less
than 0.8 seconds to play the station
saved in each button.
• Press ~ buttons more
than 0.8 seconds or longer to save the
current station to the respective button
with a beep.
7. Button
Turn the LCD Display&Backlight ON/OFF
when button press.DARK
DARK
61
61
VOLPOWER
SEEK
TRACK
SEEK
TRACKSEEK
TA
AM
AM
FM
FM
JC_PA710JCE_AUDIO
JC_PA710JCE_AUDIO
procarmanuals.com
Page 194 of 385

Features of your vehicle
118 4
8. Button
When the button is pressed, it automati-
cally selects and saves channels with
high reception rate to PRESET buttons
~ and plays the channel
saved in PRESET1. If no channel is
saved after AST, it will play the previous
channel.
• Saves only to the Preset memory
~ of FMA or AMA mode
in some models.
9. Button
• Moves Button when search-
ing PTY in RDS Broadcasting Program
Type selection.
• Moves button when search-
ing PTY in RDS Broadcasting Program
Type selection.
10. Button
Press this button to enter SETUP mode,
If no action is taken for 8 seconds, it will
return to previous mode.
In “SETUP” mode, rotate the TUNE knob
to move the cursor between items, and
push the TUNE knob to select.
• SCROLL
Select whether long file names are
scrolled continuously (On) or just once
(Off).• SDVC (Speed Dependent Volume
Control)
Select this item to turn the SDVC feature
On or Off. If it is turned ON, volume level
is adjusted automatically according to
the vehicle speed.
• MEDIA
Select default display of MP3 play infor-
mation. “Folder/File” or “Artist/Title” can
be selected.
SETUP
PTY
FLDR
PTY
FLDRPTY
61
61
AST
JC_PA710JCE_AUDIO
procarmanuals.com
Page 197 of 385

4121
Features of your vehicle
Using CD Player
1. Button (CD)
If the CD is loaded, turns to CD mode.
If no CD, it displays “No Media” for 3 sec-
onds and returns to the previous mode.
2. Button
• Press button for less than
0.8 seconds to play from the beginning
of current song.
• Press button for less than
0.8 seconds and press again within
1 second to play the previous song.
• Press button for 0.8 seconds
or longer to initiate reverse direction
high speed sound search of current
song.
• Press button for less than
0.8 seconds to play the next song.• Press button for 0.8 seconds
or longer to initiate forward direction
high speed sound search of current
song.
3. Button (RANDOM)
Press this button for less than 0.8 sec-
onds to activate ‘RDM’ mode and more
than 0.8 seconds to activate ‘ALL RDM’
mode.
• RDM : Only files/tracks in a folder/disc
are played back in a random
sequence.
• ALL RDM (MP3/WMA Only) : All files in
a disc are played back in the random
sequence.
4. Button (REPEAT)
Press this button for less than 0.8 sec-
onds to activate 'RPT' mode and more
than 0.8 seconds to activate 'FLD RPT'
mode.
• RPT : Only a track (file) is repeatedly
played back.
• FLD RPT (MP3/WMA Only) : Only files
in a folder are repeatedly played back.
5. Button
Play each song in the CD for 10 seconds.
To cancel SCAN Play, press this button
again.
5
2
1
SEEK
TRACK
SEEK
TRACK
SEEK
TRACK
SEEK
TRACK
SEEK
TRACKTRACK
MEDIA
JC_PA710JCE_AUDIO
JC_PA710JCE_AUDIO
procarmanuals.com
Page 198 of 385

Features of your vehicle
122 4
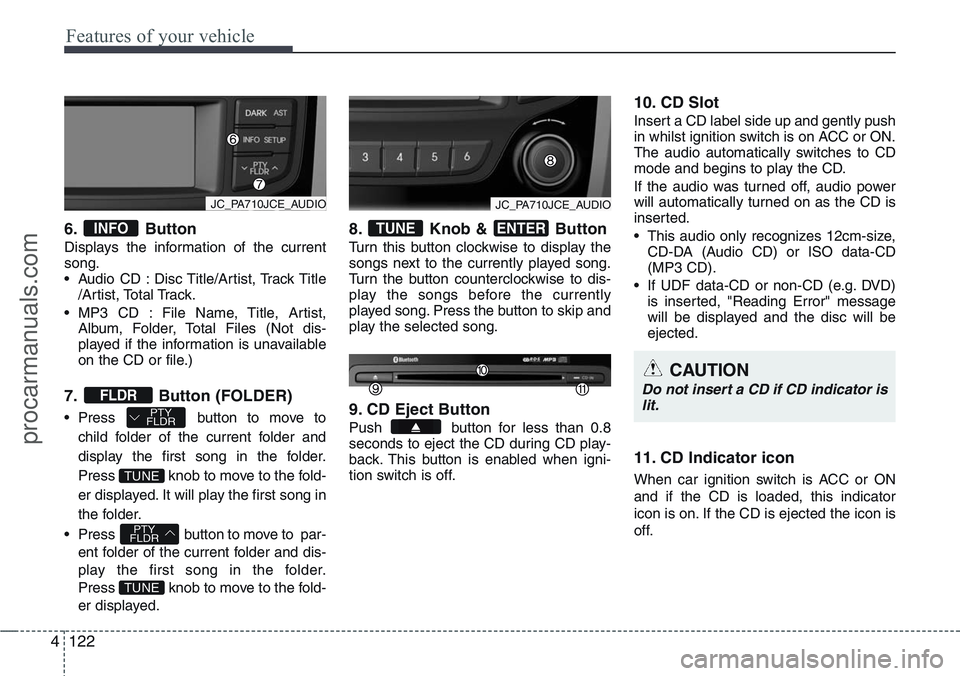
6. Button
Displays the information of the current
song.
• Audio CD : Disc Title/Artist, Track Title
/Artist, Total Track.
• MP3 CD : File Name, Title, Artist,
Album, Folder, Total Files (Not dis-
played if the information is unavailable
on the CD or file.)
7. Button (FOLDER)
• Press button to move to
child folder of the current folder and
display the first song in the folder.
Press knob to move to the fold-
er displayed. It will play the first song in
the folder.
• Press button to move to par-
ent folder of the current folder and dis-
play the first song in the folder.
Press knob to move to the fold-
er displayed.
8. Knob & Button
Turn this button clockwise to display the
songs next to the currently played song.
Turn the button counterclockwise to dis-
play the songs before the currently
played song. Press the button to skip and
play the selected song.
9. CD Eject Button
Push button for less than 0.8
seconds to eject the CD during CD play-
back. This button is enabled when igni-
tion switch is off.
10. CD Slot
Insert a CD label side up and gently push
in whilst ignition switch is on ACC or ON.
The audio automatically switches to CD
mode and begins to play the CD.
If the audio was turned off, audio power
will automatically turned on as the CD is
inserted.
• This audio only recognizes 12cm-size,
CD-DA (Audio CD) or ISO data-CD
(MP3 CD).
• If UDF data-CD or non-CD (e.g. DVD)
is inserted, "Reading Error" message
will be displayed and the disc will be
ejected.
11. CD Indicator icon
When car ignition switch is ACC or ON
and if the CD is loaded, this indicator
icon is on. If the CD is ejected the icon is
off.
ENTERTUNE
TUNE
PTY
FLDR
TUNE
PTY
FLDRFLDR
INFO
CAUTION
Do not insert a CD if CD indicator is
lit.
JC_PA710JCE_AUDIOJC_PA710JCE_AUDIO
procarmanuals.com
Page 200 of 385

Features of your vehicle
124 4
CAUTION IN USING USB
DEVICE
• To use an external USB device,
make sure the device is not con-
nected when starting up the vehi-
cle. Connect the device after
starting up.
• If you start the engine when the
USB device is connected, it may
damage the USB device. (USB
flashdrives are very sensitive to
electric shock.)
• If the engine is started up or
turned off whilst the external USB
device is connected, the external
USB device may not work.
• It may not play inauthentic MP3 or
WMA files.
1) It can only play MP3 files with
the compression rate between
8Kbps~320Kbps.
2) It can only play WMA music
files with the compression rate
between 8Kbps~320Kbps.
• Take precautions for static elec-
tricity when connecting or dis-
connecting the external USB
device.
(Continued)
(Continued)
• An encrypted MP3 PLAYER is not
recognizable.
• Depending on the condition of
the external USB device, the con-
nected external USB device can
be unrecognizable.
• When the formatted byte/sector
setting of External USB device is
not either 512BYTE or 2048BYTE,
then the device will not be recog-
nized.
• Use only a USB device formatted
to FAT 12/16/32.
• USB devices without USB I/F
authentication may not be recog-
nizable.
• Make sure the USB connection
terminal does not come in con-
tact with the human body or other
objects.
• If you repeatedly connect or dis-
connect the USB device in a short
period of time, it may break the
device.
• You may hear a strange noise
when connecting or disconnect-
ing a USB device.
(Continued)(Continued)
• If you disconnect the external
USB device during playback in
USB mode, the external USB
device can be damaged or may
malfunction. Therefore, discon-
nect the external USB device
when the audio is turned off or in
another mode. (e.g, Radio or CD)
• Depending on the type and
capacity of the external USB
device or the type of the files
stored in the device, there is a dif-
ference in the time taken for
recognition of the device.
• Do not use the USB device for
purposes other than playing
music files.
• Use of USB accessories such as
rechargers or heaters using USB
I/F may lower performance or
cause trouble.
• If you use devices such as a USB
hub purchased separately, the
vehicle’s audio system may not
recognize the USB device. In that
case, connect the USB device
directly to the multimedia termi-
nal of the vehicle.
(Continued)
procarmanuals.com