Page 326 of 385
715
Maintenance
Changing the coolant
Have the coolant changed by a
HYUNDAI authorised repairer according
to the Maintenance schedule.
WARNING - Radiator cap
Do not remove the radiator cap
when the engine and radiator are
hot. Scalding hot coolant and
steam may blow out under pres-
sure causing serious injury.
CAUTION
Put a thick cloth or fabric around
the radiator cap before refilling the
coolant in order to prevent the
coolant from overflowing into
engine parts such as the alternator.
WARNING -Coolant
• Do not use radiator coolant or
antifreeze in the washer fluid
reservoir.
• Radiator coolant can severely
obscure visibility when sprayed
on the windscreen and may
cause loss of vehicle control or
damage to paint and body trim.
OYN079007
procarmanuals.com
Page 327 of 385

Maintenance
16 7
BRAKE/CLUTCH FLUID (IF EQUIPPED)
Checking the brake/clutch fluid
level
Check the fluid level in the reservoir peri-
odically. The fluid level should be
between MAX (Maximum) and MIN
(Minimum) marks on the side of the
reservoir.
Before removing the reservoir cap and
adding brake/clutch fluid, clean the area
around the reservoir cap thoroughly to
prevent brake/clutch fluid contamination.If the level is low, add fluid to the MAX
(Maximum) level. The level will fall with
accumulated mileage. This is a normal
condition associated with the wear of the
brake linings and/or clutch disc (if
equipped). If the fluid level is excessively
low, have the brake system checked by a
HYUNDAI authorised repairer.
Use only the specified brake/clutch fluid.
(Refer to “Recommended lubricants or
capacities” in section 8.)
Never mix different types of fluid.
WARNING - Loss of brake
fluid
In the event the brake system
requires frequent additions of fluid,
the vehicle should be inspected by
a HYUNDAI authorised repairer.
WARNING - Brake/clutch
fluid
When changing and adding
brake/clutch fluid, handle it careful-
ly. Do not let it come in contact with
your eyes. If brake/clutch fluid
come in contact with your eyes,
immediately flush them with a large
quantity of fresh tap water. Have
your eyes examined by a doctor as
soon as possible.
CAUTION
Do not allow brake/clutch fluid to
contact the vehicle's body paint, as
paint damage will result.
Brake/clutch fluid, which has been
exposed to open air for an extended
time should never be used as its
quality cannot be guaranteed. It
should be properly disposed. Don't
put in the wrong kind of fluid. A few
drops of mineral-based oil, such as
engine oil, in your brake/clutch sys-
tem can damage brake/clutch sys-
tem parts.
OYN079009R
procarmanuals.com
Page 328 of 385

717
Maintenance
AUTOMATIC TRANSAXLE FLUID (IF EQUIPPED)
Checking the automatic transaxle
fluid level
The automatic transaxle fluid level
should be checked regularly.
Keep the vehicle on the level ground with
the parking brake applied and check the
fluid level according to the following pro-
cedure.
1. Place the shift lever in N (Neutral) posi-
tion and confirm the engine is running
at normal idle speed.
2. After the transaxle is warmed up suffi-
ciently [fluid temperature 70~80°C
(158~176°F)], for example by 10 min-
utes usual driving, move the shift lever
through all positions then place the
shift lever in N (Neutral) or P (Park)
position.3. Confirm if the fluid level is in the "HOT"
range on the level gauge. If the fluid
level is lower, add the specified fluid
from the fill hole. If the fluid level is
higher, drain the fluid from the drain
hole.
4. If the fluid level is checked in cold con-
dition [fluid temperature 20~30 °C
(68~86 °F)], add the fluid to the “C”
(COLD) line and then recheck the fluid
level according to the above step 2.
✽NOTICE
“C” (COLD) range is for reference only
and should NOT be used to determine
transaxle fluid level.
WARNING - Transaxle fluid
The transaxle fluid level should be
checked when the engine is at nor-
mal operating temperature. This
means that the engine, radiator,
radiator hose and exhaust system
etc., are very hot. Exercise great
care not to burn yourself during
this procedure.
WARNING- Parking brake
To avoid sudden movement of the
vehicle, apply parking brake and
depress the brake pedal before
moving the shift lever.
CAUTION
• Low fluid level causes transaxle
shift slippage. Overfilling can
cause foaming, loss of fluid and
transaxle malfunction.
• The use of a non-specified fluid
could result in transaxle malfunc-
tion and failure.
OYN079010OSA077009 COLDHOT
↔
↔
procarmanuals.com
Page 329 of 385
Maintenance
18 7
✽NOTICE
New automatic transaxle fluid should be
red. The red dye is added so the assem-
bly plant can identify it as automatic
transaxle fluid and distinguish it from
engine oil or antifreeze. The red dye,
which is not an indicator of fluid quali-
ty, is not permanent. As the vehicle is
driven, the automatic transaxle fluid
will begin to look darker. The colour
may eventually appear light brown.
Therefore, have a HYUNDAI autho-
rised repairer change the automatic
transaxle fluid according to the
Scheduled Maintenance.
Use only specified automatic transaxle
fluid. (Refer to "Recommended lubricants
or capacities" in section 8.)
Changing the automatic transaxle
fluid
Have the automatic transaxle fluid
changed by a HYUNDAI authorised
repairer according to the Maintenance
Schedule.
procarmanuals.com
Page 331 of 385

Maintenance
20 7
FUEL FILTER (FOR DIESEL)
Draining water from the fuel filter
The fuel filter for diesel engine plays an
important role of separating water from
fuel and accumulating the water in its
bottom.
If water accumulates in the fuel filter, the
warning light comes on when the ignition
switch is in the ON position.
If this warning light illuminates,
take your car to a HYUNDAI
authorised repairer and have
the water drained and
checked.
Extracting air from the fuel filter
If you drove until you have no fuel left or
if you replaced the fuel filter, be sure to
extract air in the fuel system as it makes
you difficult to start the engine.
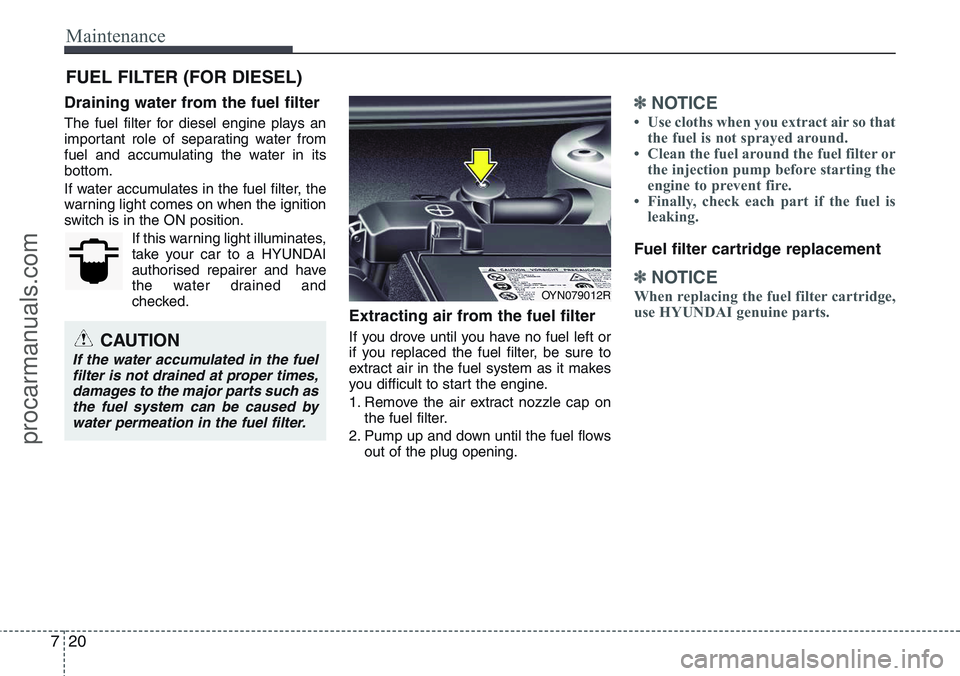
1. Remove the air extract nozzle cap on
the fuel filter.
2. Pump up and down until the fuel flows
out of the plug opening.
✽NOTICE
• Use cloths when you extract air so that
the fuel is not sprayed around.
• Clean the fuel around the fuel filter or
the injection pump before starting the
engine to prevent fire.
• Finally, check each part if the fuel is
leaking.
Fuel filter cartridge replacement
✽NOTICE
When replacing the fuel filter cartridge,
use HYUNDAI genuine parts.
CAUTION
If the water accumulated in the fuel
filter is not drained at proper times,
damages to the major parts such as
the fuel system can be caused by
water permeation in the fuel filter.
OYN079012R
procarmanuals.com
Page 332 of 385

721
Maintenance
AIR CLEANER
Filter replacement
You can clean the filter when inspecting
the air cleaner element.
Clean the filter by using compressed air.
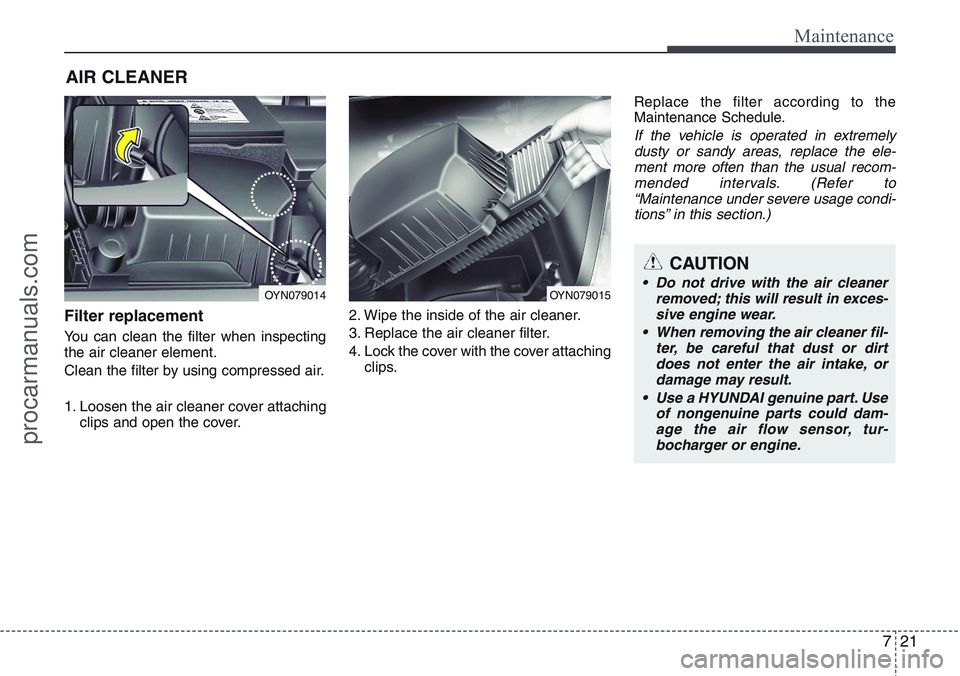
1. Loosen the air cleaner cover attaching
clips and open the cover.2. Wipe the inside of the air cleaner.
3. Replace the air cleaner filter.
4. Lock the cover with the cover attaching
clips.Replace the filter according to the
Maintenance Schedule.
If the vehicle is operated in extremely
dusty or sandy areas, replace the ele-
ment more often than the usual recom-
mended intervals. (Refer to
“Maintenance under severe usage condi-
tions” in this section.)
OYN079014OYN079015
CAUTION
• Do not drive with the air cleaner
removed; this will result in exces-
sive engine wear.
• When removing the air cleaner fil-
ter, be careful that dust or dirt
does not enter the air intake, or
damage may result.
• Use a HYUNDAI genuine part. Use
of nongenuine parts could dam-
age the air flow sensor, tur-
bocharger or engine.
procarmanuals.com
Page 337 of 385

Maintenance
26 7
Battery recharging
Your vehicle has a maintenance-free,
calcium-based battery.
• If the battery becomes discharged in a
short time (because, for example, the
headlights or interior lights were left on
whilst the vehicle was not in use),
recharge it by slow charging (trickle)
for 10 hours.
• If the battery gradually discharges
because of high electric load whilst the
vehicle is being used, recharge it at 20-
30A for two hours.(Continued)
• When lifting a plastic-cased bat-
tery, excessive pressure on the
case may cause battery acid to
leak, resulting in personal injury.
Lift with a battery carrier or with
your hands on opposite corners.
• Never attempt to recharge the
battery when the battery cables
are connected.
• The electrical ignition system
works with high voltage. Never
touch these components with the
engine running or the ignition
switched on.
Failure to follow the above warn-
ings can result in serious bodily
injury or death.CAUTION- AGM battery
(if equipped)
• Absorbent Glass Matt (AGM) bat-
teries are maintenance-free and
should only be serviced by a
HYUNDAI authorised repairer. For
charging your AGM battery, use
only fully automatic battery
chargers that are specially devel-
oped for AGM batteries.
• When replacing the AGM battery,
use only the HYUNDAI genuine
battery for the ISG system.
• Do not open or remove the cap on
top of the battery. This may cause
leaks of internal electrolyte that
could result in severe injury.
• If the AGM battery is reconnected
or replaced, ISG function will not
operate immediately.
If you want to use the ISG func-
tion, the battery sensor needs to
be calibrated for approximately 4
hours with the ignition off.
procarmanuals.com
Page 338 of 385

727
Maintenance
Reset items
Items should be reset after the battery
has been discharged or the battery has
been disconnected.
• Auto up/down window (See section 4)
• Sunroof (See section 4)
• Trip computer (See section 4)
• Climate control system
(See section 4)
• Clock (See section 4)
• Audio (See section 4)WARNING
• Before performing maintenance
or recharging the battery, turn off
all accessories and stop the
engine.
• The negative battery cable must
be removed first and installed
last when the battery is discon-
nected.
WARNING- Recharging
battery
When recharging the battery,
observe the following precautions:
• The battery must be removed
from the vehicle and placed in an
area with good ventilation.
• Do not allow cigarettes, sparks,
or flame near the battery.
• Watch the battery during charg-
ing, and stop or reduce the charg-
ing rate if the battery cells begin
gassing (boiling) violently or if
the temperature of the electrolyte
of any cell exceeds 49°C (120°F).
• Wear eye protection when check-
ing the battery during charging.
• Disconnect the battery charger in
the following order.
1. Turn off the battery charger main
switch.
2. Unhook the negative clamp from
the negative battery terminal.
3. Unhook the positive clamp from
the positive battery terminal.
procarmanuals.com