2015 HYUNDAI I40 brake light
[x] Cancel search: brake lightPage 379 of 534
Downloaded from www.Manualslib.com manuals search engine What to do in an emergency
46
IF THE ENGINE DOES NOT START
If engine doesn't turn over or
turns over slowly
1. If your vehicle has an automatictransaxle, be sure the shift lever is in N
(Neutral) or P (Park) and the emer-
gency brake is set.
2. Check the battery connections to be sure they are clean and tight.
3. Turn on the interior light. If the light dims or goes out when you operate the
starter, the battery is discharged.
4. Check the starter connections to be sure they are securely tightened.
5. Do not push or pull the vehicle to start it. See instructions for "Jump starting".
If engine turns over normally but
does not start
1. Check fuel level.
2. With the ignition switch in the LOCK/OFF position, check all connectors at
ignition, coil and spark plugs.
Reconnect any that may be discon-
nected or loose.
3. Check the fuel line in the engine com- partment.
4. If the engine still does not start, call an authorized HYUNDAI dealer or seek
other qualified assistance.
WARNING
If the engine does not start, do not
push or pull the vehicle to start it.
This could result in a collision or
cause other damage. In addition,
push or pull starting may cause the
catalytic converter (if equipped) to
be overloaded and create a fire haz-
ard.
Page 395 of 534

Downloaded from www.Manualslib.com manuals search engine What to do in an emergency
20
6
You may not be able identify a low
tire by simply looking at it. Always
use a good quality tire pressure
gauge to measure the tire's inflation
pressure. Please note that a tire that
is hot (from being driven) will have a
higher pressure measurement than a
tire that is cold (from sitting station-
ary for at least 3 hours and driven
less than 1 mile (1.6 km) during that
3 hour period).
Allow the tire to cool before measur-
ing the inflation pressure. Always be
sure the tire is cold before inflating to
the recommended pressure.
A cold tire means the vehicle has
been sitting for 3 hours and driven for
less than 1 mile (1.6 km) in that 3
hour period.
WARNING - Protecting
TPMS
Tampering with, modifying, or
disabling the Tire Pressure
Monitoring System (TPMS)
components may interfere with
the system's ability to warn the
driver of low tire pressure con-
ditions and/or TPMS malfunc-
tions. Tampering with, modify-
ing, or disabling the Tire
Pressure Monitoring System
(TPMS) components may void
the warranty for that portion of
the vehicle.WARNING- TPMS
The TPMS cannot alert you to severe and sudden tire dam-
age caused by external fac-
tors such as nails or road
debris.
If you feel any vehicle instabil- ity, immediately take your foot
off the accelerator, apply the
brakes gradually and with
light force, and slowly move to
a safe position off the road.
CAUTION
Do not use any tire sealantexcept the Tire Mobility Kitapproved by HYUNDAI if yourvehicle is equipped with a TirePressure Monitoring System.The liquid sealant can damagethe tire pressure sensors.
Page 406 of 534
Downloaded from www.Manualslib.com manuals search engine 7
Engine compartment / 7-2
Maintenance services / 7-5
Owner maintenance / 7-7
Scheduled maintenance service / 7-9
Explanation of scheduled maintenance items / 7-41
Engine oil / 7-44
Engine coolant / 7-45
Brake/clutch fluid / 7-48
Washer fluid / 7-49
Fuel filter / 7-50
Air cleaner / 7-51
Climate control air filter / 7-53
Wiper blades 7-55
Battery / 7-58
Tires and wheels / 7-61
Fuses / 7-71
Light bulbs / 7-85
Appearance care / 7-99
Emission control system / 7-105
Maintenance
Page 412 of 534
Downloaded from www.Manualslib.com manuals search engine 77
Maintenance
OWNER MAINTENANCE
The following lists are vehicle checks and
inspections that should be performed by
the owner or an authorized HYUNDAI
dealer at the frequencies indicated to
help ensure safe, dependable operation
of your vehicle.
Any adverse conditions should be
brought to the attention of your dealer as
soon as possible.
These Owner Maintenance Checks are
generally not covered by warranties and
you may be charged for labor, parts and
lubricants used.Owner maintenance schedule
When you stop for fuel:
Check the engine oil level.
Check coolant level in coolant reser-voir.
Check the windshield washer fluid level.
Look for low or under-inflated tires.
While operating your vehicle:
Note any changes in the sound of the exhaust or any smell of exhaust fumes
in the vehicle.
Check for vibrations in the steering wheel. Notice any increased steering
effort or looseness in the steering
wheel, or change in its straight-ahead
position.
Notice if your vehicle constantly turns slightly or “pulls” to one side when trav-
eling on smooth, level road.
When stopping, listen and check for unusual sounds, pulling to one side,
increased brake pedal travel or “hard-
to-push” brake pedal.
If any slipping or changes in the oper- ation of your transaxle occurs, check
the transaxle fluid level.
Check manual transaxle operation, including clutch operation.
Check automatic transaxle P (Park) function.
Check parking brake.
Check for fluid leaks under your vehicle (water dripping from the air condition-
ing system during or after use is nor-
mal).
WARNING
Be careful when checking your
engine coolant level when the
engine is hot. Scalding hot coolant
and steam may blow out under
pressure. This could cause burns
or other serious injury.
Page 413 of 534
Downloaded from www.Manualslib.com manuals search engine Maintenance
87
At least monthly:
Check coolant level in the enginecoolant reservoir.
Check the operation of all exterior lights, including the stoplights, turn sig-
nals and hazard warning flashers.
Check the inflation pressures of all tires including the spare.
At least twice a year (i.e., every Spring and Fall) :
Check radiator, heater and air condi- tioning hoses for leaks or damage.
Check windshield washer spray and wiper operation. Clean wiper blades
with clean cloth dampened with wash-
er fluid.
Check headlight alignment.
Check muffler, exhaust pipes, shields and clamps.
Check the lap/shoulder belts for wear and function.
Check for worn tires and loose wheel lug nuts.
At least once a year :
Clean body and door drain holes.
Lubricate door hinges and checks, andhood hinges.
Lubricate door and hood locks and latches.
Lubricate door rubber weatherstrips.
Check the air conditioning system.
Check the power steering fluid level.
Inspect and lubricate automatic transaxle linkage and controls.
Clean battery and terminals.
Check the brake (and clutch) fluid level.
Page 471 of 534
Downloaded from www.Manualslib.com manuals search engine Maintenance
66
7
Compact spare tire replacement
(if equipped)
A compact spare tire has a shorter
tread life than a regular size tire.
Replace it when you can see the
tread wear indicator bars on the tire.
The replacement compact spare tire
should be the same size and design
tire as the one provided with your
new vehicle and should be mounted
on the same compact spare tire
wheel. The compact spare tire is not
designed to be mounted on a regular
size wheel, and the compact spare
tire wheel is not designed for mount-
ing a regular size tire. Wheel replacement
When replacing the metal wheels for
any reason, make sure the new
wheels are equivalent to the original
factory units in diameter, rim width
and offset.
(Continued)
The use of any other tire size
or type may seriously affect
ride, handling, ground clear-
ance, stopping distance, body
to tire clearance, snow tire
clearance, and speedometer
reliability.
It is best to replace all four tires at the same time. If that
is not possible, or necessary,
then replace the two front or
two rear tires as a pair.
Replacing just one tire can
seriously affect your vehicle’s
handling.
The ABS works by comparing the speed of the wheels. Tire
size can affect wheel speed.
When replacing tires, all 4
tires must use the same size
originally supplied with the
vehicle. Using tires of a differ-
ent size can cause the ABS
(Anti-lock Brake System) and
ESP (Electronic Stability
Program) (if equipped) to
work irregularly.
WARNING
A wheel that is not the correct
size may adversely affect wheel
and bearing life, braking and
stopping abilities, handling
characteristics, ground clear-
ance, body-to-tire clearance,
snow chain clearance,
speedometer and odometer cal-
ibration, headlight aim and
bumper height.
Page 483 of 534

Downloaded from www.Manualslib.com manuals search engine Maintenance
78
7
No.Fuse ratingSymbol Fuse NameProtected component
2220AIG1E/R Fuse & Relay Box (Fuse - F27, F28, F29, F30, F31)
2310AMODULE 6Instrument Cluster, Front Seat Warmer Switch LH/RH,
Adaptive Front Lighting Module, Electric Parking Brake Module
2410AMDPSEPS Control Module
2520ADR LOCKDoor Lock/Unlock Relay, ICM Relay Box (Dead Lock Relay),
Driver/Passenger Door Lock Actuator, Rear Door Lock Actuator LH/RH
2615AS/HEATER FRTDriver/Passenger CCS Control Module,
Driver/Passenger Seat Warmer Modul
2710AINTERIOR LAMPDriver/Passenger Door Lamp, Overhead Console Lamp, Portable Lamp, Room Lamp,
Glove Box Lamp, Luggage Lamp, Driver/Passenger Foot Lamp, Trunk Room Lamp,
Rear Personal Lamp LH/RH, Vanity Lamp LH/RH
2815AMULTI MEDIAAudio, A/V & Navigation Head Unit, DC-DC Converter (Audio)
2915AA/BAGSRS Control Module
3010ACURTAINRear Curtain Module
317.5AMEMORY 1Instrument Cluster, Tire Pressure Monitoring Module, Rear Curtain Module,
Tilt Sensor, A/C Control Module, BCM, Ultrasonic Instrusion Protection Sensor,
Siren, Driver IMS Module, Power Outside Mirror Switch
327.5AA/BAG INDInstrument Cluster
337.5APDM 3Smart Key Control Module
Page 490 of 534
Downloaded from www.Manualslib.com manuals search engine 785
Maintenance
LIGHT BULBS
Use only the bulbs of the specifiedwattage.
✽
✽ NOTICE
After driving in heavy rain or washing
the vehicle, headlight and taillight lenses
could appear frosty. This condition is
caused by the temperature difference
between the lamp inside and outside.
This is similar to the condensation on
your windows inside your vehicle during
rain and doesn’t indicate a problem with
your vehicle. If the water leaks into the
lamp bulb circuitry, have the vehicle
checked by an authorized HYUNDAI
dealer.
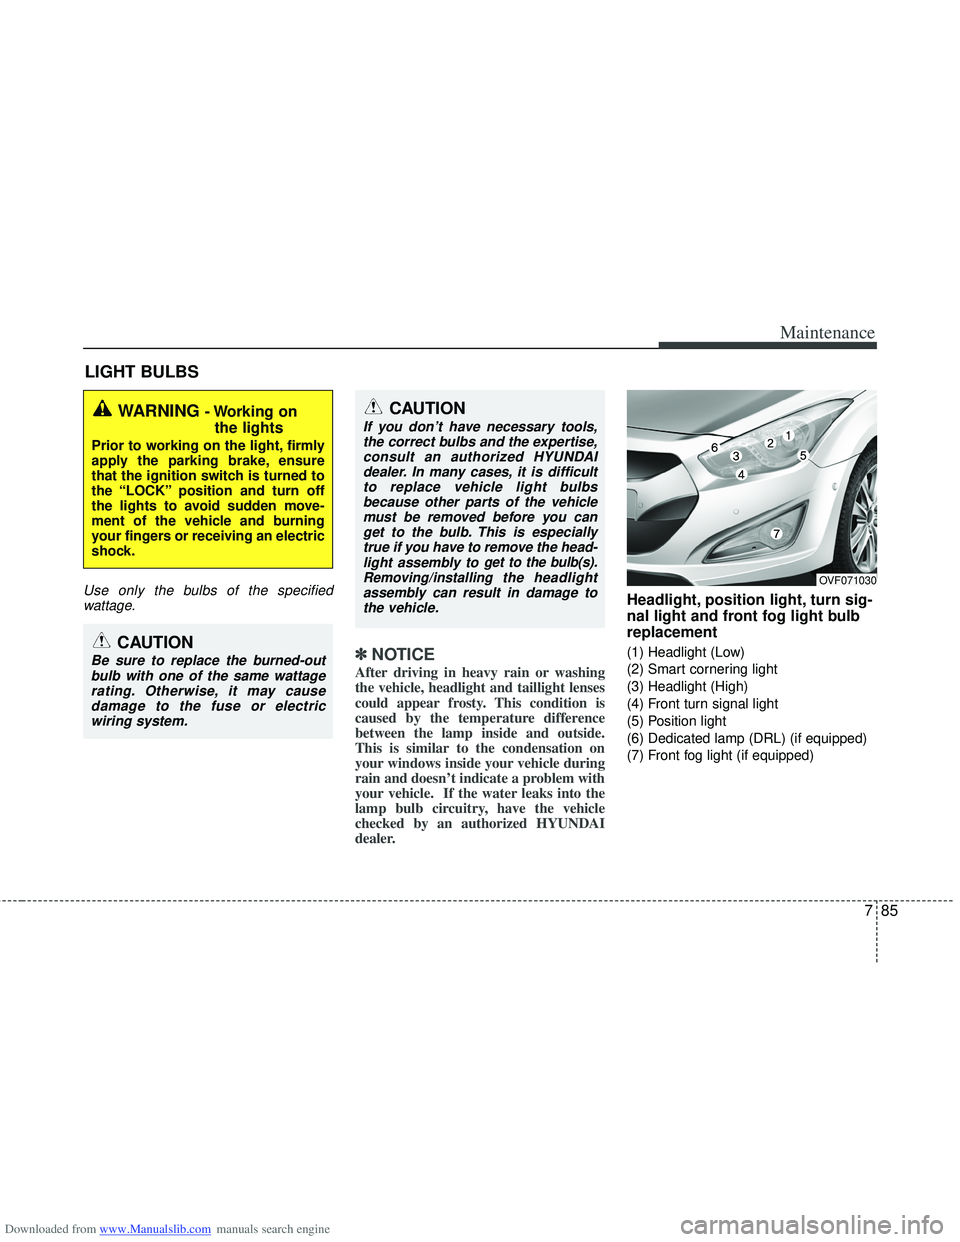
Headlight, position light, turn sig-
nal light and front fog light bulb
replacement
(1) Headlight (Low)
(2) Smart cornering light
(3) Headlight (High)
(4) Front turn signal light
(5) Position light
(6) Dedicated lamp (DRL) (if equipped)
(7) Front fog light (if equipped)
WARNING - Working on
the lights
Prior to working on the light, firmly
apply the parking brake, ensure
that the ignition switch is turned to
the “LOCK” position and turn off
the lights to avoid sudden move-
ment of the vehicle and burning
your fingers or receiving an electric
shock.
CAUTION
Be sure to replace the burned-out
bulb with one of the same wattagerating. Otherwise, it may causedamage to the fuse or electric wiring system.
CAUTION
If you don’t have necessary tools,the correct bulbs and the expertise,consult an authorized HYUNDAIdealer. In many cases, it is difficultto replace vehicle light bulbs because other parts of the vehiclemust be removed before you canget to the bulb. This is especiallytrue if you have to remove the head-light assembly to
get to the bulb(s).
Removing/installingthe headlight
assembly can result in damage to the vehicle.OVF071030