2015 HYUNDAI I40 warning
[x] Cancel search: warningPage 388 of 534
Downloaded from www.Manualslib.com manuals search engine 613
What to do in an emergency
Wheel nut tightening torque:
Steel wheel & aluminium alloy wheel:
9~11 kg.m (65~79 lb.ft)
If you have a tire gauge, remove the
valve cap and check the air pressure.
If the pressure is lower than recom-
mended, drive slowly to the nearest
service station and inflate to the cor-
rect pressure. If it is too high, adjust
it until it is correct. Always reinstall
the valve cap after checking or
adjusting tire pressure. If the cap is
not replaced, air may leak from the
tire. If you lose a valve cap, buy
another and install it as soon as pos-
sible.
After you have changed wheels,
always secure the flat tire in its place
and return the jack and tools to their
proper storage locations.To prevent the jack, jack handle,
wheel lug nut wrench and spare tire
from rattling while the vehicle is in
motion, store them properly.
CAUTION
Your vehicle has metric threads
on the wheel studs and nuts.Make certain during wheelremoval that the same nuts thatwere removed are reinstalled -or, if replaced, that nuts withmetric threads and the samechamfer configuration are used.Installation of a non-metricthread nut on a metric stud orvice-versa will not secure thewheel to the hub properly andwill damage the stud so that itmust be replaced.
Note that most lug nuts do nothave metric threads. Be sure touse extreme care in checkingfor thread style before installingaftermarket lug nuts or wheels.If in doubt, consult an author-ized HYUNDAI dealer.
WARNING- Wheel studs
If the studs are damaged, they
may lose their ability to retain
the wheel. This could lead to the
loss of the wheel and a collision
resulting in serious injuries.
WARNING - Inadequate
spare tire pressure
Check the inflation pressures as
soon as possible after installing
the spare tire. Adjust it to the
specified pressure, if necessary.
Refer to “Tires and wheels” in
section 8.
Page 389 of 534
Downloaded from www.Manualslib.com manuals search engine What to do in an emergency
14
6
Important - use of compact spare tire
(if equipped)
Your vehicle is equipped with a com-
pact spare tire. This compact spare
tire takes up less space than a regu-
lar-size tire. This tire is smaller than a
conventional tire and is designed for
temporary use only.
The compact spare should be inflat-
ed to 420 kPa (60 psi).
✽ ✽NOTICE
Check the inflation pressure after
installing the spare tire. Adjust it to
the specified pressure, as necessary.
When using a compact spare tire,
observe the following precautions:
Under no circumstances should
you exceed 80 km/h (50 mph); a
higher speed could damage the
tire.
Ensure that you drive slowly enough to avoid all hazards. Any
road hazard, such as a pothole or
debris, could seriously damage the
compact spare.
Any continuous road use of this tire could result in tire failure, loss of
vehicle control, and possible per-
sonal injury.
Do not exceed the vehicle’s maxi- mum load rating or the load-carry-
ing capacity shown on the sidewall
of the compact spare tire.
Avoid driving over obstacles. The compact spare tire diameter is
smaller than the diameter of a con-
ventional tire and reduces the
ground clearance approximately
25 mm (1 inch), which could result
in damage to the vehicle.
CAUTION
You should drive carefully when the compact spare is inuse. The compact spareshould be replaced by theproper conventional tire andrim at the first opportunity.
The operation of this vehicle is not recommended withmore than one compact sparetire in use at the same time.
WARNING
The compact spare tire is for
emergency use only. Do not
operate your vehicle on this
compact spare at the speed
over 80 km/h (50 mph). The
original tire should be repaired
or replaced as soon as possible
to avoid failure of the spare
possibly leading to personal
injury or death.
Page 392 of 534

Downloaded from www.Manualslib.com manuals search engine 617
What to do in an emergency
TPMS malfunctions may occur for a
variety of reasons, including the
installation of replacement or alter-
nate tires or wheels on the vehicle
that prevent the TPMS from function-
ing properly. Always check the
TPMS malfunction telltale after
replacing one or more tires or wheels
on your vehicle to ensure that the
replacement or alternate tires and
wheels allow the TPMS to continue
to function properly.
✽ ✽NOTICE
Take your vehicle to the nearest
authorized HYUNDAI dealer and
have the system checked if any of
the below happens:
1.The low tire pressure telltale/
TPMS malfunction indicator and
low tire pressure position telltale
do not illuminate.
2. The TPMS malfunction indicator remains illuminated after blinking
for approximately 1 minute.
3. The Low tire pressure position telltale remains illuminated.
Low tire pressure tell-
tale
Low tire pressure posi-
tion telltale
When the tire pressure monitoring
system warning indicators are illumi-
nated, one or more of your tires is
significantly under-inflated. The low
tire pressure position telltale light will
indicate which tire is significantly
under-inflated by illuminating the cor-
responding position light.
If either telltale illuminates, immedi-
ately reduce your speed, avoid hard
cornering and anticipate increased
stopping distances. You should stop
and check your tires as soon as pos-
sible. Inflate the tires to the proper
pressure as indicated on the vehi-
cle’s placard or tire inflation pressure
label located on the driver’s side cen-
ter pillar outer panel. If you cannot
reach a service station or if the tire
cannot hold the newly added air,
replace the low pressure tire with a
spare tire. After you replace the low pressure
tire with the spare tire, one of the fol-
lowing will happen:
The TPMS malfunction indicator
may blink for approximately 1
minute and then remain continuous-
ly illuminated because the TPMS
sensor is not mounted on the spare
wheel. (changed tire equipped with
a sensor not in the vehicle)
The TPMS malfunction indicator will remain continuously illuminated
while driving because the TPMS
sensor is not mounted on the spare
wheel. (changed tire equipped with
a sensor in the vehicle)
Page 393 of 534

Downloaded from www.Manualslib.com manuals search engine What to do in an emergency
18
6
TPMS (Tire Pressure
Monitoring System)
malfunction indicator
The TPMS malfunction indicator will
illuminate after it blinks for approxi-
mately one minute when there is a
problem with the Tire Pressure
Monitoring System. If the system is
able to correctly detect an under infla-
tion warning at the same time as sys-
tem failure then the TPMS malfunc-
tion indicator remains illuminated
after blinking for approximately 1
minute and the low tire pressure posi-
tion telltale will illuminate e.g. if Front
Left sensor fails, the TPMS malfunc-
tion indicator remains illuminated
after blinking for approximately 1
minute, but if the Front Right, Rear
Left, or Rear Right tire is under-inflat-
ed, the low tire pressure position tell-
tales may illuminate together with the
TPMS malfunction indicator.
Have the system checked by an
authorized HYUNDAI dealer as soon
as possible to determine the cause
of the problem.
WARNING - Low pressure damage
Significantly low tire pressure
makes the vehicle unstable and
can contribute to loss of vehicle
control and increased braking
distances.
Continued driving on low pres-
sure tires can cause the tires to
overheat and fail.CAUTION
In winter or cold weather, the low tire pressure telltale mayilluminate if the tire pressurewas adjusted to the recom-mended tire inflation pressurein warm weather. It does notmean your TPMS is malfunction-ing because the decreased tem-perature leads to a proportionallowering of tire pressure.
When you drive your vehiclefrom a warm area to a cold areaor from a cold area to a warmarea, or the outside temperatureis greatly higher or lower, youshould check the tire inflationpressure and adjust the tires tothe recommended tire inflationpressure.
Page 395 of 534

Downloaded from www.Manualslib.com manuals search engine What to do in an emergency
20
6
You may not be able identify a low
tire by simply looking at it. Always
use a good quality tire pressure
gauge to measure the tire's inflation
pressure. Please note that a tire that
is hot (from being driven) will have a
higher pressure measurement than a
tire that is cold (from sitting station-
ary for at least 3 hours and driven
less than 1 mile (1.6 km) during that
3 hour period).
Allow the tire to cool before measur-
ing the inflation pressure. Always be
sure the tire is cold before inflating to
the recommended pressure.
A cold tire means the vehicle has
been sitting for 3 hours and driven for
less than 1 mile (1.6 km) in that 3
hour period.
WARNING - Protecting
TPMS
Tampering with, modifying, or
disabling the Tire Pressure
Monitoring System (TPMS)
components may interfere with
the system's ability to warn the
driver of low tire pressure con-
ditions and/or TPMS malfunc-
tions. Tampering with, modify-
ing, or disabling the Tire
Pressure Monitoring System
(TPMS) components may void
the warranty for that portion of
the vehicle.WARNING- TPMS
The TPMS cannot alert you to severe and sudden tire dam-
age caused by external fac-
tors such as nails or road
debris.
If you feel any vehicle instabil- ity, immediately take your foot
off the accelerator, apply the
brakes gradually and with
light force, and slowly move to
a safe position off the road.
CAUTION
Do not use any tire sealantexcept the Tire Mobility Kitapproved by HYUNDAI if yourvehicle is equipped with a TirePressure Monitoring System.The liquid sealant can damagethe tire pressure sensors.
Page 396 of 534
Downloaded from www.Manualslib.com manuals search engine 621
What to do in an emergency
IF YOU HAVE A FLAT TIRE (WITH TIREMOBILITYKIT, IF EQUIPPED)
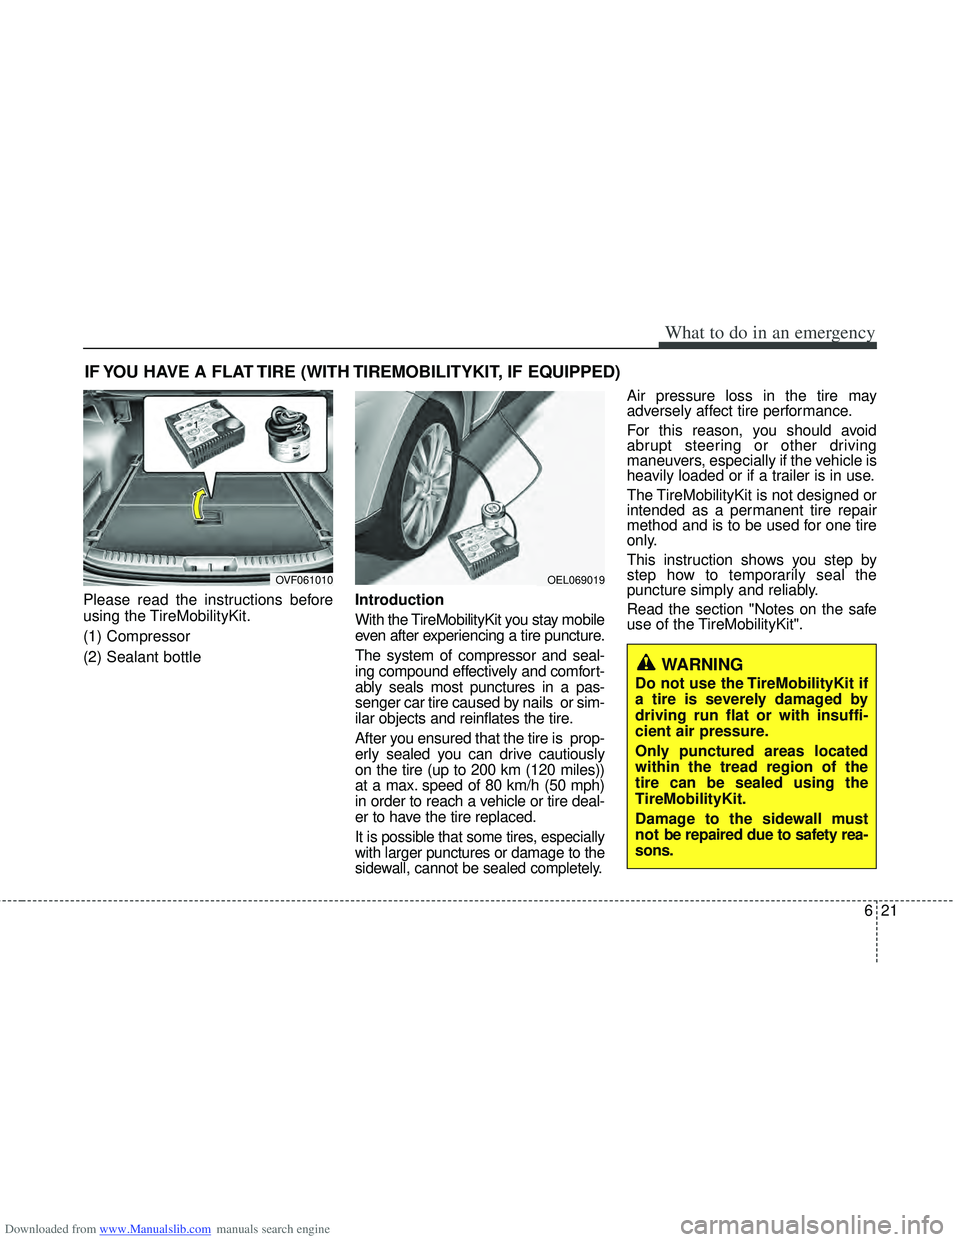
Please read the instructions before
using the TireMobilityKit.
(1) Compressor
(2) Sealant bottleIntroduction
With the TireMobilityKit you stay mobile
even after experiencing a tire puncture.
The system of compressor and seal-
ing compound effectively and comfort-
ably seals most punctures in a pas-
senger car tire caused by nails or sim-
ilar objects and reinflates the tire.
After you ensured that the tire is prop-
erly sealed you can drive cautiously
on the tire (up to 200 km (120 miles))
at a max. speed of 80 km/h (50 mph)
in order to reach a vehicle or tire deal-
er to have the tire replaced.
It is possible that some tires, especially
with larger punctures or damage to the
sidewall, cannot be sealed completely.
Air pressure loss in the tire may
adversely affect tire performance.
For this reason, you should avoid
abrupt steering or other driving
maneuvers, especially if the vehicle is
heavily loaded or if a trailer is in use.
The TireMobilityKit is not designed or
intended as a permanent tire repair
method and is to be used for one tire
only.
This instruction shows you step by
step how to temporarily seal the
puncture simply and reliably.
Read the section "Notes on the safe
use of the TireMobilityKit".
OEL069019
WARNING
Do not use the TireMobilityKit if
a tire is severely damaged by
driving run flat or with insuffi-
cient air pressure.
Only punctured areas located
within the tread region of the
tire can be sealed using the
TireMobilityKit.
Damage to the sidewall must
not be repaired due to safety rea-
sons.
OVF061010
Page 397 of 534
Downloaded from www.Manualslib.com manuals search engine What to do in an emergency
22
6
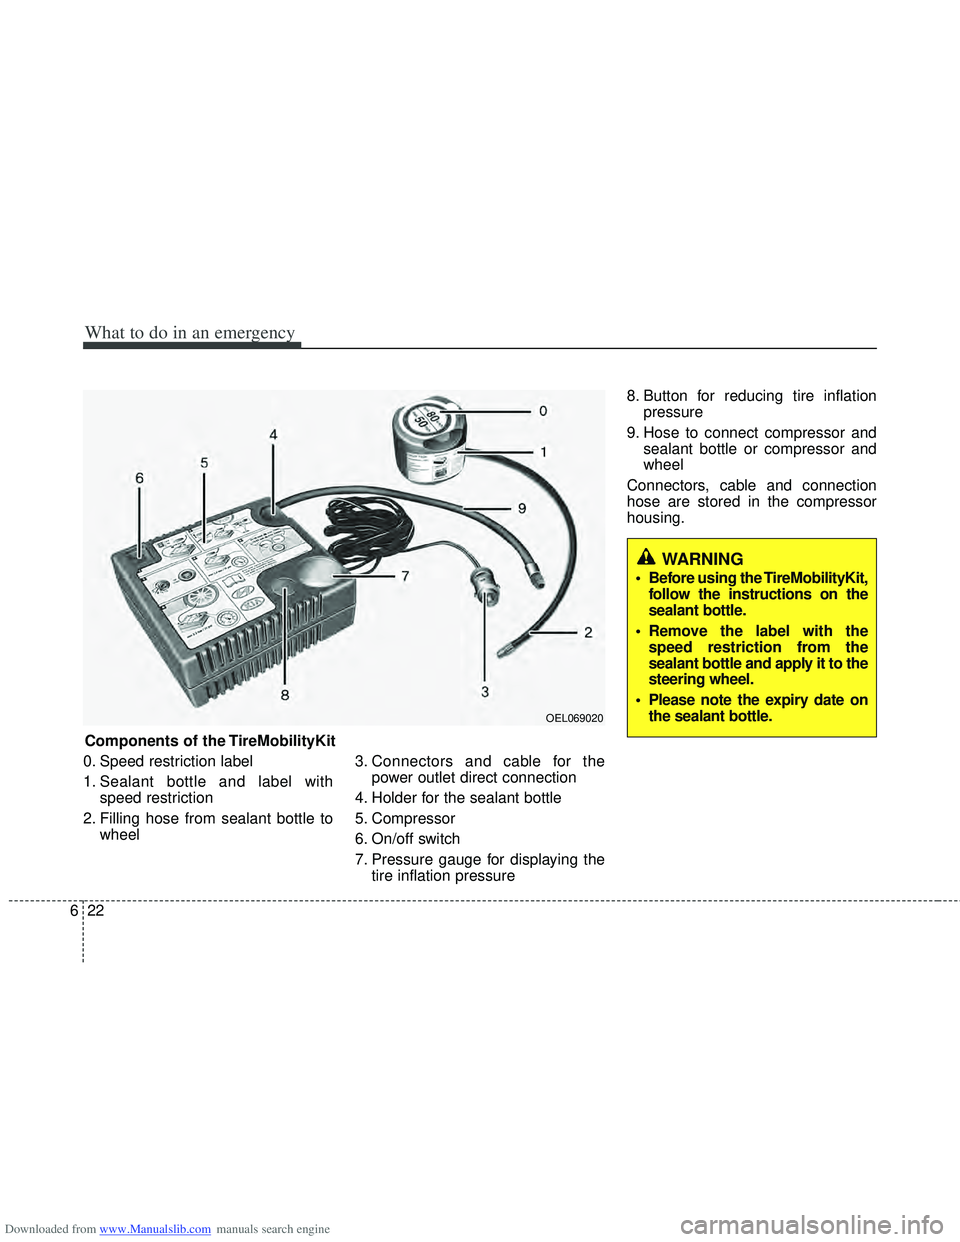
0. Speed restriction label
1. Sealant bottle and label with
speed restriction
2. Filling hose from sealant bottle to wheel 3. Connectors and cable for the
power outlet direct connection
4. Holder for the sealant bottle
5. Compressor
6. On/off switch
7. Pressure gauge for displaying the tire inflation pressure 8. Button for reducing tire inflation
pressure
9. Hose to connect compressor and sealant bottle or compressor and
wheel
Connectors, cable and connection
hose are stored in the compressor
housing.
WARNING
Before using the TireMobilityKit, follow the instructions on the
sealant bottle.
Remove the label with the speed restriction from the
sealant bottle and apply it to the
steering wheel.
Please note the expiry date on the sealant bottle.
Components of the TireMobilityKit
OEL069020
Page 398 of 534
Downloaded from www.Manualslib.com manuals search engine 623
What to do in an emergency
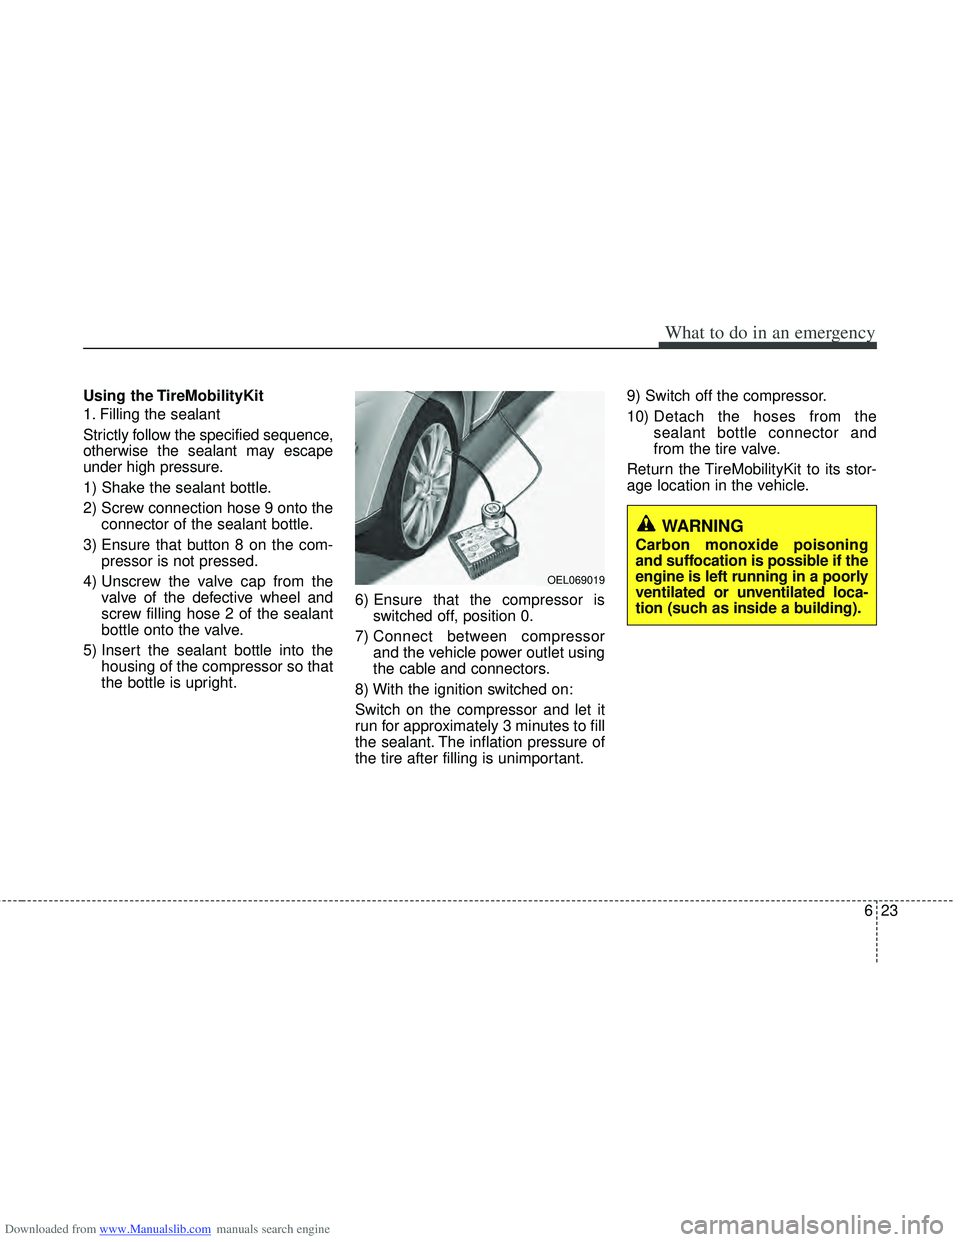
Using the TireMobilityKit
1. Filling the sealant
Strictly follow the specified sequence,
otherwise the sealant may escape
under high pressure.
1) Shake the sealant bottle.
2) Screw connection hose 9 onto theconnector of the sealant bottle.
3) Ensure that button 8 on the com- pressor is not pressed.
4) Unscrew the valve cap from the valve of the defective wheel and
screw filling hose 2 of the sealant
bottle onto the valve.
5) Insert the sealant bottle into the housing of the compressor so that
the bottle is upright. 6) Ensure that the compressor is
switched off, position 0.
7) Connect between compressor and the vehicle power outlet using
the cable and connectors.
8) With the ignition switched on:
Switch on the compressor and let it
run for approximately 3 minutes to fill
the sealant. The inflation pressure of
the tire after filling is unimportant. 9) Switch off the compressor.
10)
Detach the hoses from the
sealant bottle connector and
from the tire valve.
Return the TireMobilityKit to its stor-
age location in the vehicle.
WARNING
Carbon monoxide poisoning
and suffocation is possible if the
engine is left running in a poorly
ventilated or unventilated loca-
tion (such as inside a building).
OEL069019