2015 HYUNDAI I30 bulb
[x] Cancel search: bulbPage 125 of 635

447
Features of your vehicle
Engine coolant temperature warninglight (if equipped)
The warning light shows the temperature of the engine coolant when the ignition
switch is ON.
The warning light illuminates if the tem-
perature of the engine coolant is above
120°C (248°F) and the warning light
turns off if the temperature of the engine
coolant is below 115°C (239°F).
Do not continue driving with an overheat-
ed engine. If your vehicle overheats, refer
to “Overheating” in section 6.
✽✽ NOTICE
If the engine coolant temperature warn- ing light illuminates, it indicates over-heating that may damage the engine.
D150308AFD
Parking brake & brake fluid warning
Parking brake warning
This light is illuminated when the parking
brake is applied with the ignition switch in
the START or ON position. The warning
light should go off when the parking
brake is released. Low brake fluid level warning
If the warning light remains on, it may
indicate that the brake fluid level in the
reservoir is low.
If the warning light remains on:
1. Drive carefully to the nearest safe location and stop your vehicle.
2. With the engine stopped, check the brake fluid level immediately and add
fluid as required. Then check all brake
components for fluid leaks.
3. Do not drive the vehicle if leaks are found, the warning light remains on or
the brakes do not operate properly.
Have it towed to any authorized
HYUNDAI dealer for a brake system
inspection and necessary repairs. Your vehicle is equipped with dual-diago-
nal braking systems. This means you still
have braking on two wheels even if one
of the dual systems should fail. With only
one of the dual systems working, more
than normal pedal travel and greaterpedal pressure are required to stop the
car. Also, the car will not stop in as short
a distance with only a portion of the
brake system working. If the brakes fail
while you are driving, shift to a lower gear
for additional engine braking and stop the
car as soon as it is safe to do so.
To check bulb operation, check whether
the parking brake and brake fluid warning
light illuminates when the ignition switchis in the ON position.
WARNING
Driving the vehicle with a warning
light on is dangerous. If the brake
warning light remains on, have the
brakes checked and repaired imme-
diately by an authorized HYUNDAI
dealer.
Page 140 of 635
Features of your vehicle
62
4
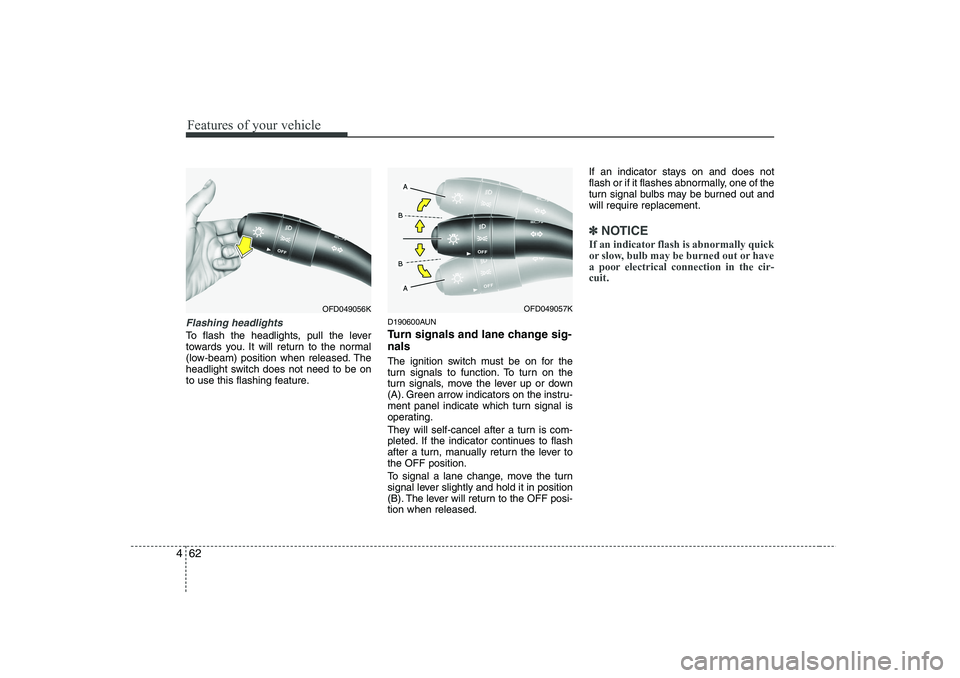
Flashing headlights
To flash the headlights, pull the lever
towards you. It will return to the normal
(low-beam) position when released. The
headlight switch does not need to be on
to use this flashing feature. D190600AUN
Turn signals and lane change sig- nals
The ignition switch must be on for the
turn signals to function. To turn on the
turn signals, move the lever up or down
(A). Green arrow indicators on the instru-
ment panel indicate which turn signal is
operating.
They will self-cancel after a turn is com-
pleted. If the indicator continues to flash
after a turn, manually return the lever tothe OFF position.
To signal a lane change, move the turn
signal lever slightly and hold it in position
(B). The lever will return to the OFF posi-tion when released.If an indicator stays on and does not
flash or if it flashes abnormally, one of the
turn signal bulbs may be burned out andwill require replacement.
✽✽
NOTICE
If an indicator flash is abnormally quick
or slow, bulb may be burned out or have
a poor electrical connection in the cir-cuit.
OFD049057KOFD049056K
Page 286 of 635
543
Driving your vehicle
E140400AUN Driving with a trailer
Towing a trailer requires a certain
amount of experience. Before setting out
for the open road, you must get to know
your trailer. Acquaint yourself with the
feel of handling and braking with the
added weight of the trailer. And always
keep in mind that the vehicle you are
driving is now a good deal longer and not
nearly so responsive as your vehicle is
by itself.
Before you start, check the trailer hitch
and platform, safety chains, electrical
connector(s), lights, tires and mirror
adjustment. If the trailer has electric
brakes, start your vehicle and trailer mov-
ing and then apply the trailer brake con-
troller by hand to be sure the brakes are
working. This lets you check your electri-
cal connection at the same time.
During your trip, check occasionally to be
sure that the load is secure, and that the
lights and any trailer brakes are still work-ing.
E140401AUN
Following distance
Stay at least twice as far behind the vehi-
cle ahead as you would when driving
your vehicle without a trailer. This can
help you avoid situations that require
heavy braking and sudden turns.E140402AUN
Passing
You’ll need more passing distance up
ahead when you’re towing a trailer. And,
because of the increased vehicle length,
you’ll need to go much farther beyond the
passed vehicle before you can return to
your lane.
E140403AUN
Backing up
Hold the bottom of the steering wheel
with one hand. Then, to move the trailer
to the left, just move your hand to the left.
To move the trailer to the right, move your
hand to the right. Always back up slowly
and, if possible, have someone guide
you.
E140404AUN
Making turns
When you’re turning with a trailer, make
wider turns than normal. Do this so your
trailer won’t strike soft shoulders, curbs,
road signs, trees, or other objects. Avoid
jerky or sudden maneuvers. Signal well
in advance.
E140405AFD
Turn signals when towing a trailer
When you tow a trailer, your vehicle has
to have a different turn signal flasher and
extra wiring. The green arrows on your
instrument panel will flash whenever you
signal a turn or lane change. Properly
connected, the trailer lights will also flash
to alert other drivers you’re about to turn,
change lanes, or stop.
When towing a trailer, the green arrows
on your instrument panel will flash for
turns even if the bulbs on the trailer are
burned out. Thus, you may think drivers
behind you are seeing your signals
when, in fact, they are not. It’s important
to check occasionally to be sure the trail-
er bulbs are still working. You must also
check the lights every time you discon-
nect and then reconnect the wires.
Do not connect a trailer lighting system
directly to your vehicle’s lighting system.
Use only an approved trailer wiring har-
ness.
An authorized HYUNDAI dealer can
assist you in installing the wiring harness.
WARNING
Failure to use an approved trailer wiring harness could result in dam-
age to the vehicle electrical system
and/or personal injury.
Page 318 of 635

7
Engine compartment / 7-2
Maintenance services / 7-4
Owner maintenance / 7-6
Scheduled maintenance service / 7-8
Explanation of scheduled maintenance items / 7-21
Engine oil / 7-24
Engine coolant / 7-25
Brakes and clutch fluid / 7-28
Automatic transaxle fluid / 7-29
Washer fluid / 7-31
Parking brake / 7-31
Fuel filter / 7-32
Air cleaner / 7-33
Climate control air filter / 7-34
Wiper blades / 7-36
Battery / 7-40
Tires and wheels / 7-43
Fuses / 7-53
Light bulbs / 7-62
Appearance care / 7-68
Emission control system / 7-74
Maintenance
Page 379 of 635
Maintenance
62
7
LIGHT BULBS
G220000AFD
Use only the bulbs of the specified wattage.
✽✽ NOTICE
After heavy, driving rain or washing,
headlight and taillight lenses could
appear frosty. This condition is caused by
the temperature difference between the
lamp inside and outside. This is similar
to the condensation on your windows
inside your vehicle during the rain and
doesn’t indicate a problem with your
vehicle. If the water leaks into the lamp
bulb circuitry, have the vehicle checked
by an authorized HYUNDAI dealer.
WARNING - Working on
the lights
Prior to working on the light, firmly
apply the parking brake, ensure
that the ignition switch is turned to
the “LOCK” position and turn off
the lights to avoid sudden move-
ment of the vehicle and burning
your fingers or receiving an electric
shock.
CAUTION
Be sure to replace the burned-out bulb with one of the same wattagerating. Otherwise, it may causedamage to the fuse or electric wiring system.
CAUTION
If you don’t have necessary tools,the correct bulbs and the expertise,
consult an authorized HYUNDAIdealer. In many cases, it is difficultto replace vehicle light bulbs because other parts of the vehicle
must be removed before you canget to the bulb. This is especiallytrue if you have to remove the head-
light assembly to
get to the bulb(s).
Removing/installingthe headlight
assembly can result in damage to the vehicle.
Page 380 of 635
763
Maintenance
G220100AUN
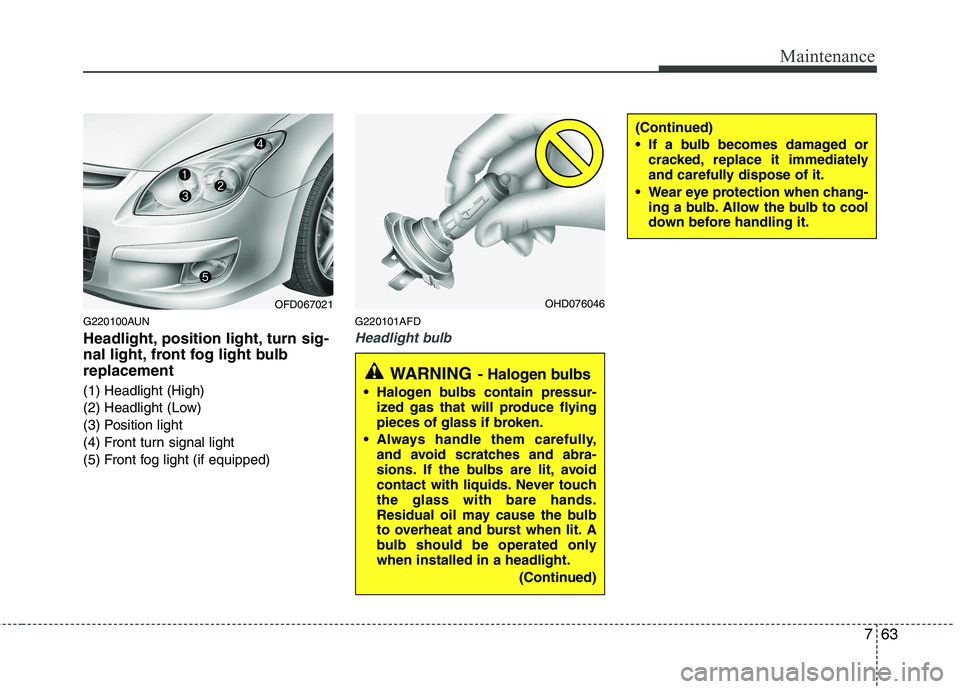
Headlight, position light, turn sig-
nal light, front fog light bulbreplacement
(1) Headlight (High)
(2) Headlight (Low)
(3) Position light
(4) Front turn signal light
(5) Front fog light (if equipped)G220101AFD
Headlight bulb
OFD067021OHD076046
WARNING
- Halogen bulbs
Halogen bulbs contain pressur-
ized gas that will produce flying
pieces of glass if broken.
Always handle them carefully, and avoid scratches and abra-
sions. If the bulbs are lit, avoid
contact with liquids. Never touchthe glass with bare hands.
Residual oil may cause the bulb
to overheat and burst when lit. A
bulb should be operated onlywhen installed in a headlight.
(Continued)
(Continued)
If a bulb becomes damaged orcracked, replace it immediately
and carefully dispose of it.
Wear eye protection when chang- ing a bulb. Allow the bulb to cool
down before handling it.
Page 381 of 635
Maintenance
64
7
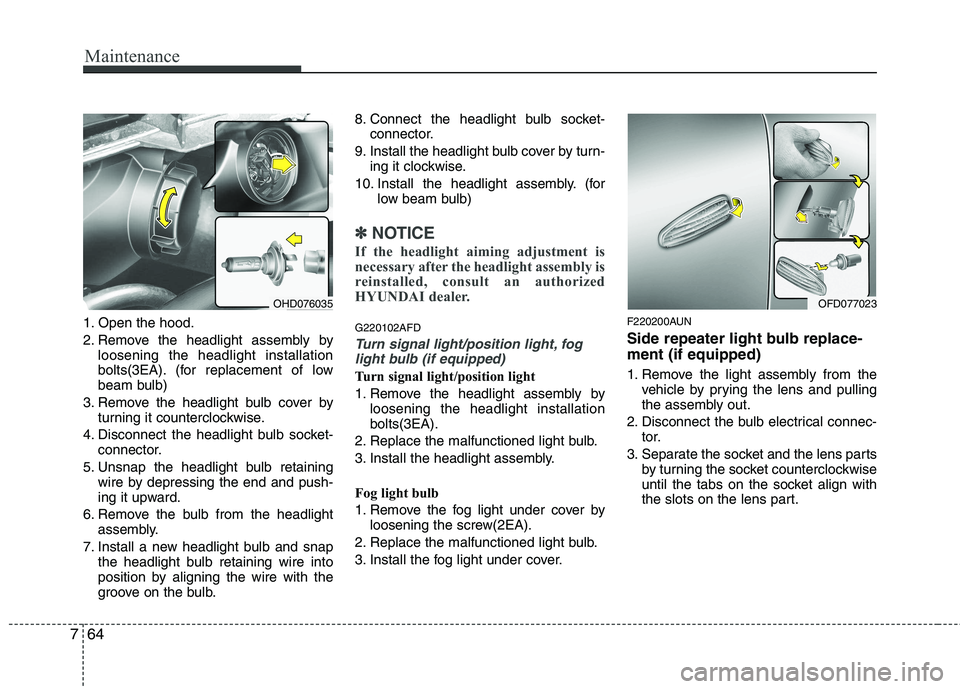
1. Open the hood.
2. Remove the headlight assembly by
loosening the headlight installation
bolts(3EA). (for replacement of low
beam bulb)
3. Remove the headlight bulb cover by turning it counterclockwise.
4. Disconnect the headlight bulb socket- connector.
5. Unsnap the headlight bulb retaining wire by depressing the end and push-
ing it upward.
6. Remove the bulb from the headlight assembly.
7. Install a new headlight bulb and snap the headlight bulb retaining wire into
position by aligning the wire with the
groove on the bulb. 8. Connect the headlight bulb socket-
connector.
9. Install the headlight bulb cover by turn- ing it clockwise.
10. Install the headlight assembly. (for low beam bulb)
✽✽NOTICE
If the headlight aiming adjustment is
necessary after the headlight assembly is
reinstalled, consult an authorized
HYUNDAI dealer.
G220102AFD
Turn signal light/position light, fog light bulb (if equipped)
Turn signal light/position light
1. Remove the headlight assembly by loosening the headlight installation bolts(3EA).
2. Replace the malfunctioned light bulb.
3. Install the headlight assembly.
Fog light bulb
1. Remove the fog light under cover by loosening the screw(2EA).
2. Replace the malfunctioned light bulb.
3. Install the fog light under cover. F220200AUN
Side repeater light bulb replace- ment (if equipped)
1. Remove the light assembly from the
vehicle by prying the lens and pulling
the assembly out.
2. Disconnect the bulb electrical connec- tor.
3. Separate the socket and the lens parts by turning the socket counterclockwise
until the tabs on the socket align with
the slots on the lens part.
OHD076035OFD077023
Page 382 of 635
765
Maintenance
4. Remove the bulb by pulling it straightout.
5. Insert a new bulb in the socket.
6. Reassemble the socket and the lens part.
7. Connect the bulb electrical connector.
8. Reinstall the light assembly to the body of the vehicle.
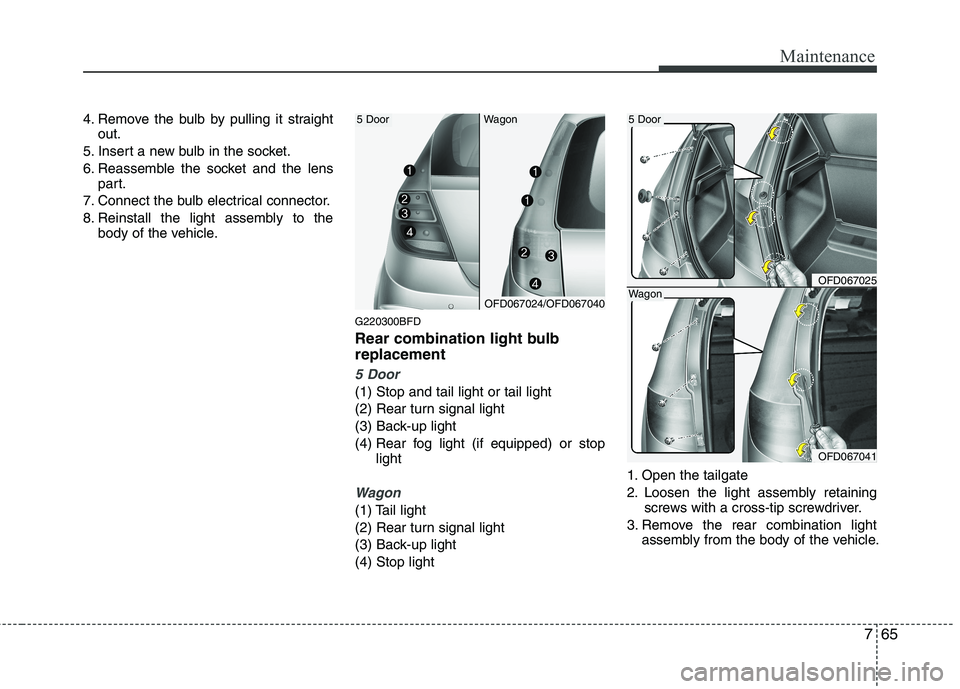
G220300BFD
Rear combination light bulb replacement
5 Door
(1) Stop and tail light or tail light
(2) Rear turn signal light
(3) Back-up light
(4) Rear fog light (if equipped) or stoplight
Wagon
(1) Tail light
(2) Rear turn signal light
(3) Back-up light(4) Stop light 1. Open the tailgate
2. Loosen the light assembly retaining
screws with a cross-tip screwdriver.
3. Remove the rear combination light assembly from the body of the vehicle.
OFD067024/OFD067040
OFD067025
OFD067041
5 Door5 Door
Wagon
Wagon