2015 HYUNDAI I10 valve
[x] Cancel search: valvePage 246 of 343

613
What to do in an emergency
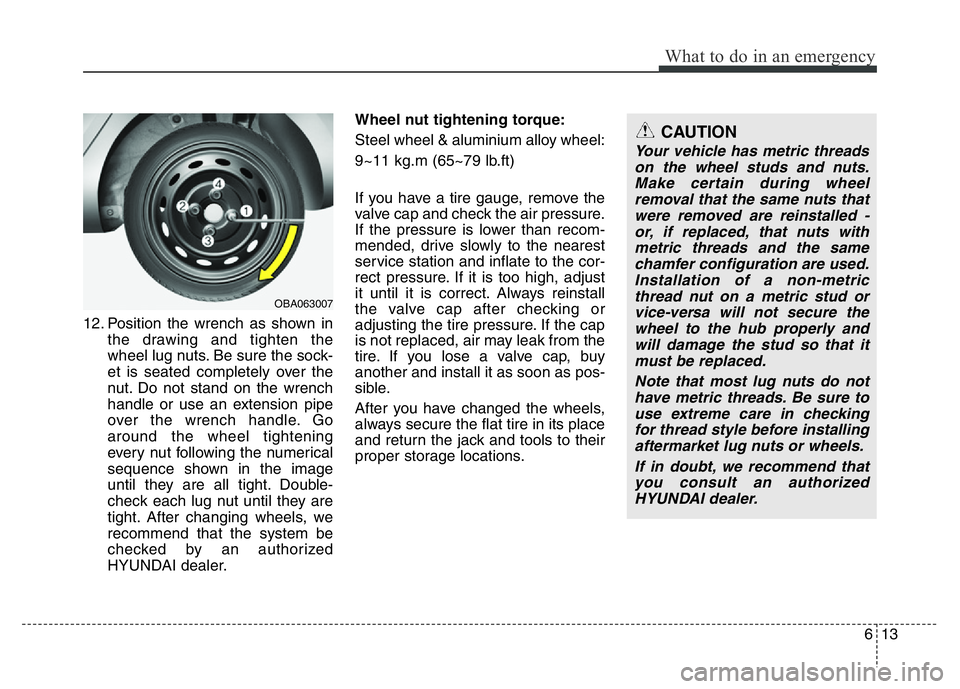
12. Position the wrench as shown in
the drawing and tighten the
wheel lug nuts. Be sure the sock-
et is seated completely over the
nut. Do not stand on the wrench
handle or use an extension pipe
over the wrench handle. Go
around the wheel tightening
every nut following the numerical
sequence shown in the image
until they are all tight. Double-
check each lug nut until they are
tight. After changing wheels, we
recommend that the system be
checked by an authorized
HYUNDAI dealer.Wheel nut tightening torque:
Steel wheel & aluminium alloy wheel:
9~11 kg.m (65~79 lb.ft)
If you have a tire gauge, remove the
valve cap and check the air pressure.
If the pressure is lower than recom-
mended, drive slowly to the nearest
service station and inflate to the cor-
rect pressure. If it is too high, adjust
it until it is correct. Always reinstall
the valve cap after checking or
adjusting the tire pressure. If the cap
is not replaced, air may leak from the
tire. If you lose a valve cap, buy
another and install it as soon as pos-
sible.
After you have changed the wheels,
always secure the flat tire in its place
and return the jack and tools to their
proper storage locations.
CAUTION
Your vehicle has metric threads
on the wheel studs and nuts.
Make certain during wheel
removal that the same nuts that
were removed are reinstalled -
or, if replaced, that nuts with
metric threads and the same
chamfer configuration are used.
Installation of a non-metric
thread nut on a metric stud or
vice-versa will not secure the
wheel to the hub properly and
will damage the stud so that it
must be replaced.
Note that most lug nuts do not
have metric threads. Be sure to
use extreme care in checking
for thread style before installing
aftermarket lug nuts or wheels.
If in doubt, we recommend that
you consult an authorized
HYUNDAI dealer.
OBA063007
Page 262 of 343

Maintenance
10 7
NORMAL MAINTENANCE SCHEDULE (FOR MEXICO) (CONT.)
MAINTENANCE
INTERVALS
MAINTENANCE
ITEMNumber of months or driving distance, whichever comes first
Months 6 12 18 24 30 36 42 48
Miles×1,000 6.5 13 19.5 26 32.5 39 45.5 52
Km×1,000 10 20 30 40 50 60 70 80
Valve clearance *
4 (if equipped)
Vapor hose and fuel filler cap I I
Vacuum hose IIII
Fuel filter *
5IRIR
Fuel lines, hoses and connections I I
Cooling system
Inspect “Coolant level and leak” every day
Inspect “Water pump” when replacing the drive belt or timing belt
I : Inspect and if necessary, adjust, correct, clean or replace.
R : Replace or change.
*
3: For your convenience, it can be replaced prior to it's interval when you do maintenance of other items.
*4: Inspect for excessive valve noise and/or engine vibration and adjust if necessary. We recommend that the system be serviced
by an authorized HYUNDAI dealer.
*
5: The fuel filter is considered to be maintenance free but periodic inspection is recommended for this maintenance schedule
depends on fuel quality. If there are some important safety matters like fuel flow restriction, surging, loss of power, hard start-
ing problem etc, replace the fuel filter immediately regardless of maintenance schedule and consult an authorized HYUNDAI
dealer for details.
Inspect every 95,000 km (60,000 miles) or 48 months *3
Page 266 of 343

Maintenance
14 7
NORMAL MAINTENANCE SCHEDULE (EXCEPT MEXICO) (CONT.)
MAINTENANCE
INTERVALS
MAINTENANCE
ITEMNumber of months or driving distance, whichever comes first
Months 12 24 36 48 60 72 84 96
Miles×1,000 10 20 30 40 50 60 70 80
Km×1,000 15 30 45 60 75 90 105 120
Valve clearance *
4 (if equipped)
Vapor hose and fuel filler cap I I
Vacuum hose IIII
Fuel filter *
5IRIR
Fuel lines, hoses and connections I I
Cooling system
Inspect “Coolant level and leak” every day
Inspect “Water pump” when replacing the drive belt or timing belt
I : Inspect and if necessary, adjust, correct, clean or replace.
R : Replace or change.
*
3: For your convenience, it can be replaced prior to it's interval when you do maintenance of other items.
*4: Inspect for excessive valve noise and/or engine vibration and adjust if necessary. We recommend that the system be serviced
by an authorized HYUNDAI dealer.
*
5: The fuel filter is considered to be maintenance free but periodic inspection is recommended for this maintenance schedule
depends on fuel quality. If there are some important safety matters like fuel flow restriction, surging, loss of power, hard start-
ing problem etc, replace the fuel filter immediately regardless of maintenance schedule and consult an authorized HYUNDAI
dealer for details.
Inspect every 95,000 km (60,000 miles) or 48 months *3
Page 272 of 343

Maintenance
20 7
Air cleaner filter
When replacing the air cleaner filter, we
recommend that you use HYUNDAI gen-
uine parts.
Spark plugs
Make sure to install new spark plugs of
the correct heat range.
Valve clearance (if equipped)
Inspect for excessive valve noise and/or
engine vibration and adjust if necessary.
We recommend that the system be serv-
iced by an authorized HYUNDAI dealer.
Cooling system
Check the cooling system components,
such as the radiator, coolant reservoir,
hoses and connections for leakage and
damage. Replace any damaged parts.
Coolant
The coolant should be changed at the
intervals specified in the maintenance
schedule.
Manual transaxle fluid
(if equipped)
Inspect the manual transaxle fluid
according to the maintenance schedule.
Automatic transaxle fluid
(if equipped)
Inspect the automatic transaxle fluid
according to the maintenance schedule.
Brake hoses and lines
Visually check for proper installation,
chafing, cracks, deterioration and any
leakage. Replace any deteriorated or
damaged parts immediately.
Brake fluid
Check the brake fluid level in the brake
fluid reservoir. The level should be
between “MIN” and “MAX” marks on the
side of the reservoir. Use only hydraulic
brake fluid conforming to DOT 3 or DOT
4 specification.
Parking brake
Inspect the parking brake system includ-
ing the parking brake lever and cables.
Page 294 of 343

Maintenance
42 7
WARNING - Tire inflation
Overinflation or underinflation
can reduce tire life, adversely
affect vehicle handling, and
lead to sudden tire failure. This
could result in loss of vehicle
control and potential injury.
CAUTION - Tire pressure
Always observe the following:
• Check tire pressure when the
tires are cold. (After vehicle
has been parked for at least
three hours or hasn't been
driven more than 1.6 km (one
mile) since startup.)
• Check the pressure of your
spare tire each time you check
the pressure of other tires.
• Never overload your vehicle.
Be careful not to overload a
vehicle luggage rack if your
vehicle is equipped with one.
• Worn, old tires can cause acci-
dents. If your tread is badly
worn, or if your tires have
been damaged, replace them.
CAUTION
• Underinflation also results in
excessive wear, poor handling
and reduced fuel economy.
Wheel deformation also is
possible. Keep your tire pres-
sures at the proper levels. If a
tire frequently needs refilling,
we recommend that the sys-
tem be checked by an author-
ized HYUNDAI dealer.
• Overinflation produces a
harsh ride, excessive wear at
the center of the tire tread, and
a greater possibility of dam-
age from road hazards.
CAUTION
• Warm tires normally exceed
recommended cold tire pres-
sures by 28 to 41 kPa (4 to 6
psi). Do not release air from
warm tires to adjust the pres-
sure or the tires will be under-
inflated.
• Be sure to reinstall the tire
inflation valve caps. Without
the valve cap, dirt or moisture
could get into the valve core
and cause air leakage. If a
valve cap is missing, install a
new one as soon as possible.
Page 295 of 343

743
Maintenance
Checking tire inflation pressure
Check your tires once a month or
more.
Also, check the tire pressure of the
spare tire.
How to check
Use a good quality gage to check tire
pressure. You can not tell if your tires
are properly inflated simply by look-
ing at them. Radial tires may look
properly inflated even when they're
underinflated.
Check the tire's inflation pressure
when the tires are cold. - "Cold"
means your vehicle has been sitting
for at least three hours or driven no
more than 1.6 km (1 mile).Remove the valve cap from the tire
valve stem. Press the tire gage firm-
ly onto the valve to get a pressure
measurement. If the cold tire inflation
pressure matches the recommended
pressure on the tire and loading
information label, no further adjust-
ment is necessary. If the pressure is
low, add air until you reach the rec-
ommended amount.
If you overfill the tire, release air by
pushing on the metal stem in the
center of the tire valve. Recheck the
tire pressure with the tire gage. Be
sure to put the valve caps back on
the valve stems. They help prevent
leaks by keeping out dirt and mois-
ture.
WARNING
• Inspect your tires frequently
for proper inflation as well as
wear and damage. Always use
a tire pressure gauge.
• Tires with too much or too little
pressure wear unevenly caus-
ing poor handling, loss of vehi-
cle control, and sudden tire
failure leading to accidents,
injuries, and even death. The
recommended cold tire pres-
sure for your vehicle can be
found in this manual and on
the tire label located on the dri-
ver's side center pillar.
• Worn tires can cause acci-
dents. Replace tires that are
worn, show uneven wear, or
are damaged.
• Remember to check the pres-
sure of your spare tire.
HYUNDAI recommends that
you check the spare every
time you check the pressure
of the other tires on your vehi-
cle.
Page 319 of 343

767
Maintenance
Fuse Name Symbol Fuse rating Circuit Protected
FUSE
F/PUMP15A F/Pump 1 Relay
HORN10A Horn Relay, B/Alarm Horn Relay
A/CON10A A/CON Relay
VACUUM
PUMPVACUUM
PUMP20A Vacuum Pump Relay
HEADLAMP
DIPPED
BEAM15A Headlamp High Beam
HEADLAMP
HIGH BEAM20A Headlamp Low Beam
C/FAN40A C/FAN LO Relay, C/FAN HI Relay
IG240AStart Relay, Ignition Switch (W/O Button Start), PDM Relay Box (IG2 Relay) (With
Button Start)
ECU3E310A PCM
ECU2E210A B3LA : PCM, Shut Off Valve #1/#2
SENSORS110AC/FAN LO Relay, C/FAN HI Relay, A/CON Relay, Start Relay (G3LA, With ISG),
PCM, Oil Control Valve #1/#2 (IN/EX), Purge Control Solenoid Valve, Camshaft
Position Sensor #1/#2 (IN/EX)
SENSOR2S210A G3LA/G4LA : PCM
Page 334 of 343

Maintenance
82 7
EMISSION CONTROL SYSTEM
The emission control system of your
vehicle is covered by a written limited
warranty. Please see the warranty infor-
mation contained in the Service Passport
in your vehicle.
Your vehicle is equipped with an emis-
sion control system to meet all emission
regulations.
There are three emission control sys-
tems which are as follows.
(1) Crankcase emission control system
(2) Evaporative emission control system
(3) Exhaust emission control system
In order to assure the proper function of
the emission control systems, it is rec-
ommended that you have your vehicle
inspected and maintained by an author-
ized HYUNDAI dealer in accordance with
the maintenance schedule in this manu-
al.Caution for the Inspection and
Maintenance Test (With Electronic
Stability Control (ESC) system)
• To prevent the vehicle from misfir-
ing during dynamometer testing,
turn the Electronic Stability Control
(ESC) system off by pressing the
ESC switch.
• After dynamometer testing is com-
pleted, turn the ESC system back on
by pressing the ESC switch again.
1. Crankcase emission control
system
The positive crankcase ventilation sys-
tem is employed to prevent air pollution
caused by blow-by gases being emitted
from the crankcase. This system supplies
fresh filtered air to the crankcase through
the air intake hose. Inside the crankcase,
the fresh air mixes with blow-by gases,
which then pass through the PCV valve
into the induction system.
2. Evaporative emission control
System
The Evaporative Emission Control
System is designed to prevent fuel
vapors from escaping into the atmos-
phere.
Canister
Fuel vapors generated inside the fuel
tank are absorbed and stored in the
onboard canister. When the engine is
running, the fuel vapors absorbed in the
canister are drawn into the surge tank
through the purge control solenoid valve.
Purge Control Solenoid Valve (PCSV)
The purge control solenoid valve is con-
trolled by the Engine Control Module
(ECM); when the engine coolant temper-
ature is low during idling, the PCSV clos-
es so that evaporated fuel is not taken
into the engine. After the engine warms
up during ordinary driving, the PCSV
opens to introduce evaporated fuel to the
engine.