2015 Hyundai H350 change wheel
[x] Cancel search: change wheelPage 344 of 473

6-9
What to do in an emergency
6
■■Jacking instructions
The jack is provided for emergency
tire changing only.
To prevent the jack from “rattling”
while the vehicle is in motion, store it
properly and fasten the jack screw
fully.
Follow jacking instructions to reduce
the possibility of personal injury.
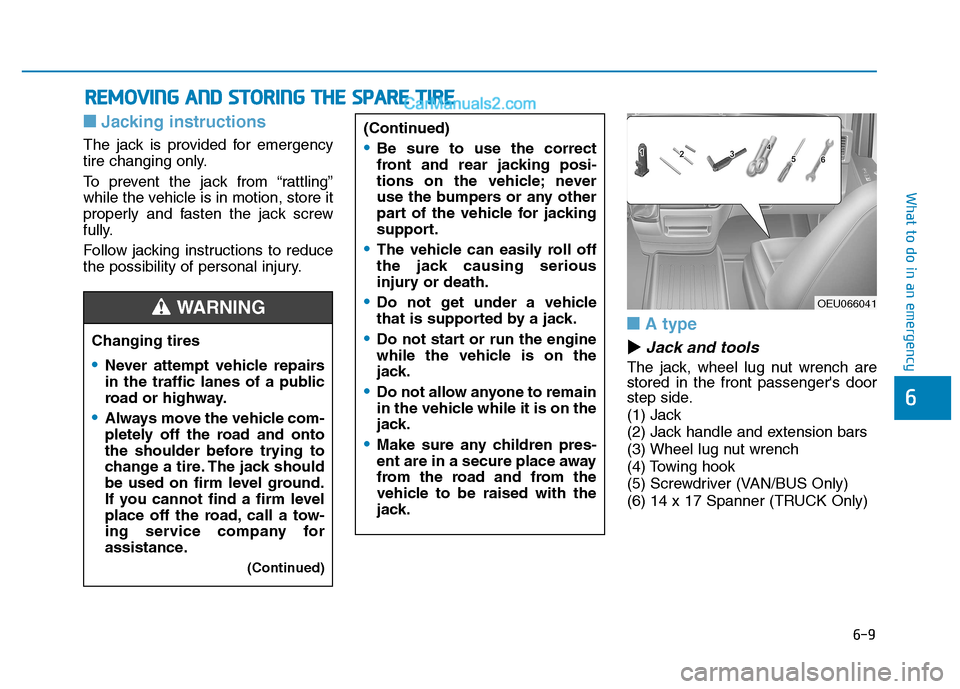
■■A type
��Jack and tools
The jack, wheel lug nut wrench are stored in the front passenger's door
step side.
(1) Jack
(2) Jack handle and extension bars
(3) Wheel lug nut wrench
(4) Towing hook
(5) Screwdriver (VAN/BUS Only)
(6) 14 x 17 Spanner (TRUCK Only)
RREEMM OOVVIINN GG AA NN DD SS TT OO RRIINN GG TT HH EE SS PP AA RREE TT IIRR EE
OEU066041
Changing tires
Never attempt vehicle repairs
in the traffic lanes of a public
road or highway.
Always move the vehicle com-
pletely off the road and onto
the shoulder before trying to
change a tire. The jack should
be used on firm level ground.
If you cannot find a firm level
place off the road, call a tow-
ing service company for
assistance. (Continued)
(Continued)
Be sure to use the correct
front and rear jacking posi-
tions on the vehicle; never
use the bumpers or any other
part of the vehicle for jacking
support.
The vehicle can easily roll off
the jack causing serious
injury or death.
Do not get under a vehicle
that is supported by a jack.
Do not start or run the engine
while the vehicle is on the
jack.
Do not allow anyone to remain
in the vehicle while it is on the
jack.
Make sure any children pres-
ent are in a secure place away
from the road and from the
vehicle to be raised with the
jack.
WARNING
Page 350 of 473

6-15
What to do in an emergency
6
6.Loosen the wheel lug nuts counter-clockwise one turn each, but do
not remove any nut until the tire
has been raised off the ground.
7.Place the jack at the front or rearjacking position closest to the tire
you are changing. The jack should
be positioned as shown in the
drawing.
Changing a tire
To prevent vehicle movement
while changing a tire, always
set the parking brake fully,
and always block the wheel
diagonally opposite the wheel
being changed.
We recommend that the
wheels of the vehicle be
chocked, and that no person
remain in a vehicle that is
being jacked.
WARNING
OEU064012OEU064024
■
FRONT TIRE
OEU064025
■REAR TIRE
Page 354 of 473

6-19
What to do in an emergency
6
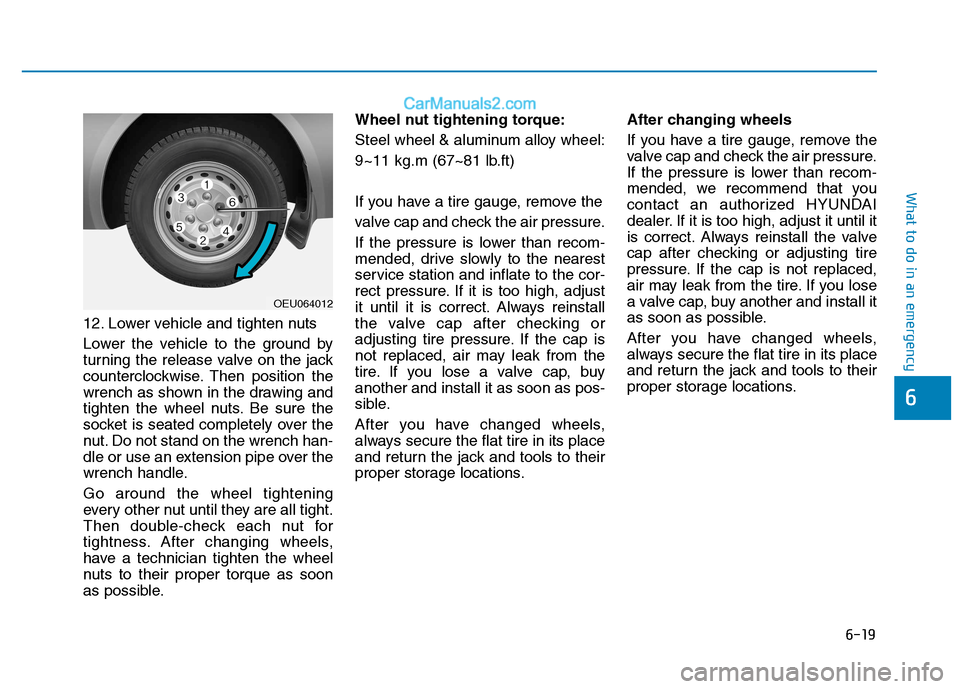
12. Lower vehicle and tighten nuts
Lower the vehicle to the ground by
turning the release valve on the jack
counterclockwise. Then position the
wrench as shown in the drawing and
tighten the wheel nuts. Be sure the
socket is seated completely over the
nut. Do not stand on the wrench han-
dle or use an extension pipe over the
wrench handle. Go around the wheel tightening
every other nut until they are all tight.
Then double-check each nut for
tightness. After changing wheels,
have a technician tighten the wheel
nuts to their proper torque as soon
as possible.Wheel nut tightening torque:
Steel wheel & aluminum alloy wheel:
9~11 kg.m (67~81 lb.ft)
If you have a tire gauge, remove the
valve cap and check the air pressure.
If the pressure is lower than recom-
mended, drive slowly to the nearest
service station and inflate to the cor-
rect pressure. If it is too high, adjust
it until it is correct. Always reinstall
the valve cap after checking or
adjusting tire pressure. If the cap is
not replaced, air may leak from the
tire. If you lose a valve cap, buyanother and install it as soon as pos-
sible.
After you have changed wheels,
always secure the flat tire in its place
and return the jack and tools to their
proper storage locations.
After changing wheels
If you have a tire gauge, remove the
valve cap and check the air pressure.
If the pressure is lower than recom-
mended, we recommend that you
contact an authorized HYUNDAI
dealer. If it is too high, adjust it until it
is correct. Always reinstall the valve
cap after checking or adjusting tire
pressure. If the cap is not replaced,
air may leak from the tire. If you lose
a valve cap, buy another and install it
as soon as possible.
After you have changed wheels,
always secure the flat tire in its place
and return the jack and tools to their
proper storage locations.
OEU064012
Page 364 of 473

7
Maintenance
7
Maintenance
Engine compartment .............................................7-3
Maintenance services ...........................................7-5Owner's responsibility ......................................................7-5
Owner maintenance precautions ..................................7-5
Engine compartment precautions (Diesel engine) ....7-7
Owner maintenance ...............................................7-8 Owner maintenance schedule ........................................7-8
Scheduled maintenance services ......................7-10 Normal maintenance schedule (for Europe) ............7-11
Normal maintenance schedule (except Europe) .....7-14
Maintenance under severe usage conditions ..........7-17
Explanation of scheduled maintenance items ..7-19
Engine oil ..............................................................7-22 Checking the engine oil level ....................................7-22
Changing the engine oil and filter ..............................7-23
Engine coolant......................................................7-24 Checking the coolant level ...........................................7-24
Changing the coolant .....................................................7-26
Brake/Clutch fluid ..............................................7-27 Checking the brake/clutch fluid level ........................7-27
Power steering fluid ............................................7-28 Checking the power steering fluid level ...................2-28
Checking the power steering hose.............................2-29
Washer fluid .........................................................7-29 Checking the washer fluid level ...............................7-29 Parking brake .......................................................7-30
Checking the parking brake .........................................7-30
Fuel filter (For diesel).........................................7-30 Draining water from fuel filter ....................................7-30
Fuel filter cartridge replacement ................................7-30
Manual transmission and rearaxle oil ..............7-31 Check and adding oil ......................................................7-31
Change the gear oil ........................................................7-31
Air cleaner ............................................................7-31 Filter replacement ...........................................................7-31
Climate control air filter .....................................7-33 Filter inspection ...............................................................7-33
Filter replacement ...........................................................7-33
Wiper blades .........................................................7-34 Blade inspection ..............................................................7-34
Blade replacement ..........................................................7-35
Battery...................................................................7-37 For best battery service................................................7-37
Battery capacity label ...................................................7-40
Battery recharging .......................................................7-40
Reset items .......................................................................7-41
Tires and wheels ..................................................7-42 Tire care ............................................................................7-42
Recommended cold tire inflation pressures.............7-42
Checking tire inflation pressure ..................................7-43
7
Page 371 of 473

7-8
Maintenance
The following lists are vehicle checks and inspections that should be per-
formed at the frequencies indicated
to help ensure safe, dependable
operation of your vehicle. If you have
any question, we recommend that
you consult an authorized HYUNDAI
dealer.
These Owner Maintenance Checks
are generally not covered by war-
ranties and you may be charged for
labor, parts and lubricants used.Owner maintenance schedule
When you stop for fuel:
Check the engine oil level.
Check coolant level in coolantreservoir.
Check the windshield washer fluid level.
Look for low or under-inflated tires.
While operating your vehicle:
Note any changes in the sound of the exhaust or any smell of
exhaust fumes in the vehicle.
Check for vibrations in the steering wheel. Notice any increased steer-
ing effort or looseness in the steer-
ing wheel, or change in its straight-ahead position.
Notice if your vehicle constantly turns slightly or “pulls” to one side
when traveling on smooth, levelroad.
When stopping, listen and check for unusual sounds, pulling to one
side, increased brake pedal travel
or “hard-to-push” brake pedal.
If any slipping or changes in the operation of your transmission
occurs, check the transmission
fluid level.
Check manual transmission opera- tion, including clutch operation.
Check parking brake.
Check for fluid leaks under your vehicle (water dripping from the air
conditioning system during or after
use is normal).
OOWW NNEERR MM AAIINN TTEENN AANN CCEE
Be careful when checking your
engine coolant level when the
engine is hot. Scalding hot
coolant and steam may blow
out under pressure. This could
cause burns or other serious
injury.
WARNING
Page 384 of 473

7-21
7
Maintenance
Coolant
The coolant should be changed at
the intervals specified in the mainte-
nance schedule.
Manual transmission fluid (if equipped)
Inspect the manual transmission fluid according to the maintenance
schedule.
Brake hoses and lines
Visually check for proper installation,
chafing, cracks, deterioration and
any leakage. Replace any deteriorat-
ed or damaged parts immediately.
Brake fluid
Check brake fluid level in the brake
fluid reservoir. The level should be
between “MIN” and “MAX” marks on
the side of the reservoir. Use only
hydraulic brake fluid conforming to
DOT 4 specification.
Parking brake
Inspect the parking brake system
including the parking brake lever and
cables.
Brake discs, pads, calipers
and rotors
Check the pads for excessive wear,
discs for run out and wear, and
calipers for fluid leakage.
For more information on checking
the pads or lining wear limit, refer to
the HYUNDAI web site. (http://brakeman
ual.hmc.co.kr)
Suspension mounting bolts
Check the suspension connections
for looseness or damage. Retighten
to the specified torque.
Steering gear box, linkage &
boots/lower arm ball joint
With the vehicle stopped and engine
off, check for excessive free-play in
the steering wheel.
Check the linkage for bends or dam-
age. Check the dust boots and ball
joints for deterioration, cracks, or
damage. Replace any damaged
parts.
Power steering pump, belt and hoses
Check the power steering pump and
hoses for leakage and damage.
Replace any damaged or leaking
parts immediately. Inspect the power
steering belt (or drive belt) for evi-
dence of cuts, cracks, excessive
wear, oiliness and proper tension.
Replace or adjust it if necessary.
Air conditioning refrigerant (if equipped)
Check the air conditioning lines and
connections for leakage and dam-
age.