2015 Hyundai Grand Santa Fe warning light
[x] Cancel search: warning lightPage 113 of 717
Features of your vehicle
16 4
• Lock the doors by pressing the
lock button on the smart key.
After completion of the steps
above, the hazard warning lights
will operate once to indicate that
the system is armed.
If any door, tailgate or engine hood
remains open, the hazard warning
lights won't operate and theft-
alarm will not arm. After this, if all
doors, tailgate and engine hood
are closed, the hazard warning
lights will blink once.Using the transmitter
Park the vehicle and stop the engine.
Arm the system as described below.
1.Turn off the engine and remove the
ignition key from the ignition switch.
2.Make sure that all doors, the
engine hood and tailgate are
closed and latched.
3.Lock the doors by pressing the lock
button on the transmitter.
After completion of the steps
above, the hazard warning lights
will blink once to indicate that the
system is armed.
If any door, tailgate or engine hood
remains opened, the hazard warn-
ing lights will not operate and theft-
alarm will not arm. After this, if all
doors, tailgate and engine hood
are closed, the hazard warning
lights will blink once.• Do not arm the system until all
passengers have left the vehi-
cle. If the system is armed while
a passenger(s) remains in the
vehicle, the alarm may be acti-
vated when the remaining pas-
senger(s) leave the vehicle. If
any door, tailgate lid or engine
hood is opened within 30 sec-
onds after entering the armed
stage, the system is disarmed to
prevent unnecessary alarm.
Page 114 of 717
417
Features of your vehicle
Theft-alarm stage
The alarm will be activated if any of
the following occurs while the system
is armed.
• A front or rear door is opened with-
out using transmitter or smart key.
• The tailgate is opened without
using transmitter or smart key.
• The engine hood is opened.
The siren will sound and the hazard
warning lights will blink continuously
for 27 seconds, unless the system is
disarmed. To turn off the system,
unlock the doors with the transmitter
or smart key.
Disarmed stage
The system will be disarmed when:
Transmitter
- The door unlock button is pressed.
- The engine is started.
- The ignition switch is in the “ON”
position for 30 seconds or more.
Smart key
- The door unlock button is pressed.
- The button of the front outside door
is pressed while carrying the smart
key.
- The engine is started.
- The engine start/stop button is
turned to the ON position.
After the doors are unlocked, the haz-
ard warning lights will blink twice to
indicate that the system is disarmed.
After pressing the unlock button, if
any door (or tailgate) is not opened
within 30 seconds, the system will be
rearmed.
✽NOTICE
• Without smart key system
If the system is not disarmed with
the transmitter, insert the key into
the ignition switch and start the
engine. Then the system will be
disarmed.
• With smart key system
If the system is not disarmed with
the smart key, open the door with
the mechanical key and start the
engine. Then the system will be
disarmed.
• If you lose your keys, we recom-
mend that you consult with your
authorized HYUNDAI dealer.
CAUTION
Do not change, alter or adjust
the theft-alarm system because
it could cause the theft-alarm
system to malfunction and we
recommend that the system be
serviced by an authorized
HYUNDAI dealer.
Malfunctions caused by improp-
er alterations, adjustments or
modifications to the theft-alarm
system are not covered by your
vehicle manufacturer warranty.
Page 128 of 717
431
Features of your vehicle
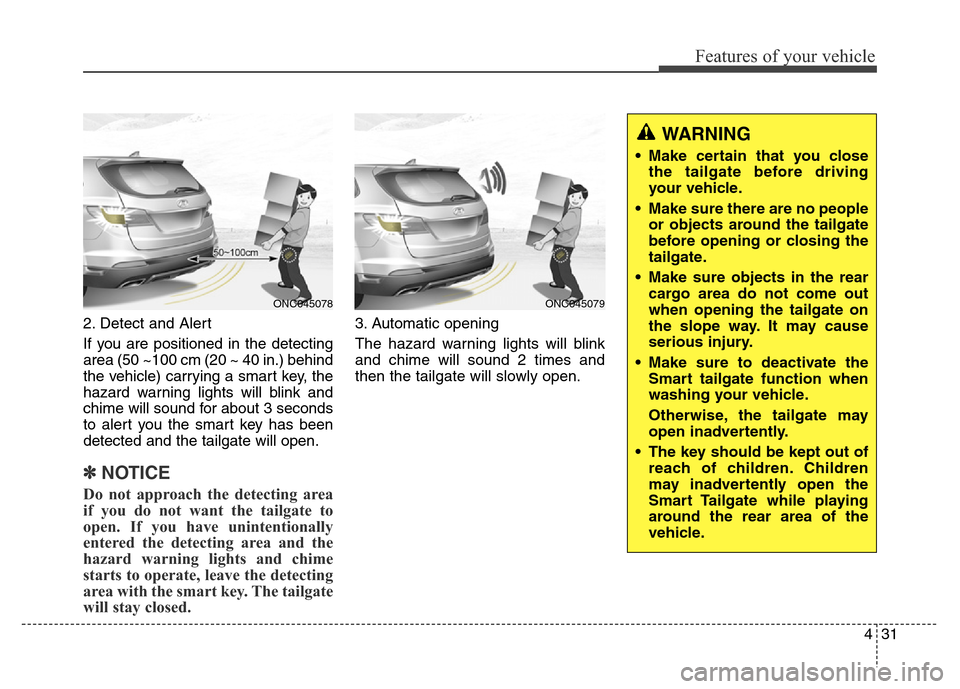
2. Detect and Alert
If you are positioned in the detecting
area (50 ~100 cm (20 ~ 40 in.) behind
the vehicle) carrying a smart key, the
hazard warning lights will blink and
chime will sound for about 3 seconds
to alert you the smart key has been
detected and the tailgate will open.
✽NOTICE
Do not approach the detecting area
if you do not want the tailgate to
open. If you have unintentionally
entered the detecting area and the
hazard warning lights and chime
starts to operate, leave the detecting
area with the smart key. The tailgate
will stay closed.
3. Automatic opening
The hazard warning lights will blink
and chime will sound 2 times and
then the tailgate will slowly open.
ONC045078ONC045079
WARNING
• Make certain that you close
the tailgate before driving
your vehicle.
• Make sure there are no people
or objects around the tailgate
before opening or closing the
tailgate.
• Make sure objects in the rear
cargo area do not come out
when opening the tailgate on
the slope way. It may cause
serious injury.
• Make sure to deactivate the
Smart tailgate function when
washing your vehicle.
Otherwise, the tailgate may
open inadvertently.
• The key should be kept out of
reach of children. Children
may inadvertently open the
Smart Tailgate while playing
around the rear area of the
vehicle.
Page 136 of 717
439
Features of your vehicle
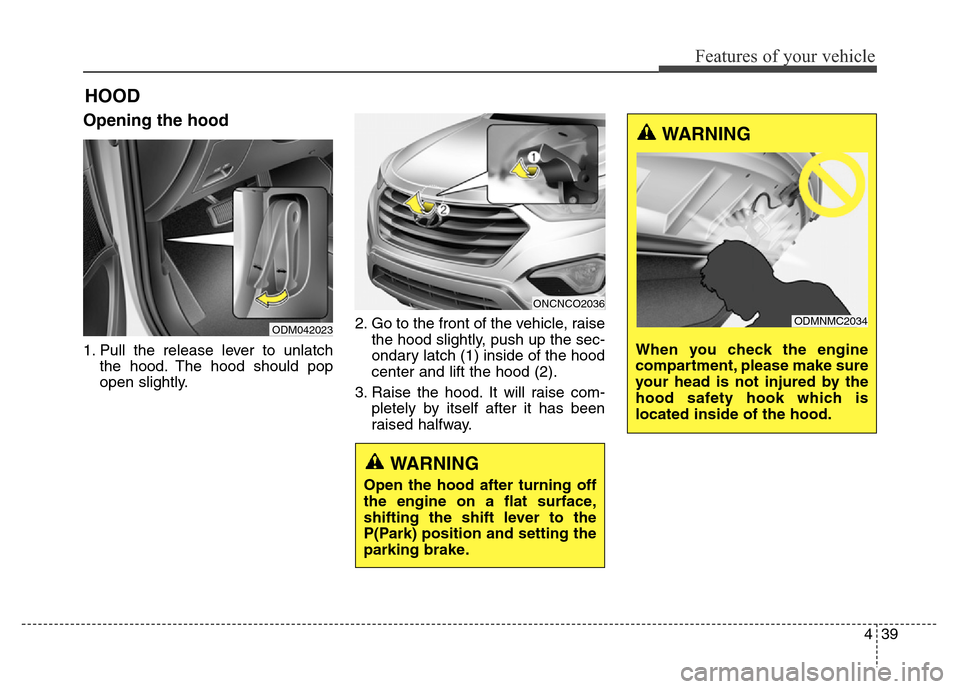
Opening the hood
1. Pull the release lever to unlatch
the hood. The hood should pop
open slightly.2. Go to the front of the vehicle, raise
the hood slightly, push up the sec-
ondary latch (1) inside of the hood
center and lift the hood (2).
3. Raise the hood. It will raise com-
pletely by itself after it has been
raised halfway.
HOOD
WARNING
Open the hood after turning off
the engine on a flat surface,
shifting the shift lever to the
P(Park) position and setting the
parking brake.
ODM042023
ONCNCO2036
WARNING
When you check the engine
compartment, please make sure
your head is not injured by the
hood safety hook which is
located inside of the hood.
ODMNMC2034
Page 138 of 717
441
Features of your vehicle
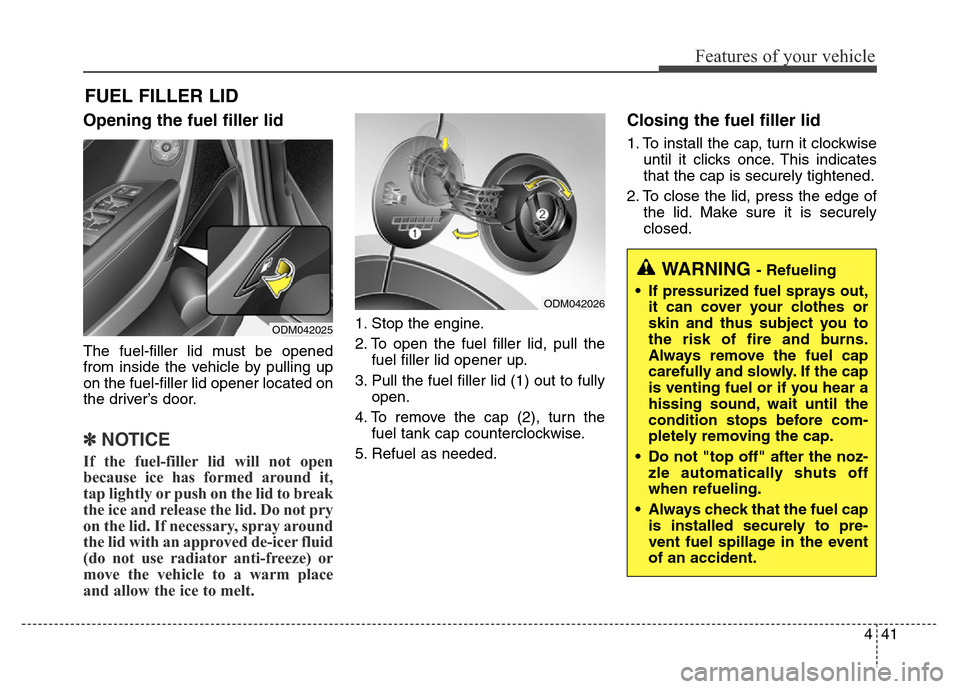
Opening the fuel filler lid
The fuel-filler lid must be opened
from inside the vehicle by pulling up
on the fuel-filler lid opener located on
the driver’s door.
✽NOTICE
If the fuel-filler lid will not open
because ice has formed around it,
tap lightly or push on the lid to break
the ice and release the lid. Do not pry
on the lid. If necessary, spray around
the lid with an approved de-icer fluid
(do not use radiator anti-freeze) or
move the vehicle to a warm place
and allow the ice to melt.
1. Stop the engine.
2. To open the fuel filler lid, pull the
fuel filler lid opener up.
3. Pull the fuel filler lid (1) out to fully
open.
4. To remove the cap (2), turn the
fuel tank cap counterclockwise.
5. Refuel as needed.
Closing the fuel filler lid
1. To install the cap, turn it clockwise
until it clicks once. This indicates
that the cap is securely tightened.
2. To close the lid, press the edge of
the lid. Make sure it is securely
closed.
FUEL FILLER LID
ODM042025
ODM042026
WARNING - Refueling
• If pressurized fuel sprays out,
it can cover your clothes or
skin and thus subject you to
the risk of fire and burns.
Always remove the fuel cap
carefully and slowly. If the cap
is venting fuel or if you hear a
hissing sound, wait until the
condition stops before com-
pletely removing the cap.
• Do not "top off" after the noz-
zle automatically shuts off
when refueling.
• Always check that the fuel cap
is installed securely to pre-
vent fuel spillage in the event
of an accident.
Page 146 of 717
449
Features of your vehicle
Electronic power steering
Power steering uses the motor to
assist you in steering the vehicle. If
the engine is off or if the power steer-
ing system becomes inoperative, the
vehicle may still be steered, but it will
require increased steering effort.
The motor driven power steering is
controlled by the power steering con-
trol unit which senses the steering
wheel torque and vehicle speed to
command the motor.
The steering wheel becomes heavier
as the vehicle’s speed increases and
becomes lighter as the vehicle’s
speed decreases for better control of
the steering wheel.
Should you notice any change in the
effort required to steer during normal
vehicle operation, we recommend
that the system be checked by
authorized HYUNDAI dealer.
✽NOTICE
The following symptoms may occur
during normal vehicle operation:
• The EPS warning light does not
illuminate.
• The steering effort is high immedi-
ately after turning the ignition
switch on. This happens as the sys-
tem performs the EPS system
diagnostics. When the diagnostics
is completed, the steering wheel
will return to its normal condition.
• A click noise may be heard from
the EPS relay after the ignition
switch is turned to the ON or
LOCK/OFF position.
• Motor noise may be heard when
the vehicle is at a stop or at a low
driving speed.
• The steering effort increases if the
steering wheel is rotated continu-
ously when the vehicle is not in
motion. However, after a few min-
utes, it will return to its normal
conditions.
(Continued)(Continued)
• If the Electronic Power Steering
System does not operate normally,
the warning light will illuminate on
the instrument cluster. The steer-
ing wheel may become difficult to
control or operate abnormally. We
recommend that you contact an
authorized HYUNDAI dealer.
• When you operate the steering
wheel in low temperature, abnor-
mal noise could occur. If tempera-
ture rises, the noise will disappear.
This is a normal condition.
STEERING WHEEL
Page 147 of 717
Features of your vehicle
50 4
Tilt steering
A tilt steering wheel allows you to
adjust the steering wheel before you
drive. You can also raise it to give
your legs more room when you exit
and enter the vehicle.
The steering wheel should be posi-
tioned so that it is comfortable for
you to drive, while permitting you to
see the instrument panel warning
lights and gauges.
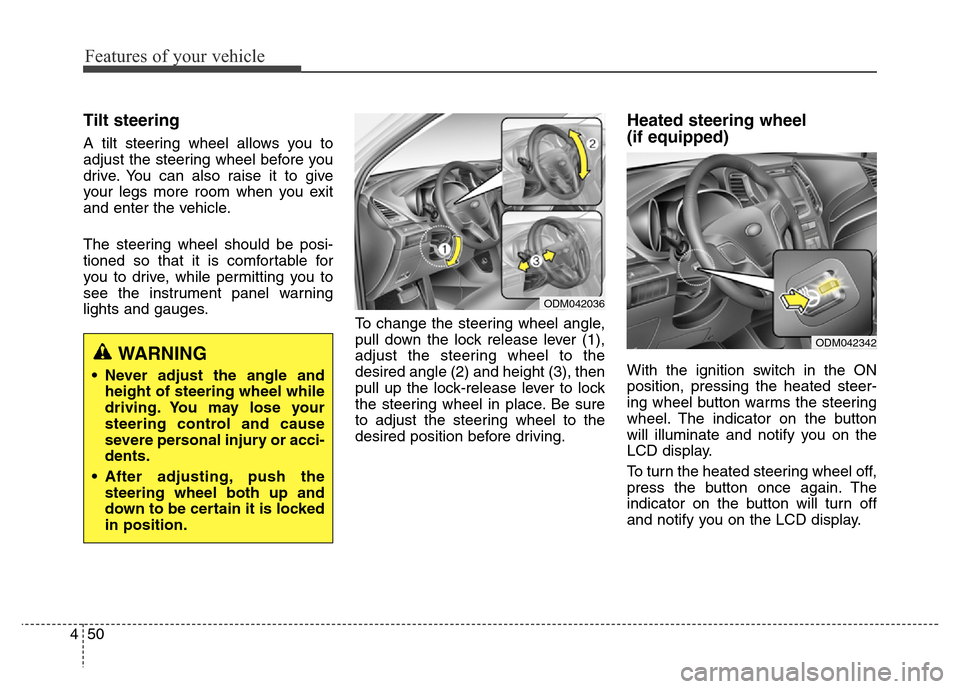
To change the steering wheel angle,
pull down the lock release lever (1),
adjust the steering wheel to the
desired angle (2) and height (3), then
pull up the lock-release lever to lock
the steering wheel in place. Be sure
to adjust the steering wheel to the
desired position before driving.
Heated steering wheel
(if equipped)
With the ignition switch in the ON
position, pressing the heated steer-
ing wheel button warms the steering
wheel. The indicator on the button
will illuminate and notify you on the
LCD display.
To turn the heated steering wheel off,
press the button once again. The
indicator on the button will turn off
and notify you on the LCD display.WARNING
• Never adjust the angle and
height of steering wheel while
driving. You may lose your
steering control and cause
severe personal injury or acci-
dents.
• After adjusting, push the
steering wheel both up and
down to be certain it is locked
in position.
ODM042036
ODM042342
Page 152 of 717
455
Features of your vehicle
Inside rearview mirror
Adjust the rearview mirror so that the
center view through the rear window
is seen. Make this adjustment before
you start driving.
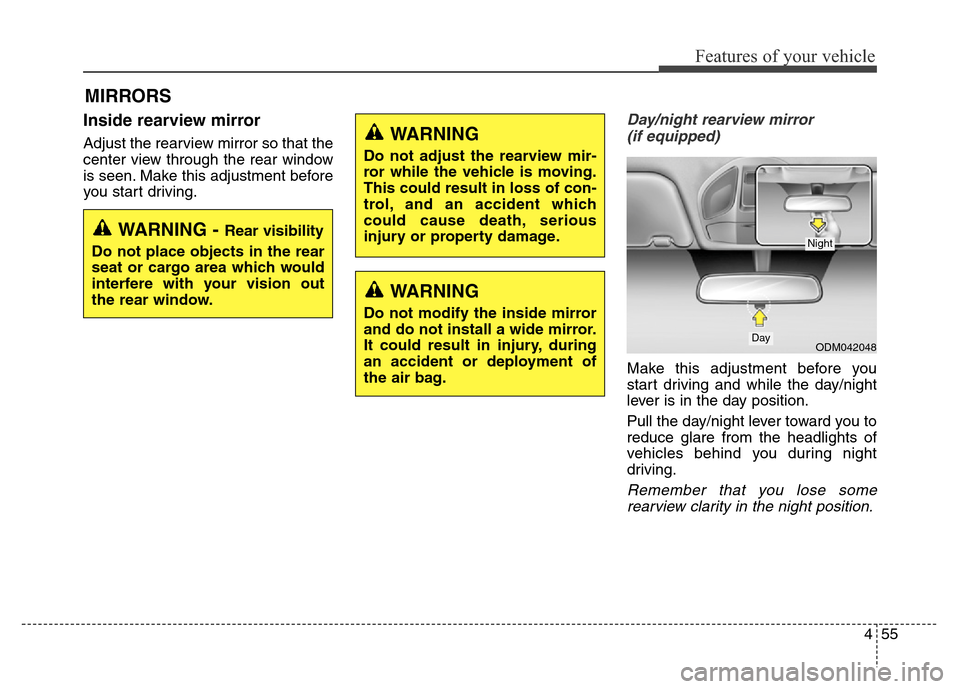
Day/night rearview mirror
(if equipped)
Make this adjustment before you
start driving and while the day/night
lever is in the day position.
Pull the day/night lever toward you to
reduce glare from the headlights of
vehicles behind you during night
driving.
Remember that you lose some
rearview clarity in the night position.
MIRRORS
WARNING - Rear visibility
Do not place objects in the rear
seat or cargo area which would
interfere with your vision out
the rear window.
ODM042048Day
Night
WARNING
Do not adjust the rearview mir-
ror while the vehicle is moving.
This could result in loss of con-
trol, and an accident which
could cause death, serious
injury or property damage.
WARNING
Do not modify the inside mirror
and do not install a wide mirror.
It could result in injury, during
an accident or deployment of
the air bag.