Page 645 of 717

Maintenance
64 7
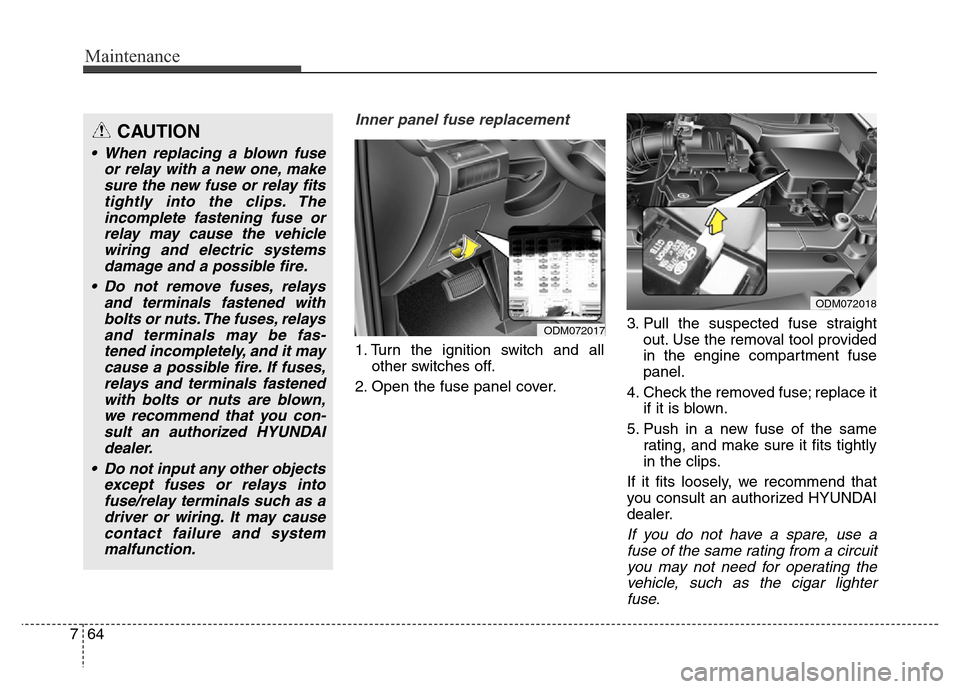
Inner panel fuse replacement
1. Turn the ignition switch and all
other switches off.
2. Open the fuse panel cover.3. Pull the suspected fuse straight
out. Use the removal tool provided
in the engine compartment fuse
panel.
4. Check the removed fuse; replace it
if it is blown.
5. Push in a new fuse of the same
rating, and make sure it fits tightly
in the clips.
If it fits loosely, we recommend that
you consult an authorized HYUNDAI
dealer.
If you do not have a spare, use a
fuse of the same rating from a circuit
you may not need for operating the
vehicle, such as the cigar lighter
fuse.
ODM072017
ODM072018
CAUTION
• When replacing a blown fuse
or relay with a new one, make
sure the new fuse or relay fits
tightly into the clips. The
incomplete fastening fuse or
relay may cause the vehicle
wiring and electric systems
damage and a possible fire.
• Do not remove fuses, relays
and terminals fastened with
bolts or nuts. The fuses, relays
and terminals may be fas-
tened incompletely, and it may
cause a possible fire. If fuses,
relays and terminals fastened
with bolts or nuts are blown,
we recommend that you con-
sult an authorized HYUNDAI
dealer.
• Do not input any other objects
except fuses or relays into
fuse/relay terminals such as a
driver or wiring. It may cause
contact failure and system
malfunction.
Page 646 of 717
765
Maintenance
If the headlights or other electrical
components do not work and the
fuses are OK, check the fuse block in
the engine compartment. If a fuse is
blown, it must be replaced.Fuse switch
Always, put the Fuse switch at the
ON position.
If you move the switch to the OFF
position, some items such as audio
and digital clock must be reset and
transmitter (or smart key) may not
work properly.
Engine compartment panel fuse
replacement
1. Turn the ignition switch and all
other switches off.
2. Remove the fuse box cover by
pressing the tap and pulling up.
ODM072019
CAUTION
Always place the fuse switch in
the ON position while driving
the vehicle.
ODM072027
ODM072028
Diesel only
Page 647 of 717

Maintenance
66 7
3. Check the removed fuse; replace it
if it is blown. To remove or insert
the fuse, use the fuse puller in the
engine compartment fuse panel.
4. Push in a new fuse of the same
rating, and make sure it fits tightly
in the clips. If it fits loosely, we rec-
ommend that you consult an
authorized HYUNDAI dealer.Multi fuse
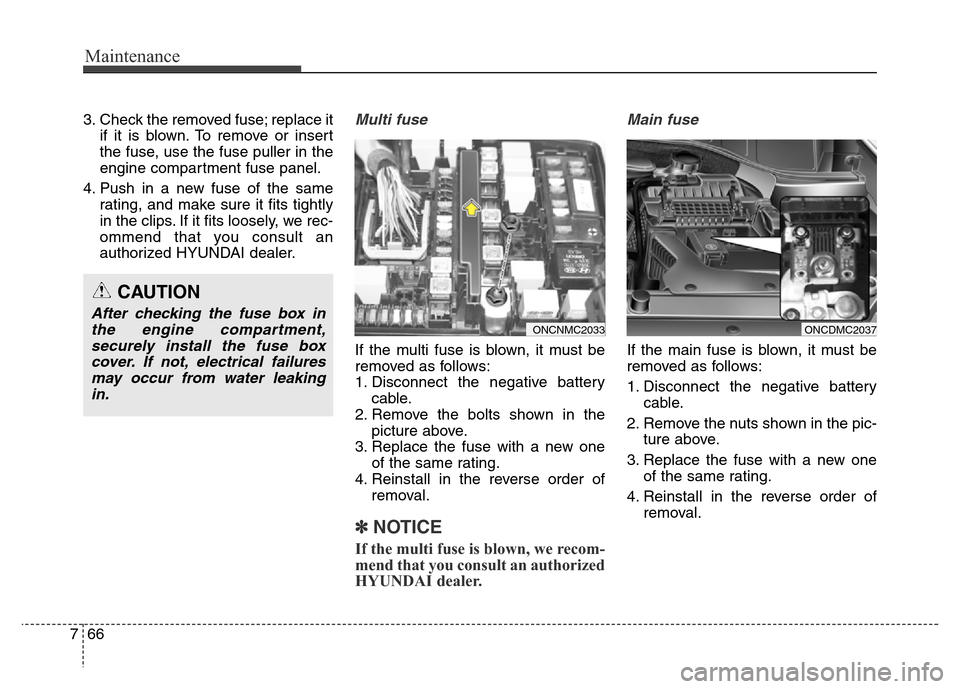
If the multi fuse is blown, it must be
removed as follows:
1. Disconnect the negative battery
cable.
2. Remove the bolts shown in the
picture above.
3. Replace the fuse with a new one
of the same rating.
4. Reinstall in the reverse order of
removal.
✽NOTICE
If the multi fuse is blown, we recom-
mend that you consult an authorized
HYUNDAI dealer.
Main fuse
If the main fuse is blown, it must be
removed as follows:
1. Disconnect the negative battery
cable.
2. Remove the nuts shown in the pic-
ture above.
3. Replace the fuse with a new one
of the same rating.
4. Reinstall in the reverse order of
removal.
CAUTION
After checking the fuse box in
the engine compartment,
securely install the fuse box
cover. If not, electrical failures
may occur from water leaking
in.ONCNMC2033ONCDMC2037
Page 653 of 717
Maintenance
72 7
Engine compartment fuse panel
ODM072050
ODMEMC2015
Page 657 of 717
Maintenance
76 7
DescriptionSymbol Fuse ratingProtected Component
FUSE
TRAILER 115ATrailer Lamp & Power Outlet
WIPER10ABCM, PCM/ECM
WIPER FRT25ARLY. 5 (Wiper (LO) Relay), Front Wiper Motor
B/UP LAMP10AM/T - Back-Up Lamp Switch, A/T - Rear Combination Lamp (IN) LH/RH,
Electro Chromic Mirror, Trailer Lamp & Power Outlet, Audio, A/V & Navigation
Head Unit
ABS37.5AABS Control Module, ESC Control Module
SENSOR57.5APCM/ECM, Mass Air Flow Sensor
TCU15ATCM (DSL), Transaxle Range Switch
F/PUMP15AFuel Pump Relay
ECU115AG4KE/G4KJ/G6DF : PCM
D4HA/D4HB (VGT Regular Engine Pack) : TCM (A/T)
ECU210AD4HA/D4HB : Electronic VGT Actuator
SENSOR310AG6DF : PCM, Injector #1/#2/#3/#4/#5/#6, Fuel Pump Relay
D4HA/D4HB (VGT Regular Engine Pack) : Lambda Sensor, Stop Lamp Switch
Page 658 of 717
777
Maintenance
DescriptionSymbol Fuse ratingProtected Component
FUSE
IGN COIL20AG6DF : Condenser #1/#2, Ignition Coil #1/#2/#3/#4/#5/#6
D4HA/D4HB : ECM
SENSOR210A
G6DF : PCM, Oil Control Valve #1/#2/#3/#4, Variable Intake Solenoid Valve
#1/#2, Purge Control Solenoid Valve
D4HA/D4HB (VGT Regular Engine Pack) : EGR Cooling Bypass Solenoid
Valve, Lower Power EGR Valve, Crankshaft
Position Sensor, Fuel Pump Relay, E/R Fuse &
Relay Box (RLY. 6/10)
SENSOR115AG6DF : PCM, Oxygen Sensor #1/#2/#3/#4, E/R Fuse & Relay Box (RLY. 6/10)
D4HA/D4HB (VGT Regular Engine Pack) : Oil Level Sensor, Fuel Pressure
Regulating Valve, Rail Pressure Regulating Valve
SENSOR420AG4KE/G4KJ : PCM
B/ALARM10ABurglar Alarm Horn Relay
Page 659 of 717
Maintenance
78 7
Engine compartment fuse panel
(Diesel engine only)
ODM072049
ODM074045
Page 666 of 717

785
Maintenance
4. With the head lamp and battery in
normal condition, aim the head
lamps so the brightest portion falls
on the horizontal and vertical
lines.
5. To aim the low/high beam left or
right, turn the driver clockwise or
counterclockwise. To aim the
low/high beam up or down, turn
the driver clockwise or counter-
clockwise.With AFLS
1. Turn off the engine
2. Turn the light switch to the low
beam position.
3. Position the tires straight ahead
with the steering wheel.
4. Turn on the engine.
5. Inflate the tires to the specified
pressure and remove any loads
from the vehicle except the driver,
spare tire, and tools.
6. The vehicle should be placed on a
flat floor.
7. Draw vertical lines (Vertical lines
passing through respective head
lamp centers) and a horizontal line
(Horizontal line passing through
center of head lamps) on the
screen.
8. With the head lamp and battery in
normal condition, aim the head
lamps so the brightest portion falls
on the horizontal and vertical lines
after 20 seconds for AFLS system
initialization.9. To aim the low beam left or right,
turn the driver clockwise or coun-
terclockwise. To aim the low beam
up or down, turn the driver clock-
wise or counterclockwise. To aim
the high beam up or down, turn
the driver clockwise or counter-
clockwise.