2015 Hyundai Grand Santa Fe warning light
[x] Cancel search: warning lightPage 631 of 717
Maintenance
50 7
Battery recharging
Your vehicle has a maintenance-free,
calcium-based battery.
• If the battery becomes discharged
in a short time (because, for exam-
ple, the headlights or interior lights
were left on while the vehicle was
not in use), recharge it by slow
charging (trickle) for 10 hours.
• If the battery gradually discharges
because of high electric load while
the vehicle is being used, recharge
it at 20-30A for two hours.
Reset items
Items should be reset after the bat-
tery has been discharged or the bat-
tery has been disconnected.
• Auto up/down window
(See section 4)
• Sunroof (See section 4)
• Trip computer (See section 4)
• Climate control system
(See section 4)
• Clock (See section 4)
• Audio (See section 4)(Continued)
• Watch the battery during charg-
ing, and stop or reduce the
charging rate if the battery cells
begin gassing (boiling) violently
or if the temperature of the elec-
trolyte of any cell exceeds 49°C
(120°F).
• Wear eye protection when check-
ing the battery during charging.
• Disconnect the battery charger
in the following order.
1. Turn off the battery charger
main switch.
2. Unhook the negative clamp
from the negative battery ter-
minal.
3. Unhook the positive clamp
from the positive battery termi-
nal.
• Before performing maintenance
or recharging the battery, turn off
all accessories and stop the
engine.
• The negative battery cable must
be removed first and installed
last when the battery is discon-
nected.
WARNING- Recharging
battery
When recharging the battery,
observe the following precau-
tions:
• The battery must be removed
from the vehicle and placed in
an area with good ventilation.
• Do not allow cigarettes,
sparks, or flame near the bat-
tery.
(Continued)
Page 637 of 717
Maintenance
56 7
Compact spare tire replacement
(if equipped)
A compact spare tire has a shorter
tread life than a regular size tire.
Replace it when you can see the
tread wear indicator bars on the tire.
The replacement compact spare tire
should be the same size and design
tire as the one provided with your
new vehicle and should be mounted
on the same compact spare tire
wheel. The compact spare tire is not
designed to be mounted on a regular
size wheel, and the compact spare
tire wheel is not designed for mount-
ing a regular size tire.
Wheel replacement
When replacing the metal wheels for
any reason, make sure the new
wheels are equivalent to the original
factory units in diameter, rim width
and offset.(Continued)
• The use of any other tire size
or type may seriously affect
ride, handling, ground clear-
ance, stopping distance, body
to tire clearance, snow tire
clearance, and speedometer
reliability.
• It is best to replace all four
tires at the same time. If that
is not possible, or necessary,
then replace the two front or
two rear tires as a pair.
Replacing just one tire can
seriously affect your vehicle’s
handling.
• The ABS works by comparing
the speed of the wheels. Tire
size can affect wheel speed.
When replacing tires, all 4
tires must use the same size
originally supplied with the
vehicle. Using tires of a differ-
ent size can cause the ABS
(Anti-lock Brake System) and
ESC (Electronic Stability
Control) (if equipped) to work
irregularly.
WARNING
A wheel that is not the correct
size may adversely affect wheel
and bearing life, braking and
stopping abilities, handling
characteristics, ground clear-
ance, body-to-tire clearance,
snow chain clearance,
speedometer and odometer cal-
ibration, headlight aim and
bumper height.
Page 644 of 717
763
Maintenance
FUSES
A vehicle’s electrical system is pro-
tected from electrical overload dam-
age by fuses.
This vehicle has 2 (or 3) fuse panels,
one located in the driver’s side panel
bolster, the other in the engine com-
partment near the battery.
If any of your vehicle’s lights, acces-
sories, or controls do not work, check
the appropriate circuit fuse. If a fuse
has blown, the element inside the
fuse will be melted.
If the electrical system does not
work, first check the driver’s side
fuse panel.
Before replacing a blown fuse, dis-
connect the negative battery cable.
Always replace a blown fuse with
one of the same rating.
If the replacement fuse blows, this
indicates an electrical problem. Avoid
using the system involved and imme-
diately consult an authorized
HYUNDAI dealer.
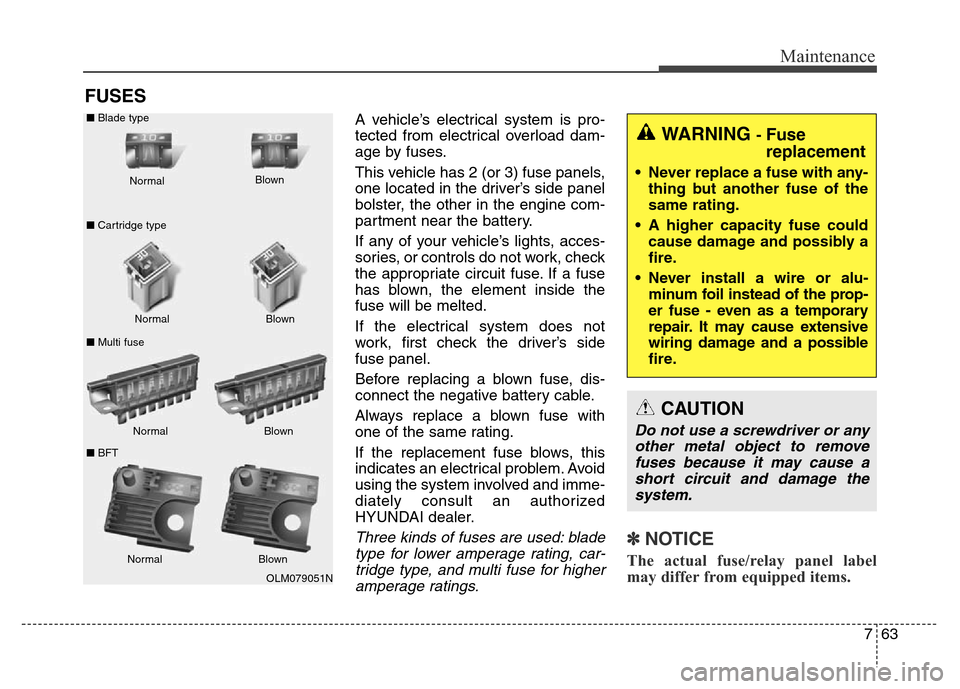
Three kinds of fuses are used: blade
type for lower amperage rating, car-
tridge type, and multi fuse for higher
amperage ratings.✽NOTICE
The actual fuse/relay panel label
may differ from equipped items.
WARNING - Fuse
replacement
• Never replace a fuse with any-
thing but another fuse of the
same rating.
• A higher capacity fuse could
cause damage and possibly a
fire.
• Never install a wire or alu-
minum foil instead of the prop-
er fuse - even as a temporary
repair. It may cause extensive
wiring damage and a possible
fire.
CAUTION
Do not use a screwdriver or any
other metal object to remove
fuses because it may cause a
short circuit and damage the
system.
OLM079051N Normal Normal ■Blade type
■Cartridge type
■Multi fuseBlown
Blown
Normal Blown
Normal Blown ■BFT
Page 649 of 717
Maintenance
68 7
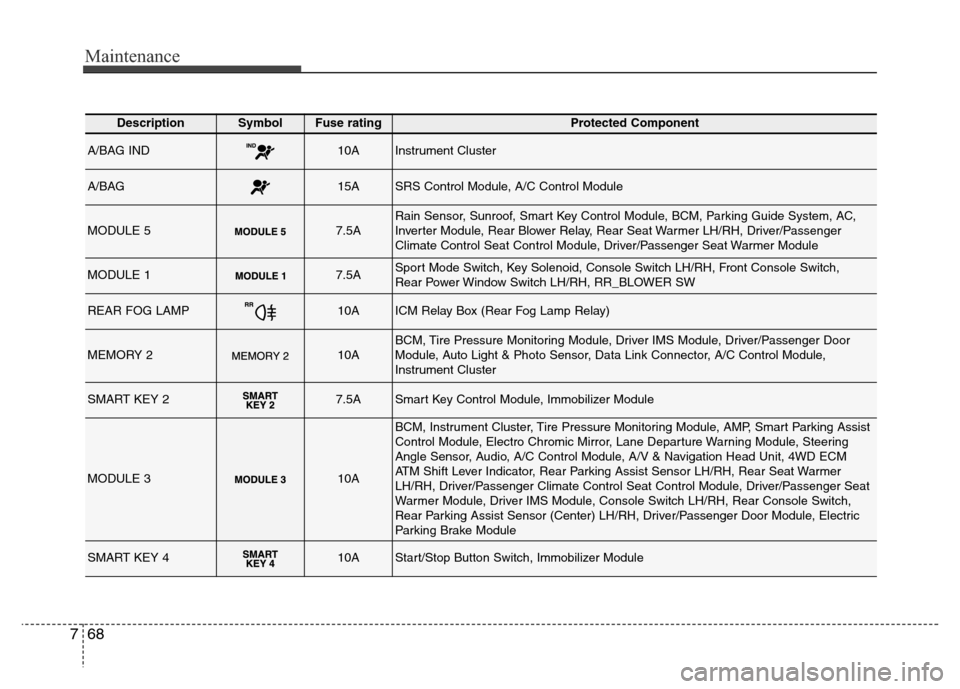
DescriptionSymbol Fuse ratingProtected Component
A/BAG IND10AInstrument Cluster
A/BAG15ASRS Control Module, A/C Control Module
MODULE 57.5ARain Sensor, Sunroof, Smart Key Control Module, BCM, Parking Guide System, AC,
Inverter Module, Rear Blower Relay, Rear Seat Warmer LH/RH, Driver/Passenger
Climate Control Seat Control Module, Driver/Passenger Seat Warmer Module
MODULE 17.5ASport Mode Switch, Key Solenoid, Console Switch LH/RH, Front Console Switch,
Rear Power Window Switch LH/RH, RR_BLOWER SW
REAR FOG LAMP10AICM Relay Box (Rear Fog Lamp Relay)
MEMORY 210ABCM, Tire Pressure Monitoring Module, Driver IMS Module, Driver/Passenger Door
Module, Auto Light & Photo Sensor, Data Link Connector, A/C Control Module,
Instrument Cluster
SMART KEY 27.5ASmart Key Control Module, Immobilizer Module
MODULE 310A
BCM, Instrument Cluster, Tire Pressure Monitoring Module, AMP, Smart Parking Assist
Control Module, Electro Chromic Mirror, Lane Departure Warning Module, Steering
Angle Sensor, Audio, A/C Control Module, A/V & Navigation Head Unit, 4WD ECM
ATM Shift Lever Indicator, Rear Parking Assist Sensor LH/RH, Rear Seat Warmer
LH/RH, Driver/Passenger Climate Control Seat Control Module, Driver/Passenger Seat
Warmer Module, Driver IMS Module, Console Switch LH/RH, Rear Console Switch,
Rear Parking Assist Sensor (Center) LH/RH, Driver/Passenger Door Module, Electric
Parking Brake Module
SMART KEY 410AStart/Stop Button Switch, Immobilizer Module
Page 650 of 717
769
Maintenance
DescriptionSymbol Fuse ratingProtected Component
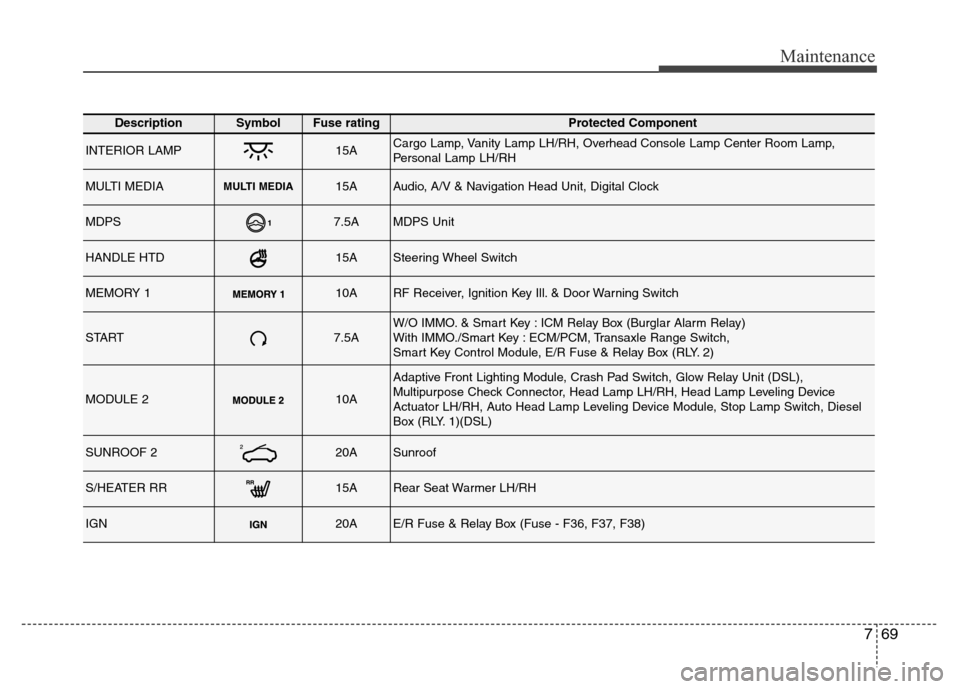
INTERIOR LAMP15ACargo Lamp, Vanity Lamp LH/RH, Overhead Console Lamp Center Room Lamp,
Personal Lamp LH/RH
MULTI MEDIAMULTI MEDIA15AAudio, A/V & Navigation Head Unit, Digital Clock
MDPS7.5AMDPS Unit
HANDLE HTD15ASteering Wheel Switch
MEMORY 110ARF Receiver, Ignition Key Ill. & Door Warning Switch
START7.5AW/O IMMO. & Smart Key : ICM Relay Box (Burglar Alarm Relay)
With IMMO./Smart Key : ECM/PCM, Transaxle Range Switch,
Smart Key Control Module, E/R Fuse & Relay Box (RLY. 2)
MODULE 210A
Adaptive Front Lighting Module, Crash Pad Switch, Glow Relay Unit (DSL),
Multipurpose Check Connector, Head Lamp LH/RH, Head Lamp Leveling Device
Actuator LH/RH, Auto Head Lamp Leveling Device Module, Stop Lamp Switch, Diesel
Box (RLY. 1)(DSL)
SUNROOF 220ASunroof
S/HEATER RR15ARear Seat Warmer LH/RH
IGN20AE/R Fuse & Relay Box (Fuse - F36, F37, F38)
Page 661 of 717
Maintenance
80 7
LIGHT BULBS
Use only the bulbs of the specified
wattage.
✽NOTICE
After heavy, driving rain or wash-
ing, headlight and taillight lenses
could appear frosty. This condition
is caused by the temperature differ-
ence between the lamp inside and
outside. This is similar to the con-
densation on your windows inside
your vehicle during the rain and
doesn’t indicate a problem with
your vehicle. If the water leaks into
the lamp bulb circuitry, we recom-
mend that the system be checked by
an authorized HYUNDAI dealer.WARNING - Working on
the lights
Prior to working on the light,
firmly apply the parking brake,
ensure that the ignition switch
is turned to the “LOCK” position
and turn off the lights to avoid
sudden movement of the vehi-
cle and burning your fingers or
receiving an electric shock.
CAUTION
Be sure to replace the burned-
out bulb with one of the same
wattage rating. Otherwise, it
may cause damage to the fuse
or electric wiring system.
CAUTION
If you don’t have necessary
tools, the correct bulbs and the
expertise, consult an authorized
HYUNDAI dealer. In many cases,
it is difficult to replace vehicle
light bulbs because other parts
of the vehicle must be removed
before you can get to the bulb.
This is especially true if you
have to remove the headlight
assembly to get to the bulb(s).
Removing/installing the head-
light assembly can result in
damage to the vehicle.
Page 665 of 717
Maintenance
84 7
Headlamp (HID type), position
(LED) lamp, daytime running
lamp replacement
If the light bulb does not operate, we
recommend that the system be
checked by an authorized HYUNDAI
dealer.
✽NOTICE
HID lamps have superior perform-
ance vs. halogen bulbs. HID lamps
are estimated by the manufacturer
to last twice as long or longer than
halogen bulbs depending on their
frequency of use. They will probably
require replacement at some point
in the life of the vehicle. Cycling the
headlamps on and off more than
typical use will shorten HID lamps
life. HID lamps do not fail in the
same manner as halogen incandes-
cent lamps. If a headlamp goes out
after a period of operation but will
immediately relight when the head-
lamp switch is cycled it is likely the
HID lamp needs to be replaced. HID
lighting components are more com-
plex than conventional halogen
bulbs thus have higher replacement
cost.
Headlight and front fog light
aiming (for Europe)
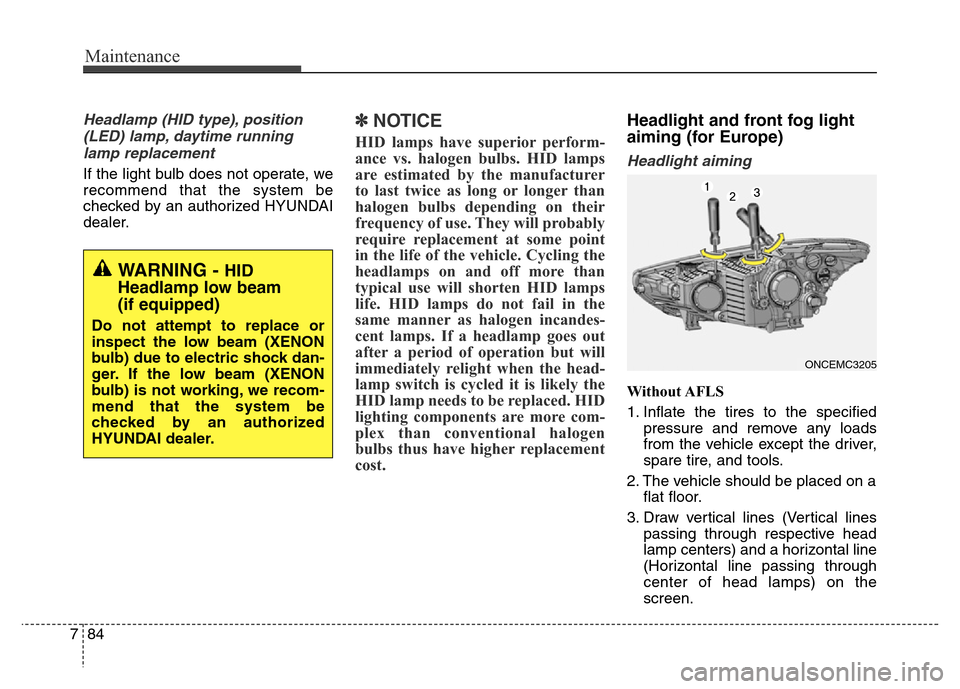
Headlight aiming
Without AFLS
1. Inflate the tires to the specified
pressure and remove any loads
from the vehicle except the driver,
spare tire, and tools.
2. The vehicle should be placed on a
flat floor.
3. Draw vertical lines (Vertical lines
passing through respective head
lamp centers) and a horizontal line
(Horizontal line passing through
center of head lamps) on the
screen.
WARNING - HID
Headlamp low beam
(if equipped)
Do not attempt to replace or
inspect the low beam (XENON
bulb) due to electric shock dan-
ger. If the low beam (XENON
bulb) is not working, we recom-
mend that the system be
checked by an authorized
HYUNDAI dealer.
ONCEMC3205
Page 678 of 717
797
Maintenance
APPEARANCE CARE
Exterior care
Exterior general caution
It is very important to follow the label
directions when using any chemical
cleaner or polish. Read all warning
and caution statements that appear
on the label.
Finish maintenance
Washing
To help protect your vehicle’s finish
from rust and deterioration, wash it
thoroughly and frequently at least
once a month with lukewarm or cold
water.
If you use your vehicle for off-road
driving, you should wash it after each
off-road trip. Pay special attention to
the removal of any accumulation of
salt, dirt, mud, and other foreign
materials. Make sure the drain holes
in the lower edges of the doors and
rocker panels are kept clear and
clean.
Insects, tar, tree sap, bird droppings,
industrial pollution and similar
deposits can damage your vehicle’s
finish if not removed immediately.
Even prompt washing with plain
water may not completely remove all
these deposits.
A mild soap, safe for use on painted
surfaces, may be used.
After washing, rinse the vehicle thor-
oughly with lukewarm or cold water.
Do not allow soap to dry on the fin-
ish.
WARNING - Wet brakes
After washing the vehicle, test
the brakes while driving slowly
to see if they have been affected
by water. If braking performance
is impaired, dry the brakes by
applying them lightly while
maintaining a slow forward
speed.
CAUTION
• Do not use strong soap, chem-
ical detergents or hot water,
and do not wash the vehicle in
direct sunlight or when the
body of the vehicle is warm.
• Be careful when washing the
side windows of your vehicle.
Especially, with high-pressure
water. Water may leak through
the windows and wet the inte-
rior.
• To prevent damage to the
plastic parts and lamps, do
not clean with chemical sol-
vents or strong detergents.