Page 9 of 22
Quick Reference Guide I 15
INSTRUMENT CLUSTER
14 I Quick Reference Guide
Fuel gauge
Tachometer
Speedometer
Engine coolant temperature gauge Warning and
indicator lights
LCD display
(including trip computer)
Type A with 4.3" LCD Display
Type B with 7" LCD Display
GENESIS
HYUNDAI
Fuel gauge
Tachometer
Speedometer
Engine coolant temperature gauge Warning and
indicator lights
LCD display
(including trip computer)
Page 10 of 22
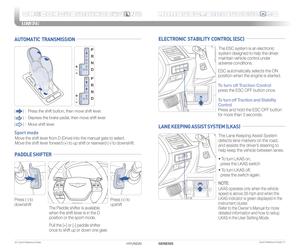
 warning light
Seat belt warningParking brake & B")
INSTRUMENT CLUSTER
Quick Reference Guide I 1716 I Quick Reference Guide
WARNINGS AND INDICATORS
Air bag warning light
Electric Power Steering
(EPS) warning light
Seat belt warningParking brake & Brake
fluid warning light
Electronic Brake Force Distribution (EBD)
system warning light
Low tire pressure
warning lightTrunk open
warning light
Low fuel level
warning light
Front fog light indicator
Low beam indicator
Smart high beam
indicator
SNOW mode
indicator
Light ON indicator
ECO indicator
SPORT mode
indicator
Anti-lock Brake System
(ABS) warning light
High beam indicator
Door open
warning light
Electronic Stability Control (ESC) indicatorMaster warning light
Automatic Emergency
Braking (AEB) warning lightElectric Parking Brake
(EPB) warning light
Engine oil pressure
warning light
Charging system
warning light
Immobilizer indicator
Malfunction Indicator
Lamp (MIL)
Electronic Stability Control
(ESC) OFF indicator
Cruise indicator
Lane Keeping Assistant System(LKAS)
indicator
Cruise SET indicator
AUTO HOLD indicator
Turn signal indicator
LCD DISPLAY MODES
The head up display is a transparent
display which projects a shadow of
selected information of the instrument
cluster and navigation on the
windshield glass.
To activate the head up display, select
“Head-up Display” on the “User
Settings Mode” in the LCD display.
Adjust "Head-up Display" height until
in view.
HEAD UP DISPLAY
1 : MODE button for changing
modes
2 : MOVE switch for changing
items
: SELECT/RESET button for
setting or resetting the
selected item
3 : BACK button for moving
to upper level menu
(if equipped)
LCD DISPLAY CONTROL
Modes Symbol Explanation
Trip Computer This mode displays driving information like the
tripmeter, fuel economy, and so on.
Turn By Turn (TBT) (if equipped)
This mode displays the navigation turn by turn
guidance.
ASCC/LKAS(if equipped) This mode displays the state of the Advanced
Smart Cruise Control (ASCC) and
Lane Keeping Assist System (LKAS).
A/V This mode displays the state of the A/V
system.
Informaition orDisplays service interval and warning
messages.
User Settings Changes settings.
Type A
Type B
1
2
3
1
2
Engine coolant temperature
warning light
AWD warning light
GENESIS
HYUNDAI
NOTE: See Owner's Manual for more details on selecting content to
display on the Head Up Display.
(Press)
Page 11 of 22

Quick Reference Guide I 19
CLIMATE CONTROL
1 8 I Quick Reference Guide
DEFOGGING / DEFROSTING
3. Set the fan speed to
the highest speed.
2.
Select warmest
temperature.
1. Press the defrost
button.AIR INTAKE CONTROL
SYSTEM OFFPressing the OFF button will
place the system in the OFF mode.
•
Front blower will turn off.
• Outside (fresh) air position
will be selected.
•
Vented air will be at last set
temperature.
Controlling the modes,
fan speeds, air intake and
air-conditioning automatically.
AUTOMATIC HEATING /
AIR CONDITIONING
10 SYNC button
11 Air intake control button (Outside air)
12 Air intake control button
(Recirculated air)
13 Climate information screen selection button
14 Mode selection button (Passenger)
15 Air intake control button
16 Rear temperature control thumbwheel
17 Rear vent ON/OFF thumbwheel
1 Driver’s temperature control knob
2 Fan speed control button
3 OFF button
4 AUTO (automatic control) button
5 Mode selection button (Driver)
6 Air conditioning button
7 Front windshield defrost button
8 Rear window defrost button
9 Passenger’s temperature
control knob
Front Rear
Type A
Type B
1
1
10
10
9
9
8
8
12
15
7
7
11
14
4
4
6
6
3
3
2
2
5
5
13
13
1617
When cabin humidity and carbon dioxide levels increase while Climate
Control is off, fresh air will be circulated into the cabin.
Please refer to the Owner's Manual for more information.
Changing the direction of the air flow
as follow.
SMART VENT
MODE SELECTION
GENESIS
HYUNDAI
Outside(fresh) air position
(type B)
Recirculated air position
Outside(fresh) air position
(type A)
Page 12 of 22

MULTIMEDIA
20 I Quick Reference Guide HYUNDAI Quick Reference Guide I 21GENESIS
Pairing tutorials, phone compatibility and
Operational tips can be found through the
Smart QR code using the QR reader
application on your Smartphone.
BLUETOOTH PHONE PAIRING
Pairing a new device
Standard AVN
DIS navigation system
2. Press to search for
Bluetooth phones. 3.
Pair your car after your mobile
phone detects the Bluetooth device.
4. Enter the passkey or accept
the authorization popup.
(The default passkey is 0000.) 5. Connect Bluetooth.
1.
Press the PHONE button in the head unit(or DIS navigation system)
or
button in the steering wheel remote control.
NOTE: Vehicle must be parked to complete pairing process.
BLUE LINK TELEMATICS SYSTEM
• SOS
• Navigation
• Blue Link
Press the button for access to the voice-response menu of services.
- Press the button for Destination Search Powered by Google®.
- Press the
button for SOS Emergency Assistance.
- Refer to your Blue Link User’s Manual for detailed information on system
operation.
- For immediate assistance with subscription services, please call
1-855-2BLUELINK (1-855-225-8354).
Google® is a registered trademark of Google Inc.
You can say:
- "Service Link" to schedule a service appointment.
- "Roadside Assistance" for roadside services.
- "Blue Link Account Services" for help with your Blue Link subscription\
.
Page 13 of 22

You can download the Blue Link mobile app to your
compatible smart phone from the following sites:
• iPhone
® — Apple® App Store
• Android® — Google Play
This feature enables you to remotely start your vehicle and set an engine
timer (1-10 minutes) from virtually anywhere. You can also set the climate
control temperature and turn on the rear-window defroster, ensuring a
warm or cool car is ready to go when you are.
•
To use this feature, you must have a Blue Link Personal
Identification Number (PIN). To create or change your PIN,
log on to www.MyHyundai.com. See page 5 of this guide for more
information.
• Remote Start with Climate Control will automatically shut off after 10 minutes or after selected engine timer runs out.
• While this feature is active, the parking lights will blink until vehicle is turned off or when vehicle is in operation.
• To continue operation of the vehicle, the proximity key must be inside
the vehicle with the driver prior to pressing the brake and being able to
move the gearshift from the "P" (park) position.
Genesis Intelligent Assistance App
Remember...
Remote Features
Please note: Remote Services are subject to adequate cellular coverage and signal
strength, and only available in the 50 United States.
Preconditions:
• Ignition is OFF
• Alarm is armed (i.e., vehicle locked by key fob Remote Door Lock)
• Gearshift level is in the “P” (park) position
• Brake pedal is not depressed
• Engine hood is securely closed
• All the doors are closed and locked
• The tailgate or trunk lid is closed
• The security/panic system is not activated
• The proximity key is not inside the vehicle
• The battery power is not low
• Vehicle is located in an open area
• It has been less than 4 days since last vehicle ignition off
• Vehicle located in area with good cell reception
Remote Start with Climate will terminate...
• After 10 minutes or after selected engine timer runs out
• Brake is pressed without proximity key inside vehicle
• Alarm is triggered without proximity key inside vehicle
• Door/trunk is opened from inside the vehicle
Notice: Laws in some communities may restrict the use of the
features that remotely start the engine. For example, some laws may
require a person using the remote start feature to have the vehicle in
view when doing so or limit the length of time a vehicle engine may
idle. Please check local and state regulations for any requirements
and restrictions on remote starting of vehicles and engine idling time.
WARNING!
Do not remote start vehicle in an enclosed environment (i.e., closed ga\
rage). Prolonged operation of a
motor vehicle in an enclosed environment can cause a harmful build-up of\
carbon monoxide. Carbon
monoxide is harmful to your health. Exposure to high levels of carbon mo\
noxide can cause headaches,
dizziness or in extreme cases unconsciousness and/or death. Do not leave\
children or animals
unattended in a vehicle while using the remote start function.
CAUTION!
If the vehicle’s windshield wipers are left on when the vehicle was last driven, then t\
he wipers will turn
on if the remote start function is activated. To avoid damage to the wiper blades (i.e., due to heavy ice
or snow accumulated on the windshield), please always turn the vehicle’\
s windshield wipers off when
parking the vehicle.
MULTIMEDIA
22 I Quick Reference Guide HYUNDAI Quick Reference Guide I 23GENESIS
Page 14 of 22

STEERING WHEEL AUDIO CONTROL
2
3
1
1 VOLUME/MUTE
Scroll up or down to adjust the volume.
Press to mute or unmute the sound.
2 SEEK/PRESET
Change station.
3 MODE
Change the audio source.
To Answer a Call: • Press button on the steering wheel.
To Reject a Call: • Press button on the steering wheel.
To Adjust Ring Volume: • Use the VOLUME buttons on the steering wheel.
To Transfer a Call to the Phone
(Secret Call):
• Press and hold button on the steering wheel until the
audio system transfers a call to the phone.
To Finish a Call: • Press button on the steering wheel.
BLUETOOTH OPERATIONAL TIPS
In the following situations you or the other party may have difficulty
hearing each other:
1. When Bluetooth volume is set too high. High volume may result in
distortion and echo.
2. When driving on a rough road, high speeds and/or with the window open.
3. When the air conditioning vents are facing the microphone and/or when
the air conditioning fan is at the max speed.
Steering wheel bluetooth control
1 TALK
Activates voice recognition.
2 CALL
Places and transfers calls.
3 END
Ends calls or cancels functions.
23
1
Making a call using voice recognition:
The menu tree identifes available voice recognition Bluetooth ®
functions.
Calling by Name:
1. Press button.
2. Say the following command:
• “Call ”: Connects the call to John Smith.
• “ Call on ”: Connects the
call to John Smith’s Mobile, Home, or Offce phone number.
Dialing by Number:
1. Press button.
2. Say “Dial Number”.
3. Say desired phone number. For complete list of commands,
refer to your Owner’s Manual.
VOICE RECOGNITION TIPS
Your vehicle is equipped with Voice Recognition technology which allows drivers to
operate their phones without having to take their eyes off the road
to minimize distractions.
Voice recognition performance may be affected if driving with windows
and sun roof open; when the heating-cooling system is on; when passing in
a tunnel or when driving on rugged and uneven roads.
Quick reference on using voice commands
To start voice command. Press the
key, the following commands are available:
Command Function
CallDisplays downloaded Contacts.
Call Calls saved in Contacts.
Dial Number Displays a screen where you can say a phone number to dial.
Dial You can directly say the number to call.
ex) Dial 111 555 1234
Redial Directly calls at the number that you last dialed.
Call History Displays your Call History.
MULTIMEDIA
24 I Quick Reference Guide HYUNDAI Quick Reference Guide I 25GENESIS
Page 15 of 22

MULTIMEDIA
26 I Quick Reference Guide HYUNDAI Quick Reference Guide I 27GENESIS
AUX, USB AND iPod PORT
Use the input jack to connect an
external audio device and listen to it
through the audio system in your
vehicle.
NOTE: To operate your iPod® through the vehicle's audio system,
connect your Apple supplied USB cable to the USB port
iPod® is a trademark of Apple Inc.
Map position
Standard AVN
DIS Navigation system
NAVIGATION
North UP/Heading up.
•
Displays the current map mode to reflect the position in reference to
the screen. The map mode can be switched between North Up and
Heading Up.
•
Each time the button is pressed, the screen will switch in the order
shown below.
– Heading Up
North Up Heading Up
– Map Scale: Increases or decreases the map size.
– Map Scale indicator: shows the scale of the map.
– Map Voice Key: Activate/deactivate the voice guidance.
1 Move to the Home Screen2 Change the map view mode3 Navigation Voice Guidance On/Off4 Zoom in the map5 Map scale display6 Zoom out the map
1 Clock display2 Move to the Home Screen3 Change the map view mode4 Navigation voice guidance on/off5 Zoom in the map6 Map scale display7 Zoom out the map
7 [MENU] button 8 Touch to scroll the map9 Quick and easy selection of
a destination from the map screen
10 Set a waypoint to the current route11 Save frequently used address to address book12 Find a POI(Point Of Interest) around the current position13 Vehicle position
8 [MENU] button9 Route guidance10 Vehicle position11 Current position and Destination12 Remaining distance display/ Remaining time13 Cancel Route14 [Route] button
1
21
34567
81112
9
13
10
14
8
9101112
13
23456
7
Page 16 of 22

Quick Reference Guide I 29
FEATURES AND CONTROLS
28 I Quick Reference Guide GENESIS
HYUNDAI
Scrolling through Controller
Move the focus or scroll through the
navigation map.
Turning the controller
Move the focus, or zoom in/out the
navigation map.
Pressing the controller
Start/Select the focused feature.
CENTRAL CONTROL PANEL CLOCK ADJUSTMENT
The central control panel is located in the vehicle center console.
It comprises the controller and the main function buttons.
Open the HOME
main menu
Open the main menu
Go back
one menu
level Open the
Navigation main
menu
Open the Bluelink main menu
Open the
PHONE main
menu
MAP/VOICE
button
1.
Press "HOME" button.
1. Press the "SETUP" button.
2. Press "Settings" icon on the screen, then press "Clock".
3. To set your preferred Time Setting:
• Check "GPS Time" to adjust the time automatically.
• Press "Time Format" to adjust the clock manually.
• If "Daylight Savings Time" is selected, the clock will be
adjusted forward by one hour.
2. Press "Clock" icon on the screen.
3. To set your preferred Time Setting:
• Check "GPS Time" to adjust the time automatically.
• Press "Time Format" to adjust the clock manually.
• If "Daylight Savings Time" is selected, the clock will be
adjusted forward by one hour.
With DIS Touch System
With Touch Screen System
NOTE: Once the digital clock is adjusted, the analog
clock will be updated accordingly.