2015 Hyundai Genesis clock
[x] Cancel search: clockPage 15 of 501

F15
Climate control additional features.................3-150
Cluster ionizer ................................................................3-150
Smart ventilation ...........................................................3-150
Rear climate system ON/OFF ....................................3-151
CO2 control auto air conditioner ..............................3-151
Storage compartment ........................................3-152
Center console storage ...............................................3-152
Glove box ........................................................................3-153
Sunglass holder .............................................................3-153
Interior features.................................................3-154
Ashtray ............................................................................3-154
Cup holder.......................................................................3-154
Sunvisor ...........................................................................3-155
Power outlet ...................................................................3-156
Clock .................................................................................3-157
Clothes hanger ..............................................................3-158
Bag hanger .....................................................................3-158
Floor mat anchor(s)......................................................3-159
Rear curtain....................................................................3-160
Side curtain.....................................................................3-160
Luggage net holder ......................................................3-161
Multimedia system .................................................4-2
AUX, USB and iPod®port ...............................................4-2
Antenna ...............................................................................4-3
Steering wheel audio control .........................................4-4
Audio / Video / Navigation system (AVN) ..................4-5
Bluetooth®Wireless Technology hands-free ............4-5
F15
4Multimedia system
Page 31 of 501

Safety precautions
Adjusting the seats so that you are sit-
ting in a safe, comfortable position
plays an important role in driver and
passenger safety together with the
seat belts and air bags in an accident.
Air bags
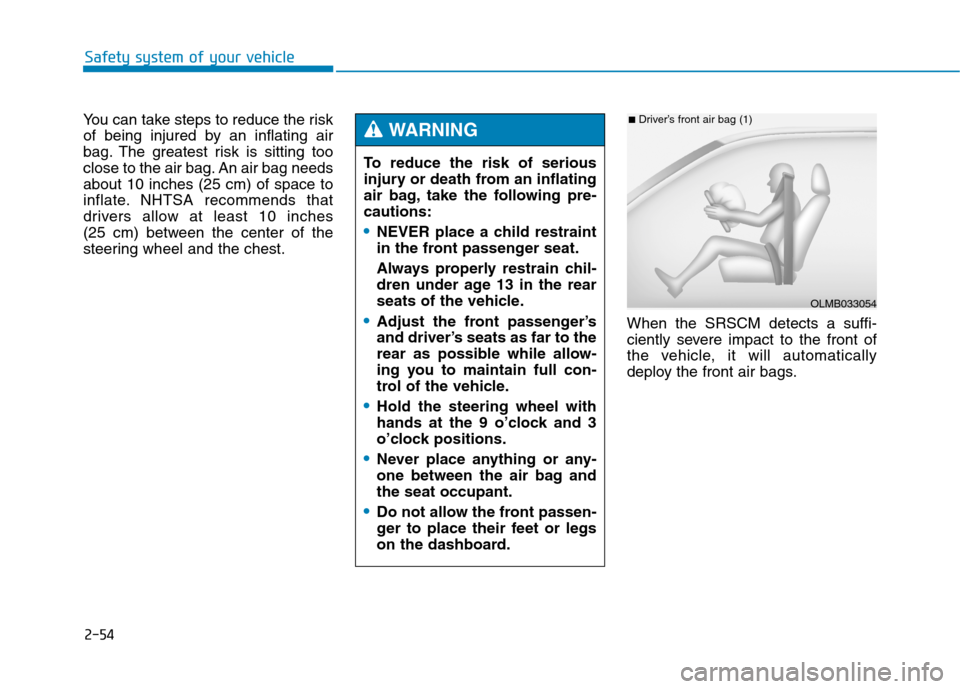
You can take steps to reduce the risk
of being injured by an inflating air
bag. Sitting too close to an air bag
greatly increases the risk of injury in
the event the air bag inflates.The National Highway Traffic Safety
Administration (NHTSA) recommends
that drivers allow at least 10 inches
(25 cm) between the center of the
steering wheel and their chest.
Seat belts
Always fasten your seat belt before
starting any trip.
At all times, passengers should sit
upright and be properly restrained.
Infants and small children must be
restrained in appropriate child restraint
systems. Children who have outgrown
a booster seat and adults must be
restrained using the seat belts.
Do not use a cushion that
reduces friction between the seat
and the passenger. The passen-
ger's hips may slide under the
lap portion of the seat belt during
an accident or a sudden stop.
Serious or fatal internal injuries
could result because the seat
belt cannot operate properly.
WARNING To reduce the risk of serious
injury or death from an inflating
air bag, take the following pre-
cautions:
Adjust the driver’s seat as far to
the rear as possible while main-
taining the ability to maintain
full control of the vehicle.
Adjust the front passenger seat
as far to the rear as possible.
Hold the steering wheel by the
rim with hands at the 9 o’clock
and 3 o’clock positions to mini-
mize the risk of injuries to your
hands and arms.
NEVER place anything or any-
one between the steering wheel
and the air bag.
Do not allow the front passen-
ger to place feet or legs on the
dashboard to minimize the risk
of leg injuries.
WARNING
2-5
Safety system of your vehicle
2
Page 76 of 501

2-50
Safety system of your vehicle
Curtain air bags
Curtain air bags are located along
both sides of the roof rails above the
front and rear doors. To reduce the risk of serious
injury or death from an inflating
side air bag, take the following
precautions:
Seat belts must be worn at all
times to help keep occupants
positioned properly.
Do not allow passengers to
lean their heads or bodies onto
doors, put their arms on the
doors, stretch their arms out of
the window, or place objects
between the doors and seats.
Hold the steering wheel at the 9
o’clock and 3 o’clock positions,
to minimize the risk of injuries
to your hands and arms.
Do not use any accessory
seat covers. This could reduce
or prevent the effectiveness
of the system.
Do not place any objects over
the air bag or between the air
bag and yourself.
(Continued)
WARNING (Continued)
Do not place any objects
between the door and the
seat. They may become dan-
gerous projectiles if the side
air bag inflates.
Do not install any accessories
on the side or near the side air
bags.
Do not cause impact to the
doors when the Engine
Start/Stop button is in the ON
position or this may cause the
side air bags to inflate.
If the seat or seat cover is
damaged, have the vehicle
checked and repaired by an
authorized HYUNDAI dealer.
ODH033087
ODH033089
Page 80 of 501

2-54
Safety system of your vehicle
You can take steps to reduce the risk
of being injured by an inflating air
bag. The greatest risk is sitting too
close to the air bag. An air bag needs
about 10 inches (25 cm) of space to
inflate. NHTSA recommends that
drivers allow at least 10 inches
(25 cm) between the center of the
steering wheel and the chest.
When the SRSCM detects a suffi-
ciently severe impact to the front of
the vehicle, it will automatically
deploy the front air bags.
OLMB033054
■Driver’s front air bag (1)
To reduce the risk of serious
injury or death from an inflating
air bag, take the following pre-
cautions:
NEVER place a child restraint
in the front passenger seat.
Always properly restrain chil-
dren under age 13 in the rear
seats of the vehicle.
Adjust the front passenger’s
and driver’s seats as far to the
rear as possible while allow-
ing you to maintain full con-
trol of the vehicle.
Hold the steering wheel with
hands at the 9 o’clock and 3
o’clock positions.
Never place anything or any-
one between the air bag and
the seat occupant.
Do not allow the front passen-
ger to place their feet or legs
on the dashboard.
WARNING
Page 97 of 501

Convenient features of your vehicle
3
Interior features.................................................3-154
Ashtray ............................................................................3-154
Cup holder.......................................................................3-154
Sunvisor ...........................................................................3-155
Power outlet ...................................................................3-156
Clock .................................................................................3-157
Clothes hanger ..............................................................3-158
Bag hanger .....................................................................3-158
Floor mat anchor(s)......................................................3-159
Rear curtain....................................................................3-160
Side curtain.....................................................................3-160
Luggage net holder ......................................................3-161
3
Page 152 of 501

3-58
Convenient features of your vehicle
Fuel filler door
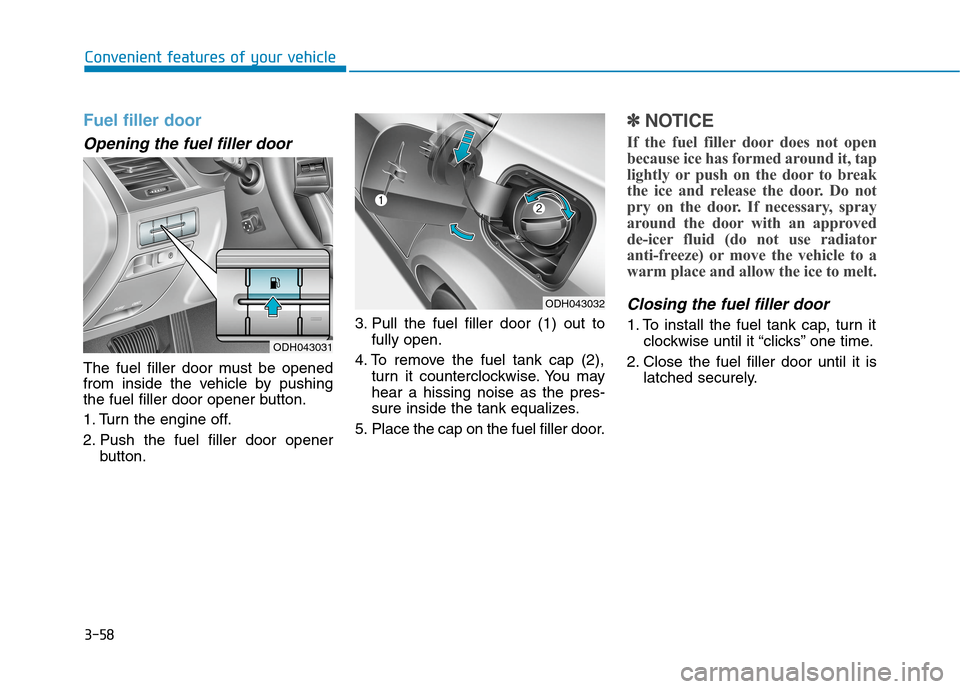
Opening the fuel filler door
The fuel filler door must be opened
from inside the vehicle by pushing
the fuel filler door opener button.
1. Turn the engine off.
2. Push the fuel filler door opener
button.3. Pull the fuel filler door (1) out to
fully open.
4. To remove the fuel tank cap (2),
turn it counterclockwise. You may
hear a hissing noise as the pres-
sure inside the tank equalizes.
5. Place the cap on the fuel filler door.
✽ ✽
NOTICE
If the fuel filler door does not open
because ice has formed around it, tap
lightly or push on the door to break
the ice and release the door. Do not
pry on the door. If necessary, spray
around the door with an approved
de-icer fluid (do not use radiator
anti-freeze) or move the vehicle to a
warm place and allow the ice to melt.
Closing the fuel filler door
1. To install the fuel tank cap, turn it
clockwise until it “clicks” one time.
2. Close the fuel filler door until it is
latched securely.
ODH043032
ODH043031
Page 251 of 501

3-157
Convenient features of your vehicle
3
Clock
You can set the clock by using the
AVN (Audio & Navigation).
For more details, please refer to the
Multimedia System Manual or DIS
Navigation System Manual that was
supplied with your vehicle. To prevent damage to the Power
Outlets :
Use the power outlet only when
the engine is running and
remove the accessory plug
after use. Using the accessory
plug for prolonged periods of
time with the engine off could
cause the battery to discharge.
Only use 12V electric acces-
sories which are less than 180
W(Watt) in electric capacity.
Adjust the air-conditioner or
heater to the lowest operating
level when using the power
outlet.
Close the cover when not in
use.
(Continued)
(Continued)
Some electronic devices can
cause electronic interference
when plugged into a vehicle’s
power outlet. These devices
may cause excessive audio
static and malfunctions in
other electronic systems or
devices used in your vehicle.
Push the plug in as far as it
will go. If good contact is not
made, the plug may overheat
and the fuse may open.
Plug in battery equipped elec-
trical/electronic devices with
reverse current protection. The
current from the battery may
flow into the vehicle's electri-
cal/electronic system and
cause system malfunction.
CAUTION
Do not adjust the clock while
driving. You may lose your
steering control and cause an
accident that results in severe
personal injury or death.
WARNING
ODH043111
Page 365 of 501

6-8
What to do in an emergency
6.If you cannot find the cause of the
overheating, wait until the engine
temperature has returned to nor-
mal. Then, if coolant has been lost,
carefully add coolant to the reser-
voir to bring the fluid level in the
reservoir up to the halfway mark.
7.Proceed with caution, keeping
alert for further signs of overheat-
ing. If overheating happens again,
call an authorized HYUNDAI deal-
er for assistance.
Serious loss of coolant indi-
cates a leak in the cooling sys-
tem and should be checked as
soon as possible by an author-
ized HYUNDAI dealer.
CAUTION
NEVER remove the
radiator cap or the
drain plug while the
engine and radiator
are hot. Hot coolant
and steam may blow out under
pressure, causing serious
injury.
Turn the engine off and wait
until the engine cools down.
Use extreme care when remov-
ing the radiator cap. Wrap a
thick towel around it, and turn it
counterclockwise slowly to the
first stop. Step back while the
pressure is released from the
cooling system. When you are
sure all the pressure has been
released, press down on the
cap, using a thick towel, and
continue turning counterclock-
wise to remove it.
WARNING