Page 135 of 501

3-41
Convenient features of your vehicle
3
Auto up/down window
Pressing or pulling up the power win-
dow switch momentarily to the sec-
ond detent position (6) completely
lowers or lifts the window even when
the switch is released. To stop the
window at the desired position while
the window is in operation, pull up or
press down and release the switch.
To reset the power windows
If the power windows do not operate
normally, the automatic power win-
dow system must be reset as follows:
1. Place the Engine Start/Stop button
to the ON position.
2. Close the window and continue
pulling up on the power window
switch for at least one second.
If the power windows do not operate
properly after resetting, have the
system checked by an authorized
HYUNDAI dealer.
Automatic reverse
If a window senses any obstacle while
it is closing automatically, it will stop
and lower approximately 12 inches (30
cm) to allow the object to be cleared.
If the window detects the resistance
while the power window switch is
pulled up continuously, the window
will stop upward movement then
lower approximately 1 inch (2.5 cm).
If the power window switch is pulled
up continuously again within 5 sec-
onds after the window is lowered by
the automatic window reversal fea-
ture, the automatic window reversal
will not operate.
✽ ✽
NOTICE
The automatic reverse feature is
only active when the “Auto Up” fea-
ture is used by fully pulling up the
switch to the second detent.
ODH043136
Make sure body parts or other
objects are safely out of the way
before closing the windows to
avoid injuries or vehicle damage.
Objects less than 0.16 inch (4
mm) in diameter caught
between the window glass and
the upper window channel may
not be detected by the automat-
ic reverse window and the win-
dow will not stop and reverse
direction.
WARNING
Page 137 of 501

3-43
Convenient features of your vehicle
3
The Engine Start/Stop button must
be in the ON position before you can
open or close the sunroof.
✽ ✽
NOTICE
In cold and wet climates, the sunroof
may not work properly due to freez-
ing conditions.
Sunshade
To open the sunshade, press the
sunshade control switch (1).
To close the sunshade, press the
sunshade control switch (2). If you
press the switch when the sunroof
glass is opened, the sunroof glass
will close then the sunshade will
close.
To stop the sliding at any point, press
the sunshade control switch momen-
tarily.
P PA
AN
NO
OR
RA
AM
MA
A
S
SU
UN
NR
RO
OO
OF
F
(
(I
IF
F
E
EQ
QU
UI
IP
PP
PE
ED
D)
)
ODH043034To prevent damage to the sun-
roof and the motor, do not con-
tinue to press the sunroof con-
trol lever after the sunroof is in
the fully open, closed or tilt
position(s).
CAUTION
Never adjust the sunroof or sun-
shade while driving. This could
result in loss of vehicle control
resulting in an accident.
WARNING
ODH043035
Page 144 of 501

3-50
Convenient features of your vehicle
To close:
Do one of the following:
- Press the Power Trunk Main
Control button (1) until the Power
Trunk is closed securely.
- Press the Close button (3) on the
trunk.
- Press the Lock button (4) on the
trunk while carrying the Smart Key
with all the vehicle’s doors closed.
All doors will lock and arm the theft
alarm system.
If you push a button or switch while
the trunk is opening or closing, it
could stop moving. Press any button
to operate the Power Trunk again.
✽ ✽
NOTICE
The Power Trunk Lock button will
not work if you press the button
when:
- Any door is open.
- The Engine Start/Stop button is
not in the OFF position.
- The Smart Key is in the vehicle.
Never leave children or animals
unattended in your vehicle.
Children or animals might oper-
ate the power trunk that could
result in injury to themselves or
others, or damage to the vehicle.
WARNING
Always keep the trunk lid com-
pletely closed while the vehicle is
in motion. If it is left open or ajar,
poisonous exhaust gases con-
taining carbon monoxide (CO)
may enter the vehicle and seri-
ous illness or death may result.
WARNING
Make sure there are no people
or objects around the trunk
before opening or closing the
Power Trunk. Wait until the trunk
is open fully and stopped
before loading or unloading
cargo from the vehicle.
WARNING
Page 149 of 501

3-55
Convenient features of your vehicle
3
How to use the Smart Trunk
The trunk can be opened with no-
touch activation satisfying all the
conditions below.
After 15 seconds when all doors
are closed and locked
Positioned in the detecting area for
more than 3 seconds.
✽ ✽
NOTICE
• The Smart Trunk does not operate
when:
- The smart key is detected within
15 seconds after the doors are
closed and locked, and is contin-
uously detected.
- The smart key is detected within
15 seconds after the doors are
closed and locked, and within 60
inches (1.5 m) from the front
door handles. (for vehicles
equipped with Welcome Light)
- A door is not locked or closed.
- The smart key is in the vehicle. 1. Setting
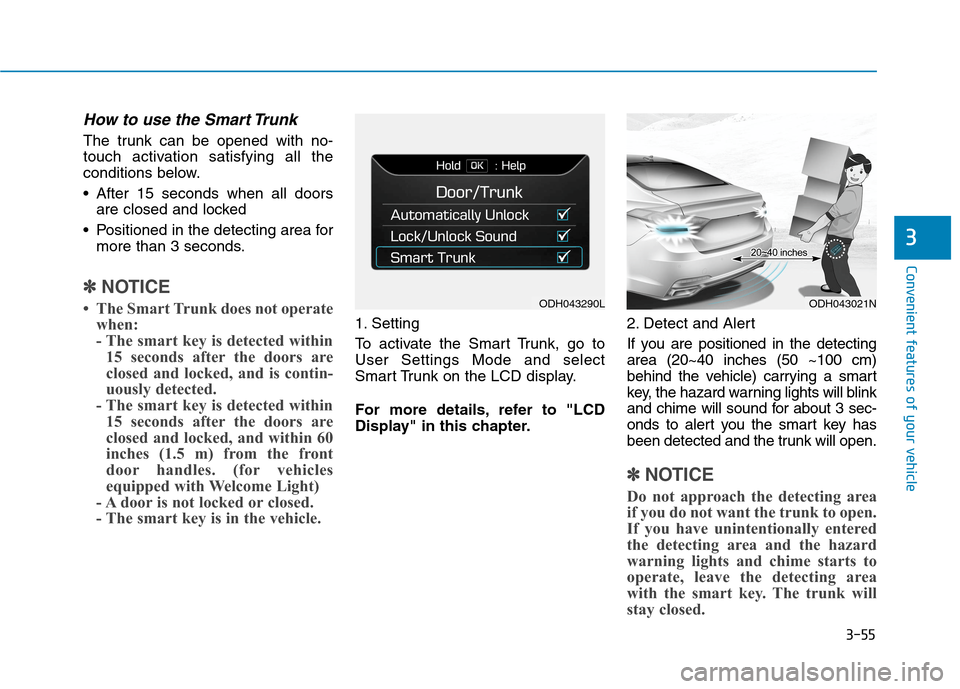
To activate the Smart Trunk, go to
User Settings Mode and select
Smart Trunk on the LCD display.
For more details, refer to "LCD
Display" in this chapter.2. Detect and Alert
If you are positioned in the detecting
area (20~40 inches (50 ~100 cm)
behind the vehicle) carrying a smart
key, the hazard warning lights will blink
and chime will sound for about 3 sec-
onds to alert you the smart key has
been detected and the trunk will open.
✽ ✽
NOTICE
Do not approach the detecting area
if you do not want the trunk to open.
If you have unintentionally entered
the detecting area and the hazard
warning lights and chime starts to
operate, leave the detecting area
with the smart key. The trunk will
stay closed.
ODH043290LODH043021N
Page 154 of 501

3-60
Convenient features of your vehicle
✽ ✽
NOTICE
• Make sure to refuel your
vehicle according to the "Fuel
Requirements" suggested in the
Introduction chapter.
• Do not spill fuel on the exterior
surfaces of the vehicle. Any type of
fuel spilled on painted surfaces
may damage the paint.
If the fuel filler cap requires
replacement, use only a gen-
uine HYUNDAI cap or the equiv-
alent specified for your vehicle.
An incorrect fuel filler cap can
result in a serious malfunction
of the fuel system or emission
control system.
CAUTION
(Continued)
When refueling, always move
the shift lever to the P (Park)
position, set the parking
brake, and press the Engine
Start/Stop button to the OFF
position. Sparks produced by
electrical components related
to the engine can ignite fuel
vapors causing a fire.
Do not use matches or a
lighter and do not smoke or
leave a lit cigarette in your
vehicle while at a gas station,
especially during refueling.
Do not over-fill or top-off your
vehicle tank, which can cause
gasoline spillage.
(Continued)
(Continued)
If a fire breaks out during refu-
eling, leave the vicinity of the
vehicle, and immediately con-
tact the manager of the gas
station and then contact the
local fire department. Follow
any safety instructions they
provide.
If pressurized fuel sprays out,
it can cover your clothes or
skin and thus subject you to
the risk of fire and burns.
Always remove the fuel cap
carefully and slowly. If the cap
is venting fuel or if you hear a
hissing sound, wait until the
condition stops before com-
pletely removing the cap.
Always check that the fuel cap
is installed securely to pre-
vent fuel spillage in the event
of an accident.
Page 156 of 501
3-62
Convenient features of your vehicle
Instrument Cluster Control
Adjusting Instrument Cluster
Illumination
When the Engine Start Stop button is
in the ON position, press the illumina-
tion control button to adjust the instru-
ment panel illumination intensity and
AVN monitor illumination intensity.
When the vehicle’s parking lights or
headlights are on, the interior switch
illumination intensity is adjusted
additionally by pressing the control
button. The brightness of the instrument
panel illumination is displayed.
If the brightness reaches to the
maximum or minimum level, an
alarm will sound.
LCD Display Control
The LCD display modes can be
changed by using the control buttons
on the steering wheel.
ODH043053
ODH043228L
Page 164 of 501
3-70
Convenient features of your vehicle
Information Mode
Tire pressure information
This mode informs of tire pressure
information.
Service Interval
Service in
It calculates and displays when you
need a scheduled maintenance
service (mileage or days).
If the remaining mileage or time
reaches 900 miles (1,500 km) or 30
days, "Service in" message is dis-
played for several seconds each time
you set the Engine Start/Stop button
to the ON position.
For the setting of the service inter-
val, refer to "User Settings Mode"
of the LCD display.
Service required
If you do not have your vehicle serv-
iced according to the already
inputted service interval, "Service
required" message is displayed for
several seconds each time you set
the Engine Start/Stop button to the
ON position.
To reset the service interval to the
mileage and days you inputted before:
- Press the OK button for more than
1 secondODH063029L
ODH043277N
ODH043406N
Page 171 of 501

3-77
Convenient features of your vehicle
3
Seat/Steering
ItemsExplanation
Seat Easy Access
The seat easy access function will be deactivated.
- When you turn off the engine, the driver’s seat will automatically move rearward short (Normal) or
long (Extended) for you to enter or exit the vehicle more comfortably.
- If you change the Engine Start/Stop button from OFF position to the ACC, ON, or START position,
the driver’s seat will return to the original position.
For more details, refer to "Driver Position Memory System" in this chapter.
Steering Easy Access
The steering wheel will automatically move forward or rearward for the driver to enter or exit
the vehicle comfortably.
The steering easy access function will be deactivated.
For more details, refer to "Driver Position Memory System" in this chapter.
Steering Position The steering position function will be deactivated.
The steering position function will be activated.
ItemsExplanation
Service Interval
On this mode, you can activate the service interval function with mileage (km or mi.) and period
(months).
The service interval function will be deactivated.
Service Interval