2015 Hyundai Genesis Transmission
[x] Cancel search: TransmissionPage 303 of 501

5-43
Driving your vehicle
5
When Active ECO is activated:
The acceleration response may be
slightly reduced as the accelerator
pedal is depressed moderately.
The air conditioner performance
may be limited.
The shift pattern of the automatic
transmission may change.
The engine noise may get louder.
The above situations are normal
conditions when the Active ECO sys-
tem is activated to improve fuel effi-
ciency.Limitation of Active ECO opera-
tion:
If the following conditions occur while
Active ECO is operating, the system
operation is limited even though
there is no change in the ECO indi-
cator.
When the coolant temperature is
low:
The system will be limited until
engine performance becomes nor-
mal.
When driving up a hill:
The system will be limited to gain
power when driving uphill because
engine torque is restricted.
When using the automatic trans-
mission Sports mode:
The system will be limited accord-
ing to the shift location.SPORT mode
SPORT mode focuses on
dynamic driving by auto-
matically controlling the
steering wheel, engine
and transmission system.
When the DRIVE MODE switch is
pressed and the SPORT mode is
selected, the SPORT indicator
(yellow) will illuminate.
When the SPORT mode is activat-
ed, and the engine is turned off
and on it will change to NORMAL
mode. To turn on the SPORT
mode, press the DRIVE MODE
switch again.
If the system is activated:
- After accelerating and releasing
the accelerator pedal, the gear
and engine speed RPM may not
drop as soon as in NORMAL
mode.
- Up-shifting is delayed.
✽ ✽
NOTICE
In SPORT mode, the fuel efficiency
may decrease.
SPORT
Page 346 of 501

5-86
Driving your vehicle
Hazardous driving conditions
When hazardous driving conditions
are encountered such as water,
snow, ice, mud or sand:
Drive cautiously and allow extra dis-
tance for braking.
Avoid sudden movements in braking
or steering.
If stuck in snow, mud, or sand, use
second gear. Accelerate slowly to
avoid spinning the drive wheels.
Use sand, rock salt, or other non-slip
material under the drive wheels to
provide traction when stuck in ice,
snow, or mud.
Rocking the vehicle
If it is necessary to rock the vehicle
to free it from snow, sand, or mud,
first turn the steering wheel right and
left to clear the area around your
front wheels. Then, shift back and
forth between R (Reverse) and a for-
ward gear.
Try to avoid spinning the wheels, and
do not race the engine.
To prevent transmission wear, wait
until the wheels stop spinning before
shifting gears. Release the accelera-
tor pedal while shifting, and press
lightly on the accelerator pedal while
the transmission is in gear. Slowly
spinning the wheels in forward and
reverse directions causes a rocking
motion that may free the vehicle.
S SP
PE
EC
CI
IA
AL
L
D
DR
RI
IV
VI
IN
NG
G
C
CO
ON
ND
DI
IT
TI
IO
ON
NS
S
Downshifting with an automatic
transmission while driving on
slippery surfaces can cause an
accident. The sudden change in
tire speed could cause the tires
to skid. Be careful when down-
shifting on slippery surfaces.
WARNING
If the tires spin at high speed the
tires can explode, and you or
others may be injured. Do not
attempt this procedure if people
or objects are anywhere near the
vehicle.
The vehicle can overheat caus-
ing an engine compartment fire
or other damage. Spin the
wheels as little as possible and
avoid spinning the wheels at
speeds over 35 mph (56 km/h) as
indicated on the speedometer.
WARNING
Page 347 of 501

5-87
Driving your vehicle
5
Smooth cornering
Avoid braking or gear changing in
corners, especially when roads are
wet. Ideally, corners should always
be taken under gentle acceleration.
Driving at night
Night driving presents more hazards
than driving in the daylight. Here are
some important tips to remember:
Slow down and keep more dis-
tance between you and other vehi-
cles, as it may be more difficult to
see at night, especially in areas
where there may not be any street
lights.
Adjust your mirrors to reduce the
glare from other driver's head-
lamps.
Keep your headlamps clean and
properly aimed. Dirty or improperly
aimed headlamps will make it
much more difficult to see at night.
Avoid staring directly at the head-
lamps of oncoming vehicles. You
could be temporarily blinded, and it
will take several seconds for your
eyes to readjust to the darkness. If you are still stuck after rock-
ing the vehicle a few times, have
the vehicle pulled out by a tow
vehicle to avoid engine over-
heating, possible damage to the
transmission, and tire damage.
See “Towing” in chapter 6.
To prevent damage to the trans-
mission, turn OFF the ESC prior
to rocking the vehicle.CAUTION
Page 363 of 501

6-6
What to do in an emergency
7.Connect the jumper cables in the
exact sequence shown in the illus-
tration. First connect one jumper
cable to the red, positive (+)
jumper terminal of your vehicle (1).
8.Connect the other end of the
jumper cable to the red, positive
(+) battery/jumper terminal of the
assisting vehicle (2).
9.Connect the second jumper cable
to the black, negative (-)
battery/chassis ground of the
assisting vehicle (3).
10. Connect the other end of the sec-
ond jumper cable to the black,
negative (-) chassis ground of
your vehicle (4).
Do not allow the jumper cables to
contact anything except the cor-
rect battery or jumper terminals
or the correct ground. Do not lean
over the battery when making
connections.
11. Start the engine of the assisting
vehicle and let it run at approxi-
mately 2,000 rpm for a few min-
utes. Then start your vehicle.If your vehicle will not start after a
few attempts, it probably requires
servicing. In this event please seek
qualified assistance. If the cause of
your battery discharging is not
apparent, have your vehicle checked
by an authorized HYUNDAI dealer.
Disconnect the jumper cables in the
exact reverse order you connected
them:
1.Disconnect the jumper cable from
the black, negative (-) chassis
ground of your vehicle (4).
2.Disconnect the other end of the
jumper cable from the black, nega-
tive (-) battery/chassis ground of
the assisting vehicle (3).
3.Disconnect the second jumper
cable from the red, positive (+) bat-
tery/jumper terminal of the assist-
ing vehicle (2).
4.Disconnect the other end of the
jumper cable from the red, positive
(+) jumper terminal of your vehicle
(1).
Push-starting
Vehicles equipped with automatic
transmission cannot be push-start-
ed.
Follow the directions in this chapter
for jump-starting.
Page 378 of 501

6-21
What to do in an emergency
6
Jack label
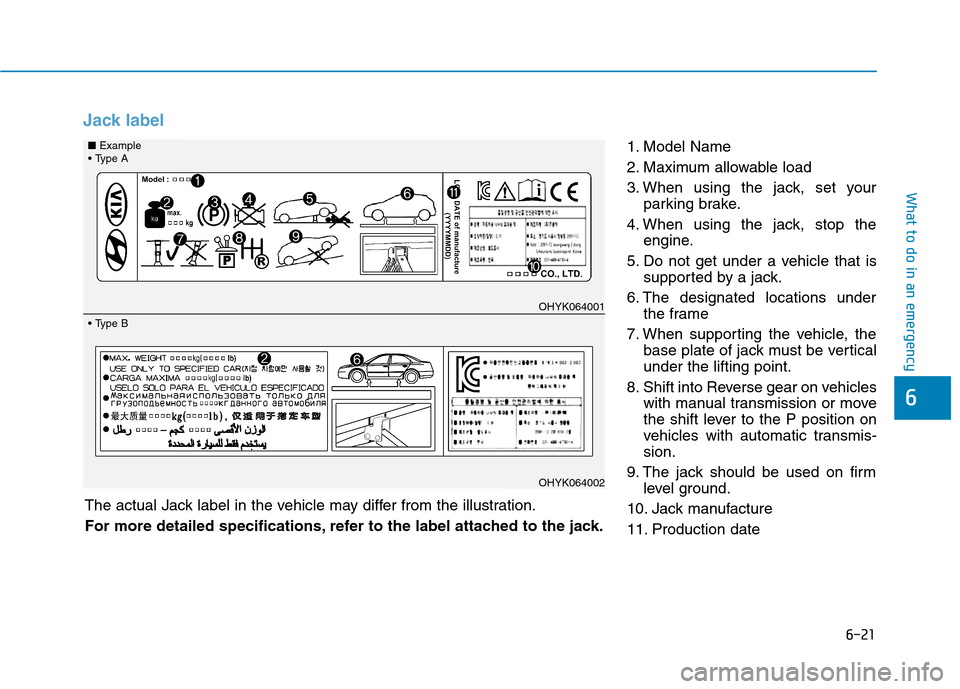
1. Model Name
2. Maximum allowable load
3. When using the jack, set your
parking brake.
4. When using the jack, stop the
engine.
5. Do not get under a vehicle that is
supported by a jack.
6. The designated locations under
the frame
7. When supporting the vehicle, the
base plate of jack must be vertical
under the lifting point.
8. Shift into Reverse gear on vehicles
with manual transmission or move
the shift lever to the P position on
vehicles with automatic transmis-
sion.
9. The jack should be used on firm
level ground.
10. Jack manufacture
11. Production date
OHYK064001
OHYK064002
Type A■Example
Type B
The actual Jack label in the vehicle may differ from the illustration.
For more detailed specifications, refer to the label attached to the jack.
Page 379 of 501

6-22
What to do in an emergency
Towing service
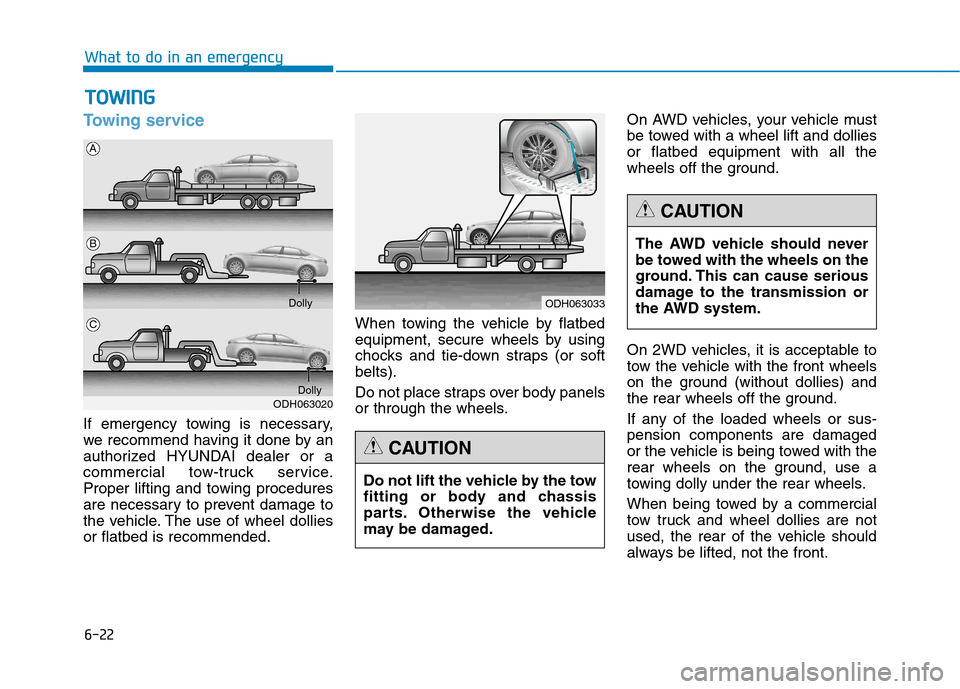
If emergency towing is necessary,
we recommend having it done by an
authorized HYUNDAI dealer or a
commercial tow-truck service.
Proper lifting and towing procedures
are necessary to prevent damage to
the vehicle. The use of wheel dollies
or flatbed is recommended.When towing the vehicle by flatbed
equipment, secure wheels by using
chocks and tie-down straps (or soft
belts).
Do not place straps over body panels
or through the wheels.On AWD vehicles, your vehicle must
be towed with a wheel lift and dollies
or flatbed equipment with all the
wheels off the ground.
On 2WD vehicles, it is acceptable to
tow the vehicle with the front wheels
on the ground (without dollies) and
the rear wheels off the ground.
If any of the loaded wheels or sus-
pension components are damaged
or the vehicle is being towed with the
rear wheels on the ground, use a
towing dolly under the rear wheels.
When being towed by a commercial
tow truck and wheel dollies are not
used, the rear of the vehicle should
always be lifted, not the front.
T TO
OW
WI
IN
NG
G
ODH063020Dolly
A
B
C
ODH063033
Do not lift the vehicle by the tow
fitting or body and chassis
parts. Otherwise the vehicle
may be damaged.
CAUTION
The AWD vehicle should never
be towed with the wheels on the
ground. This can cause serious
damage to the transmission or
the AWD system.
CAUTION
Dolly
Page 380 of 501

6-23
What to do in an emergency
6
When towing your vehicle in an
emergency without wheel dollies :
1.Set the Engine Start/Stop button in
the ACC position.
2.Place the shift lever in N (Neutral).
3.Release the parking brake.Removable towing hook
(if equipped)
1.Open the trunk, and remove the
towing hook from the tool case.
2.Remove the hole cover pressing
the lower part of the cover on the
bumper.
ODH063021
ODH063022
Do not tow the vehicle with
the rear wheels on the ground
as this may cause damage to
the vehicle.
Do not tow with sling-type
equipment. Use wheel lift or
flatbed equipment.
CAUTION
Failure to place the transmis-
sion shift lever in N (Neutral)
may cause internal damage to
the transmission.
CAUTION
ODH063015
ODH063016
■Front
■Rear
Page 382 of 501

6-25
What to do in an emergency
6
Always follow these emergency tow-
ing precautions:
Place the Engine Start/Stop button
in the ACC position so the steering
wheel is not locked.
Place the shift lever in N (Neutral).
Release the parking brake.
Depress the brake pedal with more
force than normal since you will
have reduced braking perform-
ance.
More steering effort will be
required because the power steer-
ing system will be disabled.
Use a vehicle heavier than your
own to tow your vehicle.
The drivers of both vehicles should
communicate with each other fre-
quently.
Before emergency towing, check
that the hook is not broken or dam-
aged.
Fasten the towing cable or chain
securely to the hook.
Do not jerk the hook. Apply steady
and even force. Use a towing cable or chain less
than 16 feet (5 m) long. Attach a
white or red cloth (about 12 inches
(30 cm) wide) in the middle of the
cable or chain for easy visibility.
Drive carefully so the towing cable
or chain remains tight during tow-
ing.
Before towing, check the automat-
ic transmission for fluid leaks under
your vehicle. If the automatic trans-
mission fluid is leaking, flatbed
equipment or a towing dolly must
be used.
ODH063025
To avoid damage to your vehicle
and vehicle components when
towing:
Always pull straight ahead
when using the towing hooks.
Do not pull from the side or at
a vertical angle.
Do not use the towing hooks
to pull a vehicle out of mud,
sand or other conditions from
which the vehicle cannot be
driven out under its own
power.
Limit the vehicle speed to 10
mph (15 km/h) and drive less
than 1 mile (1.5 km) when tow-
ing to avoid serious damage
to the automatic transmis-
sion.
CAUTION