2015 Hyundai Genesis anchor
[x] Cancel search: anchorPage 15 of 501

F15
Climate control additional features.................3-150
Cluster ionizer ................................................................3-150
Smart ventilation ...........................................................3-150
Rear climate system ON/OFF ....................................3-151
CO2 control auto air conditioner ..............................3-151
Storage compartment ........................................3-152
Center console storage ...............................................3-152
Glove box ........................................................................3-153
Sunglass holder .............................................................3-153
Interior features.................................................3-154
Ashtray ............................................................................3-154
Cup holder.......................................................................3-154
Sunvisor ...........................................................................3-155
Power outlet ...................................................................3-156
Clock .................................................................................3-157
Clothes hanger ..............................................................3-158
Bag hanger .....................................................................3-158
Floor mat anchor(s)......................................................3-159
Rear curtain....................................................................3-160
Side curtain.....................................................................3-160
Luggage net holder ......................................................3-161
Multimedia system .................................................4-2
AUX, USB and iPod®port ...............................................4-2
Antenna ...............................................................................4-3
Steering wheel audio control .........................................4-4
Audio / Video / Navigation system (AVN) ..................4-5
Bluetooth®Wireless Technology hands-free ............4-5
F15
4Multimedia system
Page 51 of 501
2-25
Safety system of your vehicle
2
Seat belt restraint system
Seat Belt-Driver’s 3-point sys-
tem with emergency locking
retractor
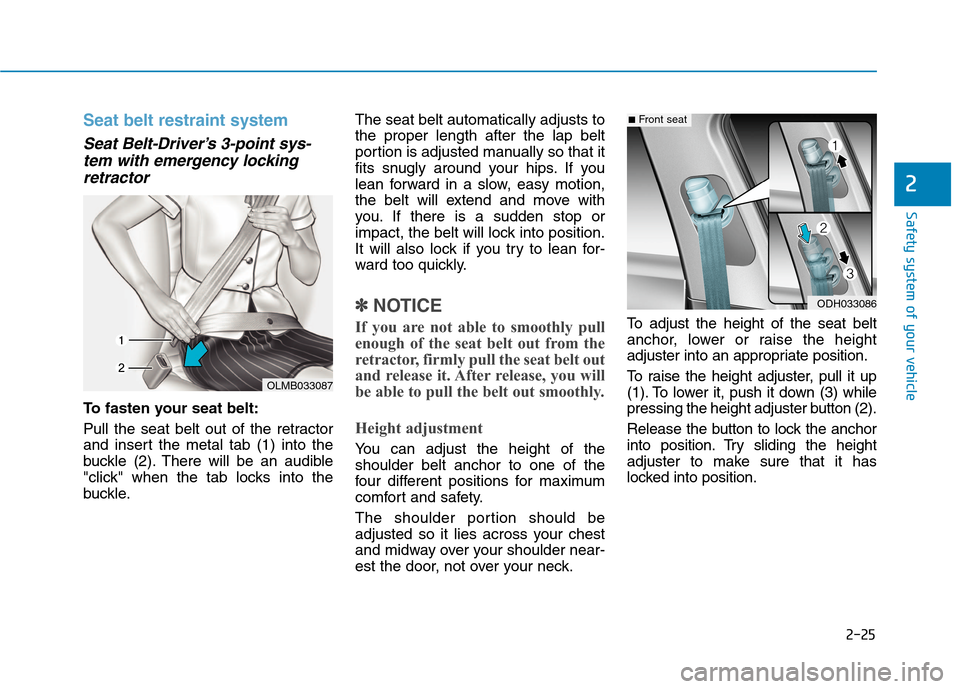
To fasten your seat belt:
Pull the seat belt out of the retractor
and insert the metal tab (1) into the
buckle (2). There will be an audible
"click" when the tab locks into the
buckle.The seat belt automatically adjusts to
the proper length after the lap belt
portion is adjusted manually so that it
fits snugly around your hips. If you
lean forward in a slow, easy motion,
the belt will extend and move with
you. If there is a sudden stop or
impact, the belt will lock into position.
It will also lock if you try to lean for-
ward too quickly.
✽ ✽
NOTICE
If you are not able to smoothly pull
enough of the seat belt out from the
retractor, firmly pull the seat belt out
and release it. After release, you will
be able to pull the belt out smoothly.
Height adjustment
You can adjust the height of the
shoulder belt anchor to one of the
four different positions for maximum
comfort and safety.
The shoulder portion should be
adjusted so it lies across your chest
and midway over your shoulder near-
est the door, not over your neck.To adjust the height of the seat belt
anchor, lower or raise the height
adjuster into an appropriate position.
To raise the height adjuster, pull it up
(1). To lower it, push it down (3) while
pressing the height adjuster button (2).
Release the button to lock the anchor
into position. Try sliding the height
adjuster to make sure that it has
locked into position.
OLMB033087
ODH033086
■Front seat
Page 52 of 501
2-26
Safety system of your vehicle
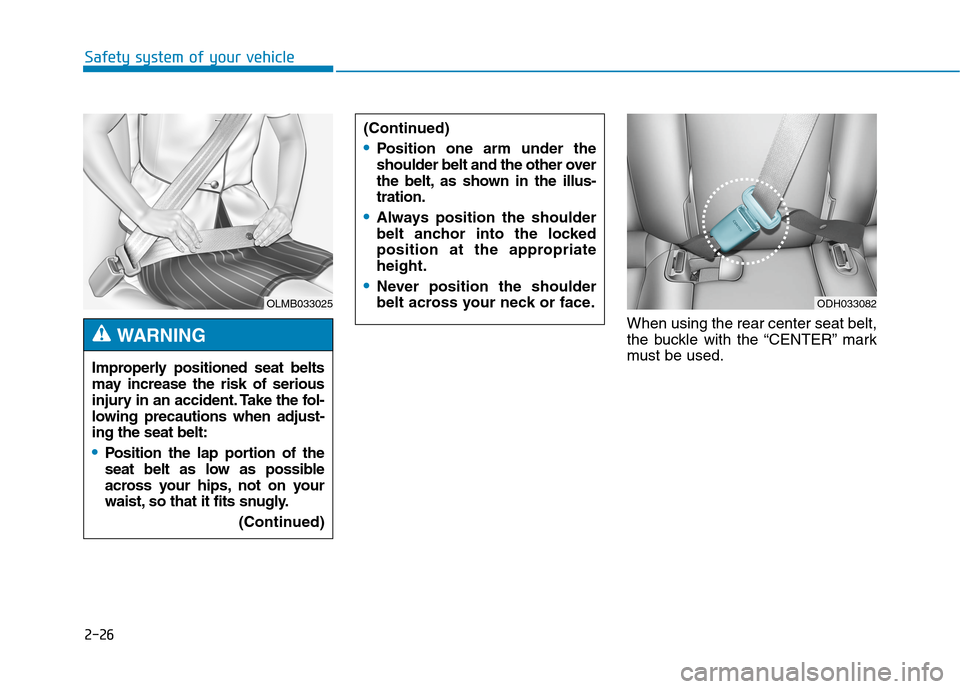
When using the rear center seat belt,
the buckle with the “CENTER” mark
must be used. (Continued)
Position one arm under the
shoulder belt and the other over
the belt, as shown in the illus-
tration.
Always position the shoulder
belt anchor into the locked
position at the appropriate
height.
Never position the shoulder
belt across your neck or face.
OLMB033025
Improperly positioned seat belts
may increase the risk of serious
injury in an accident. Take the fol-
lowing precautions when adjust-
ing the seat belt:
Position the lap portion of the
seat belt as low as possible
across your hips, not on your
waist, so that it fits snugly.
(Continued)
WARNING
ODH033082
Page 62 of 501
2-36
Safety system of your vehicle
Child restraint system (CRS)
Infants and younger children must be
restrained in an appropriate rear-fac-
ing or forward-facing CRS that has
first been properly secured to the
rear seat of the vehicle. Read and
comply with the instructions for
installation and use provided by the
manufacturer of the child restraint.
Selecting a Child Restraint
System (CRS)
When selecting a CRS for your child,
always:
Make sure the CRS has a label
certifying that it meets applicable
Federal Motor Vehicle Safety
Standards (FMVSS 213).
Select a child restraint based on
your child’s height and weight. The
required label or the instructions
for use typically provide this infor-
mation.
Select a child restraint that fits the
vehicle seating position where it
will be used.
Read and comply with the warn-
ings and instructions for installation
and use provided with the child
restraint system. (Continued)Always follow the child
restraint system manufactur-
er’s instructions for installa-
tion and use.
Always properly restrain your
child in the child restraint.
Do not use an infant carrier or
a child safety seat that
“hooks” over a seatback, it
may not provide adequate
protection in an accident.
After an accident, have a
HYUNDAI dealer check the
child restraint system, seat
belts, tether anchors and
lower anchors.An improperly secured child
restraint can increase the risk
of SERIOUS INJURY or DEATH
in an accident. Always take the
following precautions when
using a child restraint system:
NEVER install a child or infant
restraint in the front passen-
ger’s seat.
Always properly secure the
child restraint to a rear seat of
the vehicle.
(Continued)
WARNING
Page 65 of 501
2-39
Safety system of your vehicle
2
After selecting a proper child seat for
your child, check to make sure it fits
properly in your vehicle. Follow the
instructions provided by the manu-
facturer when installing the child
seat. Note these general steps when
installing the seat to your vehicle:
Properly secure the child restraint
to the vehicle.
All child restraints
must be secured to the vehicle with
the lap part of a lap/shoulder belt or
with the LATCH system.
Make sure the child restraint is
firmly secured.After installing a
child restraint to the vehicle, push
and pull the seat forward and from
side-to-side to verify that it is
securely attached to the seat. A
child restraint secured with a seat
belt should be installed as firmly as
possible. However, some side-to-
side movement can be expected.
Secure the child in the child
restraint.Make sure the child is
properly strapped in the child
restraint according to the manufac-
turer instructions.
Lower Anchors and Tether for
Children (LATCH) System
The LATCH system holds a child
restraint during driving and in an acci-
dent. This system is designed to
make installation of the child restraint
easier and reduce the possibility of
improperly installing your child
restraint. The LATCH system uses
anchors in the vehicle and attach-
ments on the child restraint. The
LATCH system eliminates the need
to use seat belts to secure the child
restraint to the rear seats.
Lower anchors are metal bars built
into the vehicle. There are two lower
anchors for each LATCH seating
position that will accommodate a
child restraint with lower attachments.
To use the LATCH system in your
vehicle, you must have a child
restraint with LATCH attachments.
The child seat manufacturer will pro-
vide you with instructions on how to
use the child seat with its attachments
for the LATCH lower anchors. A child restraint in a closed
vehicle can become very hot. To
prevent burns, check the seat-
ing surface and buckles before
placing your child in the child
restraint.
WARNING
Page 66 of 501
2-40
Safety system of your vehicle
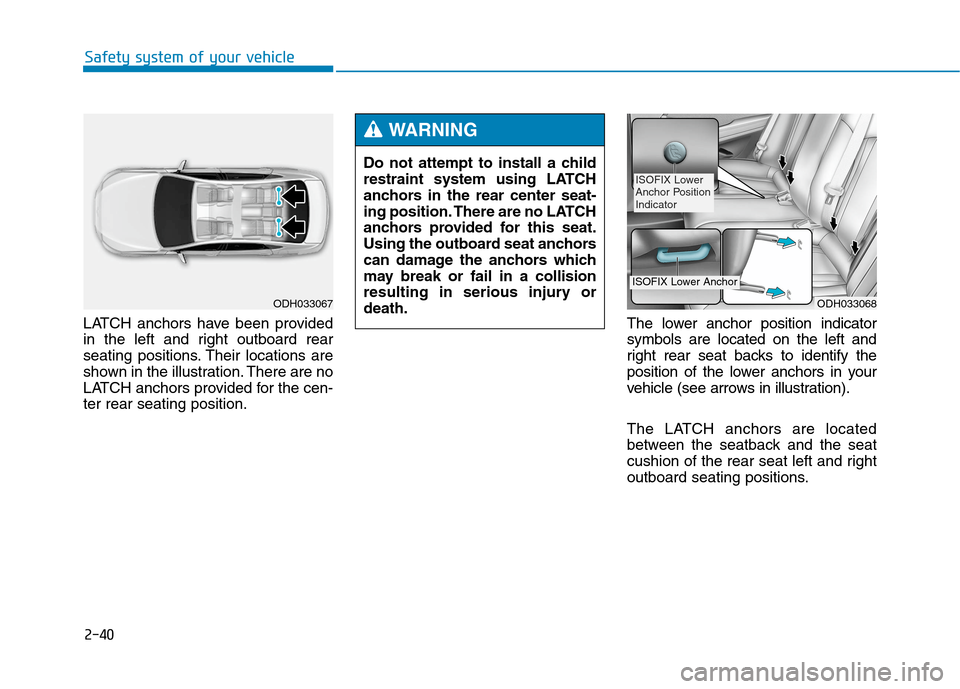
LATCH anchors have been provided
in the left and right outboard rear
seating positions. Their locations are
shown in the illustration. There are no
LATCH anchors provided for the cen-
ter rear seating position.The lower anchor position indicator
symbols are located on the left and
right rear seat backs to identify the
position of the lower anchors in your
vehicle (see arrows in illustration).
The LATCH anchors are located
between the seatback and the seat
cushion of the rear seat left and right
outboard seating positions. Do not attempt to install a child
restraint system using LATCH
anchors in the rear center seat-
ing position. There are no LATCH
anchors provided for this seat.
Using the outboard seat anchors
can damage the anchors which
may break or fail in a collision
resulting in serious injury or
death.
WARNING
ODH033067ODH033068
ISOFIX Lower
Anchor Position
Indicator
ISOFIX Lower Anchor
Page 67 of 501
2-41
Safety system of your vehicle
2
Securing a child restraint with
the LATCH anchors system
To install a LATCH-compatible child
restraint in either of the rear outboard
seating positions:
1. Move the seat belt buckle away from
the lower anchors.
2. Move any other objects away from
the anchors that could prevent a
secure connection between the child
restraint and the lower anchors.
3. Place the child restraint on the vehi-
cle seat, then attach the seat to the
lower anchors according to the
instructions provided by the child
restraint manufacturer.
4. Follow the child restraint instructions
for properly adjusting and tightening
the lower attachments on the child
restraint to the lower anchors.Take the following precautions
when using the LATCH system:
Read and follow all installation
instructions provided with
your child restraint system.
To prevent the child from
reaching and taking hold of
unretracted seat belts, buckle
all unused rear seat belts and
retract the seat belt webbing
behind the child. Children can
be strangled if a shoulder belt
becomes wrapped around
their neck and the seat belt
tightens.
NEVER attach more than one
child restraint to a single
anchor. This could cause the
anchor or attachment to come
loose or break.
Always have the LATCH sys-
tem inspected by your author-
ized HYUNDAI dealer after an
accident. An accident can
damage the LATCH system
and may not properly secure
the child restraint.
WARNING
Weight for LATCH system
The recommended weight for
the LATCH system is under 65
lb (29.48 kg).
How to calculate the child
restraint weight :
Child restraint weight =
65 lb (29.48 kg) - Child weight.
WARNING
Page 68 of 501

2-42
Safety system of your vehicle
Securing a child restraint seat
with “Tether Anchor” system
First secure the child restraint with
the LATCH lower anchors or the seat
belt. If the child restraint manufactur-
er recommends that the top tether
strap be attached, attach and tighten
the top tether strap to the top tether
strap anchor.
Child restraint hook holders are
located on the package tray.To install the tether anchor:
1. Route the child restraint tether
strap over the child restraint seat-
back. Route the tether strap under
the headrest and between the
headrest posts, or route the tether
strap over the top of the vehicle
seatback. Make sure the strap is
not twisted.
2. Connect the tether strap hook to
the tether anchor, then tighten the
tether strap according to the child
seat manufacturer’s instructions to
firmly secure the child restraint to
the seat. Take the following precautions
when installing the tether strap:
Read and follow all installation
instructions provided with
your child restraint system.
NEVER attach more than one
child restraint to a single teth-
er anchor. This could cause
the anchor or attachment to
come loose or break.
Do not attach the tether strap
to anything other than the cor-
rect tether anchor. It may not
work properly if attached to
something else.
Do not use the tether anchors
for adult seat belts or harness-
es, or for attaching other items
or equipment to the vehicle.
WARNING
ODH033066
ODH033065